How to bypass captcha: neural network on Tensorflow, Keras, python v numeric noisy captcha
Captcha theme is not new, including for Habr. However, the captcha algorithms are changing, as are the algorithms for solving them. Therefore, it is proposed to remember the old and operate the following version of captcha:

Along the way, understand the work of a simple neural network in practice, and also improve its results.
Immediately make a reservation that we will not plunge into thoughts about how the neuron works and what to do with all this, the article does not claim to be scientific, but only provides a small tutorial.
Perhaps someone’s words will be repeated, but most books on Deep Learning really start with the fact that the reader is offered pre-prepared data with which he begins to work. Somehow MNIST - 60,000 handwritten digits, CIFAR-10, etc. After reading, a person comes out prepared ... for these data sets. It is completely unclear how to use your data and, most importantly, how to improve something when building your own neural network.
Therefore, an article in pyimagesearch.com about how to work with your own data, as well as its translation, came in very handy.
But as they say, radish horseradish is not sweeter: even with the translation of a chewed keras article, there are many blind spots. Again, a pre-prepared dataset is offered, only with cats, dogs and pandas. Have to fill in the voids yourself.
However, this article and code will be taken as the basis.
There is nothing new here. We need captcha samples, as the network will learn from them under our guidance. You can mine the captcha yourself, or you can take a little here - 29,000 captchas . Now you need to cut the numbers from each captcha. It is not necessary to cut all 29,000 captcha, especially since 1 captcha gives 5 digits. 500 captcha will be more than enough.
How to cut? It’s possible in Photoshop, but it’s better to have a better knife.
So here is the python knife code - download . (for Windows. First create folders C: \ 1 \ test and C: \ 1 \ test-out).
The output will be a dump of numbers from 1 to 9 (there are no zeros in the captcha).
Next, you need to parse this blockage from the numbers into folders from 1 to 9 and put them in each folder by the corresponding number. So-so occupation. But in a day you can make out up to 1000 digits.
If, when choosing a number, it is doubtful which of the numbers, it is better to delete this sample. And it’s okay if the numbers are noisy or incompletely enter the “frame”:


You need to collect 200 samples of each digit in each folder. You can delegate this work to third-party services, but it’s better to do everything yourself so that you don’t look for incorrectly matched numbers later.
Tyat, tyat, our nets dragged the dead man
Before you start working with your own data, it is better to go through the above article and run the code to understand that all components (keras, tensorflow, etc.) are installed and working correctly.
We will use a simple network, the syntax for starting it from the command (!) Line:
* Tensorflow can write when working about errors in its own files and obsolete methods, you can fix it by hand, or you can simply ignore it.
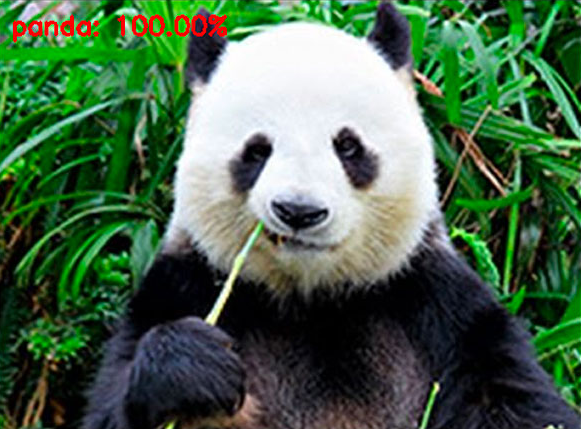
The main thing is that after the program has been worked out, two files appear in the project project folder: simple_nn_lb.pickle and simple_nn.model, and the image of the animal with an inscription and recognition rate is displayed, for example:
Now that the network operability test has been verified, you can connect your own data and begin to train the network.
Put in the dat folder folders with numbers containing selected samples for each digit.
For convenience, we will place the dat folder in the project folder (for example, next to the animals folder).
Now the syntax for starting network learning will be:
However, it’s too early to start training.
You need to fix the train_simple_nn.py file.
1. At the very end of the file:
This will add information.
2.
change to
In addition, we push this change into try:
Because the program cannot digest some pictures and issues None, therefore they are skipped.
3. Now the most important thing. Where there is a comment in the code
The network architecture in the article is defined as 3072-1024-512-3. This means that the network receives 3072 (32 pixels * 32 pixels * 3) at the input, then layer 1024, layer 512 and at the output 3 options - a cat, a dog or a panda.
In our case, the input is 1776 (16 pixels * 37 pixels * 3), then layer 1024, layer 512, at the output of 9 variants of numbers.
Therefore our code:
* 9 outputs do not need to be additionally indicated, because the program itself determines the number of exits by the number of folders in the dataset.
Since the pictures with numbers are small, the network learns very quickly (5-10 minutes) even on weak hardware, using only the CPU.
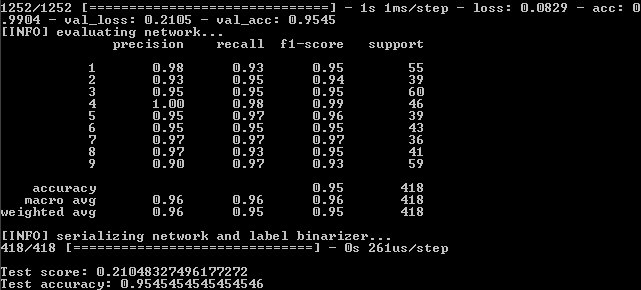
After running the program in the command line, see the results:
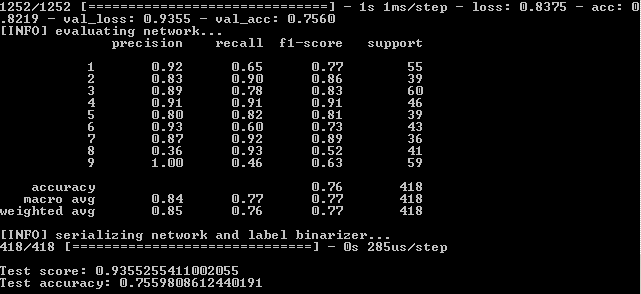
This means that on the training set fidelity was achieved - 82.19%, on the control - 75.6% and on the test - 75.59%.
We need to focus on the latter indicator for the most part. Why others are also important will be explained later.
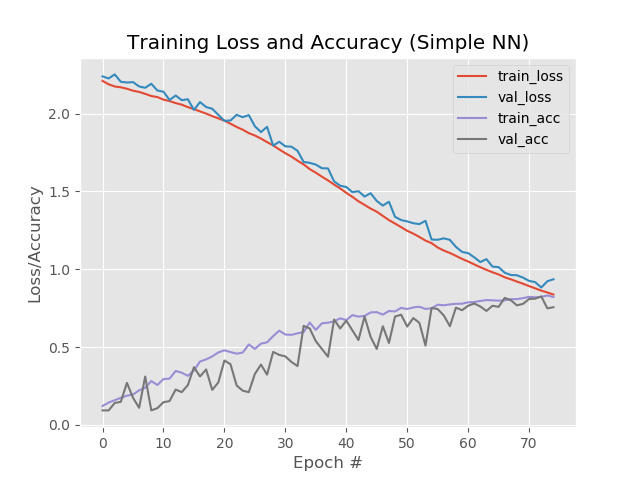
Let's also see the graphic part of the work of the neural network. It is in the output folder of the simple_nn_plot.png project:
Quite a bit about setting up a neural network, see here .
Authentic option next.
Add eras.
In the code we change
on
Increase the "number of times" that the network will undergo training.
Result:
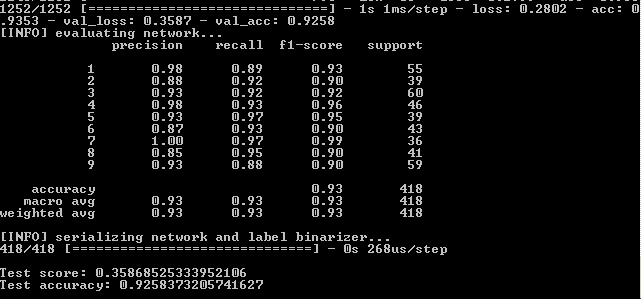
Thus, 93.5%, 92.6%, 92.6%.
In pictures:
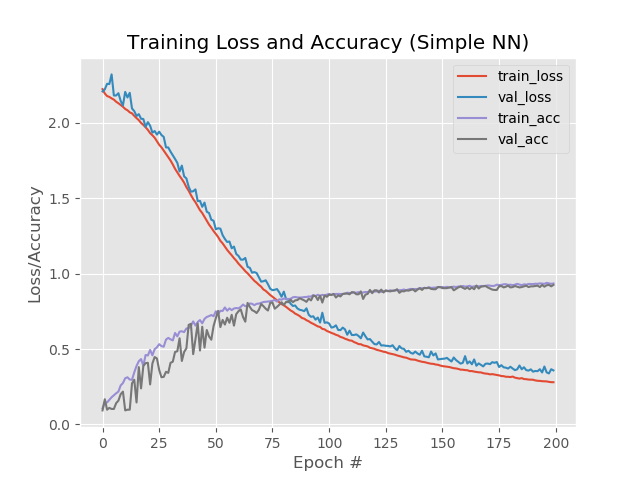
Here it is noticeable that the blue and red lines after the 130th era begin to disperse from each other and this says that a further increase in the number of eras will not give anything. Check this out.
In the code we change
on
and run away again.
Result:
So we have:
99%, 95.5%, 95.5%.
And on the chart:
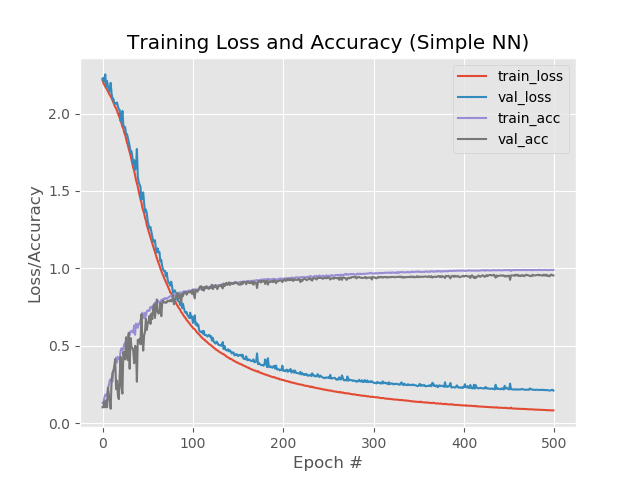
Well, the increase in the number of eras has clearly benefited the network. However, this result is misleading.
Let's check the network operation on a real example.
For these purposes, the predict.py script is in the project folder. Before starting, prepare.
In the project’s images folder, we put the files with the images of numbers from captcha, which the network had not previously encountered in the learning process. Those. it is necessary to take digits not from dat dataset dat.
In the file itself, we fix two lines for the default image size:
Run from the command line:
And we see the result:
Another picture:
However, it does not work with all noisy numbers:
What can be done here?
As you can see from the last graph, the blue and red lines diverge around the 130th era. This means that learning after the 130th era is ineffective. We fix the result on the 130th epoch: 89.3%, 88%, 88% and see if other methods to improve the network work.
Reduce the speed of learning.
Result:
41%, 39%, 39%
Well, by.
Add an extra hidden layer.
Result:
56%, 62%, 62%
Better, but no.
However, if you increase the number of eras to 250:
84%, 83%, 83%
At the same time, the red and blue lines do not come off from each other after the 130th era:
Save 250 eras and apply thinning :
Insert thinning between the layers:
Result:
53%, 65%, 65%
The first value is lower than the rest, this indicates that the network is not learning. To do this, it is recommended to increase the number of eras.
Result:
88%, 92%, 92%
With 1 extra layer, thinning and 500 eras:
Result:
92.4%, 92.6%, 92.58%
Despite a lower percentage compared to a simple increase in eras to 500, the graph looks more even:

And the network processes images that previously fell out:
Now we will collect everything into one file, which will cut the image with the captcha at the input into 5 digits, run each digit through the neural network and output the result to the python interpreter.
It’s simpler here. In the file that cut us the numbers from the captcha, add a file that deals with predictions.
Now the program not only cuts the captcha into 5 parts, but also displays all the recognized numbers in the interpreter:

Again, it must be borne in mind that the program does not give 100% of the result and often one of the 5 digits is incorrect. But this is not a bad result, considering that the training set contains only 170-200 copies for each number.
Captcha recognition lasts 3-5 seconds on a medium-power computer.
How else can you try to improve the network? You can read in the book "Keras Library - a deep learning tool" A. Dzhulli, S. Pala.
The final script that cuts the captcha and recognizes is here .
It starts without parameters.
Recycled scripts for training and testing the network.
Captcha for the test, including with false positives - here .
The model for work is here .
The numbers in folders are here .
Along the way, understand the work of a simple neural network in practice, and also improve its results.
Immediately make a reservation that we will not plunge into thoughts about how the neuron works and what to do with all this, the article does not claim to be scientific, but only provides a small tutorial.
To dance from the stove. Instead of joining
Perhaps someone’s words will be repeated, but most books on Deep Learning really start with the fact that the reader is offered pre-prepared data with which he begins to work. Somehow MNIST - 60,000 handwritten digits, CIFAR-10, etc. After reading, a person comes out prepared ... for these data sets. It is completely unclear how to use your data and, most importantly, how to improve something when building your own neural network.
Therefore, an article in pyimagesearch.com about how to work with your own data, as well as its translation, came in very handy.
But as they say, radish horseradish is not sweeter: even with the translation of a chewed keras article, there are many blind spots. Again, a pre-prepared dataset is offered, only with cats, dogs and pandas. Have to fill in the voids yourself.
However, this article and code will be taken as the basis.
We collect data on captcha
There is nothing new here. We need captcha samples, as the network will learn from them under our guidance. You can mine the captcha yourself, or you can take a little here - 29,000 captchas . Now you need to cut the numbers from each captcha. It is not necessary to cut all 29,000 captcha, especially since 1 captcha gives 5 digits. 500 captcha will be more than enough.
How to cut? It’s possible in Photoshop, but it’s better to have a better knife.
So here is the python knife code - download . (for Windows. First create folders C: \ 1 \ test and C: \ 1 \ test-out).
The output will be a dump of numbers from 1 to 9 (there are no zeros in the captcha).
Next, you need to parse this blockage from the numbers into folders from 1 to 9 and put them in each folder by the corresponding number. So-so occupation. But in a day you can make out up to 1000 digits.
If, when choosing a number, it is doubtful which of the numbers, it is better to delete this sample. And it’s okay if the numbers are noisy or incompletely enter the “frame”:
You need to collect 200 samples of each digit in each folder. You can delegate this work to third-party services, but it’s better to do everything yourself so that you don’t look for incorrectly matched numbers later.
Neural network. Test
Tyat, tyat, our nets dragged the dead man
Before you start working with your own data, it is better to go through the above article and run the code to understand that all components (keras, tensorflow, etc.) are installed and working correctly.
We will use a simple network, the syntax for starting it from the command (!) Line:
python train_simple_nn.py --dataset animals --model output/simple_nn.model --label-bin output/simple_nn_lb.pickle --plot output/simple_nn_plot.png
* Tensorflow can write when working about errors in its own files and obsolete methods, you can fix it by hand, or you can simply ignore it.
The main thing is that after the program has been worked out, two files appear in the project project folder: simple_nn_lb.pickle and simple_nn.model, and the image of the animal with an inscription and recognition rate is displayed, for example:
Neural network - own data
Now that the network operability test has been verified, you can connect your own data and begin to train the network.
Put in the dat folder folders with numbers containing selected samples for each digit.
For convenience, we will place the dat folder in the project folder (for example, next to the animals folder).
Now the syntax for starting network learning will be:
python train_simple_nn.py --dataset dat --model output/simple_nn.model --label-bin output/simple_nn_lb.pickle --plot output/simple_nn_plot.png
However, it’s too early to start training.
You need to fix the train_simple_nn.py file.
1. At the very end of the file:
#model.summary() score = model.evaluate(testX, testY, verbose=1) print("\nTest score:", score[0]) print('Test accuracy:', score[1])
This will add information.
2.
image = cv2.resize(image, (32, 32)).flatten()
change to
image = cv2.resize(image, (16, 37)).flatten()
Here we resize the input image. Why exactly this size? Because most of the chopped digits are either of this size or are reduced to it. If you scale to 32x32 pixels, the picture will be distorted. Yes, and why do it?
In addition, we push this change into try:
try: image = cv2.resize(image, (16, 37)).flatten() except: continue
Because the program cannot digest some pictures and issues None, therefore they are skipped.
3. Now the most important thing. Where there is a comment in the code
define architecture 3072-1024-512-3 with Keras
The network architecture in the article is defined as 3072-1024-512-3. This means that the network receives 3072 (32 pixels * 32 pixels * 3) at the input, then layer 1024, layer 512 and at the output 3 options - a cat, a dog or a panda.
In our case, the input is 1776 (16 pixels * 37 pixels * 3), then layer 1024, layer 512, at the output of 9 variants of numbers.
Therefore our code:
model.add(Dense(1024, input_shape=(1776,), activation="sigmoid"))model.add(Dense(512, activation="sigmoid"))
* 9 outputs do not need to be additionally indicated, because the program itself determines the number of exits by the number of folders in the dataset.
We launch
python train_simple_nn.py --dataset dat --model output/simple_nn.model --label-bin output/simple_nn_lb.pickle --plot output/simple_nn_plot.png
Since the pictures with numbers are small, the network learns very quickly (5-10 minutes) even on weak hardware, using only the CPU.
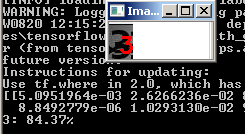
After running the program in the command line, see the results:
This means that on the training set fidelity was achieved - 82.19%, on the control - 75.6% and on the test - 75.59%.
We need to focus on the latter indicator for the most part. Why others are also important will be explained later.
Let's also see the graphic part of the work of the neural network. It is in the output folder of the simple_nn_plot.png project:
Faster, higher, stronger. Improving Results
Quite a bit about setting up a neural network, see here .
Authentic option next.
Add eras.
In the code we change
EPOCHS = 75
on
EPOCHS = 200
Increase the "number of times" that the network will undergo training.
Result:
Thus, 93.5%, 92.6%, 92.6%.
In pictures:
Here it is noticeable that the blue and red lines after the 130th era begin to disperse from each other and this says that a further increase in the number of eras will not give anything. Check this out.
In the code we change
EPOCHS = 200
on
EPOCHS = 500
and run away again.
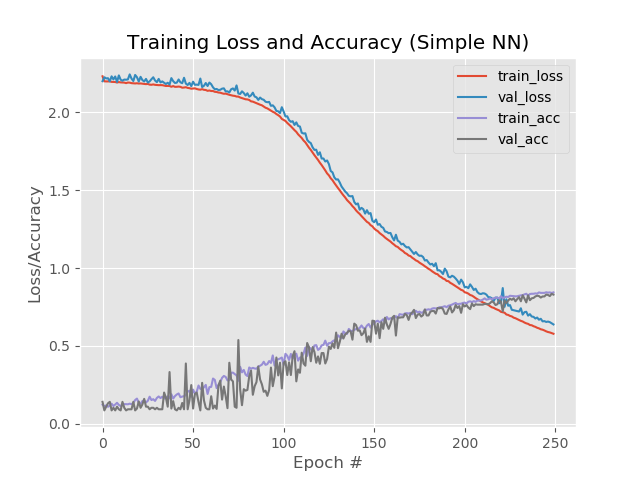
Result:
So we have:
99%, 95.5%, 95.5%.
And on the chart:
Well, the increase in the number of eras has clearly benefited the network. However, this result is misleading.
Let's check the network operation on a real example.
For these purposes, the predict.py script is in the project folder. Before starting, prepare.
In the project’s images folder, we put the files with the images of numbers from captcha, which the network had not previously encountered in the learning process. Those. it is necessary to take digits not from dat dataset dat.
In the file itself, we fix two lines for the default image size:
ap.add_argument("-w", "--width", type=int, default=16, help="target spatial dimension width") ap.add_argument("-e", "--height", type=int, default=37, help="target spatial dimension height")
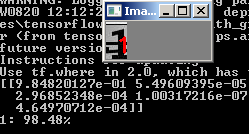
Run from the command line:
python predict.py --image images/1.jpg --model output/simple_nn.model --label-bin output/simple_nn_lb.pickle --flatten 1
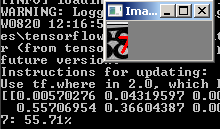
And we see the result:
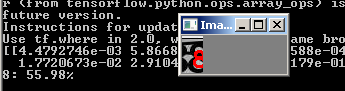
Another picture:
However, it does not work with all noisy numbers:
What can be done here?
- Increase the number of copies of numbers in the folders for training.
- Try other methods.
Let's try other methods
As you can see from the last graph, the blue and red lines diverge around the 130th era. This means that learning after the 130th era is ineffective. We fix the result on the 130th epoch: 89.3%, 88%, 88% and see if other methods to improve the network work.
Reduce the speed of learning.
INIT_LR = 0.01
on INIT_LR = 0.001
Result:
41%, 39%, 39%
Well, by.
Add an extra hidden layer.
model.add(Dense(512, activation="sigmoid"))
on model.add(Dense(512, activation="sigmoid")) model.add(Dense(258, activation="sigmoid"))
Result:
56%, 62%, 62%
Better, but no.
However, if you increase the number of eras to 250:
84%, 83%, 83%
At the same time, the red and blue lines do not come off from each other after the 130th era:
Save 250 eras and apply thinning :
from keras.layers.core import Dropout
Insert thinning between the layers:
model.add(Dense(1024, input_shape=(1776,), activation="sigmoid")) model.add(Dropout(0.3)) model.add(Dense(512, activation="sigmoid")) model.add(Dropout(0.3)) model.add(Dense(258, activation="sigmoid")) model.add(Dropout(0.3))
Result:
53%, 65%, 65%
The first value is lower than the rest, this indicates that the network is not learning. To do this, it is recommended to increase the number of eras.
model.add(Dense(1024, input_shape=(1776,), activation="sigmoid")) model.add(Dropout(0.3)) model.add(Dense(512, activation="sigmoid")) model.add(Dropout(0.3))
Result:
88%, 92%, 92%
With 1 extra layer, thinning and 500 eras:
model.add(Dense(1024, input_shape=(1776,), activation="sigmoid")) model.add(Dropout(0.3)) model.add(Dense(512, activation="sigmoid")) model.add(Dropout(0.3)) model.add(Dense(258, activation="sigmoid"))
Result:
92.4%, 92.6%, 92.58%
Despite a lower percentage compared to a simple increase in eras to 500, the graph looks more even:
And the network processes images that previously fell out:
Now we will collect everything into one file, which will cut the image with the captcha at the input into 5 digits, run each digit through the neural network and output the result to the python interpreter.
It’s simpler here. In the file that cut us the numbers from the captcha, add a file that deals with predictions.
Now the program not only cuts the captcha into 5 parts, but also displays all the recognized numbers in the interpreter:
Again, it must be borne in mind that the program does not give 100% of the result and often one of the 5 digits is incorrect. But this is not a bad result, considering that the training set contains only 170-200 copies for each number.
Captcha recognition lasts 3-5 seconds on a medium-power computer.
How else can you try to improve the network? You can read in the book "Keras Library - a deep learning tool" A. Dzhulli, S. Pala.
The final script that cuts the captcha and recognizes is here .
It starts without parameters.
Recycled scripts for training and testing the network.
Captcha for the test, including with false positives - here .
The model for work is here .
The numbers in folders are here .
All Articles