Fantastic plugins, vol. 2. Practice
Here you can read the first article with the theory of plug-in engineering.
And in this part I will tell you what problems we encountered during the creation of the plugin and how we tried to solve them.

What will I talk about?
- Practical part
- Multipage UI
- DI in plugins
- Code generation
- Code modification
- What to do next?
- Tips
- FAQ
Multipage UI
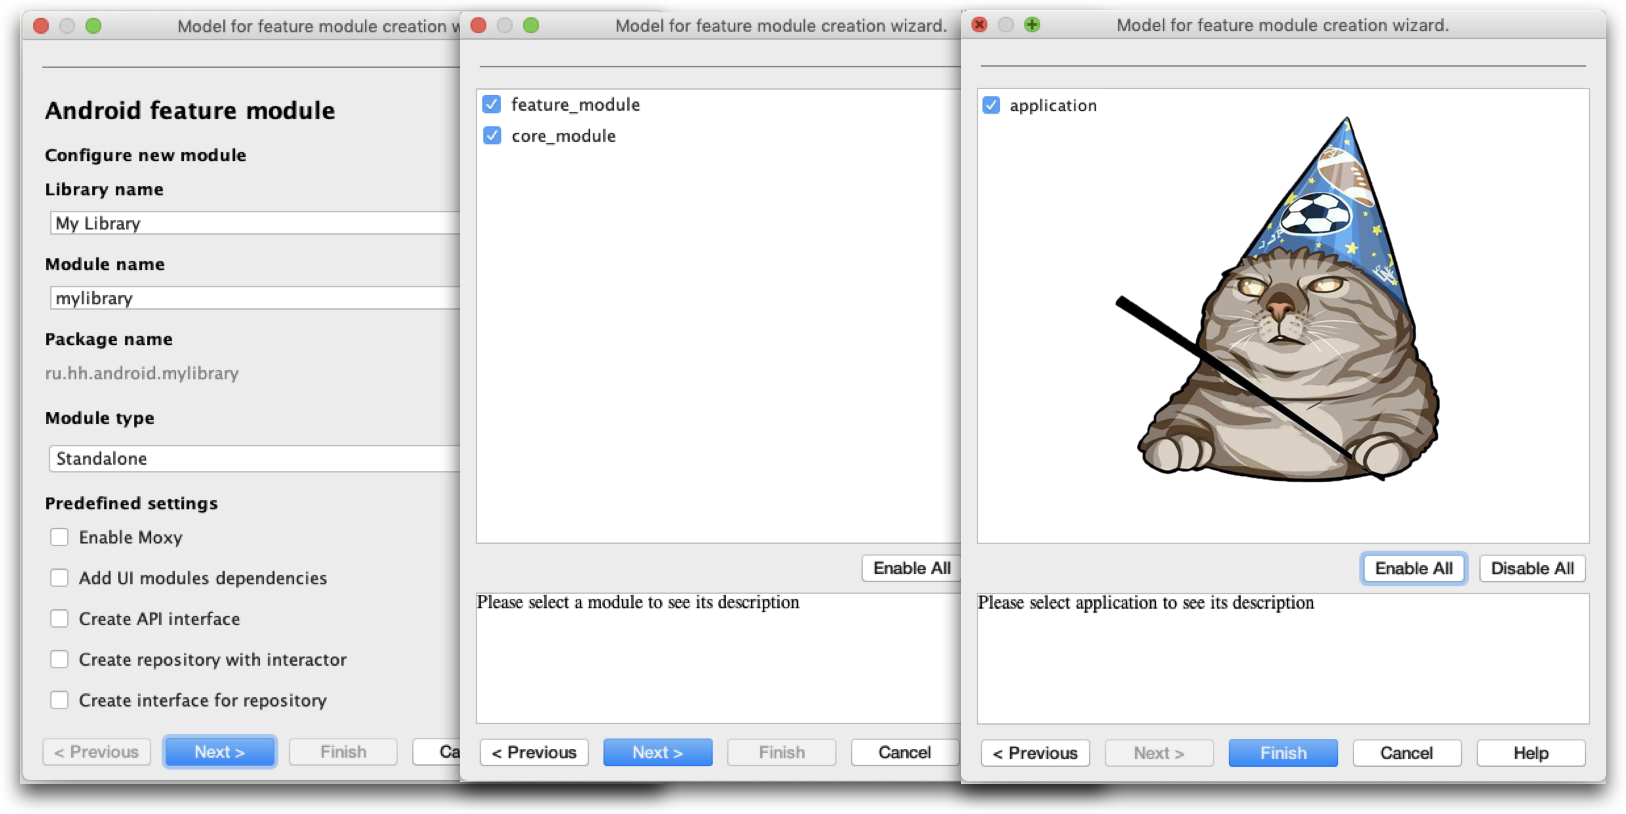
The first thing we needed to do was create a multi-page UI. We made the first complex form with a bunch of checkmarks, input fields. A little later, we decided to add the ability to select a list of modules that the user can connect to the new module. And we also want to choose the application modules to which we plan to connect the created module.
Having so many controls on one form is not very convenient, so they made three separate pages, three separate cookie cutters. In short, the Wizard dialog.
But since making multi-page UI in plugins is very painful, I wanted to find something ready. And in the bowels of IDEA, we discovered a class called WizardDialog .
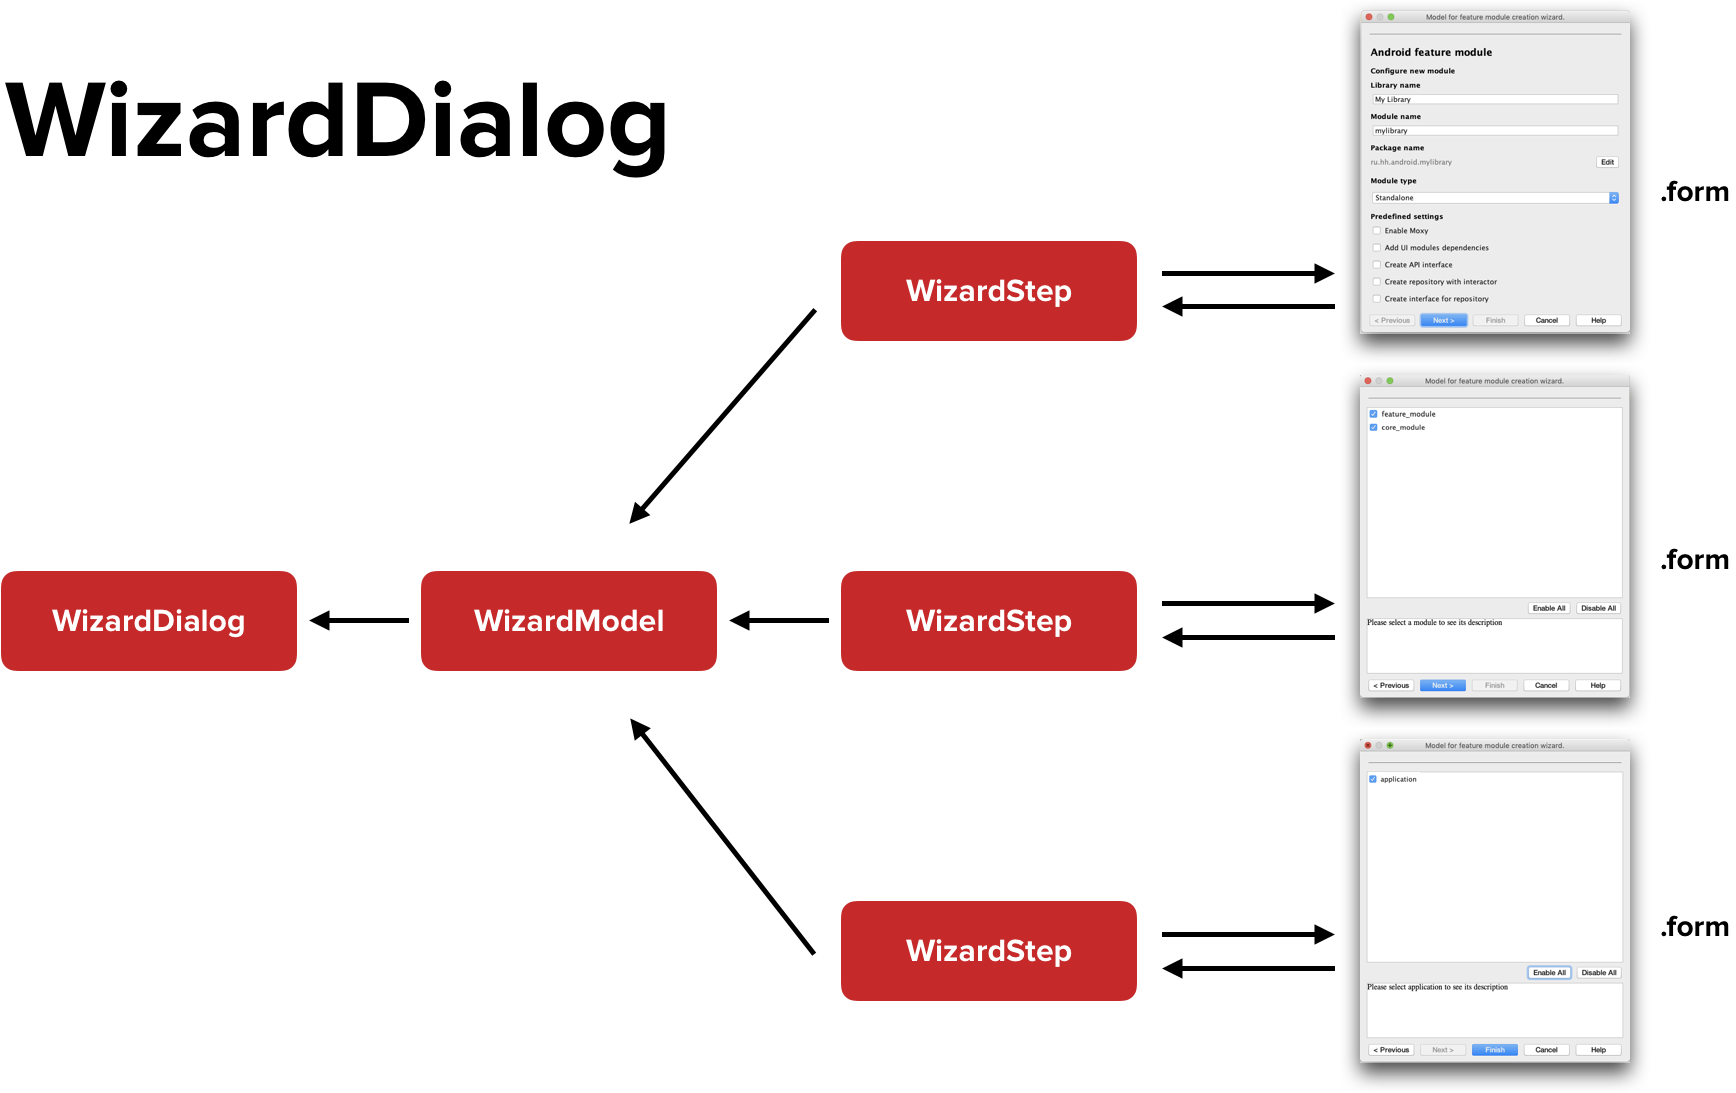
This is a wrapper class over a regular dialog, independently monitoring the user's progress in the wizard, and showing the necessary buttons (Previous, Next, Finish, etc). A special WizardModel is attached to the WizardDialog , to which individual WizardSteps are added. Each WizardStep is a separate form.
In its simplest form, the implementation of the dialogue is as follows:
class MyWizardDialog( model: MyWizardModel, private val onFinishButtonClickedListener: (MyWizardModel) -> Unit ): WizardDialog<MyWizardModel>(true, true, model) { override fun onWizardGoalAchieved() { super.onWizardGoalAchieved() onFinishButtonClickedListener.invoke(myModel) } }
We will inherit from the WizardDialog class, parameterize with the class of our WizardModel . This class has a special callback ( onWizardGoalAchieved ) that tells us that the user went through the wizard to the end and clicked on the “Finish” button.
It is important to note that from within this class there is an opportunity to reach only the WizardModel . This means that all the data that the user will collect during the passage of the wizard, you must add in the WizardModel .
class MyWizardModel: WizardModel("Title for my wizard") { init { this.add(MyWizardStep1()) this.add(MyWizardStep2()) this.add(MyWizardStep3()) } }
The model is as follows: we inherit from the WizardModel class and using the built-in add method add separate WizardSteps to the dialog.
class MyWizardStep1: WizardStep<MyWizardModel>() { private lateinit var contentPanel: JPanel override fun prepare(state: WizardNavigationState?): JComponent { return contentPanel } }
WizardSteps are also arranged simply: we inherit from the WizardStep class, parameterize it with our model class, and, most importantly, redefine the prepare method, which returns the root component of your future form.
In simple terms, it really looks like this. But in the real world, most likely your form will resemble something like this:
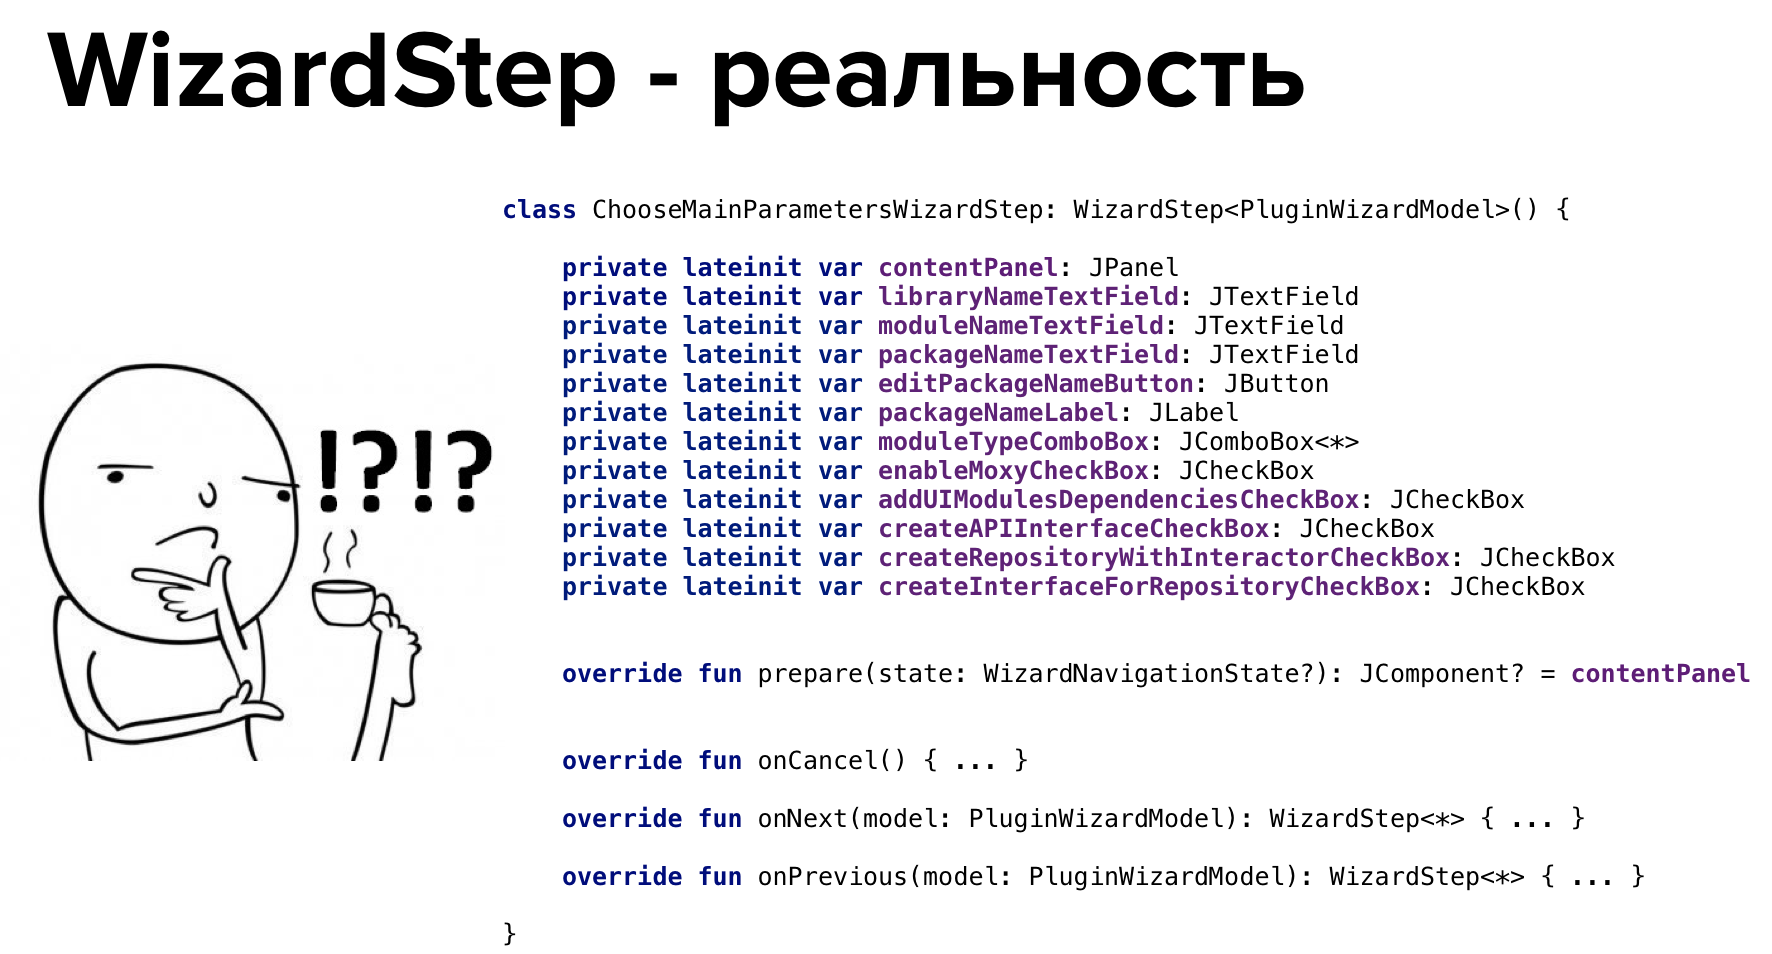
Here you can recall those times when we in the Android world did not yet know what Clean Architecture, MVP and wrote all the code in one Activity. There is a new field for architectural battles, and if you want to get confused, you can implement your own architecture for plugins.
Conclusion
If you need a multi-page UI, use WizardDialog - it will be easier.
We move on to the next topic - DI in plugins.
DI in plugins
Why might a Dependency Injection inside a plugin be required?
The first reason is the organization of the architecture inside the plugin.
It would seem, why generally observe some kind of architecture inside the plugin? A plug-in is a utility thing, if you wrote it - and that's it, I forgot.
Yes, but no.
When your plugin grows, when you write a lot of code, the question of structured code arises by itself. Here DI may come in handy.
The second, more important reason - with the help of DI you can reach the components written by developers of other plugins. It can be event buses, loggers and much more.
Despite the fact that you are free to use any DI framework (Spring, Dagger, etc), inside IntelliJ IDEA there is your own DI framework, which is based on the first three levels of abstraction, which I already talked about: Application , Project and Module .
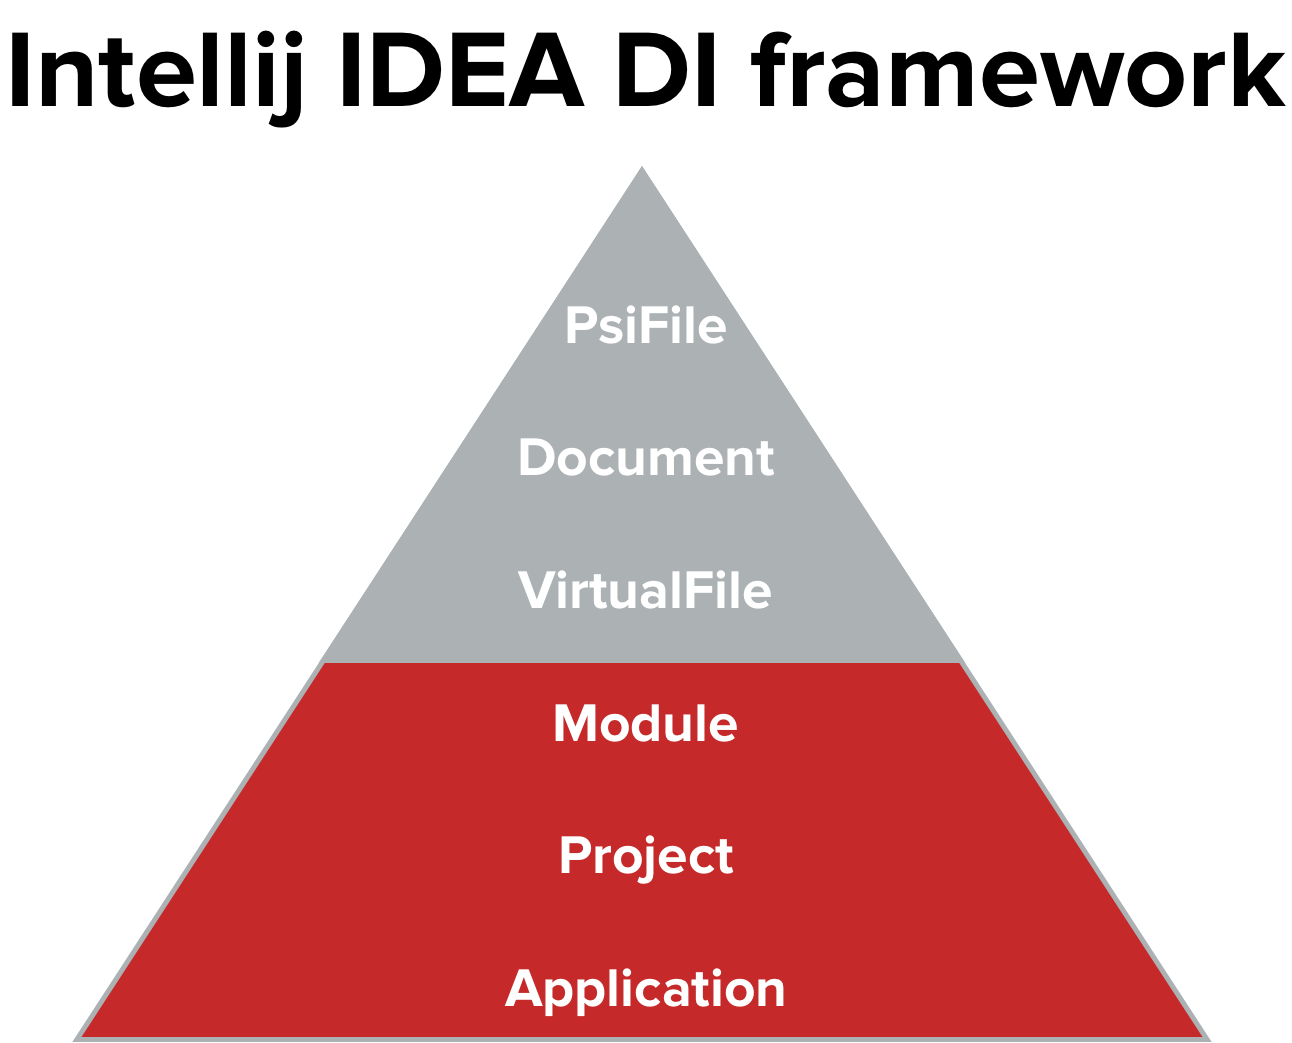
Each of these levels has its own abstraction called Component . The component of the required level is created per instance of the object of this level. So ApplicationComponent is created once for each instance of the Application class, similarly to ProjectComponent for Project instances, and so on.
What needs to be done to use the DI framework?
First, create a class that implements one of the interface components we need - for example, a class that implements ApplicationComponent , or ProjectComponent , or ModuleComponent . At the same time, we have the opportunity to inject an object of the level whose interface we are implementing. That is, for example, in ProjectComponent you can inject an object of the Project class.
class MyAppComponent( val application: Application, val anotherApplicationComponent: AnotherAppComponent ): ApplicationComponent class MyProjectComponent( val project: Project, val anotherProjectComponent: AnotherProjectComponent, val myAppComponent: MyAppComponent ): ProjectComponent class MyModuleComponent( val module: Module, val anotherModuleComponent: AnotherModuleComponent, val myProjectComponent: MyProjectComponent, val myAppComponent: MyAppComponent ): ModuleComponent
Secondly, it is possible to inject other components of the same level or higher. That is, for example, in ProjectComponent you can inject other ProjectComponent or ApplicationComponent . This is where you can access instances of "alien" components.
At the same time, IDEA guarantees that the entire dependency graph will be assembled correctly, all objects will be created in the correct order and correctly initialized.
The next thing to do is register the component in the plugin.xml file. As soon as you implement one of the Component interfaces (for example, ApplicationComponent ), IDEA will immediately offer to register your component in plugin.xml.
<idea-plugin> ... <project-components> <component> <interface-class> com.experiment.MyProjectComponent </interface-class> <implementation-class> com.experiments.MyProjectComponentImpl </implementation-class> </component> </project-components> </idea-plugin>
How it's done? A special tag <project-component> appears ( <application-component> , <module-component> - depending on the level). There is a tag inside it , it has two more tags: <interface-class> , where the interface name of your component is indicated, and <implementation-class> , where the implementation class is indicated. One and the same class can be either an interface of a component or its implementation, so you can do with a single <implementation-class> tag .
The last thing to do is get the component from the corresponding object, that is, we get the ApplicationComponent from the Application instance, ProjectComponent from Project , etc.
val myAppComponent = application.getComponent(MyAppComponent::class.java) val myProjectComponent = project.getComponent(MyProjectComponent::class.java) val myModuleComponent = module.getComponent(MyModuleComponent::class.java)
findings
- There is a DI framework inside IDEA — no need to drag anything on your own: neither Dagger nor Spring. Although, of course, you can.
- With this DI you can reach ready-made components, and this is the juice itself.
Let's move on to the third task - code generation.
Code generation
Remember, in the checklist we had the task of generating a lot of files? Each time we create a new module, we create a bunch of files: interactors, presenters, fragments. When creating a new module, these components are very similar to each other, and I would like to learn how to generate this framework automatically.
Patterns
What is the easiest way to generate a ton of similar code? Use patterns. First you need to look at your templates and understand what requirements are put forward to the code generator.
apply plugin: 'com.android.library' <if (isKotlinProject) { apply plugin: 'kotlin-android' apply plugin: 'kotlin-kapt' <if (isModuleWithUI) { apply plugin: 'kotlin-android-extensions' }> }> ... android { ... <if (isMoxyEnabled) { kapt { arguments { arg("moxyReflectorPackage", '<include var="packageName">') } } }> ... } ... dependencies { compileOnly project(':common') compileOnly project(':core-utils') <for (moduleName in enabledModules) { compileOnly project('<include var="moduleName">') }> ... }
First: we wanted to be able to use conditions inside these patterns. I give an example: if the plugin is somehow connected with the UI, we want to connect the special Gradle plugin kotlin-android-extensions .
<if (isKotlinProject) { apply plugin: 'kotlin-android' apply plugin: 'kotlin-kapt' <if (isModuleWithUI) { apply plugin: 'kotlin-android-extensions' }> }>
The second thing we want is the ability to use a variable inside this template. For example, when we configure kapt for Moxy, we want to insert the package name as an argument to the annotation processor.
kapt { arguments { arg("moxyReflectorPackage", '<include var="packageName">') } }
Another thing we need is the ability to handle loops inside the template. Remember the form where we selected the list of modules that we want to connect to the new module being created? We want to go around them in a loop and add the same line.
<for (moduleName in enabledModules) { compileOnly project('<include var="moduleName">') }>
Thus, we put forward three conditions for the code generator:
- We want to use the conditions
- Ability to substitute variable values
- We need loops in patterns
Code generators
What are the options for implementing the code generator? You can, for example, write your own code generator. For example, the guys from Uber did this: they wrote their own plugin for generating riblets (the so-called architectural units). They came up with their own template language , in which they used only the ability to insert variables. They brought the conditions to the level of the generator . But we thought that we would not do that.
The second option is to use the FileTemplateManager utility class built into IDEA, but I would not recommend doing this. Because he has Velocity as an engine, which has some problems with forwarding Java objects to templates. In addition, the FileTemplateManager cannot generate files other than Java or XML from the box. And we needed to generate Groovy files, Kotlin, Proguard and other types of files.
The third option was ... FreeMarker . If you have ready-made FreeMarker templates, do not rush to throw them away - they can be useful to you inside the plugin.
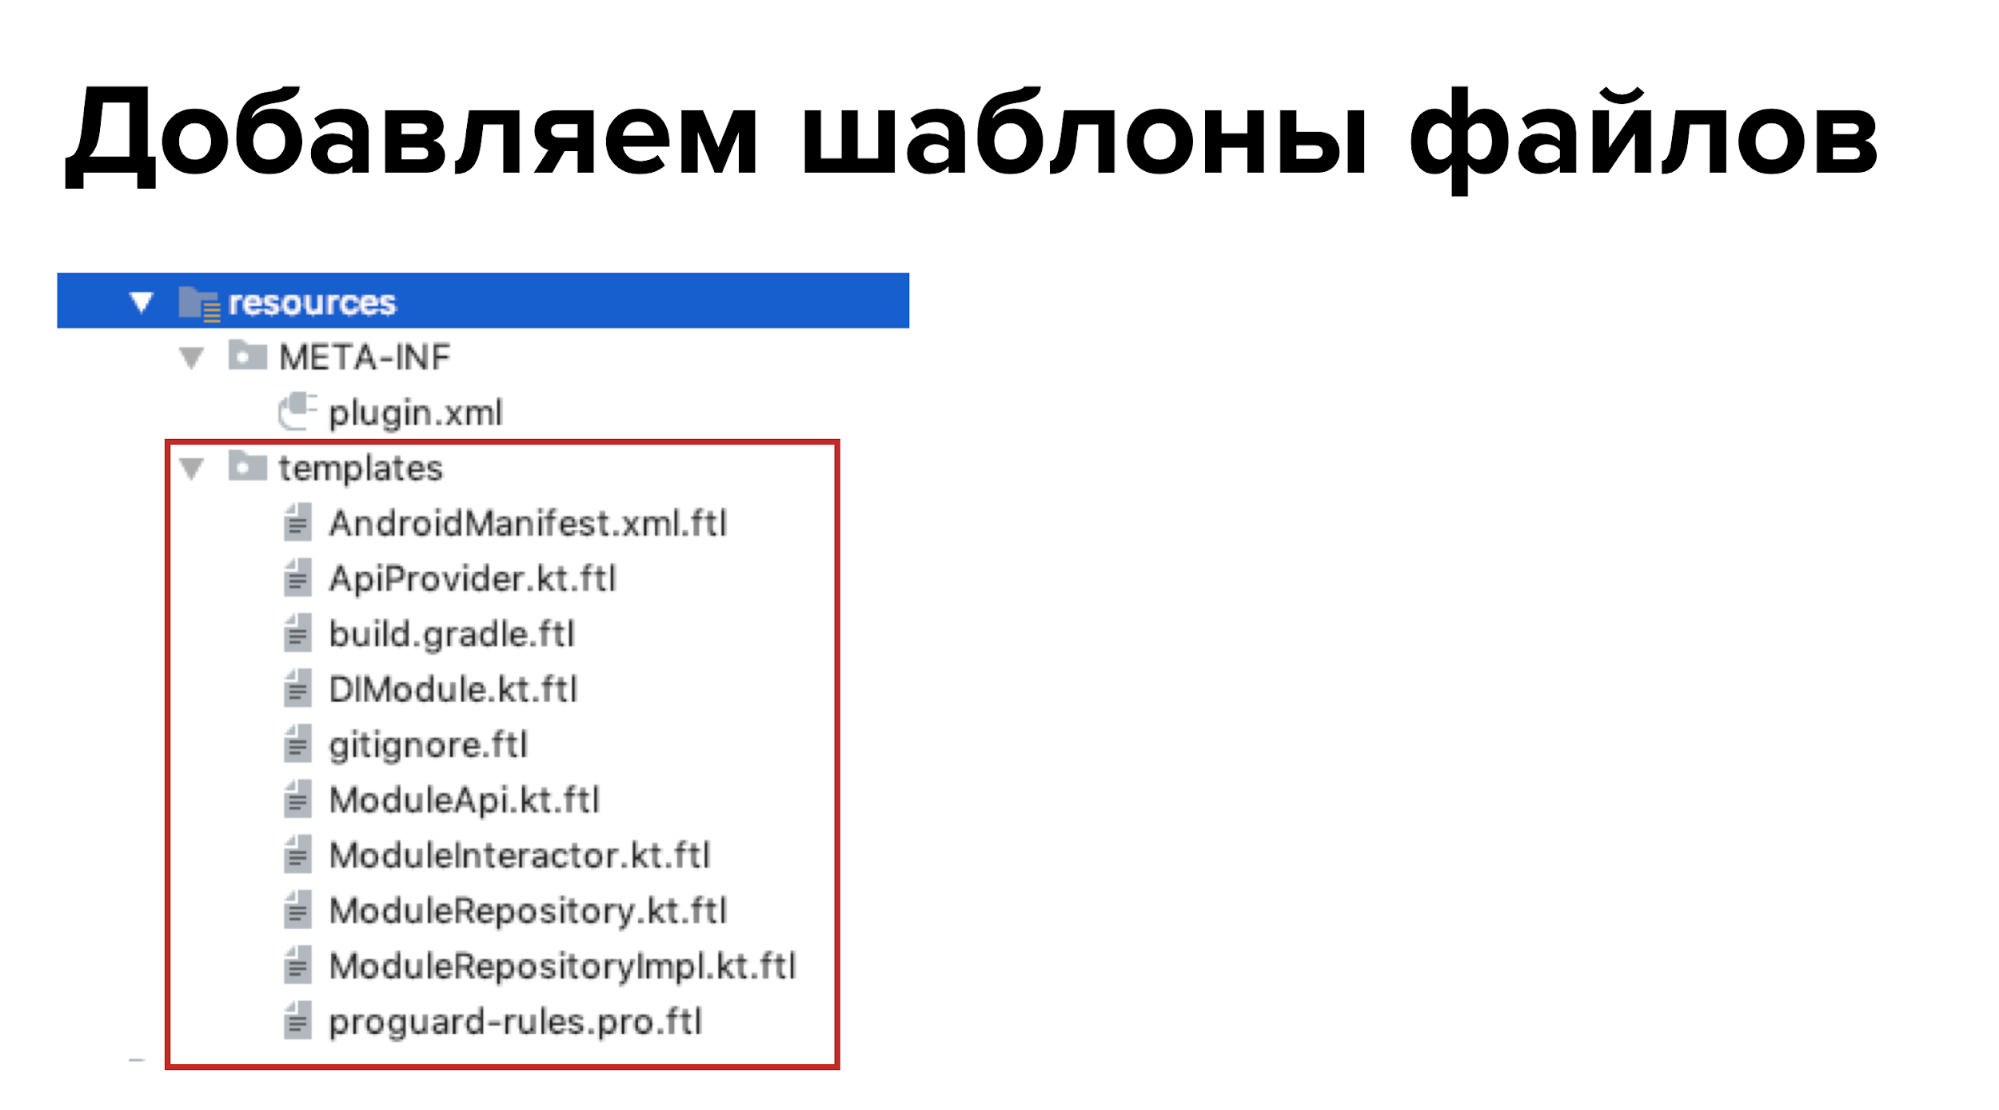
What needs to be done, what to use FreeMarker inside the plugin? First, add file templates. You can create the / templates folder inside the / resources folder and add all our templates there for all files - presenters, fragments, etc.
After that, you will need to add a dependency on the FreeMarker library. Since the plugin uses Gradle, adding a dependency is straightforward.
dependencies { ... compile 'org.freemarker:freemarker:2.3.28' }
After that, configure FreeMarker inside our plugin. I advise you to simply copy this configuration here - it is tortured, suffered, copy it, and everything just works.
class TemplatesFactory(val project: Project) : ProjectComponent { private val freeMarkerConfig by lazy { Configuration(Configuration.VERSION_2_3_28).apply { setClassForTemplateLoading( TemplatesFactory::class.java, "/templates" ) defaultEncoding = Charsets.UTF_8.name() templateExceptionHandler = TemplateExceptionHandler.RETHROW_HANDLER logTemplateExceptions = false wrapUncheckedExceptions = true } } ...
It's time to create files using FreeMarker . To do this, we get a template from the configuration by its name and use the usual FileWriter to create a file with the desired text directly on the disk.
class TemplatesFactory(val project: Project) : ProjectComponent { ... fun generate( pathToFile: String, templateFileName: String, data: Map<String, Any> ) { val template = freeMarkerConfig.getTemplate(templateFileName) FileWriter(pathToFile, false).use { writer -> template.process(data, writer) } } }
And the task seems to be solved, but no. In the theoretical part, I mentioned that the entire IDEA is permeated with the PSI structure, and this must be taken into account. If you create files bypassing the PSI structure (for example, through FileWriter), then IDEA simply won’t understand that you created something and will not display the files in the project tree. We waited about seven minutes before IDEA indexed and saw the created files.
Conclusion - do it right, create files, taking into account the structure of the PSI.
Create a PSI structure for files
To get started, let's saw the folder structure using PsiDirectory . The project start directory can be obtained using the extension functions guessProjectDir and toPsiDirectory :
val projectPsiDirectory = project.guessProjectDir()?.toPsiDirectory(project)
Subsequent directories can either be found using the PsiDirectory findSubdirectory class method, or created using the createSubdirectory method.
val coreModuleDir = projectPsiDirectory.findSubdirectory("core") val newModulePsiDir = coreModuleDir.createSubdirectory(config.mainParams.moduleName)
I also recommend that you create a Map from which you can get all the PsiDirectory folder structures using a string key, and then add the created files to any of these folders.
return mutableMapOf <String, PsiDirectory?> (). apply {
this ["root"] = modulePsiDir
this ["src"] = modulePsiDir.createSubdirectory ("src")
this ["main"] = this ["src"] ?. createSubdirectory ("main")
this ["java"] = this ["main"] ?. createSubdirectory ("java")
this ["res"] = this ["main"] ?. createSubdirectory ("res")
// PsiDirectory package name: // ru.hh.feature_worknear → ru / hh / feature_worknear createPackageNameFolder(config) // data this["data"] = this["package"]?.createSubdirectory("data") // ...
}
Folders created. We will create PsiFiles using PsiFileFactory . This class has a special method called createFileFromText . The method accepts three parameters as input: name (String fileName), text (String text) and type (FileType fileType) of the output file. Two of the three parameters are clear where to get it: we know the name ourselves, we get the text from FreeMarker. And where to get FileType ? And what is it all about?
Filetype
FileType is a special class that denotes a file type. From the “box” we have only two FileType available: JavaFileType and XmlFileType, respectively for Java-files and XML-files. But the question arises: where to get the types for the build.gradle file, for Kotlin files, for Proguard , for .gitignore , finally ?!
Firstly, most of these FileType s can be taken from other plugins that are already written by someone. GroovyFileType can be taken from the Groovy plugin , KotlinFileType from the Kotlin plugin , Proguard from the Android plugin .
How do we add the dependency of another plugin to ours? We use gradle-intellij-plugin . It adds a special intellij block to the build.gradle file of the plugin, inside which there is a special property - plugins . In this property, you can list the list of plugin identifiers on which we want to depend.
// build.gradle intellij { … plugins = ['android', 'Groovy', 'kotlin'] }
We take the keys from the official JetBrains plugin repository . For plugins built into IDEA (which are Groovy, Kotlin, and Android), the plugin folder name inside IDEA is sufficient. For the rest, you need to go to the page of a specific plugin in the official JetBrains plugin repository, the Plugin XML ID property will be indicated there, as well as the version (for example, here is the page of the Docker plugin ). Read more about connecting other plugins on GitHub .
Secondly, you need to add a dependency description to the plugin.xml file. This is done using the tag .
<idea-plugin> ... <depends>org.jetbrains.android</depends> <depends>org.jetbrains.kotlin</depends> <depends>org.intellij.groovy</depends> </idea-plugin>
After we synchronize the project, we will tighten the dependencies from other plugins, and we will be able to use them.
But what if we do not want to depend on other plugins? In this case, we can create a stub for the type of file we need. To do this, first create a class that will inherit from the Language class. The unique identifier of our programming language will be passed to this class (in our case, "ru.hh.plugins.Ignore" ).
class IgnoreLanguage private constructor() : Language("ru.hh.plugins.Ignore", "ignore", null), InjectableLanguage { companion object { val INSTANCE = IgnoreLanguage() } override fun getDisplayName(): String { return "Ignore() ($id)" } }
There is a feature: some developers add a non-unique line as an identifier. Because of this, the integration of your plugin with other plugins may break. We are great, we have a unique line.
The next thing to do after we created Language is to create a FileType . We inherit from the LanguageFileType class, use the language instance that we defined to initialize, redefine some very simple methods. Done. Now we can use the newly created FileType .
class IgnoreFileType(language: Language) : LanguageFileType(language) { companion object { val INSTANCE = IgnoreFileType(IgnoreLanguage.INSTANCE) } override fun getName(): String = "gitignore file" override fun getDescription(): String = "gitignore files" override fun getDefaultExtension(): String = "gitignore" override fun getIcon(): Icon? = null }
Finish creating the file
After you find all the necessary FileType s, I recommend creating a special container called TemplateData - it will contain all the data about the template from which you want to generate code. It will contain the name of the template file, the name of the output file that you get after generating the code, the desired FileType, and finally PsiDirectory , where you add the created file.
data class TemplateData( val templateFileName: String, val outputFileName: String, val outputFileType: FileType, val outputFilePsiDirectory: PsiDirectory? )
Then we return to FreeMarker - we get the template file from it, using StringWriter we get the text, in the PsiFileFactory we generate the PsiFile with the desired text and type. The created file is added to the desired directory.
fun createFromTemplate(data: FileTemplateData, properties: Map<String, Any>): PsiFile { val template = freeMarkerConfig.getTemplate(data.templateFileName) val text = StringWriter().use { writer -> template.process(properties, writer) writer.buffer.toString() } return psiFileFactory.createFileFromText(data.outputFileName, data.outputFileType, text) }
Thus, the PSI structure is taken into account, and IDEA, as well as other plugins, will see what we have done. There can be a profit from this: for example, if the plugin for Git sees that you have added a new file, it will automatically display a dialog box asking if you want to add these files to Git?
Conclusions about code generation
- Text files can be generated by FreeMarker. Very comfortably.
- When generating files, you need to consider the PSI structure, otherwise everything will go wrong.
- If you want to generate files using PsiFileFactory, you will have to find FileType somewhere.
Well, now we turn to the last, the most delicious practical part - this is a modification of the code.
Code modification
In fact, creating a plugin only for code generation is nonsense, because you can generate code with other tools, and the same FreeMarker . But what FreeMarker cannot do is modify the code.
There are several tasks in our checklist related to modifying the code, let's start with the simplest one - modifying the settings.gradle file.
Modification settings.gradle
Let me remind you what we want to do: we need to add a couple of lines to this file that will describe the path to the newly created module:
// settings.gradle include ':analytics project(':analytics').projectDir = new File(settingsDir, 'core/framework-metrics/analytics) ... include ':feature-worknear' project(':feature-worknear').projectDir = new File(settingsDir, 'feature/feature-worknear')
I scared you a little earlier that you must always take into account the PSI structure when working with files, otherwise everything will burn will not work. In fact, in simple tasks, such as adding a couple of lines to the end of a file, you can do this. You can add some lines to the file using the usual java.io.File . To do this, we find the path to the file, create the java.io.File instance, and using the Kotlin extension functions add two lines to the end of this file. You can do this, IDEA will see your changes.
val projectBaseDirPath = project.basePath?: return
val settingsPathFile = projectBaseDirPath + "/settings.gradle"
val settingsFile = File (settingsPathFile)
settingsFile.appendText ("include ': $ moduleName'")
settingsFile.appendText (
"project (': $ moduleName'). projectDir = new File (settingsDir, '$ folderPath')"
)
Well, ideally, of course, it is better through the PSI structure - it is more reliable.
Kapt tuning for Toothpick
Once again, I remind you of the problem: in the application module there is a build.gradle file, and inside it there are settings for the annotation processor. And we want to add a package of our created module to a specific place.
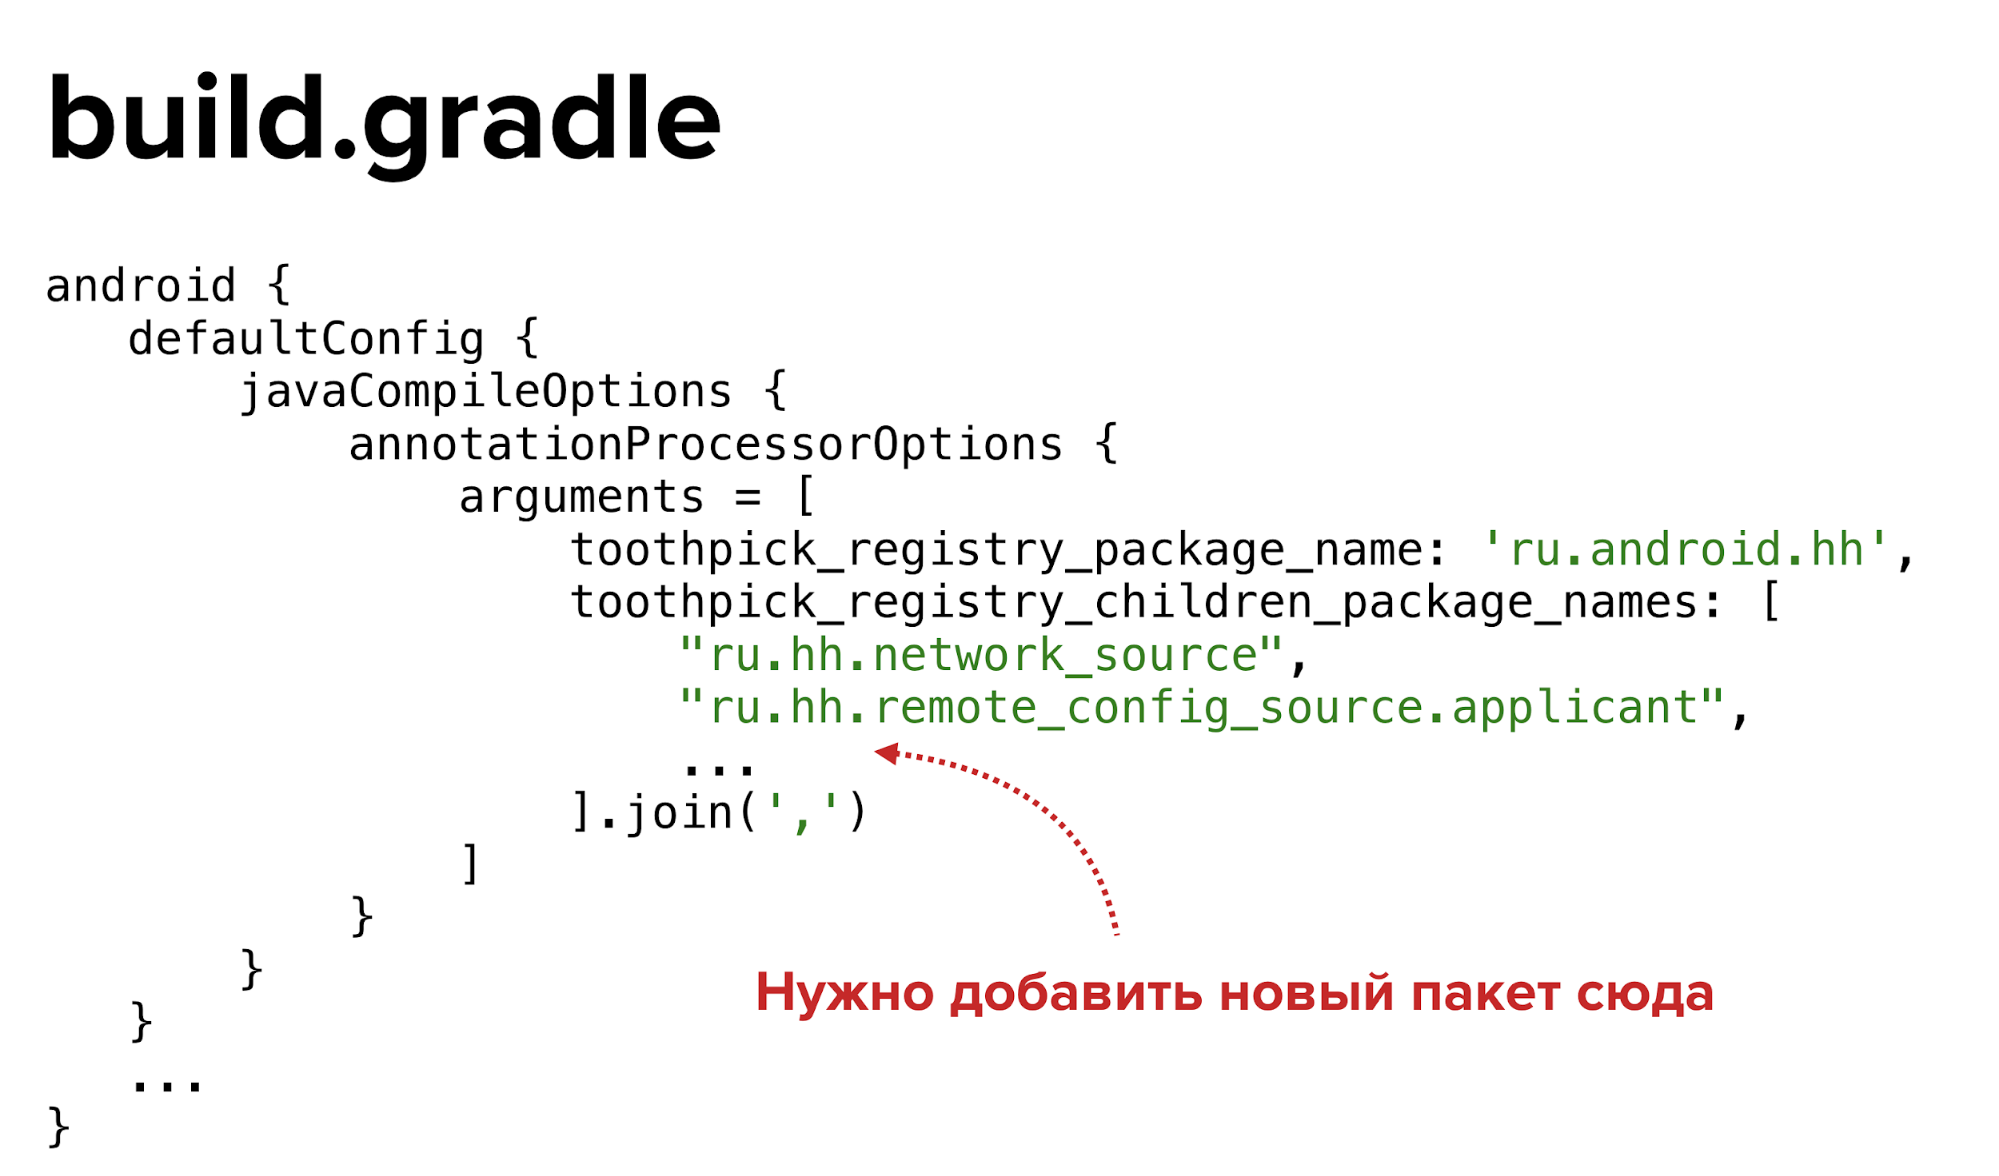
Our goal is to find a specific PsiElement , after which we plan to add our line. The search for the element begins with the search for the PsiFile , which denotes the build.gradle file of the application module. And for this you need to find the module inside which we will look for the file.
val appModule = ModuleManager.getInstance(project) .modules.toList() .first { it.name == "headhunter-applicant" }
Next, using the utility class FilenameIndex, you can find PsiFile by its name, specifying the module found as the search area.
val buildGradlePsiFile = FilenameIndex.getFilesByName( appModule.project, "build.gradle", appModule.moduleContentScope ).first()
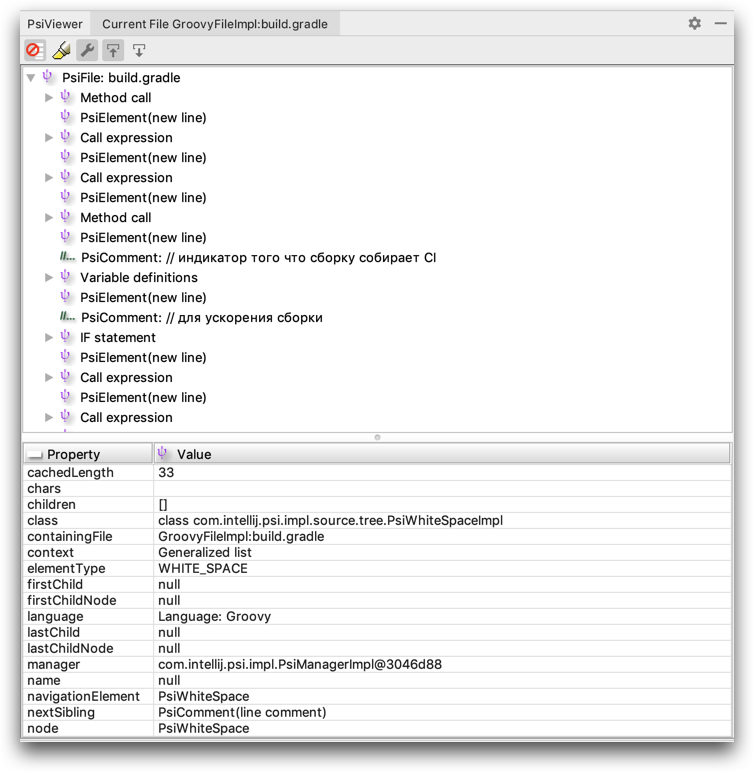
After we find the PsiFile, we can begin to search for the PsiElement. To find it, I recommend installing a special plug-in - PSI Viewer . IDEA , PSI- .
- (, build.gradle) , PSI- .
– , PsiFile -.
. PsiFile . .
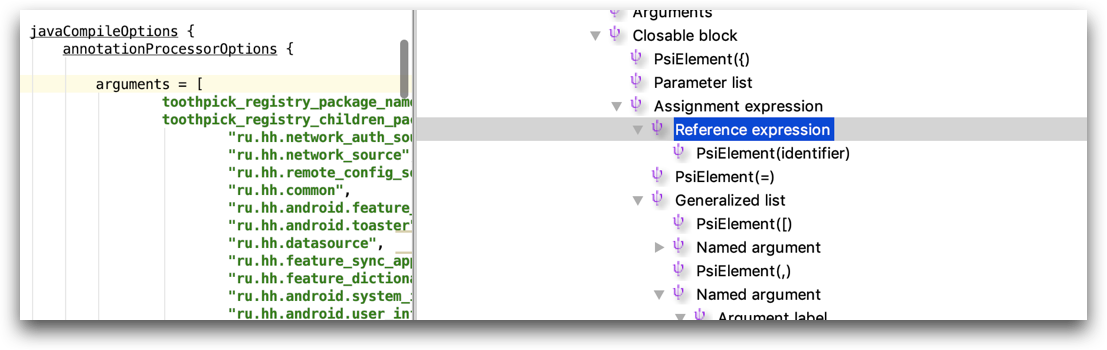
val toothpickRegistryPsiElement = buildGradlePsiFile.originalFile .collectDescendantsOfType<GrAssignmentExpression>() .firstOrNull { it.text.startsWith("arguments") } ?.lastChild ?.children?.firstOrNull { it.text.startsWith("toothpick_registry_children_package_names") } ?.collectDescendantsOfType<GrListOrMap>() ?.first() ?: return
?.. ? PSI-. GrAssignmentExpression , , arguments = [ … ] . , toothpick_registry_children_package_names = [...] , Groovy-.
PsiElement , . . .
PSI- , PsiElementFactory , . Java-? Java-. Groovy? GroovyPsiElementFactory . And so on.
PsiElementFactory . Groovy Kotlin , .
val factory = GroovyPsiElementFactory.getInstance(buildGradlePsiFile.project) val packageName = config.mainParams.packageName val newArgumentItem = factory.createStringLiteralForReference(packageName)
PsiElement .
targetPsiElement.add(newArgumentItem)
kapt- Moxy application
-, , – kapt- Moxy application . : @RegisterMoxyReflectorPackages .
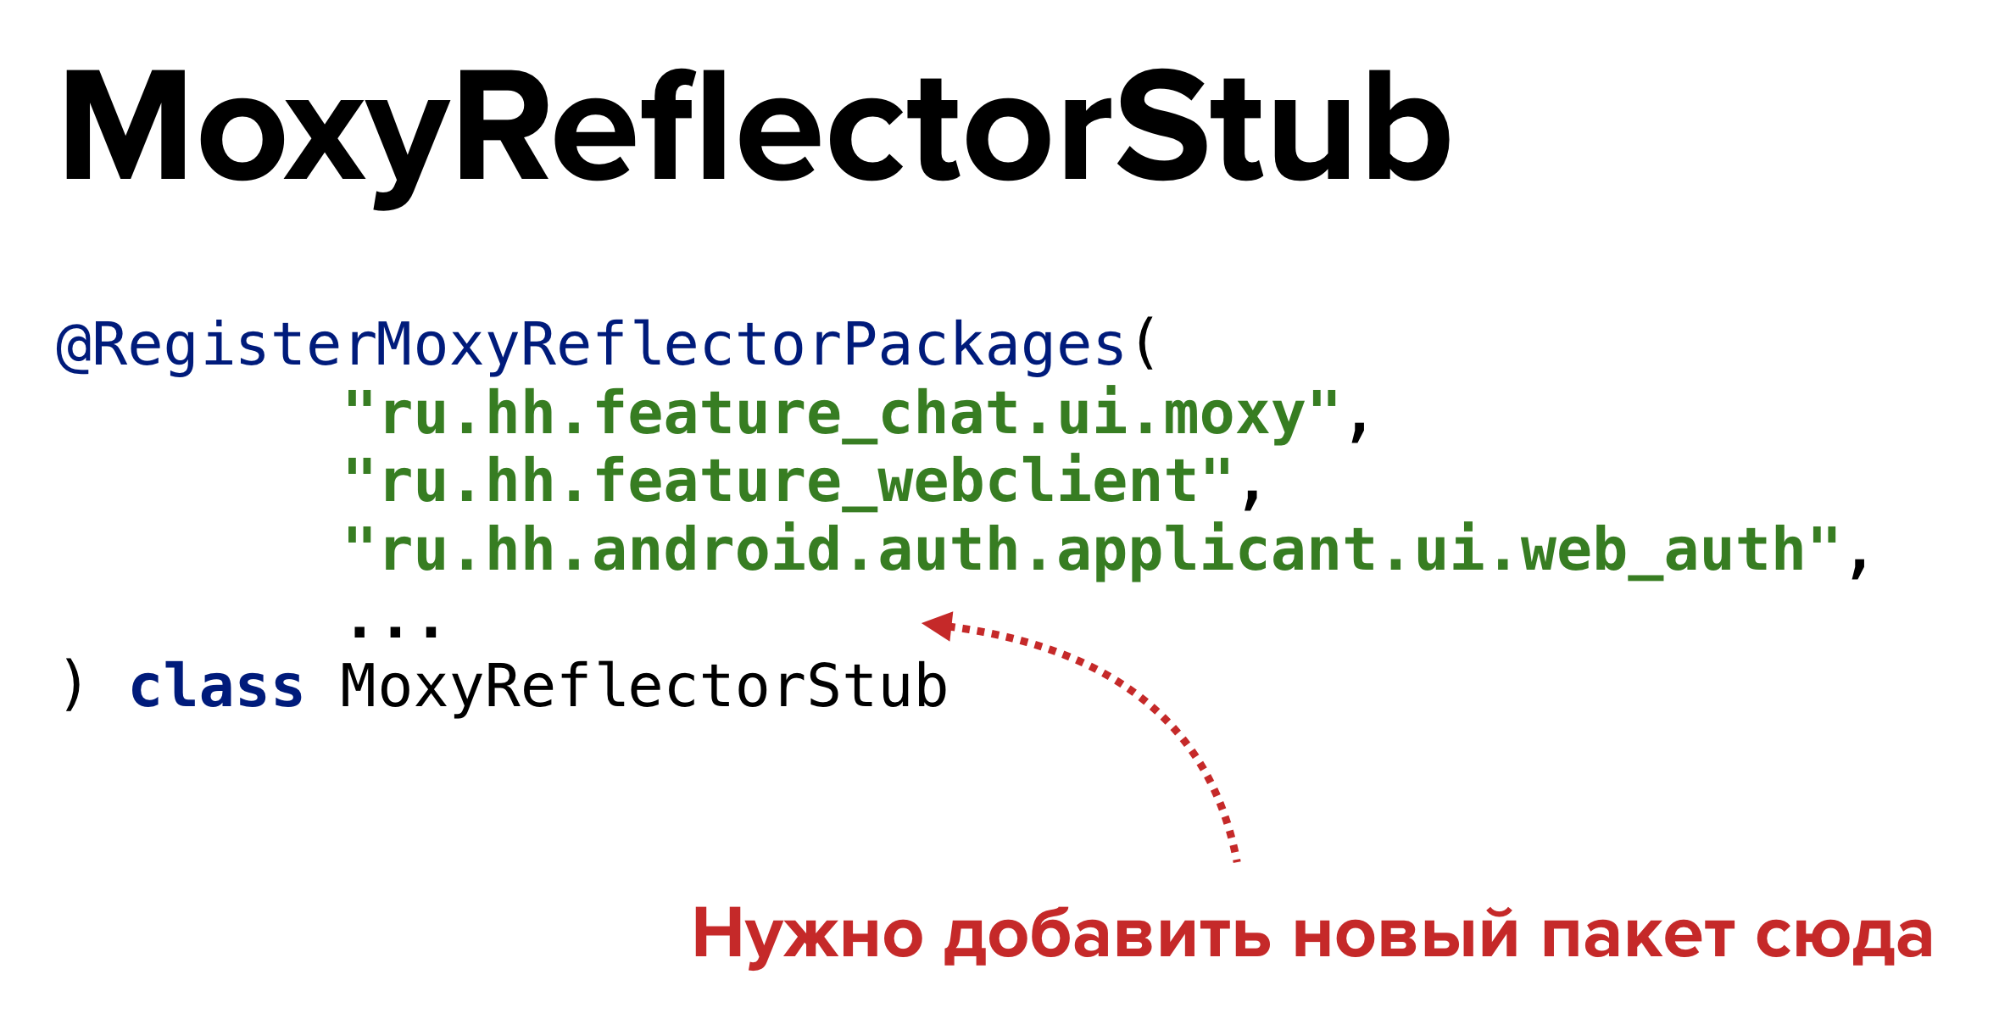
, : PsiFile , PsiElement , … , PsiElement -.
: , @RegisterMoxyReflectorPackages , value , .
, . , PsiManager , PsiClass .
val appModule = ModuleManager.getInstance(project) .modules.toList() .first { it.name == "headhunter-applicant" } val psiManager = PsiManager.getInstance(appModule.project) val annotationPsiClass = ClassUtil.findPsiClass( psiManager, "com.arellomobile.mvp.RegisterMoxyReflectorPackages" ) ?: return
AnnotatedMembersSearch , .
val annotatedPsiClass = AnnotatedMembersSearch.search( annotationPsiClass, appModule.moduleContentScope ).findAll() ?.firstOrNull() ?: return
, PsiElement , value. , .
val annotationPsiElement = (annotatedPsiClass .annotations .first() as KtLightAnnotationForSourceEntry ).kotlinOrigin val packagesPsiElements = annotationPsiElement .collectDescendantsOfType<KtValueArgumentList>() .first() .collectDescendantsOfType<KtValueArgument>() val updatedPackagesList = packagesPsiElements .mapTo(mutableListOf()) { it.text } .apply { this += "\"${config.packageName}\"" } val newAnnotationValue = updatedPackagesList.joinToString(separator = ",\n")
KtPsiFactory PsiElement – .
val kotlinPsiFactory = KtPsiFactory(project) val newAnnotationPsiElement = kotlinPsiFactory.createAnnotationEntry( "@RegisterMoxyReflectorPackages(\n$newAnnotationValue\n)" ) val replaced = annotationPsiElement.replace(newAnnotationPsiElement)
.
What could go wrong? code style. , IDEA : CodeStyleManager.
CodeStyleManager.getInstance(module.project).reformat(replacedElement)
- , .
findings
- , PSI-, .
- , PSI , , PsiElement-.
?
.
- – , .
- . . : .
- ? . , IDEA , . , . — - , GitHub . , , .
- - – IntelliJ IDEA . , Util Manager , , , .
- : . , runIde , IDEA, . , hh.ru, .
FAQ
- ?
, . , 2 3 .
- IDEA , - ?
, IDEA IDEA SDK , deprecated, , . SDK- , , .
- ?
– gitignore . - .
- ?
Android Studio Mac OS, Ubuntu, . , Windows, .
All Articles