Using Immer to Manage React Application Status
The state is used to organize the monitoring of data from React applications. States change as users interact with applications. When the user performs some action, we need to update the state, which is a set of data on the basis of which what the user sees on the screen is formed. Update the state of React applications using the setState method.

Since the states should not be updated directly (in React, the state should be immutable), with the complication of the structure of states, working with them turns into a very non-trivial task. Namely, it becomes difficult for the programmer to navigate in the state and use his data in the application.
In such situations, you can use the Immer library. Its use in React applications is devoted to the material, the translation of which we publish today.
When using Immer, the state structure of a React application can be simplified, which means that it will be easier to work with. Immer uses the concept of so-called “draft”. A “draft” can be understood as a copy of a state, but not the state itself.
Immer, as it were, copies the state by “pressing” the CMD + C keys, then, using the CMD + V keys, inserts what he copied into a place where the copied data can be viewed without disturbing the original materials. Changing the data included in the state is done in the "draft", after which, based on the changes made to the "draft", the current state of the application is updated.
Suppose your application state looks like this:
Here is the user data. This user, as it turned out, is celebrating his 31st birthday. This means that we need to update its age (
property). If you use Immer to solve this problem, a copy of this state will be created first.
Now imagine that a copy of the condition was made, it was handed over to the courier, and he delivered this copy to Kunle. This means that now there are two copies of the state. One of them is the current state of the application, and the second is a “rough” copy that was transferred to the user. The user, editing the “draft”, changes his age to 31. After that, the courier returns with the changed document and gives the “draft” to the application. There, a comparison of two versions of the document is performed, and only changes regarding the user's age are made to the current state of the application, since nothing else has changed in the “draft”.
Such a scheme of work does not violate the idea of state immunity - the current state is not directly updated. In general, we can say that the use of Immer simply helps to improve the usability of the immune state.
Let's take a look at a sample working application that uses Immer. Suppose you are developing a traffic light application. In this application you can try to use Immer.
Here is what the screen of this application looks like at one of the moments of its operation.

Traffic light application
Here you can find the project code.
Here's what the component will look like, given that the project uses Immer.
is a standard feature imported from Immer. We pass it, as a value, to the
method. The
function takes a function that, as an argument, takes
. It is within this function that we can edit the “draft” state, bringing it to the form that should take on a real state.
If all this seems too complicated to you - here is another approach to writing code that solves the same tasks as the above code. First, create a function:
To the
function, we, as arguments, pass the current state of the application and another function that takes the
argument. Now let's take advantage of all this in the component:
If you have been working with React for some time, then you should not be surprised at the spread syntax . When using Immer you do not need to use similar designs. In particular, when working with arrays contained in a state.
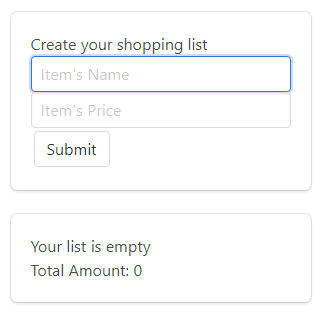
We’ll continue to explore the possibilities of Immer, creating an application that implements a shopping list.

Shopping list
Here you can experiment with it.
Here is the component we are working with.
When adding new shopping notes to the list, we need to update the state of the component, in which, in the
array, new elements should be saved. In order to update the
state element using the
method,
will need the following code:
If during the operation of the application you need to update a lot of state elements - the spread syntax will have to be used very often. A new state is obtained by combining what is already in the state with new data. As the number of changes grows, the work becomes more complicated. If to use Immer - such things do not cause difficulties. You can verify this by looking at the example code at the beginning of this section.
But what if we want to add a function to the project that, in the form of a callback, will be called after updating the state? For example, this may be necessary if you need to count the number of entries in the list or the total cost of all planned purchases.
Here you can take a look at the code of the application, which we will now analyze. Its interface is shown below.
Application with the function of calculating the total cost of planned purchases
So, suppose we want to calculate the total value of planned purchases. Let's start by creating a state update mechanism. This mechanism is represented by the
function:
In the
function
we first create an object based on the data entered by the user. The reference to the object is written to the constant
. To create a new state of the application, the
method is used. This method, called on an array, returns a new array, which includes elements of the original array, as well as a new element. The new array is written to
. After that, Immer can update the state of the application.
The callback, the
function, is called after a state update. It is important to note that this function uses an updated version of the state.
The
function will look like this:
Use-immer is a hook that allows a developer to control the state of React applications. Let's take a look at how this hook works by implementing the classic counter application on its basis:
The
function
very similar to the useState method. The function returns a state and a function that updates the state. When the component is first loaded, the contents of the state (in this case, the
property) corresponds to the value passed to
. Using the returned function to update the state allows us to create an
function that increments the value of the
state property.
And here is the code that uses the hook for Immer, reminiscent of useReducer :
The
function accepts the
function and initial state. It returns the state and
function. After that, you can bypass the state for displaying the elements in it. Sending actions using the
function is performed when a new item is added to the to-do list and when the list is cleared. The action to be sent is assigned a type based on which a decision is made in the reducer function about what exactly needs to be done to process a specific action.
In the reducer, we use, as before, a
entity, not a
. Thanks to this, we have a convenient way to manage the state of the application.
The code used in the previous example can be found here .
In this article, we talked about Immer, a library that simplifies the management of the state of React applications. The author of the article believes that everyone who is interested in this library may well use Immer in their new applications or slowly introduce it into one of the current projects.
Here is the material where you can find some details about Immer.
Dear readers! Do you plan to use Immer?

Since the states should not be updated directly (in React, the state should be immutable), with the complication of the structure of states, working with them turns into a very non-trivial task. Namely, it becomes difficult for the programmer to navigate in the state and use his data in the application.
In such situations, you can use the Immer library. Its use in React applications is devoted to the material, the translation of which we publish today.
The Basics of Using Immer in React Applications
When using Immer, the state structure of a React application can be simplified, which means that it will be easier to work with. Immer uses the concept of so-called “draft”. A “draft” can be understood as a copy of a state, but not the state itself.
Immer, as it were, copies the state by “pressing” the CMD + C keys, then, using the CMD + V keys, inserts what he copied into a place where the copied data can be viewed without disturbing the original materials. Changing the data included in the state is done in the "draft", after which, based on the changes made to the "draft", the current state of the application is updated.
Suppose your application state looks like this:
this.state = { name: 'Kunle', age: 30, city: 'Lagos', country: 'Nigeria' }
Here is the user data. This user, as it turned out, is celebrating his 31st birthday. This means that we need to update its age (
age
property). If you use Immer to solve this problem, a copy of this state will be created first.
Now imagine that a copy of the condition was made, it was handed over to the courier, and he delivered this copy to Kunle. This means that now there are two copies of the state. One of them is the current state of the application, and the second is a “rough” copy that was transferred to the user. The user, editing the “draft”, changes his age to 31. After that, the courier returns with the changed document and gives the “draft” to the application. There, a comparison of two versions of the document is performed, and only changes regarding the user's age are made to the current state of the application, since nothing else has changed in the “draft”.
Such a scheme of work does not violate the idea of state immunity - the current state is not directly updated. In general, we can say that the use of Immer simply helps to improve the usability of the immune state.
Example No. 1: traffic light
Let's take a look at a sample working application that uses Immer. Suppose you are developing a traffic light application. In this application you can try to use Immer.
Here is what the screen of this application looks like at one of the moments of its operation.
Traffic light application
Here you can find the project code.
Here's what the component will look like, given that the project uses Immer.
const {produce} = immer class App extends React.Component { state = { red: 'red', yellow: 'black', green: 'black', next: "yellow" } componentDidMount() { this.interval = setInterval(() => this.changeHandle(), 3000); } componentWillUnmount() { clearInterval(this.interval); } handleRedLight = () => { this.setState( produce(draft => { draft.red = 'red'; draft.yellow = 'black'; draft.green = 'black'; draft.next = 'yellow' }) ) } handleYellowLight = () => { this.setState( produce(draft => { draft.red = 'black'; draft.yellow = 'yellow'; draft.green = 'black'; draft.next = 'green' }) ) } handleGreenLight = () => { this.setState( produce(draft => { draft.red = 'black'; draft.yellow = 'black'; draft.green = 'green'; draft.next = 'red' }) ) } changeHandle = () => { if (this.state.next === 'yellow') { this.handleYellowLight() } else if (this.state.next === 'green') { this.handleGreenLight() } else { this.handleRedLight() } } render() { return ( <div className="box"> <div className="circle" style={{backgroundColor: this.state.red}}></div> <div className="circle" style={{backgroundColor: this.state.yellow}}></div> <div className="circle" style={{backgroundColor: this.state.green}}></div> </div> ); } };
Produce
is a standard feature imported from Immer. We pass it, as a value, to the
setState()
method. The
produce
function takes a function that, as an argument, takes
draft
. It is within this function that we can edit the “draft” state, bringing it to the form that should take on a real state.
If all this seems too complicated to you - here is another approach to writing code that solves the same tasks as the above code. First, create a function:
const handleLight = (state) => { return produce(state, (draft) => { draft.red = 'black'; draft.yellow = 'black'; draft.green = 'green'; draft.next = 'red' }); }
To the
produce
function, we, as arguments, pass the current state of the application and another function that takes the
draft
argument. Now let's take advantage of all this in the component:
handleGreenLight = () => { const nextState = handleLight(this.state) this.setState(nextState) }
Example 2: shopping list
If you have been working with React for some time, then you should not be surprised at the spread syntax . When using Immer you do not need to use similar designs. In particular, when working with arrays contained in a state.
We’ll continue to explore the possibilities of Immer, creating an application that implements a shopping list.
Shopping list
Here you can experiment with it.
Here is the component we are working with.
class App extends React.Component { constructor(props) { super(props) this.state = { item: "", price: 0, list: [ { id: 1, name: "Cereals", price: 12 }, { id: 2, name: "Rice", price: 10 } ] } } handleInputChange = e => { this.setState( produce(draft => { draft[event.target.name] = event.target.value })) } handleSubmit = (e) => { e.preventDefault() const newItem = { id: uuid.v4(), name: this.state.name, price: this.state.price } this.setState( produce(draft => { draft.list = draft.list.concat(newItem) }) ) }; render() { return ( <React.Fragment> <section className="section"> <div className="box"> <form onSubmit={this.handleSubmit}> <h2>Create your shopping list</h2> <div> <input type="text" placeholder="Item's Name" onChange={this.handleInputChange} name="name" className="input" /> </div> <div> <input type="number" placeholder="Item's Price" onChange={this.handleInputChange} name="price" className="input" /> </div> <button className="button is-grey">Submit</button> </form> </div> <div className="box"> { this.state.list.length ? ( this.state.list.map(item => ( <ul> <li key={item.id}> <p>{item.name}</p> <p>${item.price}</p> </li> <hr /> </ul> )) ) : <p>Your list is empty</p> } </div> </section> </React.Fragment> ) } } ReactDOM.render( <App />, document.getElementById('root') );
When adding new shopping notes to the list, we need to update the state of the component, in which, in the
list
array, new elements should be saved. In order to update the
list
state element using the
setState()
method,
setState()
will need the following code:
handleSubmit = (e) => { e.preventDefault() const newItem = { id: uuid.v4(), name: this.state.name, price: this.state.price } this.setState({ list: [...this.state.list, newItem] }) };
If during the operation of the application you need to update a lot of state elements - the spread syntax will have to be used very often. A new state is obtained by combining what is already in the state with new data. As the number of changes grows, the work becomes more complicated. If to use Immer - such things do not cause difficulties. You can verify this by looking at the example code at the beginning of this section.
But what if we want to add a function to the project that, in the form of a callback, will be called after updating the state? For example, this may be necessary if you need to count the number of entries in the list or the total cost of all planned purchases.
Here you can take a look at the code of the application, which we will now analyze. Its interface is shown below.
Application with the function of calculating the total cost of planned purchases
So, suppose we want to calculate the total value of planned purchases. Let's start by creating a state update mechanism. This mechanism is represented by the
handleSubmit
function:
handleSubmit = (e) => { e.preventDefault() const newItem = { id: uuid.v4(), name: this.state.name, price: this.state.price } this.setState( produce(draft => { draft.list = draft.list.concat(newItem) }), () => { this.calculateAmount(this.state.list) } ) };
In the
handleSubmit
function
handleSubmit
we first create an object based on the data entered by the user. The reference to the object is written to the constant
newItem
. To create a new state of the application, the
.concat()
method is used. This method, called on an array, returns a new array, which includes elements of the original array, as well as a new element. The new array is written to
draft.list
. After that, Immer can update the state of the application.
The callback, the
calculateAmount
function, is called after a state update. It is important to note that this function uses an updated version of the state.
The
calculateAmount
function will look like this:
calculateAmount = (list) => { let total = 0; for (let i = 0; i < list.length; i++) { total += parseInt(list[i].price, 10) } this.setState( produce(draft => { draft.totalAmount = total }) ) }
Hooks immer
Use-immer is a hook that allows a developer to control the state of React applications. Let's take a look at how this hook works by implementing the classic counter application on its basis:
import React from "react"; import {useImmer} from "use-immer"; const Counter = () => { const [count, updateCounter] = useImmer({ value: 0 }); function increment() { updateCounter(draft => { draft.value = draft.value +1; }); } return ( <div> <h1> Counter {count.value} </h1> <br /> <button onClick={increment}>Increment</button> </div> ); } export default Counter;
The
useImmer
function
useImmer
very similar to the useState method. The function returns a state and a function that updates the state. When the component is first loaded, the contents of the state (in this case, the
count
property) corresponds to the value passed to
useImmer
. Using the returned function to update the state allows us to create an
increment
function that increments the value of the
count
state property.
And here is the code that uses the hook for Immer, reminiscent of useReducer :
import React, { useRef } from "react"; import {useImmerReducer } from "use-immer"; import uuidv4 from "uuid/v4" const initialState = []; const reducer = (draft, action) => { switch (action.type) { case "ADD_ITEM": draft.push(action.item); return; case "CLEAR_LIST": return initialState; default: return draft; } } const Todo = () => { const inputEl = useRef(null); const [state, dispatch] = useImmerReducer(reducer, initialState); const handleSubmit = (e) => { e.preventDefault() const newItem = { id: uuidv4(), text: inputEl.current.value }; dispatch({ type: "ADD_ITEM", item: newItem }); inputEl.current.value = ""; inputEl.current.focus(); } const handleClear = () => { dispatch({ type: 'CLEAR_LIST' }) } return ( <div className='App'> <header className='App-header'> <ul> {state.map(todo => { return <li key={todo.id}>{todo.text}</li>; })} </ul> <form onSubmit={handleSubmit}> <input type='text' ref={inputEl} /> <button type='submit' > Add Todo </button> </form> <button onClick={handleClear} > Clear Todos </button> </header> </div> ); } export default Todo;
The
useImmerReducer
function accepts the
useImmerReducer
function and initial state. It returns the state and
dispatch
function. After that, you can bypass the state for displaying the elements in it. Sending actions using the
dispatch
function is performed when a new item is added to the to-do list and when the list is cleared. The action to be sent is assigned a type based on which a decision is made in the reducer function about what exactly needs to be done to process a specific action.
In the reducer, we use, as before, a
draft
entity, not a
state
. Thanks to this, we have a convenient way to manage the state of the application.
The code used in the previous example can be found here .
Summary
In this article, we talked about Immer, a library that simplifies the management of the state of React applications. The author of the article believes that everyone who is interested in this library may well use Immer in their new applications or slowly introduce it into one of the current projects.
Here is the material where you can find some details about Immer.
Dear readers! Do you plan to use Immer?
All Articles