Incredibly spectacular color music on the Arduino and LEDs
Holiday greetings! The New Year is approaching, which means it’s time to create a mood urgently! Well, as always at this time of the year dozens of electronic circuits of various color musical installations are born.
What only original masters will not invent. From tricolor blinkers to laser multipath installations with MIDI control.
As a big fan of the so-called address LEDs, I want to show you a very simple and amazing color music. I have never seen one like that at all. Not yet collected in one evening. So, the sound visualizer!
The scheme is very simple!
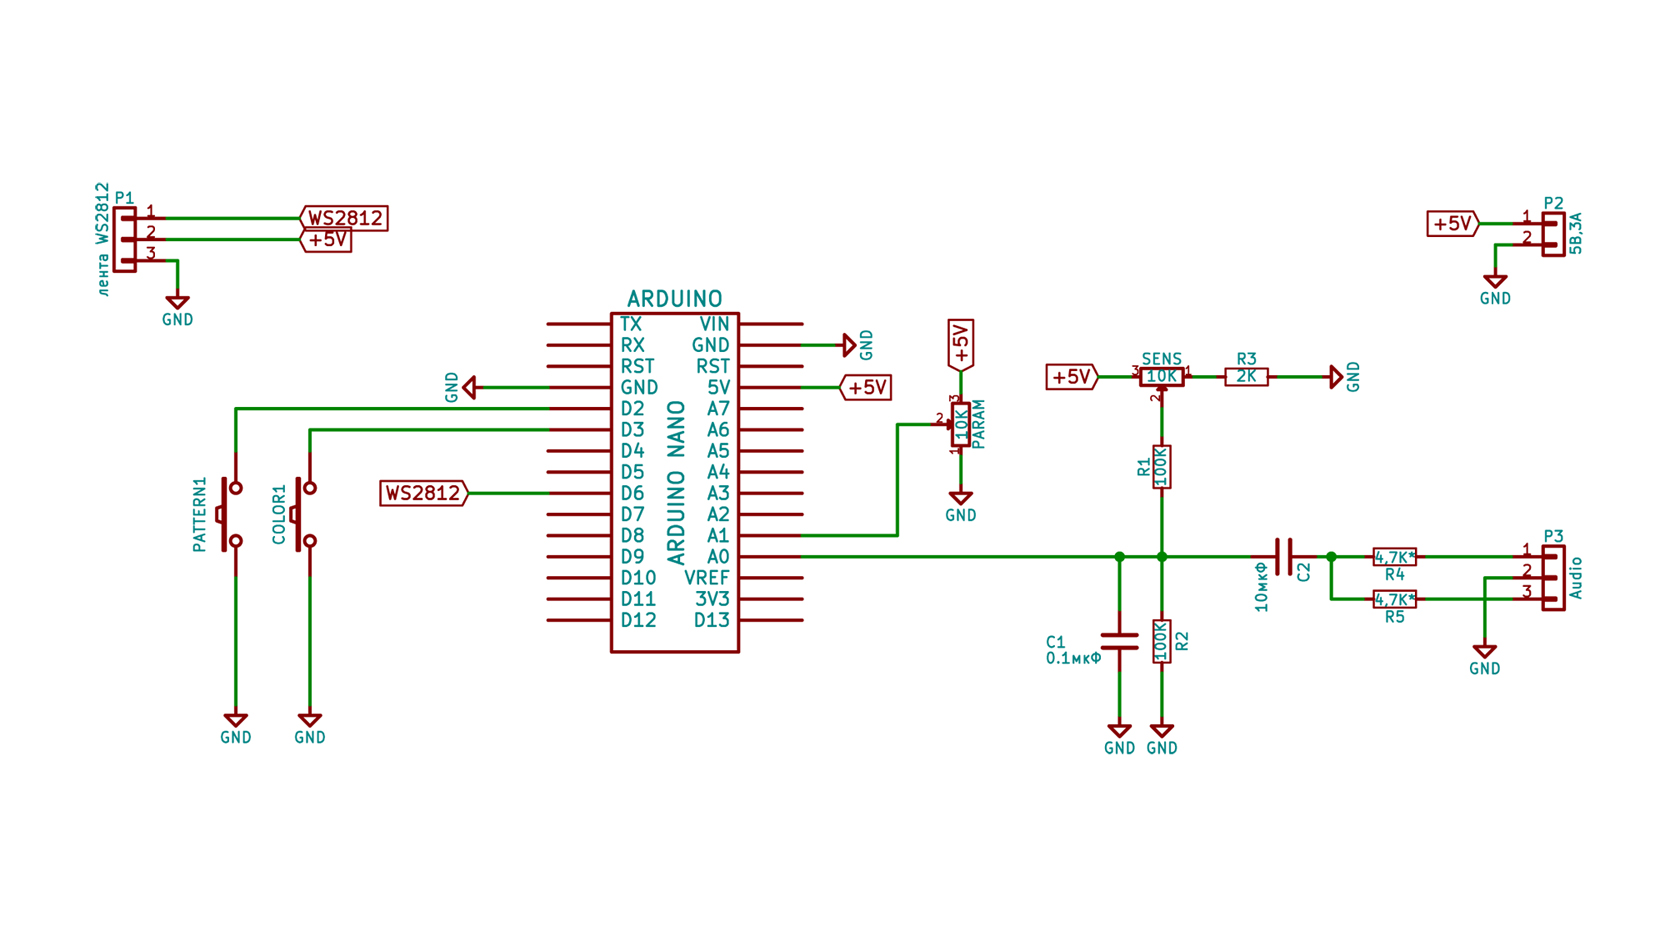
You will need an Arduino Nano, or Uno. Or what you have there? Two potentiometers, five resistors, a pair of capacitors and a ruler (tape) of 180 LEDs WS2812b. Everything! The LEDs in the lineup can be 60, 120 or 180.
In the visualizer, using the fast Fourier transform algorithm, 8 frequencies are allocated (the sensitivity threshold for each frequency is its own, decreases from 1 to 8), is converted to color and displayed on a line of LEDs using one of eight algorithms. The sketch was written by Michael Krampas, the guys from Chip and Deep added functionality, and the library for LEDs and the Fast Fourier Transform (FFT) is written in Adafrut for the Piccolo project. The FFT library for 128 points, adapted for AVR microcontrollers, is written in assembler.
The sketch itself and the FFT library need to be downloaded here and here .
Do not waste time on the analysis of algorithms, just collect, fill the sketch and enjoy the show.
This is just fun!
At the time of the first inclusion, you need to make a couple of settings :
Brightness: hold the color button when power on. A rainbow of LEDs will be displayed on the first 8 LEDs. Use the param knob to change the brightness. When finished, press the color button again, and your configuration will be stored in memory.
LED strip length: hold the pattern button when power on. One, two or three red LEDs will be displayed. Use the param knob to choose the length of the LED strip depending on the number of red LEDs:
1 = 60 LEDs
2 = 120 LEDs
3 = 180 LEDs
When finished, click the pattern button again, and your configuration will be stored in memory.
Dancing plus: the peaks of the sound signals are emitted from the center of the strip and disappear as they approach the ends. The peak speed is proportional to the magnitude of the sound signal of this peak.
Dancing minus: the same as the Dance Party, but signal peaks are emitted from one end.
Pulse: Signal peaks are displayed as bright pulses that come from the center of the band. Pulse width depends on signal level.
Light bar: the entire bar is illuminated in the peaks.
Color bars: signal peaks are displayed as color bars, which disappear.
Color Bars 2: Like color bars, but each bar shrinks and disappears.
Flashes: signal peaks are displayed as an LED flash in a random location. The initial color is white and then disappears through another color.
Fireflies: Signal peaks are displayed as single LEDs in a random place, and they move left or right and disappear. Their speed depends on the size of the signal.
Random two-color scheme: two random colors are selected and only they are used to display signal peaks. Over time, new colors will be selected. Use param to adjust the speed of color change. If the “parameters” potentiometer knob is in the upper position, the colors will change frequently and each peak of the signal will have a new color. I recommend to install the handle in the middle.
Rainbow: all signal peaks are displayed as the same color (with a small number of random variations) and this color changes like a rainbow over time. The rate of color change is set by the param potentiometer.
Color frequencies: in this mode, each signal peak is colored depending on the frequency band where it is located. The lowest band is red, and further up the spectrum. There are 8 frequency bands: red, orange, yellow, green, blue, blue, purple, white. This color mode is most interesting when the frequency response is tuned to all frequency bands.
Frequency range: you can control the frequency range to which color music responds. To set the range, press and hold both buttons. Use the param knob to select how many of the eight frequency bands will be displayed. If you want to highlight the bass and rhythm of the music, set the frequency response only on the lowest 2 or 3 bands. If you want to show all frequencies in the music (for example, vocals and higher instruments), select all frequency bands.
This is a video tutorial on setting up and it is also a demonstration of the visualizer at work. There at the end are two musical compositions with different algorithms.
Another composition
Guys! And ladies of course. I really want you to have time to make this simple design for the New Year holiday. You will not regret! Guests will be shocked!
Happy 2018 year!
Posted 12/15/2017 Epilogue or debriefing
1. How to change the backlight in pauses?
2. Is it possible to change the dynamics?
3. How to connect a tape with a number of LEDs other than 60/120/180?
Plus published updated scheme. Don't worry, just one resistor added.
It remains two weeks before the New Year. Do you have time to collect?
Posted 06/09/2018
Made the backlight settings:
sketch and scheme .
We use it so.
Backlight:
In the pauses, the backlight is turned on, i.e. the whole line will be lit with the color you choose and with the selected brightness.
Color: Set the PARAM2 potentiometer knob to the middle position and press the Background button once. The LED bar will light up. Rotate the PARAM2 potentiometer, the color of the ruler will change from red to purple. Select a color and click the Background button again.
Brightness: set the potentiometer to the minimum position (turn it clockwise) and press the Background button. The ruler goes out. Slowly turn the PARAM2 potentiometer knob to select the desired brightness of the backlight and press the Background button again. The brightness values will be recorded in the memory of the microcontroller.
What only original masters will not invent. From tricolor blinkers to laser multipath installations with MIDI control.
As a big fan of the so-called address LEDs, I want to show you a very simple and amazing color music. I have never seen one like that at all. Not yet collected in one evening. So, the sound visualizer!
Instruction
The scheme is very simple!
You will need an Arduino Nano, or Uno. Or what you have there? Two potentiometers, five resistors, a pair of capacitors and a ruler (tape) of 180 LEDs WS2812b. Everything! The LEDs in the lineup can be 60, 120 or 180.
In the visualizer, using the fast Fourier transform algorithm, 8 frequencies are allocated (the sensitivity threshold for each frequency is its own, decreases from 1 to 8), is converted to color and displayed on a line of LEDs using one of eight algorithms. The sketch was written by Michael Krampas, the guys from Chip and Deep added functionality, and the library for LEDs and the Fast Fourier Transform (FFT) is written in Adafrut for the Piccolo project. The FFT library for 128 points, adapted for AVR microcontrollers, is written in assembler.
The sketch itself and the FFT library need to be downloaded here and here .
Do not waste time on the analysis of algorithms, just collect, fill the sketch and enjoy the show.
This is just fun!
At the time of the first inclusion, you need to make a couple of settings :
Brightness: hold the color button when power on. A rainbow of LEDs will be displayed on the first 8 LEDs. Use the param knob to change the brightness. When finished, press the color button again, and your configuration will be stored in memory.
LED strip length: hold the pattern button when power on. One, two or three red LEDs will be displayed. Use the param knob to choose the length of the LED strip depending on the number of red LEDs:
1 = 60 LEDs
2 = 120 LEDs
3 = 180 LEDs
When finished, click the pattern button again, and your configuration will be stored in memory.
Algorithms
Dancing plus: the peaks of the sound signals are emitted from the center of the strip and disappear as they approach the ends. The peak speed is proportional to the magnitude of the sound signal of this peak.
Dancing minus: the same as the Dance Party, but signal peaks are emitted from one end.
Pulse: Signal peaks are displayed as bright pulses that come from the center of the band. Pulse width depends on signal level.
Light bar: the entire bar is illuminated in the peaks.
Color bars: signal peaks are displayed as color bars, which disappear.
Color Bars 2: Like color bars, but each bar shrinks and disappears.
Flashes: signal peaks are displayed as an LED flash in a random location. The initial color is white and then disappears through another color.
Fireflies: Signal peaks are displayed as single LEDs in a random place, and they move left or right and disappear. Their speed depends on the size of the signal.
Color schemes
Random two-color scheme: two random colors are selected and only they are used to display signal peaks. Over time, new colors will be selected. Use param to adjust the speed of color change. If the “parameters” potentiometer knob is in the upper position, the colors will change frequently and each peak of the signal will have a new color. I recommend to install the handle in the middle.
Rainbow: all signal peaks are displayed as the same color (with a small number of random variations) and this color changes like a rainbow over time. The rate of color change is set by the param potentiometer.
Color frequencies: in this mode, each signal peak is colored depending on the frequency band where it is located. The lowest band is red, and further up the spectrum. There are 8 frequency bands: red, orange, yellow, green, blue, blue, purple, white. This color mode is most interesting when the frequency response is tuned to all frequency bands.
Frequency range: you can control the frequency range to which color music responds. To set the range, press and hold both buttons. Use the param knob to select how many of the eight frequency bands will be displayed. If you want to highlight the bass and rhythm of the music, set the frequency response only on the lowest 2 or 3 bands. If you want to show all frequencies in the music (for example, vocals and higher instruments), select all frequency bands.
This is a video tutorial on setting up and it is also a demonstration of the visualizer at work. There at the end are two musical compositions with different algorithms.
Another composition
Guys! And ladies of course. I really want you to have time to make this simple design for the New Year holiday. You will not regret! Guests will be shocked!
Happy 2018 year!
Posted 12/15/2017 Epilogue or debriefing
1. How to change the backlight in pauses?
2. Is it possible to change the dynamics?
3. How to connect a tape with a number of LEDs other than 60/120/180?
Plus published updated scheme. Don't worry, just one resistor added.
It remains two weeks before the New Year. Do you have time to collect?
Posted 06/09/2018
Made the backlight settings:
sketch and scheme .
We use it so.
Backlight:
In the pauses, the backlight is turned on, i.e. the whole line will be lit with the color you choose and with the selected brightness.
Color: Set the PARAM2 potentiometer knob to the middle position and press the Background button once. The LED bar will light up. Rotate the PARAM2 potentiometer, the color of the ruler will change from red to purple. Select a color and click the Background button again.
Brightness: set the potentiometer to the minimum position (turn it clockwise) and press the Background button. The ruler goes out. Slowly turn the PARAM2 potentiometer knob to select the desired brightness of the backlight and press the Background button again. The brightness values will be recorded in the memory of the microcontroller.
All Articles