Sometimes it does not work
Hello. My name is Sergey. For a long time I did not write articles (posts). And now I decided to share my failure in 3D printer building, to share my experience, so to speak.

Interesting? Go under the cat.
Well, now, in essence. Photopolymer printers, in the majority (mostly budget), print from the bottom of the bath, "growing" the product up. There are both advantages and disadvantages. The main plus is that you need a small amount of polymer to start printing, ease of implementation. And the minuses just lie in the very way of separating the frozen polymer from the bottom. Especially this problem is palpable when you print a large product, when you print a large product and near a thin one, when you print a lot of small products. Here are examples of printing situations described earlier.
Large product (large area)
Large and small (relatively)

A lot of small ones.

This leads to the fact that the film is stretched over time and must be changed. Or, in the case of simultaneous printing of large and small objects, this leads to the distortion of small objects. In addition, you must carefully handle the film, puncture the film and you need to change it. Reflecting on the pros and cons, I thought, why not get rid of the film, and indeed from the bath.
And such an idea was born — to apply the polymer with a squeegee, at the same time spreading it, and immediately illuminate it. Nothing foreshadowed troubles and I assembled a printer with two squeegees (so that the working stroke was one way and the other, like on the RK-1) I redid the software a bit, electronics and began to run enthusiastically, hoping to get super quality without using a bath. In 3D, this monster looks like this:
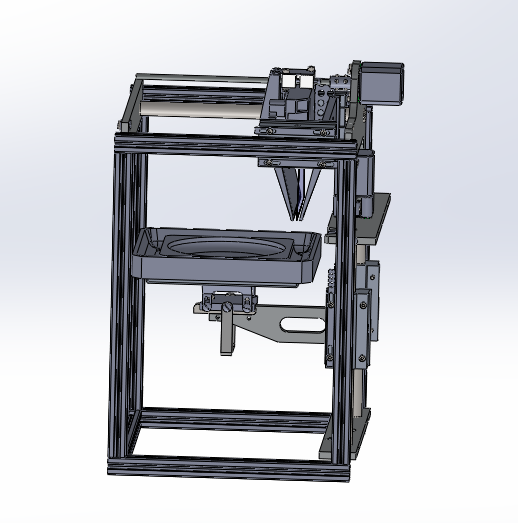
I will a little explain the general system of work. There is an expendable capacity with polymer. From this tank, the pump pumps the polymer (a filter is installed at the pump inlet) and through the filter system supplies it to the doctor blades. I digress a little on them. They are not simple. Squeegee is a hollow "rake" with nozzles, through which the polymer is fed. Inside the partition squeegee, so that the polymer is evenly fed into the nozzles.
So, let's continue the story about the system. The polymer enters the squeegee, is distributed there and evenly flows from the nozzles. Spilled polymer falls on the substrate or the remnants of the model and immediately smeared by the same squeegee.
At first I used two squeegees, but leveling did not happen as I would like, therefore, I refused one squeegee, leaving one. Accordingly, the working course is only in one direction.
Part of the polymer is applied to the model or substrate, and the remaining part flows into the "trough" from which flows through pipelines into the polymer tank.
Here, a very positive phenomenon is obtained - if the polymer is pigmented, it is constantly mixed, which does not allow the polymer to separate, if debris gets into the polymer, it is filtered out and does not enter the system. It is very easy to realize uniform heating of the polymer, if necessary, of course.
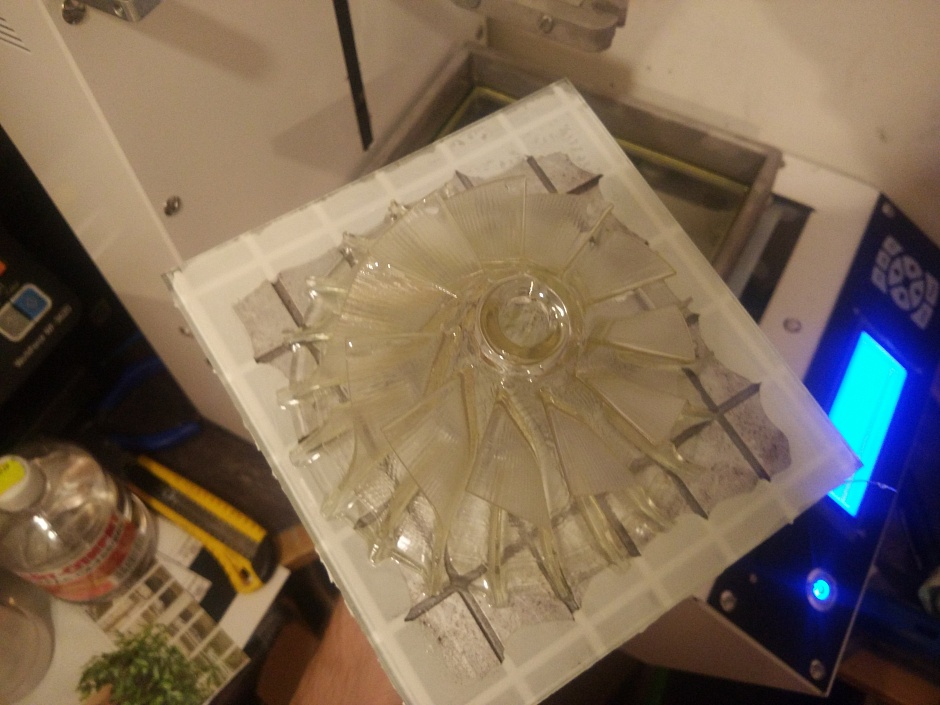
Layout this turned out.

It is a pity, but the photo is muddy. But what is on it - and so it is understandable.

There are videos illustrating this magical process.
Actually, we have come to an end, it is worth drawing conclusions.
- Raquel must be alone.
- Squeegee must be tough (plastic is not suitable).
- The working surface is highly desirable to polish.
- And the biggest problem - you need to pick up the polymer so that it is not liquid and not thick, more precisely, even with a low surface tension force.
- I don’t show the seal, because there are no test rings (not jewelry).
Thank you all for your attention!
All Articles