@ConfigurationProperties
を使用する代わりに、
@Value
を使用してアプリケーションをカスタマイズします。
記事で
- ConfigurationPropertiesを使用してapplication.propertiesでアプリケーション機能を設定および変更する
- application.propertiesとIDEの統合
- 設定値を確認する
2つのアプローチの違いについては、 ConfigurationPropertiesとvs. 価値
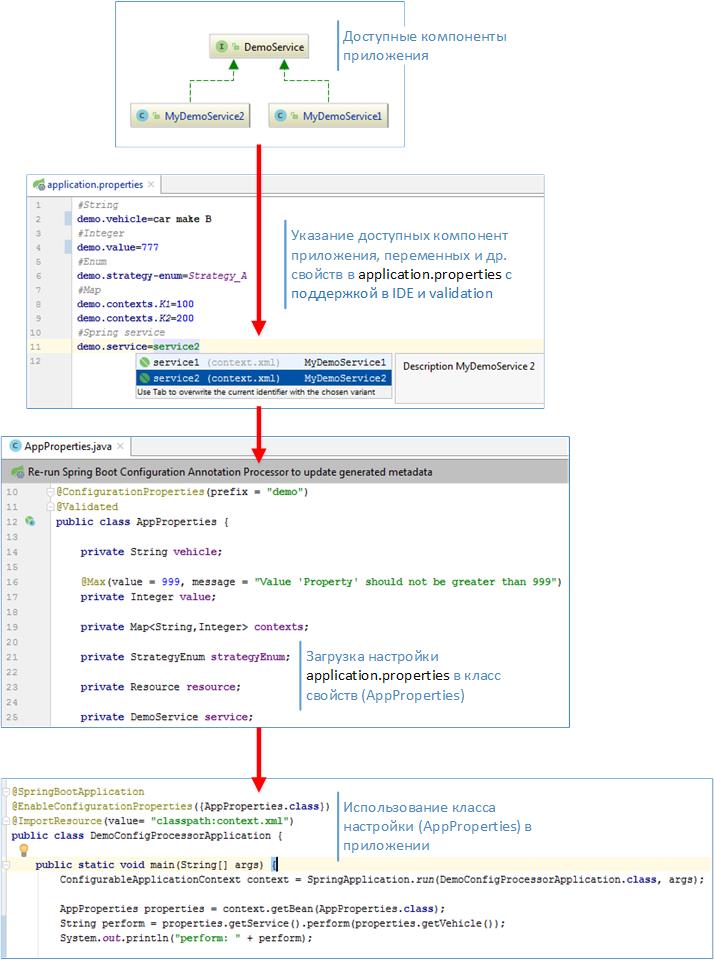
上の写真では、主な構成と動作原理。 システムの利用可能なコンポーネントは、Springコンポーネントです。クラス、さまざまな定数、変数などはapplication.propertiesファイルで指定でき、開発環境がそれを示したときでも、オプションが提供され、チェックが行われます。 アプリケーションが起動すると、指定された値がタイプ、制限に準拠しているかどうかがチェックされ、すべてが満足のいくものであれば、アプリケーションが起動します。 たとえば、利用可能なSpringコンポーネントのリストからアプリケーションの機能を設定すると非常に便利です。以下にその方法を示します。
プロパティクラス
ConfigurationPropertiesを使用してアプリケーション設定を作成するには、プロパティクラスから開始できます。 実際には、設定するプロパティ、システムコンポーネントを示します。
AppProperties.java
@ConfigurationProperties(prefix = "demo") @Validated public class AppProperties { private String vehicle; @Max(value = 999, message = "Value 'Property' should not be greater than 999") private Integer value; private Map<String,Integer> contexts; private StrategyEnum strategyEnum; private Resource resource; private DemoService service; public String getVehicle() { return vehicle; } public void setVehicle(String vehicle) { this.vehicle = vehicle; } public Map<String, Integer> getContexts() { return contexts; } public void setContexts(Map<String, Integer> contexts) { this.contexts = contexts; } public StrategyEnum getStrategyEnum() { return strategyEnum; } public void setStrategyEnum(StrategyEnum strategyEnum) { this.strategyEnum = strategyEnum; } public Resource getResource() { return resource; } public void setResource(Resource resource) { this.resource = resource; } public DemoService getService() { return service; } public void setService(DemoService service) { this.service = service; } public Integer getValue() { return value; } public void setValue(Integer value) { this.value = value; } @Override public String toString() { return "MyAppProperties{" + "\nvehicle=" + vehicle + "\n,contexts=" + contexts + "\n,service=" + service + "\n,value=" + value + "\n,strategyEnum=" + strategyEnum + '}'; } }
クラスでは、prefix = "demo"がプロパティのプレフィックスとしてapplication.propertiesで使用されます。
SpringApplicationアプリケーションクラスとプロジェクトpom.xml
@SpringBootApplication @EnableConfigurationProperties({AppProperties.class}) @ImportResource(value= "classpath:context.xml") public class DemoConfigProcessorApplication { public static void main(String[] args) { ConfigurableApplicationContext context = SpringApplication.run(DemoConfigProcessorApplication.class, args); AppProperties properties = context.getBean(AppProperties.class); String perform = properties.getService().perform(properties.getVehicle()); System.out.println("perform: " + perform); System.out.println(properties.toString()); } }
<?xml version="1.0" encoding="UTF-8"?> <project xmlns="http://maven.apache.org/POM/4.0.0" xmlns:xsi="http://www.w3.org/2001/XMLSchema-instance" xsi:schemaLocation="http://maven.apache.org/POM/4.0.0 http://maven.apache.org/xsd/maven-4.0.0.xsd"> <modelVersion>4.0.0</modelVersion> <groupId>com.example</groupId> <artifactId>demoConfigProcessor</artifactId> <version>0.0.1-SNAPSHOT</version> <packaging>jar</packaging> <name>demoConfigProcessor</name> <description>Demo project for Spring Boot Configuration Processor</description> <parent> <groupId>org.springframework.boot</groupId> <artifactId>spring-boot-starter-parent</artifactId> <version>2.1.0.RELEASE</version> <relativePath/> <!-- lookup parent from repository --> </parent> <properties> <project.build.sourceEncoding>UTF-8</project.build.sourceEncoding> <project.reporting.outputEncoding>UTF-8</project.reporting.outputEncoding> <java.version>1.8</java.version> </properties> <dependencies> <dependency> <groupId>org.springframework.boot</groupId> <artifactId>spring-boot-starter</artifactId> </dependency> <dependency> <groupId>org.springframework.boot</groupId> <artifactId>spring-boot-starter-validation</artifactId> </dependency> <dependency> <groupId>org.springframework.boot</groupId> <artifactId>spring-boot-configuration-processor</artifactId> <optional>true</optional> </dependency> <dependency> <groupId>org.springframework.boot</groupId> <artifactId>spring-boot-starter-test</artifactId> <scope>test</scope> </dependency> <dependency> <groupId>com.jayway.jsonpath</groupId> <artifactId>json-path</artifactId> </dependency> </dependencies> <build> <plugins> <plugin> <groupId>org.springframework.boot</groupId> <artifactId>spring-boot-maven-plugin</artifactId> </plugin> </plugins> </build> </project>
次に、2つのスプリングビンを宣言しました
Springコンテキスト(context.xml)
<?xml version="1.0" encoding="UTF-8"?> <beans xmlns="http://www.springframework.org/schema/beans" xmlns:xsi="http://www.w3.org/2001/XMLSchema-instance" xsi:schemaLocation="http://www.springframework.org/schema/beans http://www.springframework.org/schema/beans/spring-beans.xsd"> <bean id="service1" class="com.example.demoConfigProcessor.MyDemoService1"> <description>Description MyDemoService 1</description> </bean> <bean id="service2" class="com.example.demoConfigProcessor.MyDemoService2"> <description>Description MyDemoService 2</description> </bean> </beans>
AppPropertiesクラスで、利用可能なアプリケーションサービスへのリンクを示し、application.propertiesで変更し、2つの実装を持ち、それらの1つをapplication.propertiesで接続します。
ここに実装があります
DemoService
public interface DemoService { String perform(String value); }
public class MyDemoService1 implements DemoService { @Override public String perform(String value) { return "Service №1: perform routine maintenance work on <" + value +">"; } }
public class MyDemoService2 implements DemoService { @Override public String perform(String value) { return "Service №2: perform routine maintenance work on <" + value +">"; } }
これで、application.propertiesのカスタマイズを開始するのに十分です。 ただし、ConfigurationPropertiesを使用してクラスを変更するたびに、プロジェクトを再構築する必要があります。その後、ファイルがプロジェクトに表示されます
\target\classes\META-INF\spring-configuration-metadata.json
実際、IDEはapplication.propertiesファイルの編集に使用します。 材料のリンクでその構造を示します。 このファイルは、AppPropertiesクラスに基づいて作成されます。 ここでapplication.propertiesファイルを開き、「demo」と入力し始めると、環境に使用可能なプロパティが表示され始めます

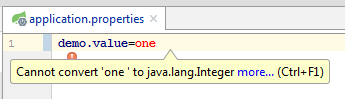
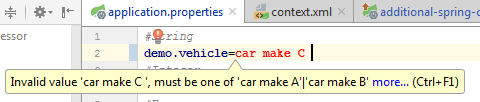
間違ったタイプを入力しようとすると、IDEは報告します
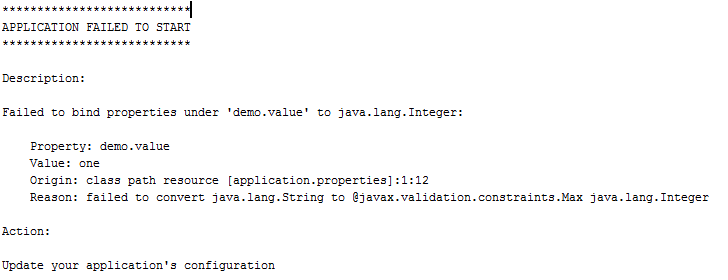
そのままにしてアプリケーションを起動しようとしても、まったく異なるエラーが発生します
メタデータを追加する
追加のメタデータ。これはIDEでapplication.propertiesを操作するための便宜のためだけであり、これが必要でない場合は実行できません。 これを行うために、追加ファイルで環境のヒントやその他の情報を指定することができます。 これを行うには、作成したspring-configuration-metadata.jsonファイルを
\src\main\resources\META-INF\
にコピーし、名前を
additional-spring-configuration-metadata.json
。 このファイルでは、ヒントセクションにのみ興味があります。[]
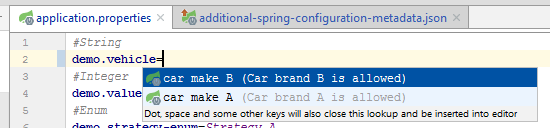
その中に、たとえば、demo.vehicleの有効な値をリストすることができます。
"hints": [ { "name": "demo.vehicle", "values": [ { "value": "car make A", "description": "Car brand A is allowed." }, { "value": "car make B", "description": "Car brand B is allowed." } ] }]
「名前」フィールドには「demo.vehicle」が表示され、「値」には有効な値のリストが表示されます。 プロジェクトをリビルドしてapplication.propertiesファイルに移動すると、demo.vehicleに入ると有効な値のリストが表示されます
提案されたものとは異なるタイプを入力しますが、同じタイプの場合、エディターは強調表示されますが、これは厳密な制限ではなく単なるヒントであるため、この場合はアプリケーションが起動します。
プロジェクトの前半で、2つのサービスMyDemoService1とMyDemoService2を発表しました。どちらもDemoServiceインターフェイスを実装しています。このインターフェイスを実装するサービスのみがapplication.propertiesにアクセスできるように構成できるようになりました。したがって、選択したクラスはAppPropertiesクラスで初期化されます。 このために、プロバイダーがあります。それらは、additional-spring-configuration-metadataで指定できます。 ドキュメントにはいくつかのタイプのプロバイダーがあります
spring-bean-reference
例を示し
spring-bean-reference
。 このタイプは、現在のプロジェクトで使用可能なBeanの名前を示します。 リストは、基本クラスまたはインターフェースに制限されています。
DemoServiceのプロバイダーの例:
"hints": [ { "name": "demo.service", "providers": [ { "name": "spring-bean-reference", "parameters": { "target": "com.example.demoConfigProcessor.DemoService" } } ] } ]
その後、demo.serviceパラメーターのapplication.propertiesで、2つのサービスの選択が可能になり、それらの説明(定義からの説明)を見ることができます。
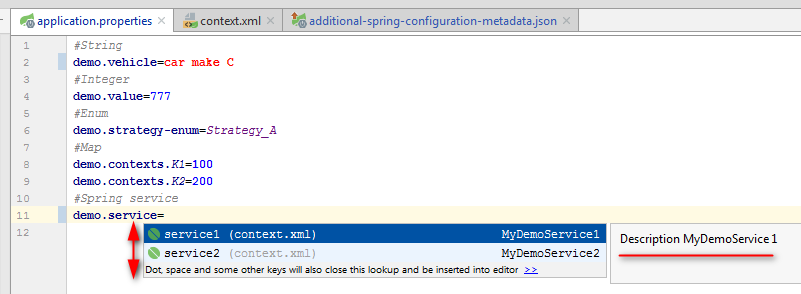
適切なサービスを選択し、アプリケーションの機能を変更すると便利です。 オブジェクト設定には1つのポイントがあります。Springは、設定で指定された文字列をオブジェクトに変換するために少し助けが必要です。 これを行うために、Converterから小さなクラスが継承されます。
ServiceConverter
@Component @ConfigurationPropertiesBinding public class ServiceConverter implements Converter<String, DemoService> { @Autowired private ApplicationContext applicationContext; @Override public DemoService convert(String source) { return (DemoService) applicationContext.getBean(source); } }
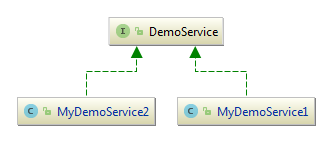
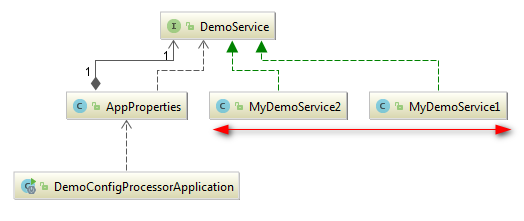
プロジェクトクラス図は、これらのサービスがメインアプリケーションからどのように分離され、AppPropertiesからアクセスできるかを示しています。
検証プロパティAppPropertiesクラスのフィールドに、JSR 303のフレームワーク内で利用可能なチェックを追加できます。これについては、 ここで書きました 。 検証可能で便利なアプリケーション構成ファイルを取得します。
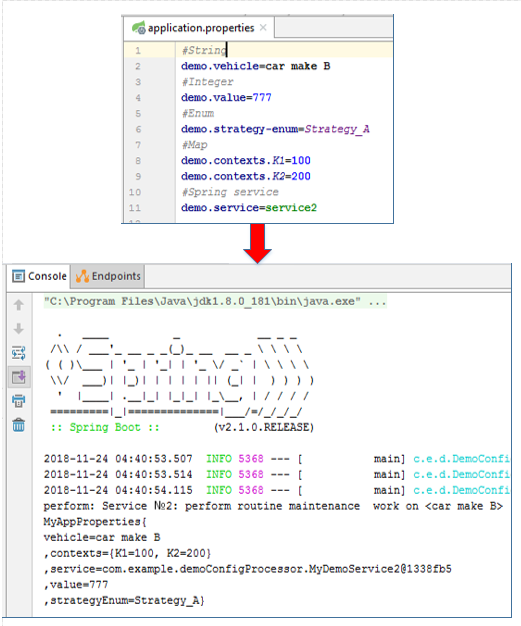
コンソール出力
プロジェクト構造

完全なファイルadditional-spring-configuration-metadata.json
追加のスプリング構成メタデータ
{ "groups": [ { "name": "demo", "type": "com.example.demoConfigProcessor.AppProperties", "sourceType": "com.example.demoConfigProcessor.AppProperties" } ], "properties": [ { "name": "demo.contexts", "type": "java.util.Map<java.lang.String,java.lang.Integer>", "sourceType": "com.example.demoConfigProcessor.AppProperties" }, { "name": "demo.vehicle", "type": "java.lang.String", "sourceType": "com.example.demoConfigProcessor.AppProperties" } ], "hints": [ { "name": "demo.vehicle", "values": [ { "value": "car make A", "description": "Car brand A is allowed." }, { "value": "car make B", "description": "Car brand B is allowed." } ] }, { "name": "demo.service", "providers": [ { "name": "spring-bean-reference", "parameters": { "target": "com.example.demoConfigProcessor.DemoService" } } ] } ] }
構成メタデータ資料