エントリー
メッセンジャーの匿名性の禁止がロシア連邦の領土で発効するとすぐに、私の手は電報ボットに関する投稿を書くようになりました。 ボットを作成する過程で、個別に解決しなければならない多くの問題に遭遇し、インターネット全体からの情報の粒を文字通り除外しました。 そして、数ヶ月の苦しみと苦痛の後(コーディングは私の主な職業ではありません)、ついにボットを使い終え、すべての問題を理解し、あなたに私の話をする準備ができました。

最初のステップ
まず、PCに電報をインストールし、メッセンジャーに登録する必要があります。 検索で探す@BotFatherは、電報のすべてのボットの父であり、ボットを作成するのは彼です。 彼/ newbotを作成し、2つの簡単な質問に答えます。ボットの名前とそのユーザー名です。 次に、@ BotFatherはボットの作成に成功したことを祝福し、そのトークン-523870826:AAF0O8T-e7riRi8m6qlRz4pBKKdh0OfHKj8を送信します。
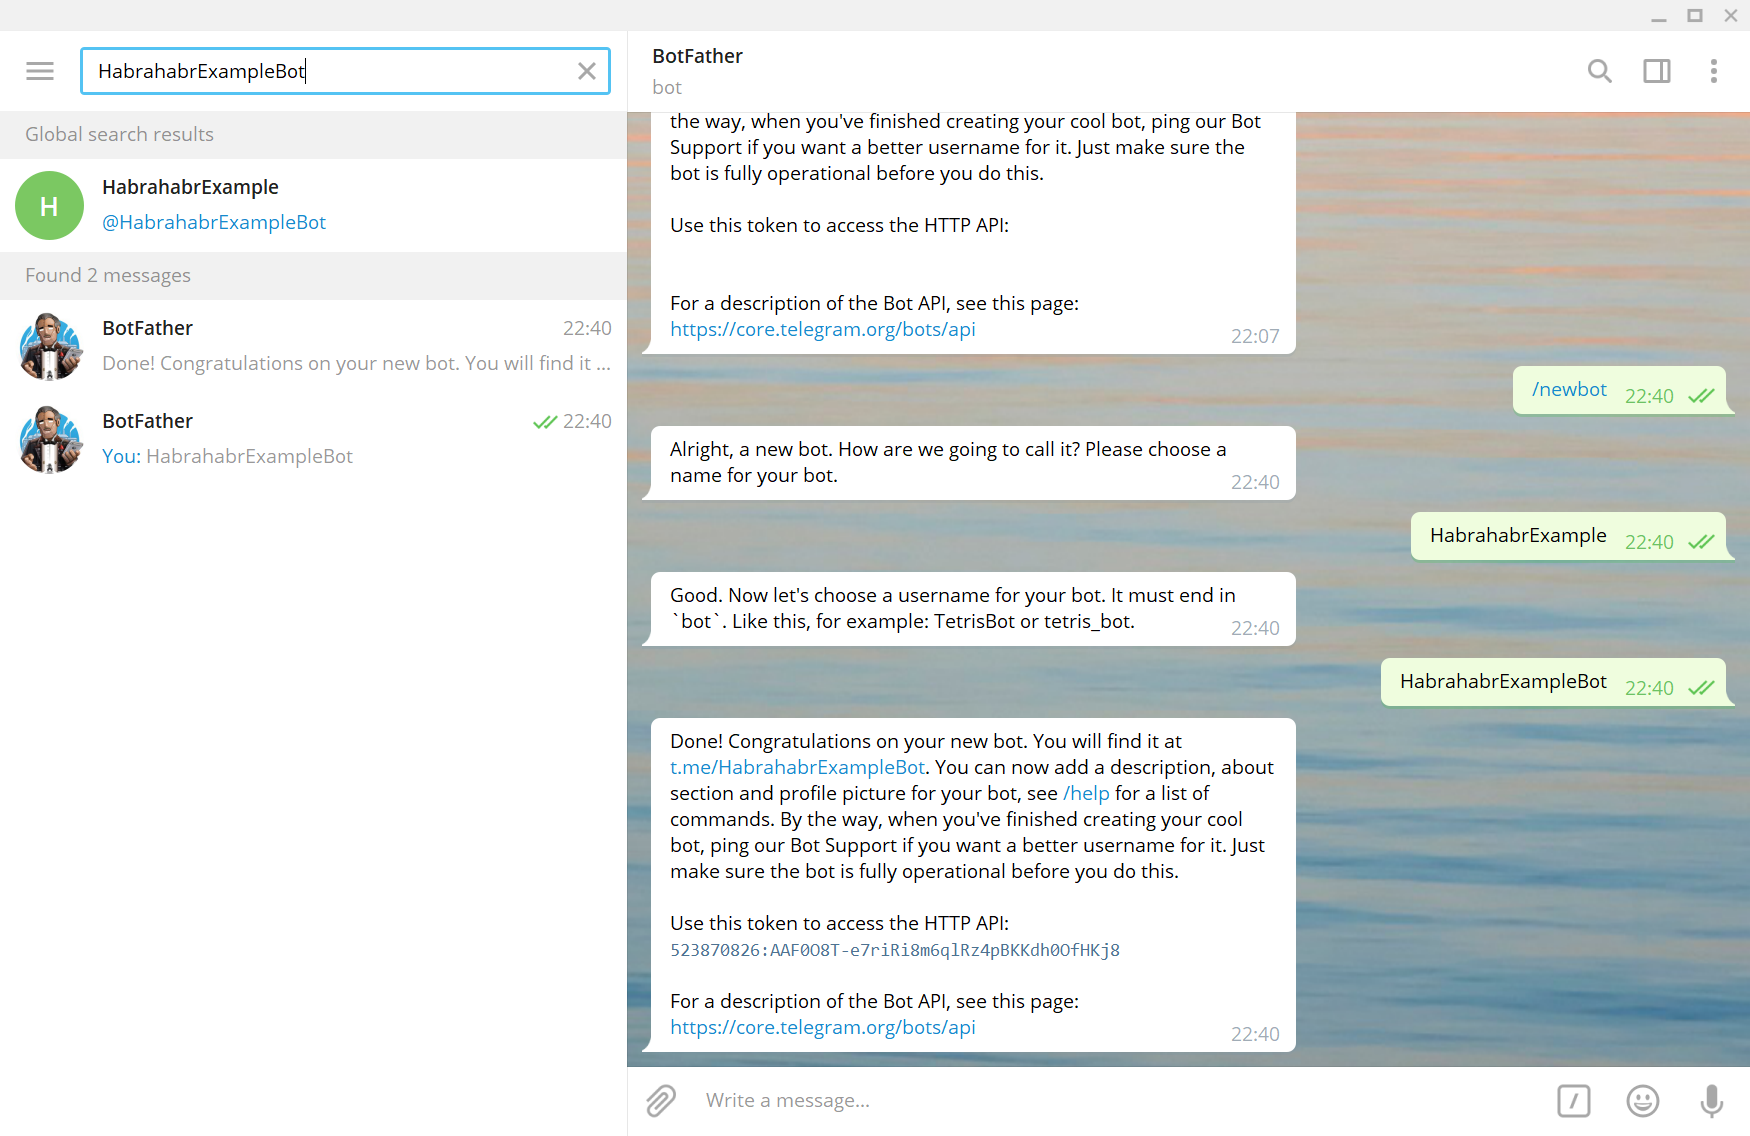
注:トークンはボットの唯一の識別キーです。 どこにもアップロードしないでください。アップロードしないと、他の人がボットを制御できます。 このトークンを持つボットは、記事が投稿されたときに削除されました。
ボットを作成するために選択するプログラミング言語は何ですか?
ここで私は長い間気にしなかったし、Pythonに落ち着いた。 PyTelagramBotAPIを使用することにしました (この記事の執筆時点で、利用可能な最新バージョンは3.5.1です)。
最初のコードに移りましょう。
PyTelegramBotAPIライブラリをインポートします。
# -*- coding: utf-8 -*- import telebot
ボットを作成しましょう。
bot = telebot.TeleBot("523870826:AAF0O8T-e7riRi8m6qlRz4pBKKdh0OfHKj8")
ボットの .message_handlerデコレータを使用して簡単なメッセージ処理を記述します。
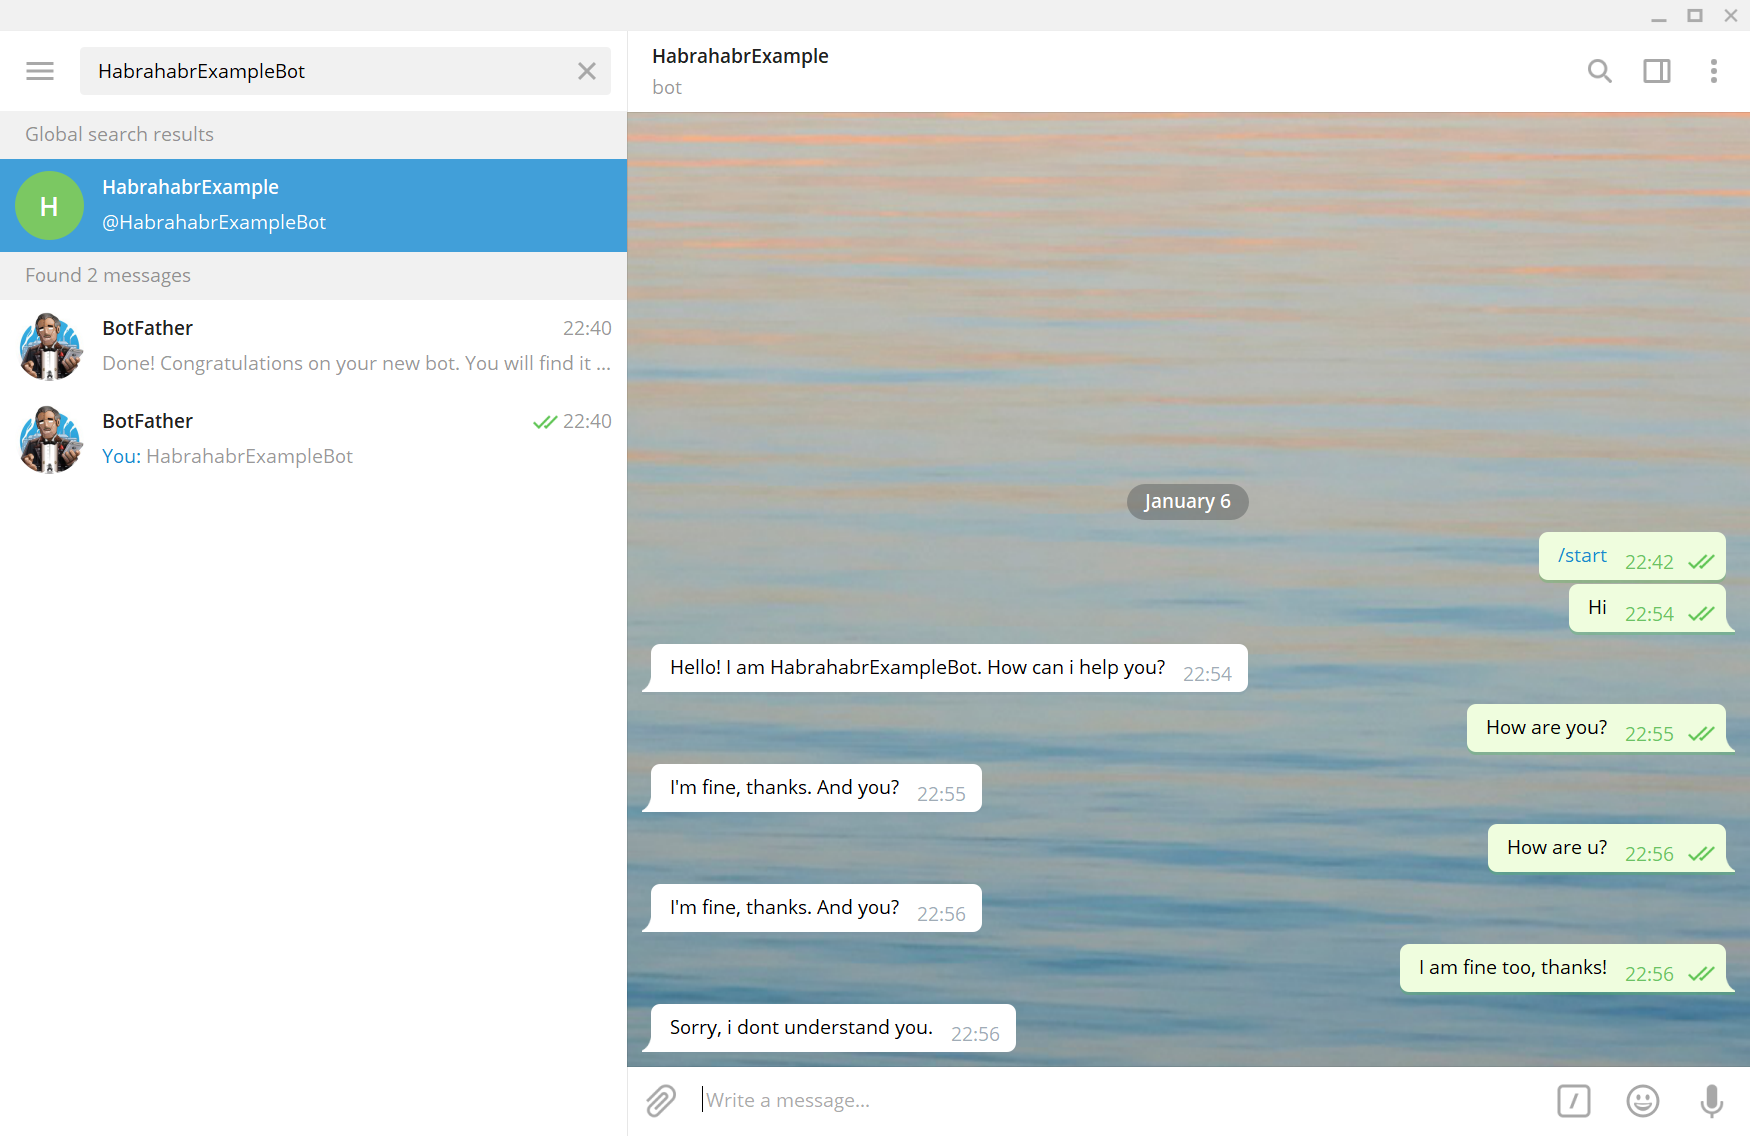
@bot.message_handler(content_types=["text"]) def handle_text(message): if message.text == "Hi": bot.send_message(message.from_user.id, "Hello! I am HabrahabrExampleBot. How can i help you?") elif message.text == "How are you?" or message.text == "How are u?": bot.send_message(message.from_user.id, "I'm fine, thanks. And you?") else: bot.send_message(message.from_user.id, "Sorry, i dont understand you.")
ボットを、電報サーバーからの情報を継続的に処理するモードにします。
bot.polling(none_stop=True, interval=0)
可変メッセージでは、電報は次の形式の辞書(マップ)を渡します。
{'content_type': 'text', 'message_id': 1, 'from_user': { 'id': None, 'is_bot': False, 'first_name': None, 'username': None, 'last_name': None, 'language_code': None}, 'date': None, 'chat': { 'type': 'private', 'last_name': None, 'first_name': None, 'username': None, 'id': None, 'title': None, 'all_members_are_administrators': None, 'photo': None, 'description': None, 'invite_link': None, 'pinned_message': None, 'sticker_set_name': None, 'can_set_sticker_set': None}, 'forward_from_chat': None, 'forward_from': None, 'forward_date': None, 'reply_to_message': None, 'edit_date': None, 'author_signature': None, 'text': '/start', 'entities': '[<telebot.types.MessageEntity object at 0x037CB6B0>]', 'caption_entities': None, 'audio': None, 'document': None, 'photo': None, 'sticker': None, 'video': None, 'video_note': None, 'voice': None, 'caption': None, 'contact': None, 'location': None, 'venue': None, 'new_chat_member': None, 'new_chat_members': None, 'left_chat_member': None, 'new_chat_title': None, 'new_chat_photo': None, 'delete_chat_photo': None, 'group_chat_created': None, 'supergroup_chat_created': None, 'channel_chat_created': None, 'migrate_to_chat_id': None, 'migrate_from_chat_id': None, 'pinned_message': None, 'invoice': None, 'successful_payment': None}
オーディオファイル、ビデオ、写真、ドキュメント、ジオロケーションなどを受信できる他のデコレータもあります。
# '/start' '/help'. @bot.message_handler(commands=['start', 'help']) def handle_start_help(message): pass # @bot.message_handler(content_types=['document', 'audio']) def handle_document_audio(message): pass
最終コード。
# -*- coding: utf-8 -*- import telebot bot = telebot.TeleBot("523870826:AAF0O8T-e7riRi8m6qlRz4pBKKdh0OfHKj8") @bot.message_handler(content_types=["text"]) def handle_text(message): if message.text == "Hi": bot.send_message(message.from_user.id, "Hello! I am HabrahabrExampleBot. How can i help you?") elif message.text == "How are you?" or message.text == "How are u?": bot.send_message(message.from_user.id, "I'm fine, thanks. And you?") else: bot.send_message(message.from_user.id, "Sorry, i dont understand you.") bot.polling(none_stop=True, interval=0) # '/start' '/help'. @bot.message_handler(commands=['start', 'help']) def handle_start_help(message): pass # @bot.message_handler(content_types=['document', 'audio']) def handle_document_audio(message): pass bot.polling(none_stop=True, interval=0)
一般に、テレグラムを使用すると、ボットはカスタムキーボードの作成から支払いまで、多くのクールな操作を実行できます。 Telegramの公式ドキュメントへのリンク。
ユーザーデータを保存するために、 sqlite3データベースを使用することにしました。
import sqlite3 connection = sqlite3.connect("database", check_same_thread = True) cursor = connection.cursor() cursor.execute("CREATE TABLE IF NOT EXISTS Inventory_on (ID INT, 'Primary weapon' TEXT, 'Secondary weapon' TEXT)") cursor.execute("CREATE TABLE IF NOT EXISTS Clans (Name TEXT, Points INT)") cursor.execute("CREATE TABLE IF NOT EXISTS WorkStatus (ID INT, Status INT)") connection.commit() connection.close()
スレッドライブラリを使用して並列プロセスが起動されました。 例:バトル計算機能。
import threading threading.Thread(target=name_of_your_function).start()
それはすべてあなたの想像力に依存します。
ボットをどこで起動しますか?
24時間365日、自分のPCを離れたくないので、実用的ではありません。 したがって、無料のherokuサービスを使用することにしましたが、選択したデータベースのために失敗しました。 ボットを再起動するたびに、herokuは最後のセッションのすべてのsqlite3コミットを例外なく削除することが判明しました。 その後、 VDS (Virtual Dedicated Server、仮想専用サーバー)を購入することにしました。特定の電力とメモリが割り当てられ、コマンドラインへのアクセス権が与えられるリモートPCです。 ほとんどの場合、このようなマシンのオペレーティングシステムはLinuxになります。 料金はわずか-400ルーブル/月なので、道徳的な苦痛をあまり感じることなく、 Debian GNU / Linuxに基づいてVDSの支払いを行い、リモートサーバーでボットを有効にする方法を見つけ始めました。
VDSへの接続方法
さまざまな方法がありますが、私はPuttyを介したSSH接続を決定しました。 公式WebサイトからPuTTYをダウンロードして開きます。 VDSのIPアドレスを入力し、開くをクリックします。

サーバーからログインとパスワードを入力する必要がある場所でウィンドウが開きます。
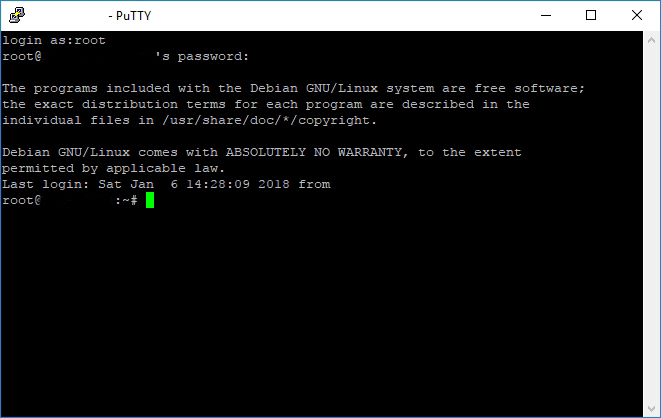
上記のデータはすべて、VDSを購入した会社から提供されます。 さらにVDSはサーバーです。
必要なすべてのプログラミング言語とライブラリをサーバーにインストールする方法は?
ここではすべてが簡単です。 この5つのコマンドをこのシーケンスでサーバーコンソールに入力することにより、python3、setuptools、pip3、およびpyTelegramBotAPIライブラリをサーバーにインストールします。
apt-get update apt-get install python3 apt-get install python3-setuptools apt-get install python3-pip pip3 install pyTelegramBotAPI
メインのpython3パッケージに含まれていないすべての追加ライブラリも原則に基づいてインストールする必要があります。
pip3 install 'name_of_site_package'
PCからサーバーにファイルをアップロードする方法は?
まず、必要なすべてのファイルをアップロードするフォルダーを作成します。 サーバーで/ usr / local / binディレクトリに移動し、ボットフォルダーを作成します。
cd /usr/local/bin mkdir bot
それぞれPCにウィンドウがインストールされており、コマンドはwindowsコマンドライン用になります 。 最初に、putty.exeがあるディレクトリに移動する必要があります。
cd /program files/putty
次に、ディレクトリC:\ Users \ Ilya \ PycharmProjects \ Bot(ディレクトリを置き換える必要があります)にあるbot.pyをサーバー上のディレクトリ/ usr / local / bin / botにロードします。
pscp.exe "C:\Users\Ilya\PycharmProjects\Bot\bot.py" root@123.123.12.12:/usr/local/bin/bot
root@123.123.12.12の行は、login @ IP_addressの形式の行で、それぞれユーザー名とIPアドレス(上記の「VDSへの接続方法」セクションで説明)で置き換える必要があります。 bot.pyを他のファイルの名前に置き換え、必要なファイルをすべてダウンロードします。
サーバーからPCにファイルをダウンロードする方法は?
putty.exeがあるディレクトリのコマンドプロンプトでサーバーにファイルをアップロードする場合と同じです。 このコマンドを入力して、データベースファイルをPCのデスクトップにダウンロードします。
pscp.exe root@123.123.12.12:/usr/local/bin/bot/database "C:\Users\Ilya\Desktop
ボットを起動する方法は?
最初の最も簡単なオプションは、実行可能ファイルのあるディレクトリに移動してpython3 bot.pyを登録することですが、パテを閉じるとボットはオフになります。
2番目のオプションは、 画面を使用してボットを起動することです-並列デスクトップを作成するモジュールですが、クラッシュの場合にボットは自動的に再起動せず、これは頻繁に発生します-テレグラムサーバーの夜間の再起動のために週に数回(午前3時) MSC)。
3番目の方法は、Linuxの他のデーモンを初期化するデーモンであるシステムマネージャーであるsystemdです。 簡単に言えば、systemdはボットを起動し、クラッシュした場合に再起動します。
systemdをインストールします。
apt-get install systemd
次の内容のbot.serviceという名前でPCにファイルを作成します。
[Unit] Description=Telegram bot 'Town Wars' After=syslog.target After=network.target [Service] Type=simple User=root WorkingDirectory=/usr/local/bin/bot ExecStart=/usr/bin/python3 /usr/local/bin/bot/bot.py RestartSec=10 Restart=always [Install] WantedBy=multi-user.target
そして、それを目的のディレクトリにロードします。
pscp.exe "C:\Users\Ilya\PycharmProjects\Bot\bot.service" root@123.123.12.12:/etc/systemd/system
次に、サーバーコンソールに4つのコマンドを登録する必要があります。
systemctl daemon-reload systemctl enable bot systemctl start bot systemctl status bot
私の場合、特定の実装エラー、特にマルチスレッドにより、バトルを計算するための関数(battle_counter.py)を別のデーモンに転送する必要がありました。
[Unit] Description=Battle counter for telegram bot 'Town Wars' After=syslog.target After=network.target [Service] Type=simple User=root WorkingDirectory=/usr/local/bin/bot ExecStart=/usr/bin/python3 /usr/local/bin/bot/battle_counter.py RestartSec=10 Restart=always [Install] WantedBy=multi-user.target
その後、次のようなメッセージが表示されます。
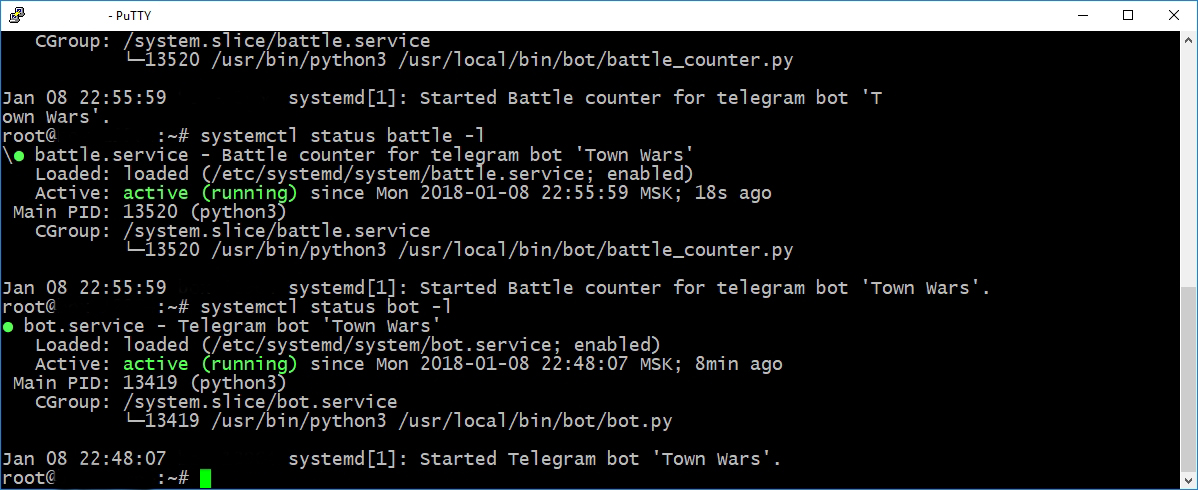
ボットが稼働しています!
ありがとう
これは私の最初の比較的大きなプロジェクトであり、私にとって膨大な量の新しい問題に直面しました。 ユリイ・ドレイクに感謝したいと思います。
リンク集
電報
電報ボット
公式電報文書
非公式文書
PyTelagramBotAPI
Vds
Debian GNU / Linux
パテ
Windowsコマンドプロンプト
Macコマンドプロンプト
スクリーン
システム化