取得するものについて説明します。
- 模倣物がブラウザで開きます。 グラフィック-SVG。
- 模倣の上部には、他の模倣に切り替えるためのボタンがあります。
- データは1秒に1回更新されます。
- スイッチ画像をクリックすると、ウィンドウが表示され、そこからオンまたはオフにできます。
SCADAシステム (より正確には、サーバー部分)を使用すると、カスタムhtmlページを追加できます。 手動でページコードを入力することはしませんが、 エディターで簡単な図を描画してから、何が起こったのか、どのように機能するのかを示します。
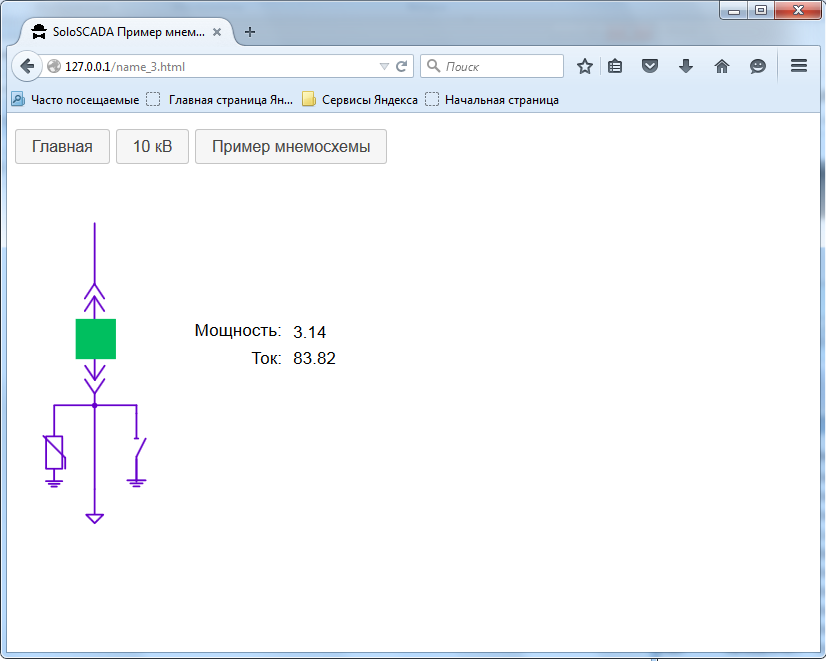
ニーモニック図は次のとおりです。

電力と電流は
I_10_111
それぞれ変数
P_10_111
と
I_10_111
ます。 スイッチのオン状態は赤い長方形(緑の長方形の下に隠れています)に結び付けられ、緑では無効になっています。
回路を保存し、サービスを再起動し、ブラウザで127.0.0.1を開くと、次の結果が得られます。
ブラウザでCtrl + uを押し、ページのソースコードを参照します(添付されていない行は省略されます)。
ページソースコード
<!DOCTYPE html> <html ng-app="countryApp"> <head> <meta name="Content-Type" content="text/html; charset=utf-8"> <meta http-equiv="Content-Type" content="text/html; charset=utf-8"> <title>SoloSCADA </title> <link rel="stylesheet" href="./css/jquery-ui.css"> <script src="./js/jquery.js"></script> <script src="./js/jquery-ui.js"></script> <script src="/js/angular.min.js"></script> <script src="/js/scada.js"></script> <script> var countryApp = angular.module('countryApp', []); countryApp.controller('CountryCtrl', function ($scope, $http, $interval){ $http.get('all.json').success(function(data) { $scope.val = data.val; }); $interval(function(){ $http.get('all.json').success(function(data) { $scope.val = data.val; $( "#label_err" ).text( "" ); }).error(function(data, status) { console.error('Error occurred:', data, status); $( "#label_err" ).text( ' !' ); }); },1000); }); countryApp.filter('format_off', function(){ return function(text){ if(text.indexOf("0")===0){ return "1"; } else{ return "0"; } } }); countryApp.filter('format_on', function(){ return function(text){ if(text.indexOf("1")===0){ return "1"; } else{ return "0"; } } }); </script> </head> <body ng-controller="CountryCtrl"> <div id="dialog-confirm" title=" "> <label id="label2">444VG</label> </div> <p> <button type="button" class="ui-button ui-widget ui-corner-all" onClick="javascript:window.location='index.html'"></button> <button type="button" class="ui-button ui-widget ui-corner-all" onClick="javascript:window.location='ps10.html'">10 </button> <button type="button" class="ui-button ui-widget ui-corner-all" onClick="javascript:window.location='name_3.html'"> </button> <label id="label_err"></label> </p> <svg xmlns="http://www.w3.org/2000/svg" xmlns:xlink="http://www.w3.org/1999/xlink" version="1.1" viewBox="0 0 930 504" xml:space="preserve"> <desc>Created with Fabric.js 1.7.3</desc> <defs> </defs> <g transform="translate(260.61 175.8) matrix(1 0 0 1 0 0) "> <text font-family="helvetica" font-size="20" font-weight="normal" style="stroke: none; stroke-width: 1; stroke-dasharray: none; stroke-linecap: butt; stroke-linejoin: miter; stroke-miterlimit: 10; fill: rgb(1,1,1); fill-rule: nonzero; opacity: 1;" > <tspan x="-50.88" y="6.3" fill="rgb(1,1,1)">:</tspan> </text> </g> <g transform="translate(293.54 208.8) matrix(1 0 0 1 0 0) "> <text font-family="helvetica" font-size="20" font-weight="normal" style="stroke: none; stroke-width: 1; stroke-dasharray: none; stroke-linecap: butt; stroke-linejoin: miter; stroke-miterlimit: 10; fill: rgb(1,1,1); fill-rule: nonzero; opacity: 1;" > <tspan x="-18.04" y="6.3" fill="rgb(1,1,1)">:</tspan> </text> </g> <rect id="V_10_111_on" x="-25" y="-25" rx="0" ry="0" width="50" height="50" style=" cursor:pointer; stroke: none; stroke-width: 1; stroke-dasharray: none; stroke-linecap: butt; stroke-linejoin: miter; stroke-miterlimit: 10; fill: rgb(255,0,0); fill-rule: nonzero; opacity:{{val.V_10_111 | format_on}};" transform="translate(94.34 185.86) scale(0.94 0.94) matrix(1 0 0 1 0 0) " onclick="tmcontrol('V_10_111','-10-111')" title=" -10-111"/> <g id="P_10_111" transform="translate(397.54 177.8) matrix(1 0 0 1 0 0) "> <text font-family="helvetica" font-size="20" font-weight="normal" style="stroke: none; stroke-width: 1; stroke-dasharray: none; stroke-linecap: butt; stroke-linejoin: miter; stroke-miterlimit: 10; fill: rgb(1,1,1); fill-rule: nonzero; opacity: 1;" > <tspan x="-73.04" y="6.3" fill="rgb(1,1,1)">{{val.P_10_111}}</tspan> </text> </g> <g id="I_10_111" transform="translate(393.65 208.8) matrix(1 0 0 1 0 0) "> <text font-family="helvetica" font-size="20" font-weight="normal" style="stroke: none; stroke-width: 1; stroke-dasharray: none; stroke-linecap: butt; stroke-linejoin: miter; stroke-miterlimit: 10; fill: rgb(1,1,1); fill-rule: nonzero; opacity: 1;" > <tspan x="-69.15" y="6.3" fill="rgb(1,1,1)">{{val.I_10_111}}</tspan> </text> </g> <rect id="V_10_111_off" x="-25" y="-25" rx="0" ry="0" width="50" height="50" style=" cursor:pointer; stroke: none; stroke-width: 1; stroke-dasharray: none; stroke-linecap: butt; stroke-linejoin: miter; stroke-miterlimit: 10; fill: rgb(0,191,95); fill-rule: nonzero; opacity:{{val.V_10_111 | format_off}};" transform="translate(94.28 185.78) scale(0.94 0.94) matrix(1 0 0 1 0 0) " onclick="tmcontrol('V_10_111','-10-111')" title=" -10-111"/> </svg> </body> </html>
順番に分析しましょう:
<script src="./js/jquery.js"></script>
jqueryを接続します。
<script src="./js/jquery-ui.js"></script>
ダイアログを有効/無効にするためにjquery-uiを有効にします:
<script src="/js/angular.min.js"></script>
angularjsを接続します:
<script src="/js/scada.js"></script>
補助スクリプトを接続します。
次に、コントローラーを作成します。 all.jsonファイルから変数の値を取得し、ページをロードするときにサーバーから1秒に1回の頻度で要求します
$interval(function(){ },1000);
all.jsonファイルが正常に要求されると、次を実行します。
コード
$http.get('all.json').success(function(data) { $scope.val = data.val; $( "#label_err" ).text( "" ); }).
データの更新。 成功しなかった場合、上部に「サーバーへの接続がありません!」というメッセージが表示されます。
label_err
。
このスクリプト
.error(function(data, status) { console.error('Error occurred:', data, status); $( "#label_err" ).text( ' !' ); });
jsonファイルは次の形式である必要があります。
{ "val":{ "V_10_111": "0", "I_10_111": "55.88", "P_10_111": "9.11" } }
SVGファイルをページ本文に直接埋め込みます。
<svg xmlns="http://www.w3.org/2000/svg" xmlns:xlink="http://www.w3.org/1999/xlink" version="1.1" viewBox="0 0 930 504" xml:space="preserve"> </svg>
テキストボックスに、変数I_10_111の値を次のように表示します。
ネタバレ
<g id="I_10_111" transform="translate(393.65 208.8) matrix(1 0 0 1 0 0) "> <text font-family="helvetica" font-size="20" font-weight="normal" style="stroke: none; stroke-width: 1; stroke-dasharray: none; stroke-linecap: butt; stroke-linejoin: miter; stroke-miterlimit: 10; fill: rgb(1,1,1); fill-rule: nonzero; opacity: 1;" > <tspan x="-69.15" y="6.3" fill="rgb(1,1,1)">{{val.I_10_111}}</tspan> </text> </g>
ここでの主なものは、エントリ
{{val.I_10_111}}.
Angularjs自体がこのようなレコードを検索し、値をI_10_111に置き換えます。
オン状態は赤いボックスに表示されます。
有効状態
<rect id="V_10_111_on" x="-25" y="-25" rx="0" ry="0" width="50" height="50" style=" cursor:pointer; stroke: none; stroke-width: 1; stroke-dasharray: none; stroke-linecap: butt; stroke-linejoin: miter; stroke-miterlimit: 10; fill: rgb(255,0,0); fill-rule: nonzero; opacity:{{val.V_10_111 | format_on}};" transform="translate(94.34 185.86) scale(0.94 0.94) matrix(1 0 0 1 0 0) " onclick="tmcontrol('V_10_111','-10-111')" title=" -10-111"/>
opacityプロパティは、format_onフィルターが適用された変数V_10_111に依存します。 値が1の場合、四角形が表示されます(不透明度:1)。 値が0の場合、長方形は見えません(不透明度:0)。 状態が未定義の場合(これは、Jsonファイル "V_10_111"の疑問符で示されます: "??")、format_onフィルターを使用すると0、つまり 長方形は見えません。
無効状態は緑色の長方形で表示されます。
無効状態
<rect id="V_10_111_off" x="-25" y="-25" rx="0" ry="0" width="50" height="50" style=" cursor:pointer; stroke: none; stroke-width: 1; stroke-dasharray: none; stroke-linecap: butt; stroke-linejoin: miter; stroke-miterlimit: 10; fill: rgb(0,191,95); fill-rule: nonzero; opacity:{{val.V_10_111 | format_off}};" transform="translate(94.28 185.78) scale(0.94 0.94) matrix(1 0 0 1 0 0) " onclick="tmcontrol('V_10_111','-10-111')" title=" -10-111"/>
opacityプロパティは、
format_off
フィルターが
format_off
れた変数
V_10_111
依存します。 変数の値が0の場合、四角形が表示されます(
opacity: 1
)。 値が1の場合、長方形は見えません(
opacity: 0
)。
四角形をクリックすると、
tmcontrol('V_10_111','-10-111')
スクリプト
tmcontrol('V_10_111','-10-111')
ます。 scada.jsファイルに記述されています。
tmcontrol
-ダイアログのテキストラベルには、コマンドが実行されている要素の名前が表示されます。
-ダイアログボックスを表示します。
function tmcontrol(perem,rusname) { elem = perem; $( "#label2" ).text( rusname ); dialog.dialog( "open" ); };
$( "#label2" ).text( rusname );
-ダイアログのテキストラベルには、コマンドが実行されている要素の名前が表示されます。
dialog.dialog( "open" );
-ダイアログボックスを表示します。
ダイアログ機能:
$( function() { dialog = $( "#dialog-confirm" ).dialog({ autoOpen: false, resizable: false, height: "auto", width: 400, modal: true, buttons: { "": function() { $.post("control.php", elem+'&1'); $( this ).dialog( "close" ); }, "": function() { $.post("control.php", elem+'&0'); $( this ).dialog( "close" ); }, "": function() { $( this ).dialog( "close" ); } } }); $( "#create-user" ).button().on( "click", function() { dialog.dialog( "open" ); }); } );
ウィンドウはjquery-uiライブラリを使用します。 有効にするコマンドは、postメソッドを使用してサーバーに渡されます。
$.post("control.php", elem+'&1');
コマンドを無効にする:
$.post("control.php", elem+'&0');
htmlファイルのダイアログボックスを接続します。
<div id="dialog-confirm" title=" "> <label id="label2"> </label> </div>
別のブラウザで試してみます!
Firefox:

など:

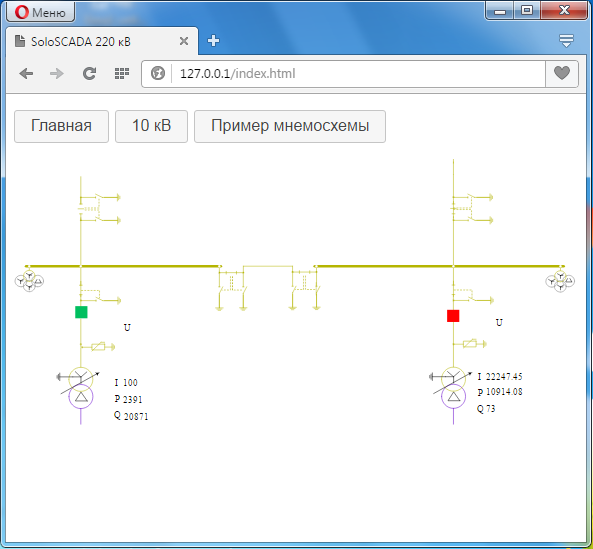
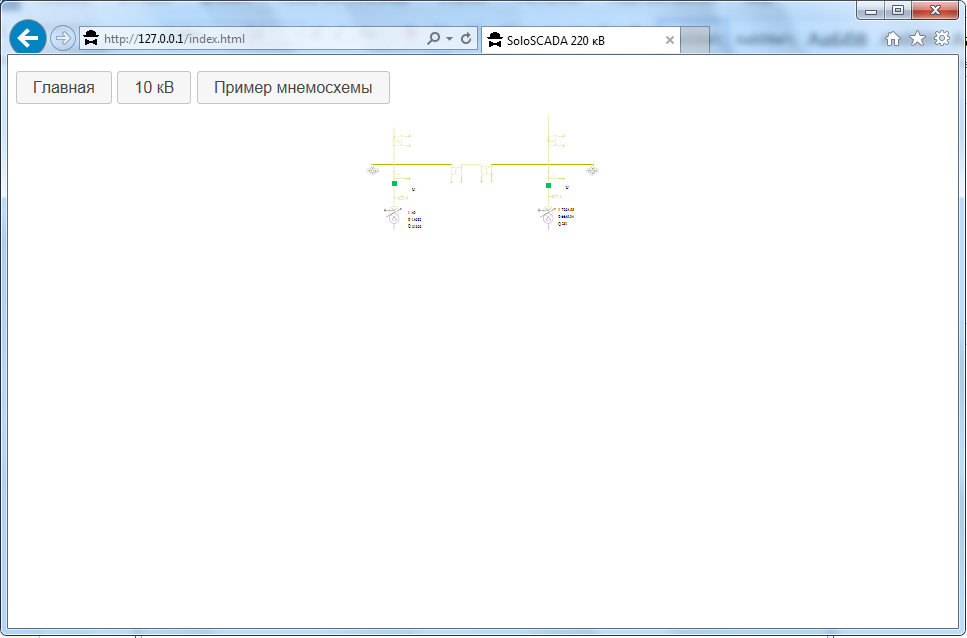
SVGは、さまざまな画面解像度とさまざまなブラウザ画面に自動的にスケーリングします。
オペラ:
いつものように、インターネットエクスプローラーには驚きがありました。
なぜこれまでのところわからなかったのか。 サンプルを自分で感じるには、 SCADA-systemをダウンロードしてインストールし、コンフィギュレーターでhtml-fileを接続する必要があります。 ファイル自体はweb_mainフォルダーに配置されます。