Swift
で実装されましたが、
Objective-C
実装しています。
カスタムUI要素を開発する方法:
- 基本要素がどのように機能するかを理解する必要があり
dataSource
。そのすべてのプロパティ、メソッド、delegate
、およびdataSource
を調べるためです。 -
UIView+
依存要素を設計します。UIView
を表示するユニバーサルソリューションを作成する必要があります。 たとえば、要素にはcontentView
ます。 ユーザーがUI要素の実装を考慮することなく、UIView
を割り当てることができるように設計する必要があります。 -
UIControl
忘れないでください。 カスタムボタンまたは他のコントロールが必要な場合は、UIView
からではUIControl
から継承することをおUIControl
ます。UIControl
にはTarget-Action
システムがあり、ボタンからInterface Builder
からコードに直接IBAction
を「ストレッチ」できます。UIView
に対する利点は、状態の存在とより良いタッチトラッキングです。 - あなたはあなたのコンポーネントに近いコンポーネントを研究する必要があります。
- さまざまなデバイスの機能、特にアクションコンポーネントを操作する際のiPhone 7の触覚振動(クラス
UIImpactFeedbackGenerator
)を忘れないでください。
実装されるもの
このレポートは、
UIPickerView
似たカスタム
UIView
例でした。 タイミングを目的としています。

このコンポーネントは
UIPickerView
似てい
UIPickerView
。 したがって、以下を実装する必要があります。
- 自動スピン;
- ドラムは要素で停止します。
- iPhone 7にはフィードバック振動が必要です(私は実装していません)。
実装方法
UIView
取り、それを丸くして、その
UILabel
に数字のある
UILabel
を
UILabel
します。 回転するには、無限の
contentSize
を持つ
UIScrollView
を追加し、シフトに基づいて回転角度を考慮します。
必要です:
-
UIScrollView
でシフトx
、y
を計算し、 - 方向を認識する
-
contentView
ひねり、 - 目的のアイテムにネジ止めする
-
UIView
を置き換える機会を与えます。
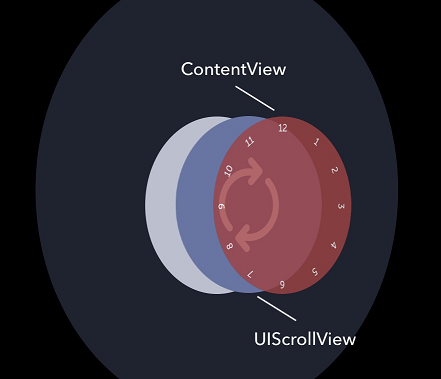
階層の準備
AYNCircleView
作成します。 これは、カスタム要素全体を含むクラスになります。 この段階では、彼には何も公開されていません。私たちはすべて個人的に行っています。 次に、階層の作成を開始します。 まず、
Interface Builder
view
を作成します。
AYNCircleView.xib
を作成して、階層を処理しましょう。
階層は次の要素で構成されます。
-
contentView
他のすべてのsubviews
がsubviews
される円、 -
scrollView
は回転を提供します。
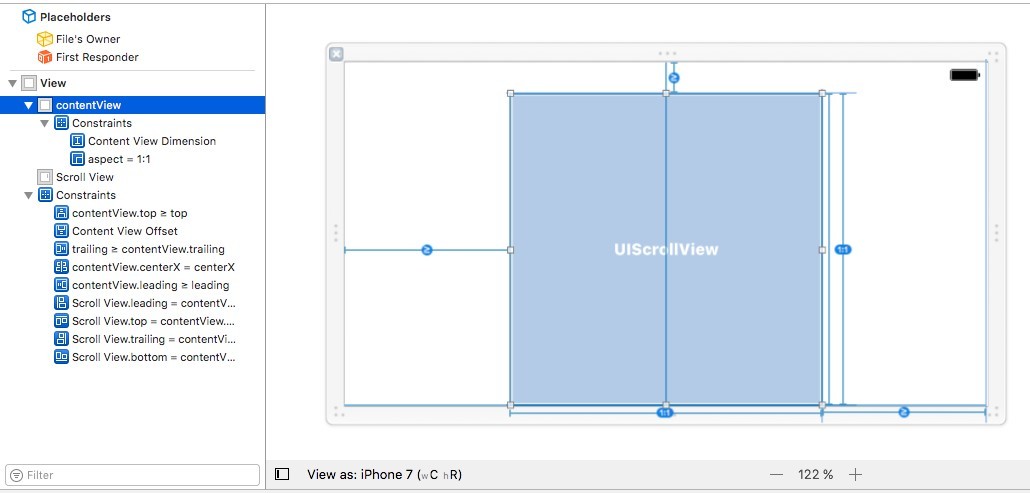
constraints
設定しましょう。 私たちが最も興味を持っているのは
contentView
と
bottom space
高さです。 サークルのサイズと位置を提供します。 残りの
constraints
は、
contentView
が
superview
を超えて
superview
を防ぎます。 便宜上、
scrollView
contentSize
側を定数で
scrollView
ます。 これはパフォーマンスに大きな影響を与えませんが、回転の「無限」をシミュレートします。 ささいなことに気を
scrollView
ば、「ジャンプ」システムを実装して
scrollView
の
contentSize
を大幅に減らすことが
scrollView
ます。
AYNCircleView
クラスを作成します。
@interface AYNCircleView : UIView @end static CGFloat const kAYNCircleViewScrollViewContentSizeLength = 1000000000; @interface AYNCircleView () @property (assign, nonatomic) BOOL isInitialized; @property (assign, nonatomic) CGFloat circleRadius; @property (weak, nonatomic) IBOutlet UIView *contentView; @property (weak, nonatomic) IBOutlet UIScrollView *scrollView; @property (weak, nonatomic) IBOutlet NSLayoutConstraint *contentViewDimension; @property (weak, nonatomic) IBOutlet NSLayoutConstraint *contentViewOffset; @end
Interface Builder
およびコードで
view
が初期化される場合に備えて、イニシャライザーを再定義します。
@implementation AYNCircleView #pragma mark - Initializers - (instancetype)initWithFrame:(CGRect)frame { self = [super initWithFrame:frame]; if (self) { [self commonInit]; } return self; } - (instancetype)initWithCoder:(NSCoder *)aDecoder { self = [super initWithCoder:aDecoder]; if (self) { [self commonInit]; } return self; } #pragma mark - Private - (void)commonInit { UIView *nibView = [[NSBundle mainBundle] loadNibNamed:NSStringFromClass([self class]) owner:self options:nil].firstObject; [self addSubview:nibView]; self.scrollView.contentSize = CGSizeMake(kAYNCircleViewScrollViewContentSizeLength, kAYNCircleViewScrollViewContentSizeLength); self.scrollView.contentOffset = CGPointMake(kAYNCircleViewScrollViewContentSizeLength / 2.0, kAYNCircleViewScrollViewContentSizeLength / 2.0); self.scrollView.delegate = self; }
階層を配置します。 現時点ではビューの実際のサイズがわからないため、これはイニシャライザーでは実行できません。
- (void)layoutSubviews
でそれらを見つけることができるので、そこでサイズを調整します。 これを行うには、最小の幅と高さに依存する円の半径を入力します。
@property (assign, nonatomic) CGFloat circleRadius;
初期化が完了したことを示すフラグを入力します。
@property (assign, nonatomic) BOOL isInitialized;
スクロールすると
- (void)layoutSubviews
れるため、階層の位置を常に計算するのは間違っています。
views
正しいサイズを設定するために制約を更新し
views
。
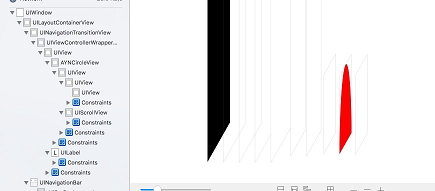
#pragma mark - Layout - (void)layoutSubviews { [super layoutSubviews]; if (!self.isInitialized) { self.isInitialized = YES; self.subviews.firstObject.frame = self.bounds; self.circleRadius = MIN(CGRectGetWidth(self.bounds), CGRectGetHeight(self.bounds)) / 2; self.contentView.layer.cornerRadius = self.circleRadius; self.contentView.layer.masksToBounds = YES; [self setNeedsUpdateConstraints]; } } - (void)updateConstraints { self.contentViewDimension.constant = self.circleRadius * 2; self.contentViewOffset.constant = self.circleRadius; [super updateConstraints]; }
できた 階層を構築した結果を確認します。 コントロールを配置する
view controller
を作成します。

生きている階層を見てみましょう。

階層が正しく構築されました、続行します。
背景UIView
次のステップ:
backgroundView
サポートします。 カスタムコントロールは、任意の
view
を背景に配置できるように考案されており、このコントロールのユーザーは実装について考えません。
backgroundView
に関する情報を含むパブリックプロパティを作成し
backgroundView
。
@property (strong, nonatomic) UIView *backgroundView;
次に、階層に追加する方法を定義します。
setter
再定義します。
- (void)setBackgroundView:(UIView *)backgroundView { [_backgroundView removeFromSuperview]; _backgroundView = backgroundView; [_contentView insertSubview:_backgroundView atIndex:0]; if (_isInitialized) { [self layoutBackgroundView]; } }
ここのロジックは何ですか? 階層から前の
view
を削除し、階層の最下位レベルに新しい
backgroundView
を追加し、メソッドでそのサイズを変更します。
- (void)layoutBackgroundView { self.backgroundView.frame = CGRectMake(0, 0, self.circleRadius * 2, self.circleRadius * 2); self.backgroundView.layer.masksToBounds = YES; self.backgroundView.layer.cornerRadius = self.circleRadius; }
view
作成さ
view
だけの場合も考慮してください。 サイズを正しく変更するには、このメソッドへの呼び出しを
- (void)layoutSubviews
ます。
新しい階層を検討してください。 赤い
UIView
を追加して、階層を確認します。
UIView *redView = [UIView new]; redView.backgroundColor = [UIColor redColor]; self.circleView.backgroundView = redView;

すべて順調です!
ダイヤル実装
ダイヤルを実装するには、
UILabel
使用し
UILabel
。 生産性を高める必要がある場合は、
CoreGraphics
のレベル
CoreGraphics
下げて、すでに署名を追加します。 私たちのソリューションは、「回転」
label
を定義する
UILabel
上のカテゴリ
label
。 メソッドに少しカスタマイズを追加しました:テキストの色とフォント。
@interface UILabel (AYNHelpers) + (UILabel *)ayn_rotatedLabelWithText:(NSString *)text angle:(CGFloat)angle circleRadius:(CGFloat)circleRadius offset:(CGFloat)offset font:(UIFont *)font textColor:(UIColor *)textColor; @end
このメソッドにより、
label
を円に配置できます。
circleRadius
はこの円の半径を定義し、
offset
はこの円に対する
offset
決定します。
angle
は中心角です。 この円の中心に回転
label
を作成し、
xOffset
と
yOffset
使用して、この
label
の中心を目的の位置に移動します。
#import "UILabel+AYNHelpers.h" @implementation UILabel (AYNHelpers) + (UILabel *)ayn_rotatedLabelWithText:(NSString *)text angle:(CGFloat)angle circleRadius:(CGFloat)circleRadius offset:(CGFloat)offset font:(UIFont *)font textColor:(UIColor *)textColor { UILabel *rotatedLabel = [[UILabel alloc] initWithFrame:CGRectZero]; rotatedLabel.text = text; rotatedLabel.font = font ?: [UIFont boldSystemFontOfSize:22.0]; rotatedLabel.textColor = textColor ?: [UIColor blackColor]; [rotatedLabel sizeToFit]; rotatedLabel.transform = CGAffineTransformMakeRotation(angle); CGFloat angleForPoint = M_PI - angle; CGFloat xOffset = sin(angleForPoint) * (circleRadius - offset); CGFloat yOffset = cos(angleForPoint) * (circleRadius - offset); rotatedLabel.center = CGPointMake(circleRadius + xOffset, circleRadius + yOffset); return rotatedLabel; } @end
できた 次に、メソッド
- (void)addLabelsWithNumber:
を
contentView
ラベルに追加する必要があります。 これを行うには、署名が配置されている角度ステップを保存すると便利です。 360度の円と12個の署名を取る場合、ステップは360/12 = 30度になります。 プロパティを作成します。回転角度を正規化すると便利です。
@property (assign, nonatomic) CGFloat angleStep; offset , . static CGFloat const kAYNCircleViewLabelOffset = 10;
ラベルに対して一定の
offset
を作成しますが、これも後で必要になります。
- (void)addLabelsWithNumber:(NSInteger)numberOfLabels { if (numberOfLabels > 0) { [self.contentView.subviews enumerateObjectsUsingBlock:^(__kindof UIView * _Nonnull obj, NSUInteger idx, BOOL * _Nonnull stop) { if ([obj isKindOfClass:[UILabel class]]) { [obj removeFromSuperview]; } }]; self.angleStep = 2 * M_PI / numberOfLabels; for (NSInteger i = 0; i < numberOfLabels; i++) { UILabel *rotatedLabel = [UILabel ayn_rotatedLabelWithText:[NSString stringWithFormat:@"%ld", i] angle:self.angleStep * i circleRadius:self.circleRadius offset:kAYNCircleViewLabelOffset font:self.labelFont textColor:self.labelTextColor]; [self.contentView addSubview:rotatedLabel]; } } }
ダイヤルに数字を設定すると、ステップが計算されます。
@property (assign, nonatomic) NSUInteger numberOfLabels;
次に、パブリックプロパティを追加して、ダイヤルの桁数を設定します。
- (void)setNumberOfLabels:(NSUInteger)numberOfLabels { _numberOfLabels = numberOfLabels; if (_isInitialized) { [self addLabelsWithNumber:_numberOfLabels]; } }
そして、
backgroundView
類推により、その
setter
を定義し
backgroundView
。
できた
view
がすでに作成されている場合、ダイヤルの桁数を設定します。 メソッド
- (void)layoutSubviews
と
- (void)layoutSubviews
初期化を忘れないでください。 署名もそこに置く必要があります。
- (void)layoutSubviews { [super layoutSubviews]; if (!self.isInitialized) { self.isInitialized = YES; …. [self addLabelsWithNumber:self.numberOfLabels]; ... } }
ここで
- (void)viewDidLoad
コントロールが
view
される
view
あるコントローラーの
- (void)viewDidLoad
は、次の形式になります。
- (void)viewDidLoad { [super viewDidLoad]; UIView *redView = [UIView new]; redView.backgroundColor = [UIColor redColor]; self.circleView.backgroundView = redView; self.circleView.numberOfLabels = 12; self.circleView.delegate = self; }
views
の階層と番号の配置を見てみましょう。
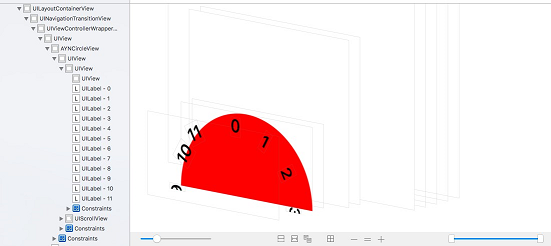
階層は真であることが判明しました-すべてのラベルは
contentView
ます。
インターフェース回転サポート
一部のアプリケーションでは画面の水平方向が使用されることに注意してください。 この状況を処理するために、インターフェイスの向きの変更に関する通知(
NSNotification
クラス)を追跡します。
UIDeviceOrientationDidChangeNotification
興味があります。
コントロールのイニシャライザーでこの通知に
observer
追加し、同じブロックで処理します。
__weak __typeof(self) weakSelf = self; [[NSNotificationCenter defaultCenter] addObserverForName:UIDeviceOrientationDidChangeNotification object:nil queue:nil usingBlock:^(NSNotification * _Nonnull note) { __strong __typeof(weakSelf) strongSelf = weakSelf; strongSelf.isInitialized = NO; [strongSelf setNeedsLayout]; }];
ブロックは暗黙的に
self
キャプチャするため、これは
retain cycle
つながる可能性がある
retain cycle
、
self
への参照を弱めます。 向きを変更するとき、円の半径、新しい中心などを再計算するために、コントロールをそのまま初期化します。
メソッド
- (void)dealloc
通知のサブスク
- (void)dealloc
忘れないでください。
- (void)dealloc { [[NSNotificationCenter defaultCenter] removeObserver:self name:UIDeviceOrientationDidChangeNotification object:nil]; }
ダイヤルが実装されています。 回転の数学と、記事の第2部でカスタムコントロールを作成するための次のステップについて読んでください 。
プロジェクト全体がgitaで利用可能です。