
ASP.NET Coreに関する2番目のシリーズの記事
1. モバイルアプリケーション用のサーバーサービスの作成 。
2. dotnet watchを使用したASP.NET Coreアプリケーションの開発 。
3. Swaggerを使用してASP.NET Web APIのマニュアルページを作成します 。
4. .NET(OWIN)のWebインターフェイスを開きます。
5.サーバーで適切な.NET開発環境を選択します。
はじめに
まず、用語について説明しましょう。
- Swashbuckleは、ASP.NET Core MVCを使用して構築されたWeb APIのSwaggerドキュメントを作成するためのオープンソースプロジェクトです。
- Swaggerは、オンラインドキュメントのサポート、クライアントSDKの作成、および検出機能を提供するRESTful APIの機械可読表現です。
このチュートリアルは、チュートリアル「ASP.NET Core MVCおよびVisual Studioを使用した最初のWeb APIの作成」の例に従って作成されています 。 興味がある場合は、 GitHubからダウンロードできます。
はじめに
スワッシュバックルは2つのコンポーネントで構成されています。
- Swashbuckle.SwaggerGen :オブジェクト、メソッド、戻り値の型などを記述するSwagger JSONドキュメントを作成するための関数が含まれています。
- Swashbuckle.SwaggerUI :上記のドキュメントを使用して、Web APIの機能を記述するための個別にカスタマイズ可能なツールを作成し、パブリックメソッドのテスト機能を含む、Swaggerユーザーインターフェイスの組み込みバージョン。
NuGetパッケージ
Swashbuckleを追加するには、次のいずれかの方法を使用できます。
- パッケージマネージャーコンソールの使用:
Install-Package Swashbuckle -Pre
- Visual Studioの場合:
o [ソリューションエクスプローラー]> [NuGetパッケージの管理]でプロジェクトを右クリックします。
o検索フィールドにSwashbuckleと入力します。
o [プレリリースを含める]チェックボックスを選択します。
oパッケージのソースとしてnuget.orgを指定します。
oスワッシュバックルパッケージ(スワッシュバックルパッケージ)をタッチして、インストールします。
Swaggerを追加し、ミドルウェアで構成します
ConfigureおよびConfigureServicesメソッドのサービスセットにSwaggerGenを追加し、ミドルウェアをアクティブ化して、作成されたJSONドキュメントとSwaggerユーザーインターフェイスを処理します。
public void ConfigureServices(IServiceCollection services) { // Add framework services. services.AddMvc(); services.AddLogging(); // Add our repository type services.AddSingleton<ITodoRepository, TodoRepository>(); // Inject an implementation of ISwaggerProvider with defaulted settings applied services.AddSwaggerGen(); } // This method gets called by the runtime. Use this method to configure the HTTP request pipeline. public void Configure(IApplicationBuilder app, IHostingEnvironment env, ILoggerFactory loggerFactory) { app.UseMvcWithDefaultRoute(); // Enable middleware to serve generated Swagger as a JSON endpoint app.UseSwagger(); // Enable middleware to serve swagger-ui assets (HTML, JS, CSS etc.) app.UseSwaggerUi(); }
Visual StudioでF5を押してアプリケーションを起動し、
http://localhost:<random_port>/swagger/v1/swagger.json
ます。 ここに、エンドポイントを説明する作成されたドキュメントが表示されます。
注: Microsoft Edge、Google Chrome、およびFirefoxブラウザーは、追加の設定なしでJSONドキュメントを表示します。 読みやすいようにドキュメントをフォーマットするために、Chrome用の拡張機能が作成されました。 以下はJavaScriptの短縮例です。
{ "swagger": "2.0", "info": { "version": "v1", "title": "API V1" }, "basePath": "/", "paths": { "/api/Todo": { "get": { "tags": [ "Todo" ], "operationId": "ApiTodoGet", "consumes": [], "produces": [ "text/plain", "application/json", "text/json" ], "responses": { "200": { "description": "OK", "schema": { "type": "array", "items": { "$ref": "#/definitions/TodoItem" } } } }, "deprecated": false }, "post": { ... } }, "/api/Todo/{id}": { "get": { ... }, "put": { ... }, "delete": { ... }, "definitions": { "TodoItem": { "type": "object", "properties": { "key": { "type": "string" }, "name": { "type": "string" }, "isComplete": { "type": "boolean" } } } }, "securityDefinitions": {} }
このドキュメントは、
http://localhost:<random_port>/swagger/ui
で利用可能なSwaggerユーザーインターフェイスの操作に使用されます。
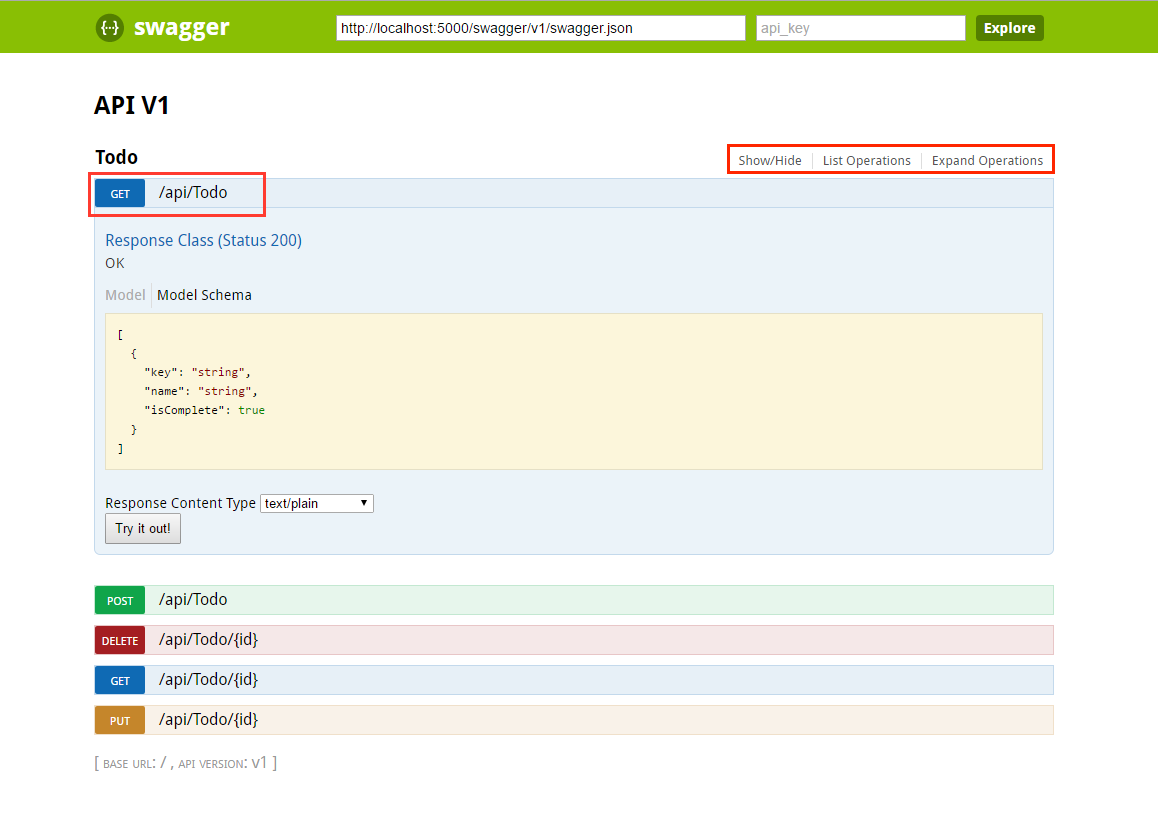
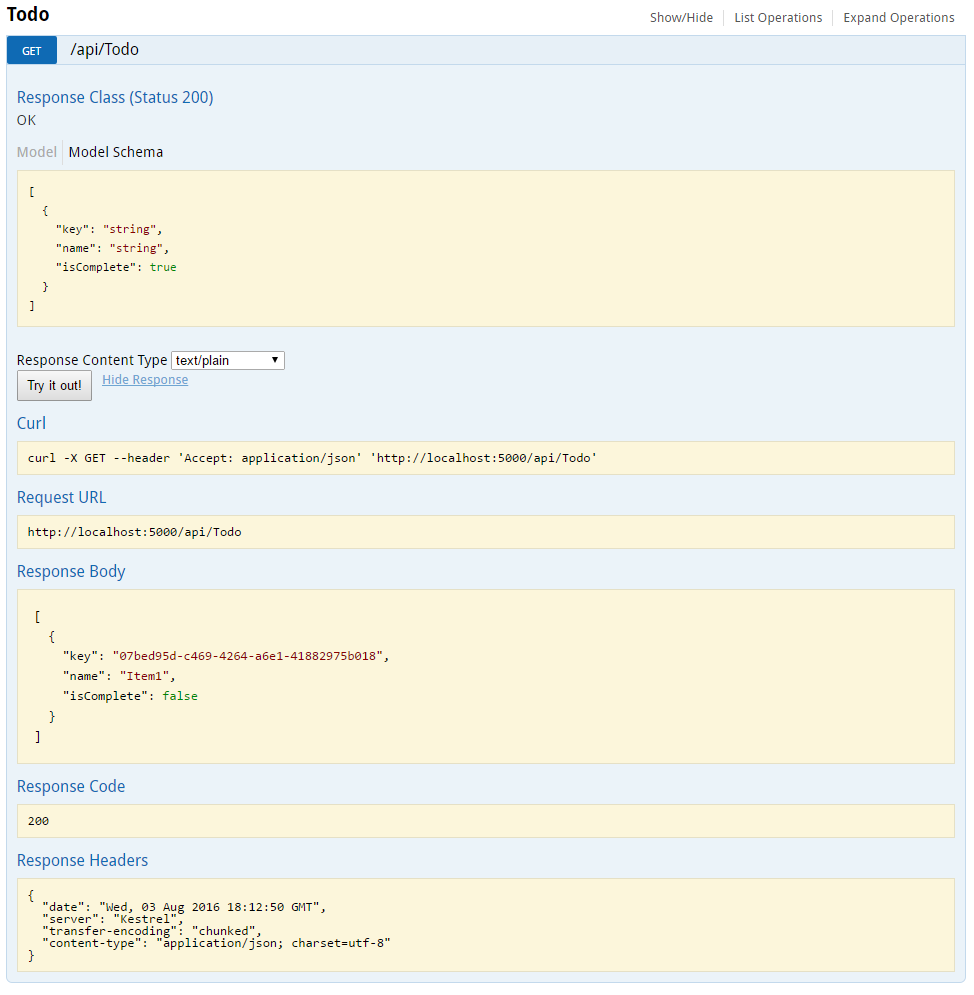
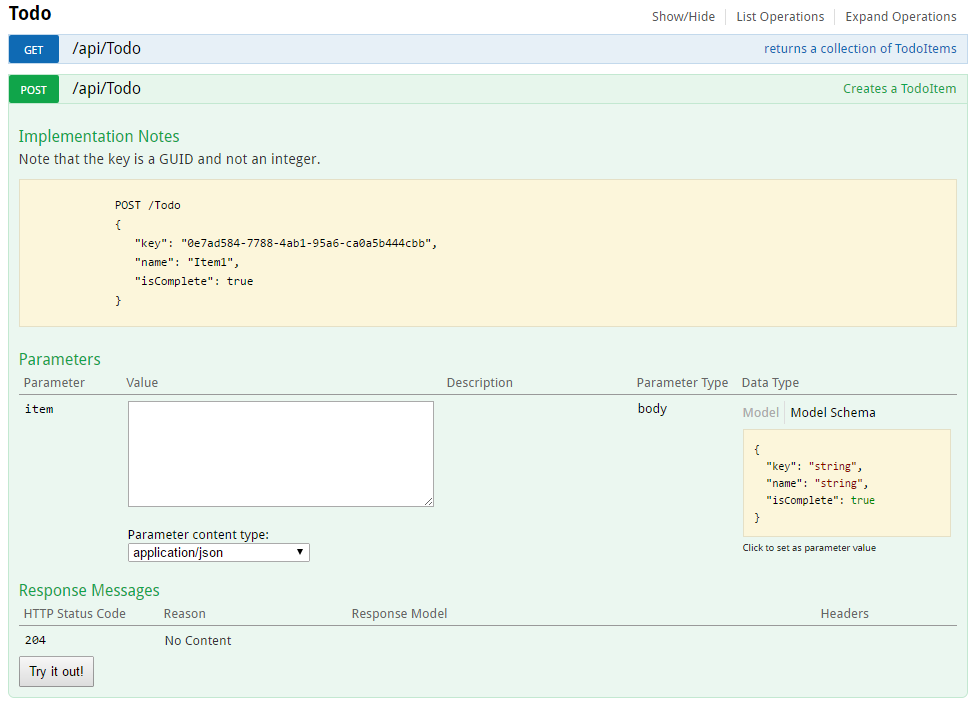
ToDoコントローラーの各メソッドは、ユーザーインターフェイスからテストできます。 メソッドをタッチしてセクションを展開し、必要なパラメーターを追加して、「試してみてください!」をクリックします。
カスタマイズと拡張性
Swaggerを使用すると、APIを簡単に表示できるだけでなく、オブジェクトモデルを文書化したり、対話型ユーザーインターフェイスの外観と言語をカスタマイズしたりするための関数も含まれています。
API情報と説明
ConfigureSwaggerGen
メソッドは、著者情報とライセンス、および説明を追加するために使用されます。
services.ConfigureSwaggerGen(options => { options.SingleApiVersion(new Info { Version = "v1", Title = "ToDo API", Description = "A simple example ASP.NET Core Web API", TermsOfService = "None", Contact = new Contact { Name = "Shayne Boyer", Email = "", Url = "http://twitter.com/spboyer"}, License = new License { Name = "Use under LICX", Url = "http://url.com" } }); });
次の図は、バージョン情報を含むSwaggerユーザーインターフェイスを示しています。

XMLコメント
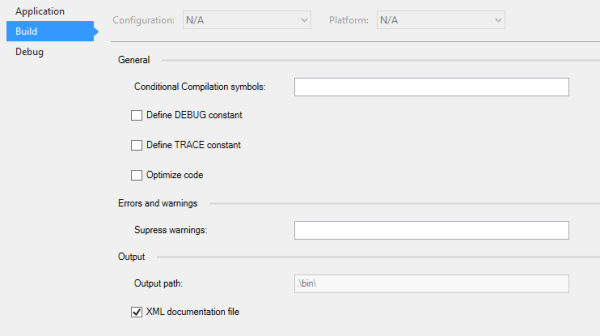
XMLコメントを有効にするには、Visual Studioでプロジェクトを右クリックし、[ プロパティ ]を選択します 。 次に、[ 出力設定]セクションの下の[ XMLドキュメントファイル]チェックボックスをオンにします。
生成されたXMLファイルを使用するようにSwaggerを構成します。
注: LinuxおよびWindows以外のオペレーティングシステムの場合、ファイル名とディレクトリ名は大文字と小文字が区別されます。 たとえば、Windowsでは
ToDoApi.XML
というファイルを検索できますが、CentOSではできません。
// This method gets called by the runtime. Use this method to add services to the container. public void ConfigureServices(IServiceCollection services) { // Add framework services. services.AddMvc(); services.AddLogging(); // Add our repository type. services.AddSingleton<ITodoRepository, TodoRepository>(); // Inject an implementation of ISwaggerProvider with defaulted settings applied. services.AddSwaggerGen(); // Add the detail information for the API. services.ConfigureSwaggerGen(options => { options.SingleApiVersion(new Info { Version = "v1", Title = "ToDo API", Description = "A simple example ASP.NET Core Web API", TermsOfService = "None", Contact = new Contact { Name = "Shayne Boyer", Email = "", Url = "http://twitter.com/spboyer"}, License = new License { Name = "Use under LICX", Url = "http://url.com" } }); //Determine base path for the application. var basePath = PlatformServices.Default.Application.ApplicationBasePath; //Set the comments path for the swagger json and ui. var xmlPath = Path.Combine(basePath, "TodoApi.xml"); options.IncludeXmlComments(xmlPath); }); } // This method gets called by the runtime. Use this method to configure the HTTP request pipeline. public void Configure(IApplicationBuilder app, IHostingEnvironment env, ILoggerFactory loggerFactory) { app.UseStaticFiles(); app.UseMvcWithDefaultRoute(); // Enable middleware to serve generated Swagger as a JSON endpoint. app.UseSwagger(); // Enable middleware to serve swagger-ui assets (HTML, JS, CSS etc.) app.UseSwaggerUi(); }
上記のコードでは、ApplicationBasePathはアプリケーションのベースディレクトリへのパスを取得します。これにより、XMLコメントへのフルパスを設定できます。
TodoApi.xml
はこの例でのみ機能します。作成されたコメント付きXMLファイルの名前は、アプリケーションの名前に基づいて割り当てられます。
メソッドで3つのスラッシュを含むコメントを使用すると、Swaggerユーザーインターフェイスを改善できます。セクションタイトルに説明が追加されます。
/// <summary> /// Deletes a specific TodoItem. /// </summary> /// <param name="id"></param> [HttpDelete("{id}")] public void Delete(string id) { TodoItems.Remove(id); }
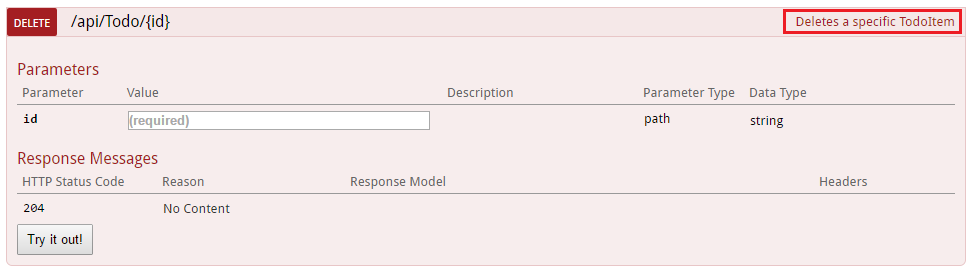
ユーザーインターフェイスは生成されたJSONファイルを使用し、これらのコメントも含むことに注意してください。
"delete": { "tags": [ "Todo" ], "summary": "Deletes a specific TodoItem", "operationId": "ApiTodoByIdDelete", "consumes": [], "produces": [], "parameters": [ { "name": "id", "in": "path", "description": "", "required": true, "type": "string" } ], "responses": { "204": { "description": "No Content" } }, "deprecated": false }
明確にするために、
<remarks />
追加し
<remarks />
。その内容は、メソッドの詳細なドキュメントのために、テキスト、JSONまたはXMLオブジェクトにすることができます。
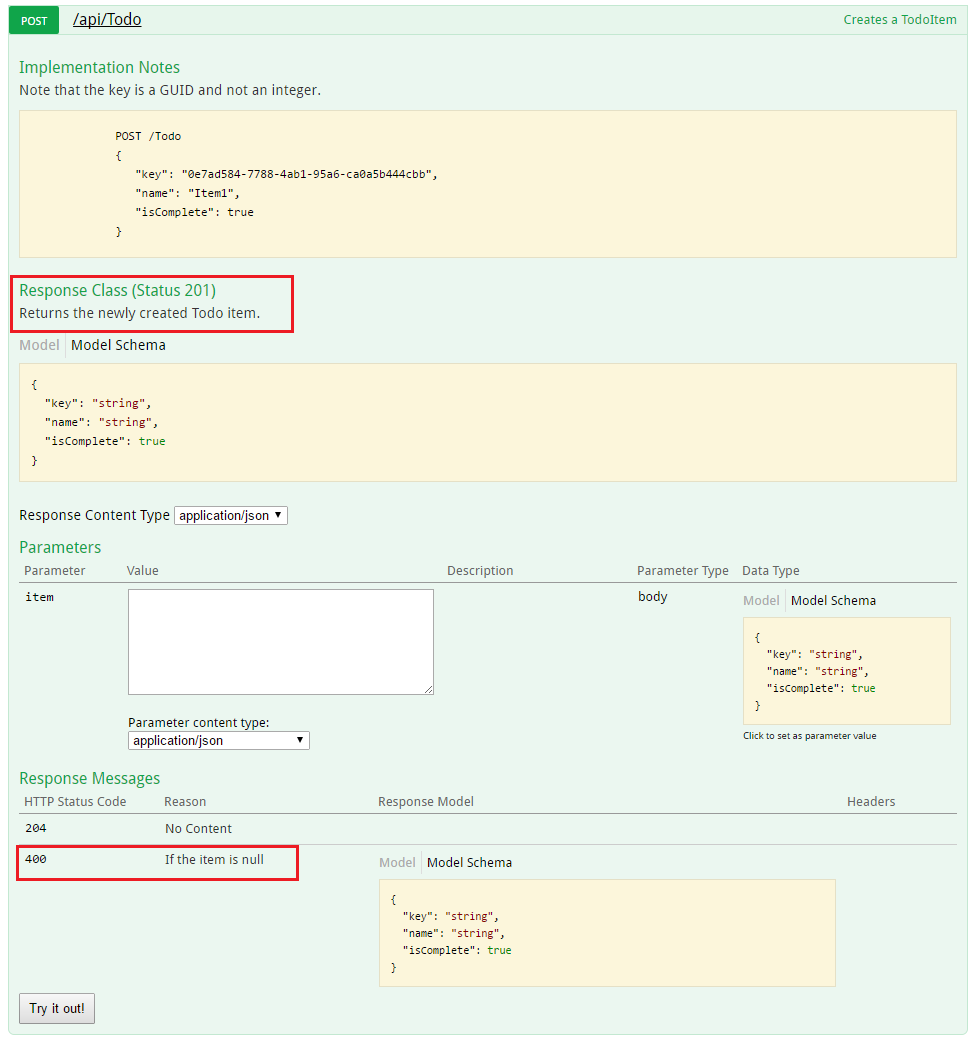
/// <summary> /// Creates a TodoItem. /// </summary> /// <remarks> /// Note that the key is a GUID and not an integer. /// /// POST /Todo /// { /// "key": "0e7ad584-7788-4ab1-95a6-ca0a5b444cbb", /// "name": "Item1", /// "isComplete": true /// } /// /// </remarks> /// <param name="item"></param> /// <returns>New Created Todo Item</returns> /// <response code="201">Returns the newly created item</response> /// <response code="400">If the item is null</response> [HttpPost] [ProducesResponseType(typeof(TodoItem), 201)] [ProducesResponseType(typeof(TodoItem), 400)] public IActionResult Create([FromBody, Required] TodoItem item) { if (item == null) { return BadRequest(); } TodoItems.Add(item); return CreatedAtRoute("GetTodo", new { id = item.Key }, item); }
追加のコメントのおかげで、ユーザーインターフェイスがどのように改善されたかに注目してください。
DataAnnotations
APIに
System.ComponentModel.DataAnnotations
コントローラーを追加して、Swaggerユーザーインターフェイス要素を強化できます。
[Required]
注釈を
TodoItem
クラスの
Name
プロパティに追加すると、ユーザーインターフェイスのModelSchema情報が変更されます。 検証エージェント
[Produces("application/json")]
、
RegularExpression
およびその他の関数を使用して、生成されたページに表示される情報を絞り込みます。 コードで使用されるメタデータが多いほど、ユーザーインターフェイスまたはAPIのヘルプページの情報が多くなります。
using System; using System.ComponentModel; using System.ComponentModel.DataAnnotations; namespace TodoApi.Models { public class TodoItem { public string Key { get; set; } [Required] public string Name { get; set; } [DefaultValue(false)] public bool IsComplete { get; set; } } }
応答タイプの説明
負荷の高いアプリケーションを作成する開発者は、出力、特に回答の種類、エラーコード(標準でない場合)に特に注意を払います。 これにはXMLコメントとDataAnnotationsが使用されます。
たとえば、
Create()
メソッドを使用します。 デフォルトでは、「201 Created」(アイテムが実際に作成された場合)または「204 No Content」(データがPOST本体に転送されていない場合)という応答を返します。 ただし、これまたはその答えが何であるかを示すドキュメントはありません。 これを修正するには、次のコードスニペットを追加します。
/// <summary> /// Creates a TodoItem. /// </summary> /// <remarks> /// Note that the key is a GUID and not an integer. /// /// POST /Todo /// { /// "key": "0e7ad584-7788-4ab1-95a6-ca0a5b444cbb", /// "name": "Item1", /// "isComplete": true /// } /// /// </remarks> /// <param name="item"></param> /// <returns>New Created Todo Item</returns> /// <response code="201">Returns the newly created item</response> /// <response code="400">If the item is null</response> [HttpPost] [ProducesResponseType(typeof(TodoItem), 201)] [ProducesResponseType(typeof(TodoItem), 400)] public IActionResult Create([FromBody, Required] TodoItem item) { if (item == null) { return BadRequest(); } TodoItems.Add(item); return CreatedAtRoute("GetTodo", new { id = item.Key }, item); }
ユーザーインターフェイスのカスタマイズ
既製のユーザーインターフェースは機能的で便利ですが、APIドキュメントページを作成する場合は、おそらくブランドまたはコーポレートアイデンティティを使用する必要があります。
これは、Swashbuckleコンポーネントを使用して実行できます。 通常はWeb APIプロジェクトに含まれていない静的ファイルを提供するリソースを追加してから、それらをホストするフォルダー構造を作成する必要があります。
«Microsoft.AspNetCore.StaticFiles»: «1.0.0-*»
パッケージを追加します
«Microsoft.AspNetCore.StaticFiles»: «1.0.0-*»
NuGetプロジェクトに。
静的ファイルのミドルウェアを有効にします。
// This method gets called by the runtime. Use this method to configure the HTTP request pipeline. public void Configure(IApplicationBuilder app, IHostingEnvironment env, ILoggerFactory loggerFactory) { // Enable static files middleware. app.UseStaticFiles(); app.UseMvcWithDefaultRoute(); // Enable middleware to serve generated Swagger as a JSON endpoint app.UseSwagger(); // Enable middleware to serve swagger-ui assets (HTML, JS, CSS etc.) app.UseSwaggerUi(); }
Swaggerユーザーインターフェイスページで使用されているindex.htmlファイルをGithubリポジトリ
<https://github.com/domaindrivendev/Ahoy/tree/master/test/WebSites/CustomizedUi/wwwroot/swagger/ui>
_から取得して移動します
wwwroot/swagger/ui
custom.css
wwwroot/swagger/ui
フォルダーに
custom.css
し、同じフォルダーに新しい
custom.css
ファイルを作成します。
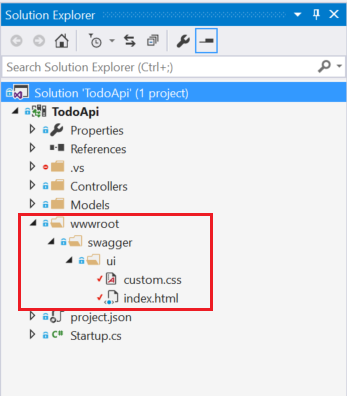
index.htmlファイルのcustom.cssにリンクします。
<link href='custom.css' media='screen' rel='stylesheet' type='text/css' />
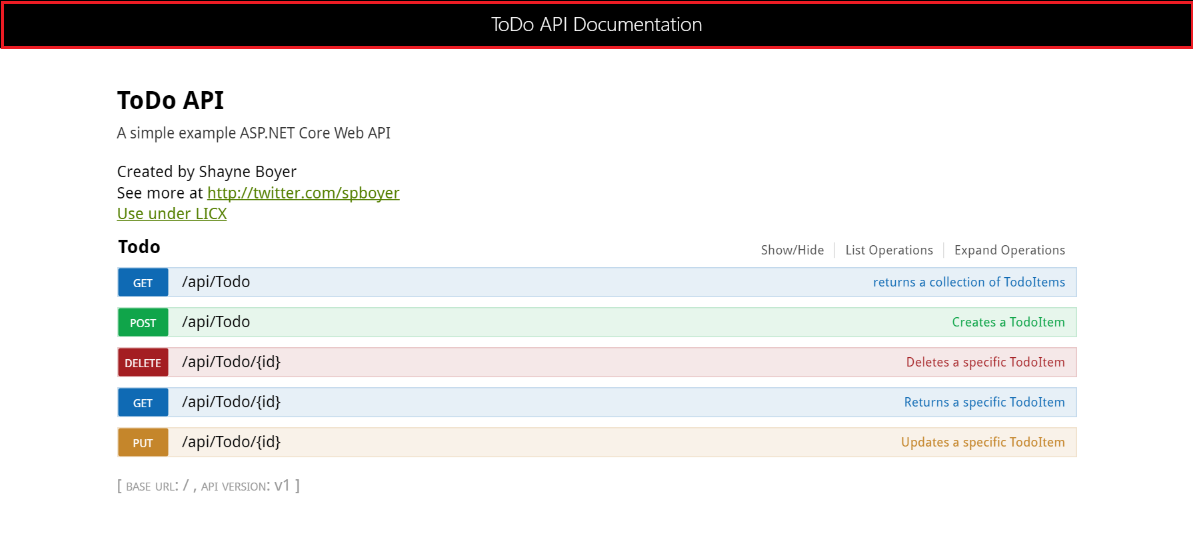
次のCSSは、カスタムページタイトルの例を示しています。
Custom.cssファイル
.swagger-section #header { border-bottom: 1px solid #000000; font-style: normal; font-weight: 400; font-family: "Segoe UI Light","Segoe WP Light","Segoe UI","Segoe WP",Tahoma,Arial,sans-serif; background-color: black; } .swagger-section #header h1 { text-align: center; font-size: 20px; color: white; }</code> <i> index.html</i> <source lang="css"><body class="swagger-section"> <div id="header"> <h1>ToDo API Documentation</h1> </div> <div id="message-bar" class="swagger-ui-wrap" data-sw-translate> </div> <div id="swagger-ui-container" class="swagger-ui-wrap"></div> </body>
しかし、ページでできることはこれだけではありません。 Swagger UIリポジトリーのGitHubにある UI機能の完全なリストを参照してください。