この記事は教育のみを目的としています。 ソースコードを他の目的に使用しないでください。
インターフェイスを作成するために、グラフィックをトップレベルのシーンオブジェクトとして記述するMacawライブラリを使用します。 見たことがない場合は、「 はじめに」をご覧になることをお勧めします。 行こう!
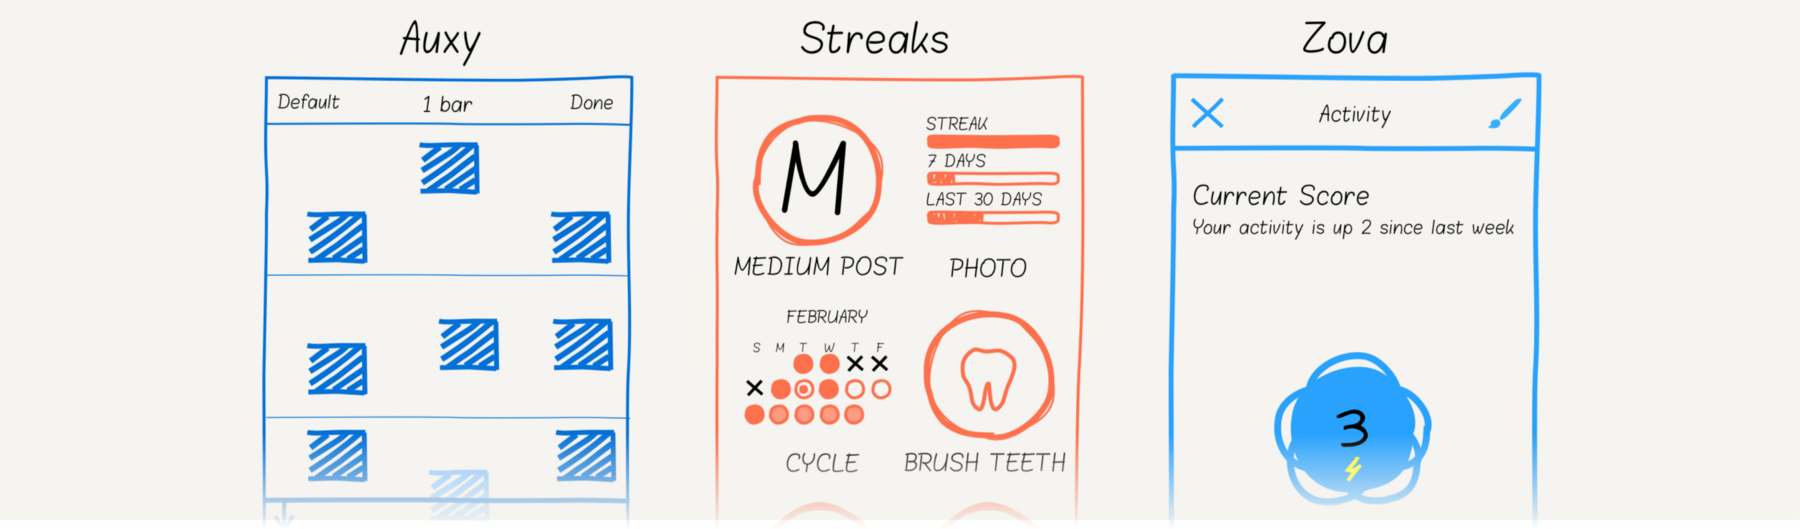
縞
縞 -良い習慣のやることリスト:毎日読んで、歯を磨くことを忘れないでください。 グラフィックコンポーネントとそれらの間の関係を定義します。

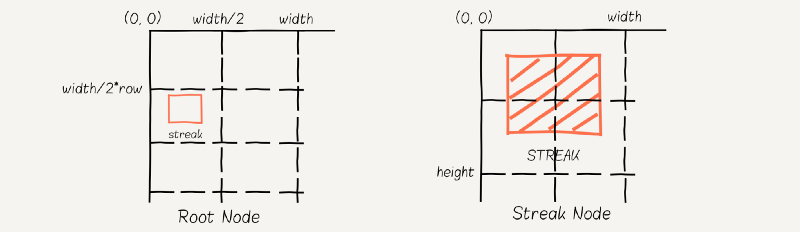
最初の要素は2 x 3のグリッドを描画します。最初の列のX座標はゼロで、2番目の要素は画面の幅の半分です。 y座標は行番号に依存し、
row*screen.width/2
(正方形のセル)に等しくなります。
ストリーク要素には、コンテンツとタイトルが含まれます。 クリックすることで、ユーザーはロゴ、カレンダー、統計の間でコンテンツを切り替えます。 切り替え機能は後で行います。
// grid cell (column, row) let streak = Group( contents: [self.streak(text: "MEDIUM", imageName: "medium")], place: Transform.move( dx: Double(screen.width / 2) * column, dy: Double(screen.width / 2) * row ) ) // streak: content + title func streak(text: String, imageName: String) -> Group { let title = Text( text: text, font: Font(name: fontName, size: 14), fill: Color.white, align: .mid, place: Transform.move( dx: Double(screen.width) / 4, dy: 0.7 * Double(screen.width) / 2 ) ) let streakContent = Group() return [streakContent, title].group() }
ロゴ、カレンダー、統計を扱いましょう。 ロゴは、2 * PIアークと中央の画像で構成されています。 半径は、画面のサイズによって異なります。 要素は、ポイント(0,0)を基準にして配置されます。

let ellipse = Ellipse(cx: radius, cy: radius, rx: radius, ry: radius) let border = Shape( form: Arc(ellipse: ellipse, extent: 2 * M_PI), fill: background, stroke: Stroke(fill: Color(val: 0x744641), width: 8) ) let image = UIImage(named: imageName)! let logoImage = Image( src: imageName, place: Transform.move( // move image in the point (radius, radius) dx: radius - Double(image.size.width) / 2, dy: radius - Double(image.size.height) / 2 ) ) let logo = [border, logoImage].group()
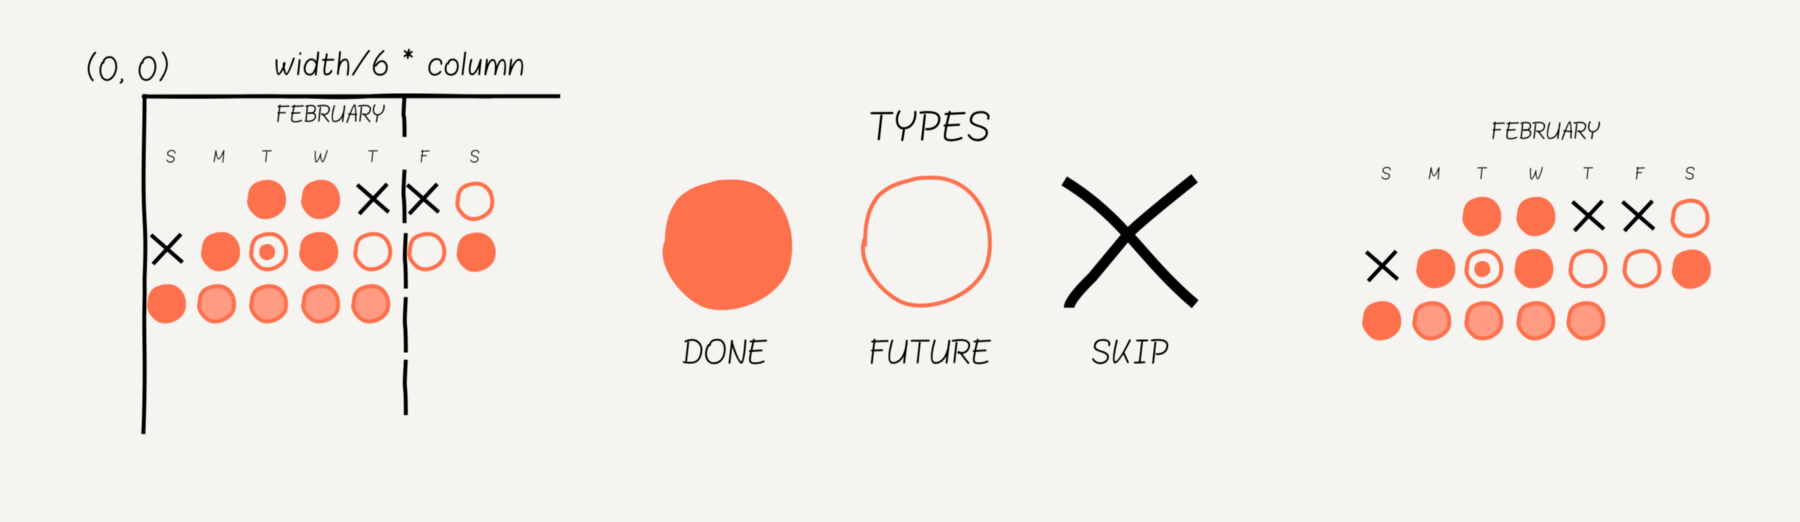
カレンダーには、月の名前、曜日、曜日のステータス(「完了」、「スキップ」、または「予定」)が含まれます。 「完了」と「予定」は単純な円で表示されます。 「Missed」-交差する2本の黒い線。
// input parameters let x = width / 6 * Double(column) let y = Double(row) * 15 // skip day let line1 = Line(x1: x - 4, y1: y, x2: x + 4, y2: y + 8) let line2 = Line(x1: x - 4, y1: y + 8, x2: x + 4, y2: y) let stroke = Stroke(fill: Color.black, width: 4) let cross = [ Shape(form: line1, stroke: stroke), Shape(form: line2, stroke: stroke) ].group() // done day let done = Shape( form: Circle(cx: x, cy: y + radius, r: radius), fill: doneColor ) // future day let future = Shape( form: Circle(cx: x, cy: y + radius, r: radius), fill: lightColor )
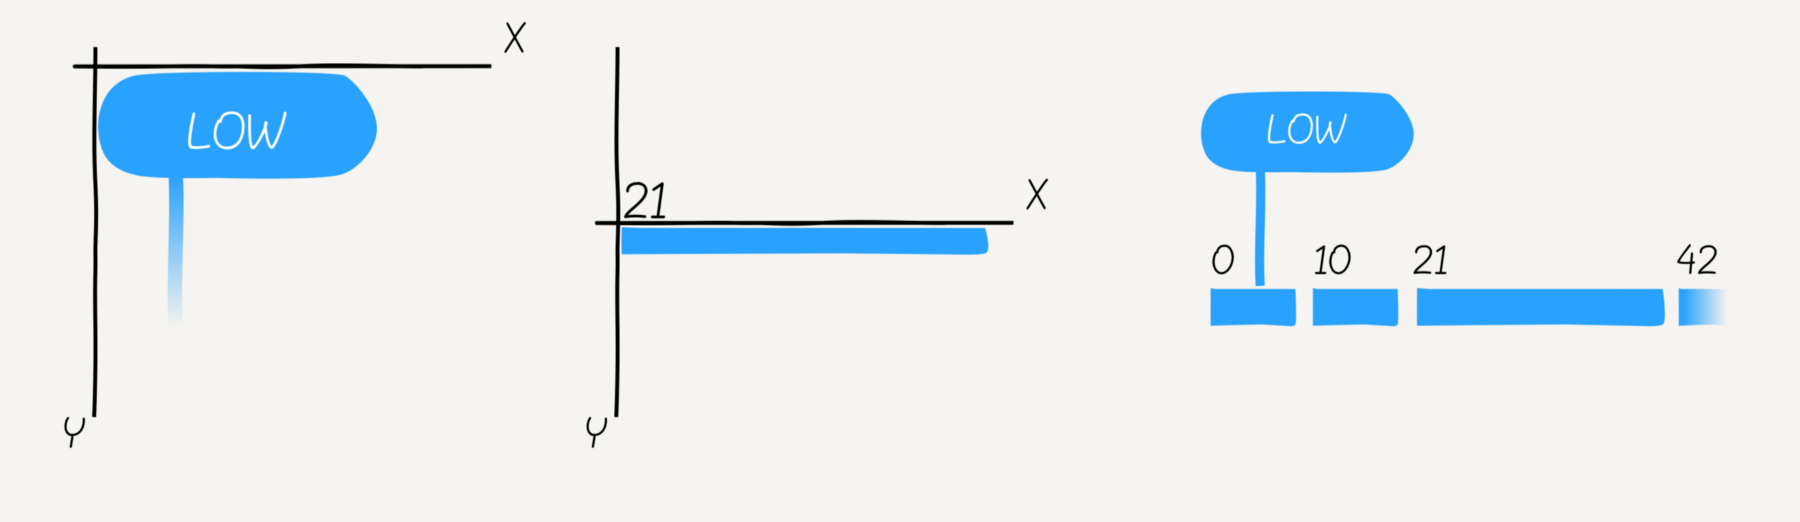
統計-異なるY座標を持つ3つのバーのグループ。 Y座標は、バー番号、および画面サイズのバー幅に依存します。この場合、幅の半分の80%(両側に10%インデント)です。
バーには4つの要素が含まれています。2つのテキストと、角が丸い2つの長方形です。 塗りつぶされた1つの長方形。

let bar = Group(contents: [ Text( text: "LAST 30 DAYS", font: Font(name: fontName, size: 12), fill: Color.white, align: .min ), Text( text: "42%", font: Font(name: fontName, size: 12), fill: lightColor, align: .max, place: Transform.move(dx: width, dy: 0) ), Shape( form: Rect(x: 0, y: 18, w: width, h: 10).round(r: 2), fill: lightColor ), Shape( form: Rect(x: 0, y: 18, w: width * 0.42, h: 10).round(r: 2), fill: Color.white ) ]
コンテンツが完成したら、切り替えアニメーションに移りましょう。 ストリークスイッチをタップして、新しいコンテンツを中央に配置します(要素の幅は異なります)。 最初のアニメーションは古いコンテンツを非表示にし、2番目のアニメーションは新しいコンテンツを表示します。
func animateStreak(newContent: Group, margin: Int) { let animation = streakContent.opacityVar.animation(to: 0.0, during: 0.1) animation.onComplete { streakContent.contents = newContent streakContent.place = Transform.move(dx: margin / 2, dy: 0) streakContent.opacityVar.animation(to: 1.0, during: 0.1).play() } animation.play() }
最後の仕上げがあります。 新しい習慣を作成するときに、アークアニメーションを
1.5*PI
から
3.5*PI
に開始します。 コンテンツアニメーションの詳細については、こちらをご覧ください。 アニメーションの最後に、「タスクの追加」コントローラーを開きます。
streak.onTap { tapEvent in let animation = group.contentsVar.animation({ t in let animatedShape = Shape( form: Arc(ellipse: ellipse, shift: 1.5 * M_PI, extent: 2 * M_PI * t), stroke: Stroke(fill: Color.white, width: 8) ) return [animatedShape] }, during: 0.5).easing(Easing.easeInOut) animation.onComplete { // open task controller } animation.play() }
結果
歯を磨いて、GitHubでXcodeプロジェクトを見るのを忘れないでください。

Auxyスタジオ
Auxyは、電話で音楽やビートを作成するためのスタジオです。 青い四角は音であり、ユーザーはタップでそれらを追加および削除します。 「再生」をクリックすると、白い線が上から下に移動し、サウンドと交差すると再生されます。
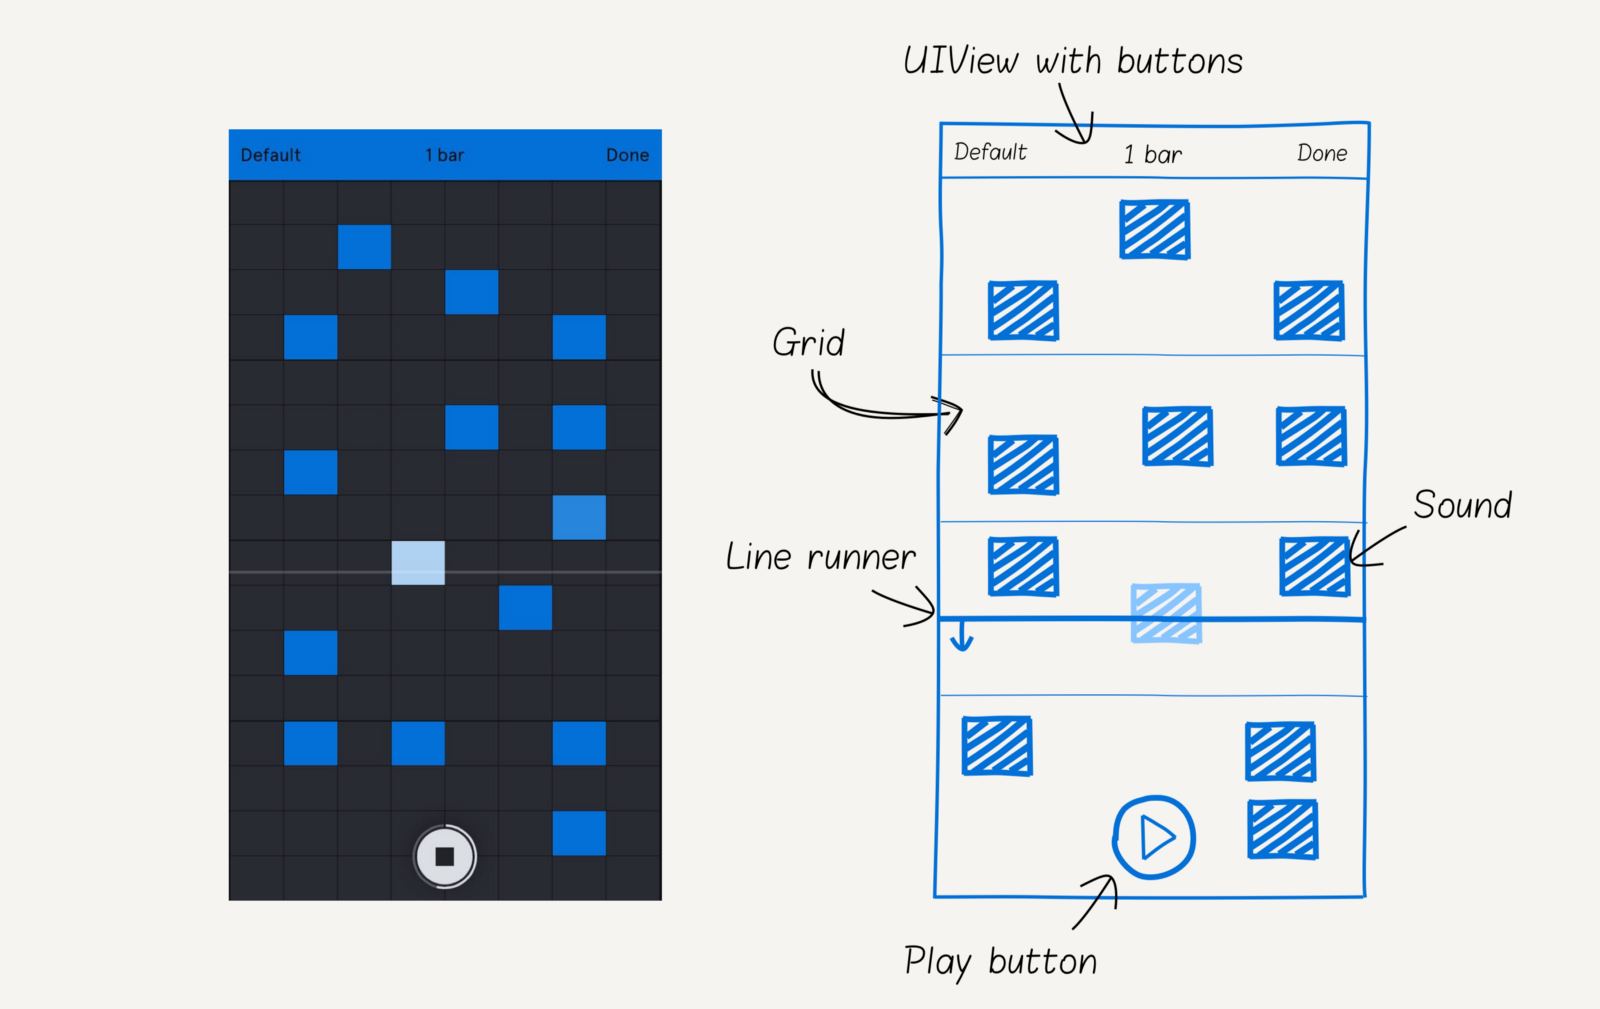
Auxy画面は、「再生」ボタン、「ラインランナー」、サウンド、およびバックグラウンドのグリッドの4つの主要コンポーネントで構成されています。
グリッドには、水平線と垂直線が含まれています。 4本ごとに水平線が強調表示されます。 8x16グリッドサイズ:
screen.width / columns
セル幅と
screen.height / rows
高さ。

let columns = Array(0..<dimension.0).map { column in let x = cell.w * column return Shape( form: Line(x1: x, y1: 0, x2: x, y2: size.h), stroke: stroke, opacity: 0.2 ) }.group() let rows = Array(0..<dimension.1).map { row in let y = cell.h * row return Shape( form: Line(x1: 0, y1: y, x2: size.w, y2: y), stroke: stroke, opacity: row % 4 == 0 ? 1 : 0.2 ) }.group()
画面をタップすると、グリッドにサウンドが追加されます。 列と行は、タップの座標から計算されます。 サウンドには2つの長方形が含まれています。前面は透明度が0.0の白で、背面は青です。 線が音と交差すると、正面の長方形が点灯します。
let column = floor(tapLocation.x / cellSize.w) let row = floor(tapLocation.y / cellSize.h) let rect = Rect(w: cellSize.w, h: cellSize.h) let background = Shape(form: rect, fill: Color.rgb(r: 4, g: 112, b: 215)) let foreground = Shape(form: rect, fill: Color.white, opacity: 0.0) let sound = Group( contents: [background, foreground], place: Transform.move( dx: column * cellSize.w, dy: row * cellSize.h ) )
[再生]ボタンは最も難しい要素です。 2つの静的要素:塗りつぶされた円と
PI/2
近くの
0.05
インデントされた円弧 「プレイ」は3つのポイントで構成されます:(-1、2)、(2、0)、(-1、-2)、4つの「ストップ」:(-2、2)、(2、2)、(2 、-2)、(-2、-2)。 シーンのどの要素も、目的のサイズに簡単にスケーリングできます。 ベクターグラフィックス-パワー!

let border = Shape( form: Arc( ellipse: Ellipse(rx: radius, ry: radius), shift: -M_PI / 2 + 0.05, extent: 2 * M_PI - 0.1 ), stroke: Stroke(fill: Color.rgba(r: 219, g: 222, b: 227, a: 0.3), width: 2.0) ) let circle = Shape(form: Circle(r: 25.0), fill: olor) let playButton = Shape( form: MoveTo(x: -1, y: 2).lineTo(x: 2, y: 0) .lineTo(x: -1, y: -2).close().build(), fill: Color.rgb(r: 46, g: 48, b: 58), place: Transform.scale(sx: 5.0, sy: 5.0) ) let stopButton = Shape( form: MoveTo(x: -2, y: 2).lineTo(x: 2, y: 2) .lineTo(x: 2, y: -2).lineTo(x: -2, y: -2).close().build(), fill: Color.rgb(r: 46, g: 48, b: 58), place: Transform.scale(sx: 4.0, sy: 4.0) ) let buttons = [[playButton], [stopButton]] let buttonGroup = Group(contents: buttons[0]) let button = Group(contents: [border, circle, buttonGroup])
ユーザーが「再生」をクリックすると:
- 「再生」を「停止」に置き換える、またはその逆
- 円弧の円形アニメーションを開始します。長さは
-PI/2+0.05
から3*PI/2–0.1
までアニメーション化されます
button.onTap { tapEvent in // change button content let index = buttons.index { $0 == buttonGroup.contents }! buttonGroup.contents = buttons[(index + 1) % buttons.count] if index == 0 { play() } else { // if stop pressed contentAnimation.stop() // hide animation group animationGroup.opacityVar.animation(to: 0.0, during: 0.1).play() } } func play() { contentAnimation = animationGroup.contentsVar.animation({ t in let shape = Shape( form: Arc( ellipse: Ellipse(rx: radius, ry: radius), shift: -M_PI / 2 + 0.05, extent: max(2 * M_PI * t - 0.1, 0) ), stroke: Stroke(fill: Color.white, width: 2) ) return [shape] }, during: time).cycle() contentAnimation.play() }
「再生」をクリックすると、線が上から下に周期的に移動します。 音と交差するとき、それを強調します。 アニメーションの時間を知って、ラインがサウンドを横切るときを計算します。 この値は、ハイライトアニメーションの遅延です。
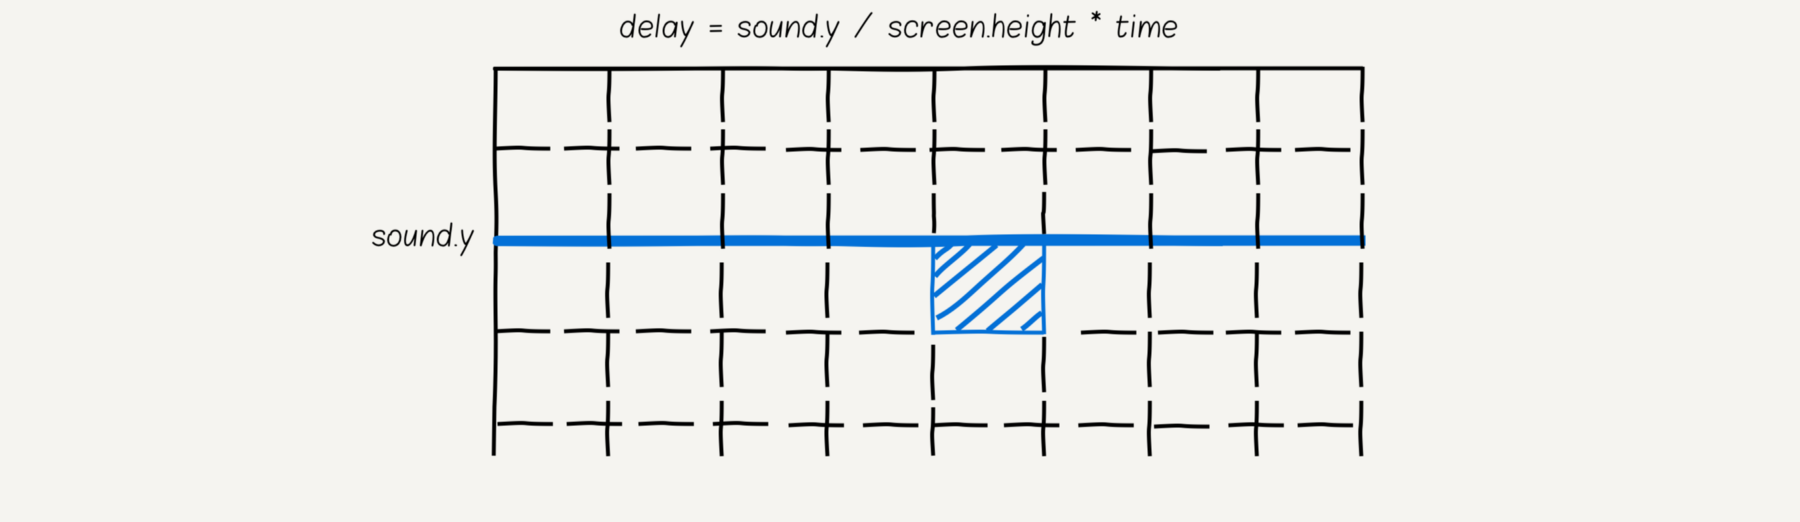
let line = Shape( form: Line(x1: 0, y1: 0, x2: size.w, y2: 0), stroke: Stroke(fill: Color.rgba(r: 219, g: 222, b: 227, a: 0.5), width: 1.0) ) func run(time: Double) { let lineAnimation = line.placeVar.animation( to: Transform.move(dx: 0, dy: screen.height), during: time ).easing(Easing.linear) let hightlight = sounds.map { sound -> Animation in return sound.hightlight().delay(sound.place.dy / screen.height * time) }.combine() let runAnimation = [soundsAnimation, lineAnimation].combine().cycle() runAnimation?.play() }
結果
音楽を作り、GitHubでXcodeプロジェクトを視聴します。

ゾバ
Zovaはパーソナルフィットネストレーナーです。 これには2つのコンポーネントが含まれます。中央の円グラフと画面下部のバーです。
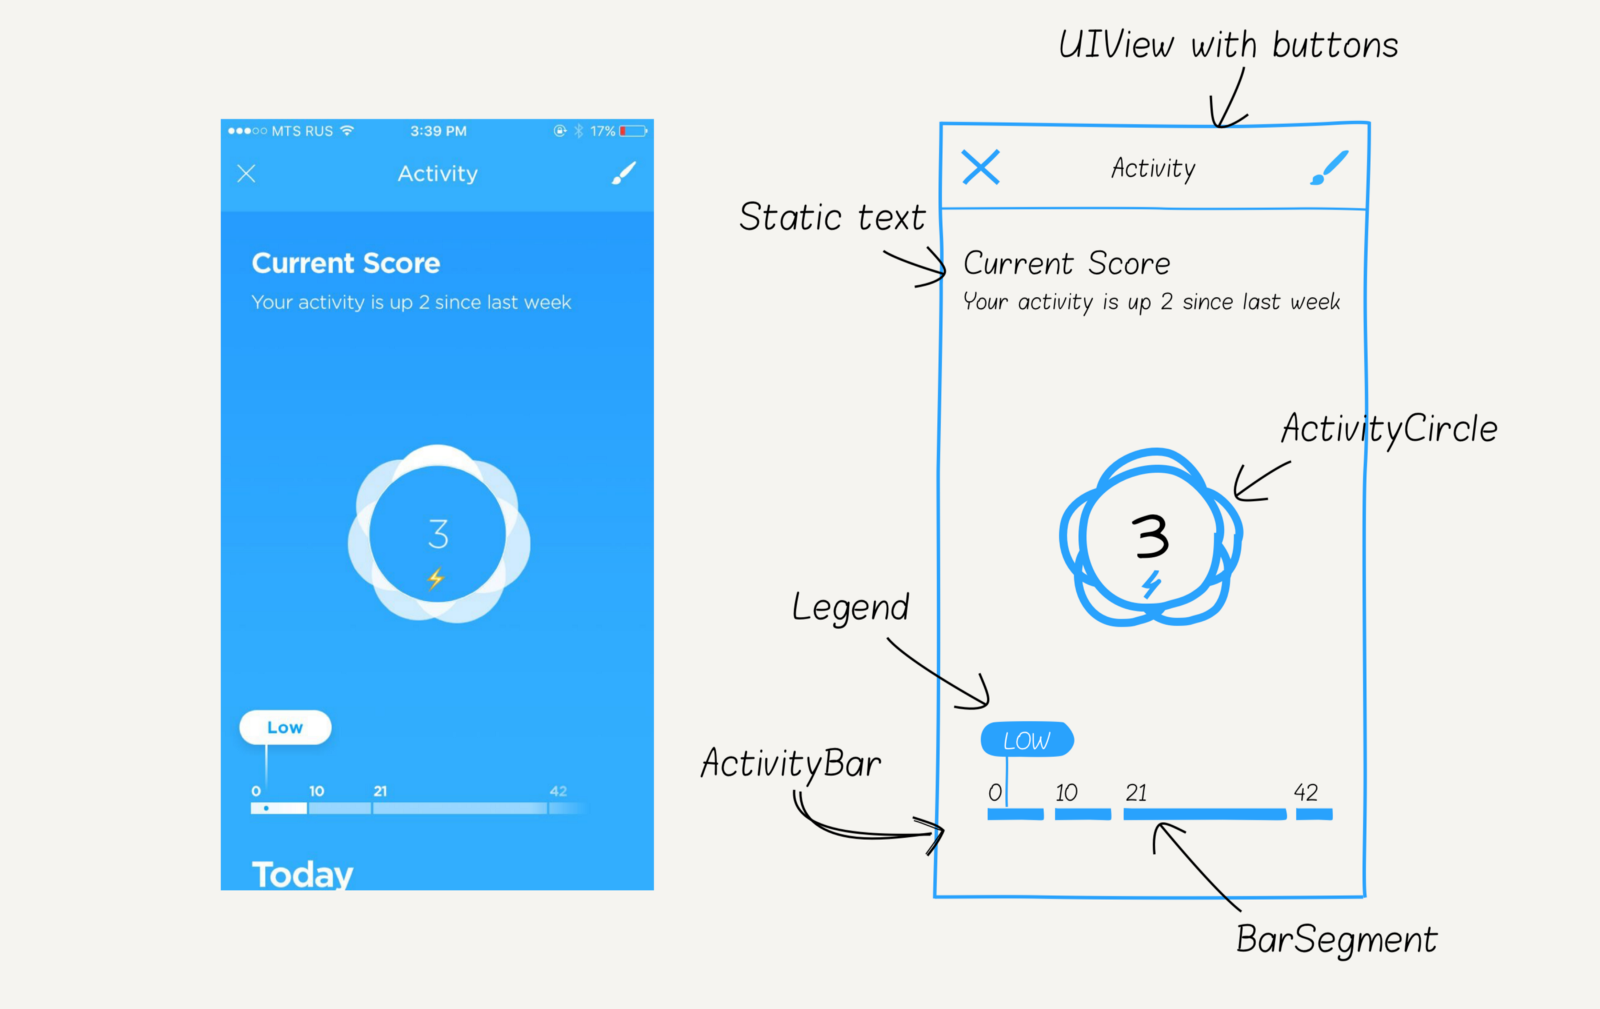
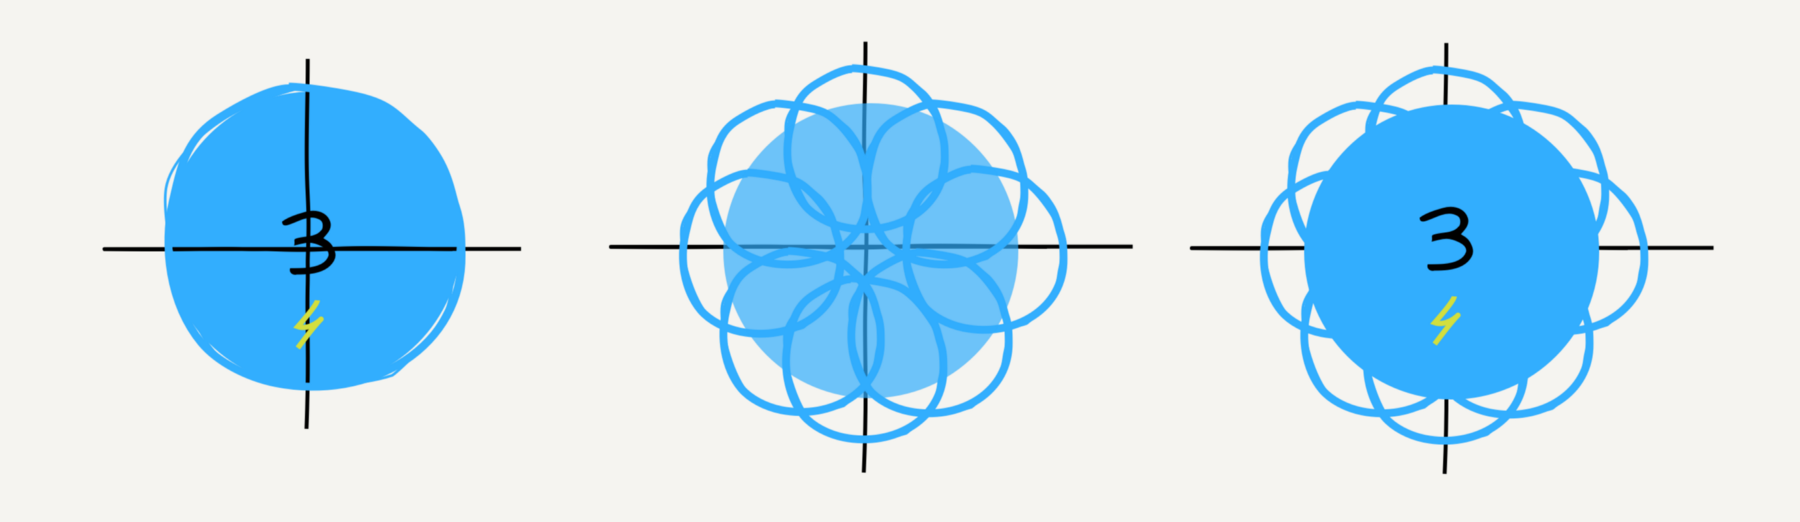
円グラフには、背景に8つの円、中央に1つの塗りつぶされた円、現在の結果、および絵文字アイコンが含まれています。
let mainCircle = Shape( form: Circle(r: 60), fill: mainColor, stroke: Stroke(fill: Color.white, width: 1.0) ) let score = Text( text: "3", font: Font(name: lightFont, size: 40), fill: Color.white, align: .mid, baseline: .mid ) let icon = Text( text: "", font: Font(name: regularFont, size: 24), fill: Color.white, align: .mid, place: Transform.move(dx: 0.0, dy: 30.0) ) let shadows = [ Point(x: 0, y: 35), Point(x: -25, y: 25), Point(x: 25, y: 25), Point(x: 25, y: -25), Point(x: -25, y: -25), Point(x: -40, y: 0), Point(x: 40, y: 0), Point(x: 0, y: -35) ].map { place in return Shape( form: Circle(r: 40), fill: Color.white.with(a: 0.8), place: Transform.move(dx: place.x, dy: place.y) ) }.group() let acivityCircle = Group(contents: [shadows, mainCircle, score, icon])
円グラフをタップすると、利用可能な絵文字アイコンが円で表示されます。 中心からアイコンまでの距離がdの場合、アイコンの座標は
(cos(alpha) * d, sin(alpha) * d)
です。 デフォルトでは、アイコン選択メニューは非表示です(透明度0.0)。
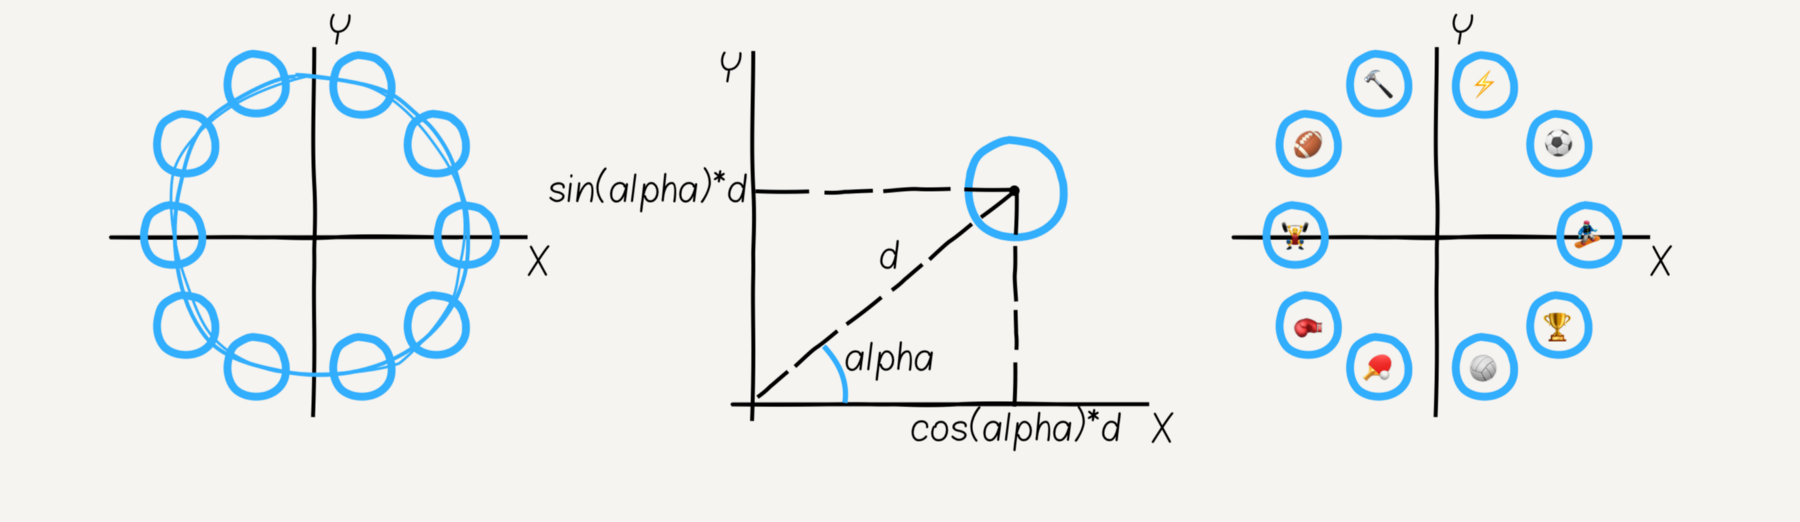
let data = ["", "", ""] // emoji let emojis = data.enumerated().map { (index, item) -> Group in let shape = Shape(form: Circle(r: 20), fill: Color.white) let icon = Text( text: item, font: Font(name: regularFont, size: 14), fill: Color.white, align: .mid, baseline: .mid ) return Group( contents: [shape, icon], place: emojiPlace(index: index, d: 20.0), opacity: 0.0 ) }.group() func emojiPlace(index: Int, d: Double) -> Transform { let alpha = 2 * M_PI / 10.0 * Double(index) return Transform.move( dx: cos(alpha) * d, dy: sin(alpha) * d ) }
バー-凡例とセグメントで構成されるグループ。 凡例は、角丸長方形、「低」テキスト、およびグラデーション色の別の長方形で構成されています。
let border = Shape( form: Rect(w: 80, h: 30).round(r: 16.0), fill: Color.white ) let text = Text( text: "Low", font: Font(name: regularFont, size: 20), fill: mainColor, align: .mid, baseline: .mid, place: Transform.move(dx: 40, dy: 15) ) let line = Shape( form: Rect(x: 20, y: 30, w: 2, h: 40), fill: LinearGradient( degree: 90, from: Color.white.with(a: 0.8), to: mainColor ) ) let legend = [border, text, line].group()
セグメントは、長方形とテキストで構成されています。 要素のx座標はゼロです。 セグメントのX座標は、その番号によって異なります。 最後のセグメントにはグラデーションカラーがあります。
let text = Text( text: text, font: Font(name: regularFont, size: 12), fill: Color.white, align: .min, baseline: .alphabetic, place: Transform.move(dx: 0, dy: -5) ) let rect = Shape( form: Rect(w: width, h: 8), fill: !last ? color : gradient ) let bar = [text, rect].group()
凡例には「ジャンプ」効果があります。垂直軸に沿ってゆっくりと上下に移動します。
let jumpAnimation = legend.placeVar.animation( to: Transform.move(dx: 0.0, dy: -8.0), during: 2.0 ).autoreversed().cycle()
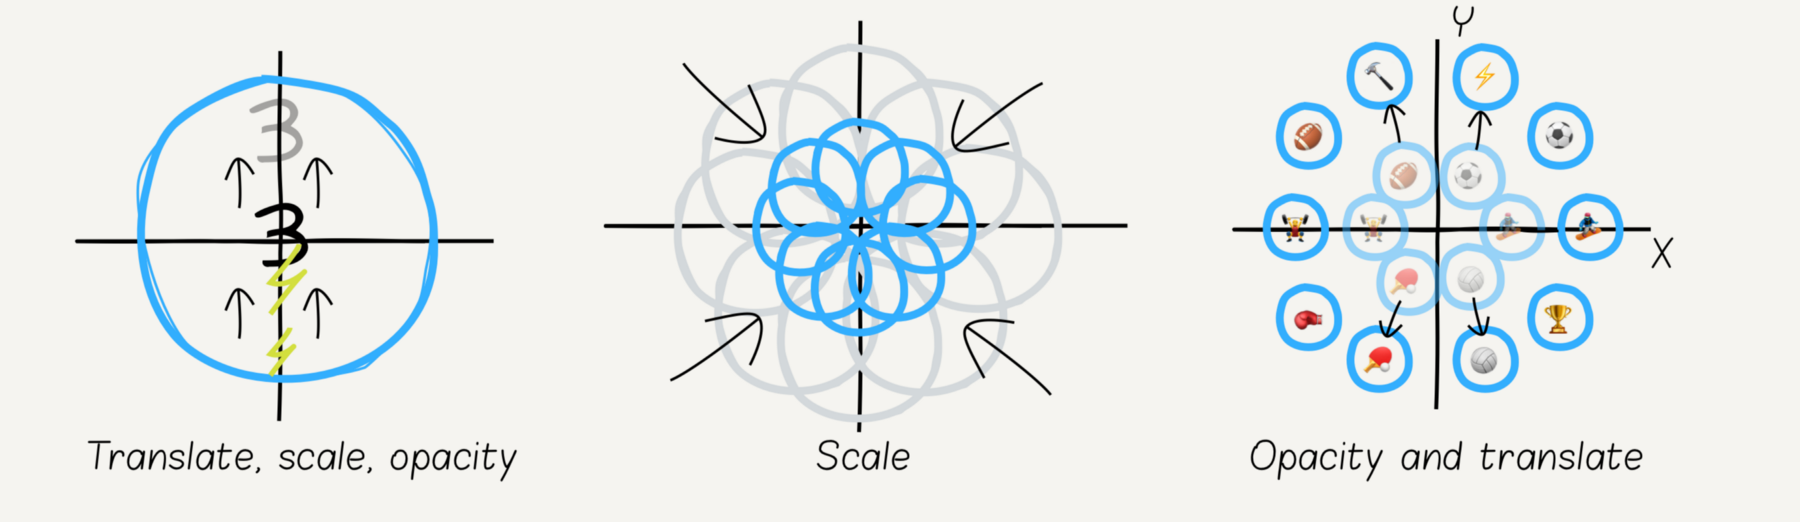
アニメーションに戻ります。 円グラフをタップすると、複数のアニメーションを同時に実行できます。
- バーと上部のラベルを非表示にします
- 背景の円を減らす
- 現在の結果でテキストを上げたり隠したりします
- 絵文字アイコンを拡大または拡大する
- 絵文字アイコンを中央から表示および移動します。
良いニュースです! リバースアニメーションについて心配する必要はありません。自動的に使用できます。どのアニメーションにも
reverse()
メソッドがあります。
let during = 0.5 let hideAnimation = [ bar.opacityVar.animation(to: 0.0, during: during), texts.opacityVar.animation(to: 0.0, during: during) ].combine() let emojisAnimation = emojis.contents.enumerated().map { (index, node) in return [ node.opacityVar.animation(to: 1.0, during: during), node.placeVar.animation( // new emoji position to: emojiPlace(index: index, d: 120.0), during: during ) ].combine() }.combine() let circleAnimation = [ shadows.placeVar.animation(to: Transform.scale(sx: 0.5, sy: 0.5), during: during), score.placeVar.animation(to: Transform.move(dx: 0, dy: -20), during: during), score.opacityVar.animation(to: 0.0, during: during), icon.placeVar.animation(to: Transform.move(dx: 0, dy: -30).scale(sx: 2.0, sy: 2.0), during: during), ].combine() let animation = [hideAnimation, emojisAnimation, circleAnimation].combine() let reverseAnimation = animation.reverse()
結果
スポーツをして、GitHubでXcodeプロジェクトを見る。

まとめ
アップル賞を受賞したデザインではなく、デザインの再活性化は簡単な作業ではありません。 開発者は、さまざまなサイズのデバイスで動作する独自のグラフィック要素とアニメーションの作成に多くの時間を費やします。 この作業は、適切な抽象化と便利なAPIを提供するツールを使用して簡素化できます。 コンゴウインコは、そのようなライブラリの1つで、必需品に集中できます。