 iPhone / iPad用のカメラアプリは非常に使いやすいです。 ユーザーは、撮影モードからビデオ撮影に簡単に切り替えることができます。 ムービーモードでは、撮影時間と1つのボタン(開始/停止)のみが表示されます。 残念ながら、標準のUIImagePickerControllerを使用する場合、1秒あたりのフレーム数やその他のパラメーターを制御する方法はありません。 AVFoundationフレームワークを使用して、1秒あたりのフレーム数、ビデオ品質、録画時間、ビデオファイルサイズなど、より微妙なカメラ設定にアクセスする方法を示します。 ユーザーには、保存された品質ですぐに画面にビデオが表示されます。
私が撮影できるようにする主なオブジェクト:
AVCaptureSession //
さらに、次のものが必要です。
AVCaptureVideoPreviewLayer // , AVCaptureDevice // / AVCaptureDeviceInput // / AVCaptureSession AVCaptureMovieFileOutput // AVCaptureSession
デザインは、xibファイルまたはストーリーボードに保存できます。 デザイナで自動レイアウトと制約を使用すると、すべてのパネルが自動的に引き伸ばされ、ボタンが中央(左または右)に配置されるようにできます。 VideoRecorderControllerには3つの操作モードがあります。
- 撮影準備完了: AVCaptureSessionが実行されており、画面上のカメラからのライブビデオが録画されていません。
下部のパネルでは、キャンセルボタンがアクティブになります-撮影をキャンセルし、スタートボタンもアクティブになります-録画を開始します。
上部パネルには、記録時間-00:00が表示されます。 [キャンセル]ボタンをクリックすると、ビデオデリゲートは-(void)videoRecorderDidCancelRecordingVideoメソッドをトリガーします。 [スタート]ボタンを押した後、次のモードに進みます。
- 撮影が進行中です:ビデオがファイルに記録されている間、AVCaptureSessionが実行され、カメラからのオンスクリーンビデオがリアルタイムで実行されます。 開始ボタンの代わりに、停止ボタンが下部パネルに表示されます-録画の終了、キャンセルボタンが非表示になり、ビデオを使用ボタンも非表示になります。 上部のパネルには、現在の記録時間-00:22が表示されます。 停止ボタンを押すと、記録が停止し、次のモードに進みます。
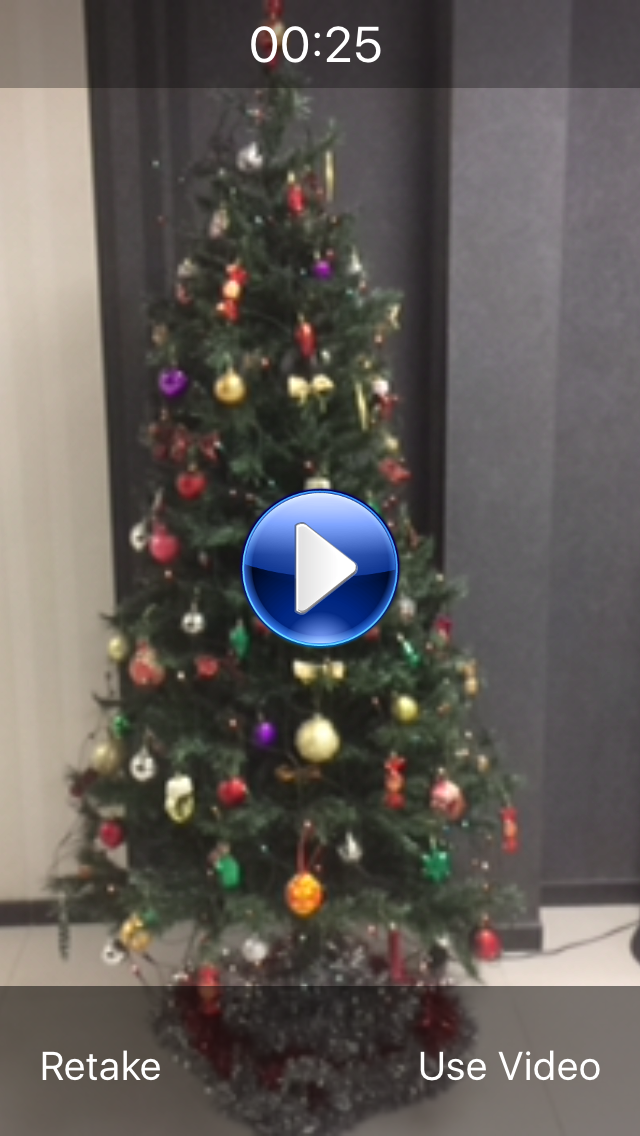
- 撮影完了: AVCaptureSessionが停止し、キャプチャされたビデオの最後のフレームが画面に表示され、ファイルへのビデオ録画が完了します。 画面の中央に[ビデオの再生]ボタンが表示されます。
下部のパネルでは、キャンセルボタンの代わりに、再撮影ボタンが表示されます-ビデオを再撮影し、ビデオを使用ボタンが表示され、スタートボタンが非表示になります。
上のパネルには、ビデオ録画の期間-00:25が表示されます。
[ビデオの再生]ボタンを押すと、AVPlayerを使用してビデオが視聴されます。
Retakeボタンを押した後、最初のモードに戻ります。
[ビデオの使用]ボタンを押すと、ビデオデリゲートは-(void)videoRecorderDidFinishRecording VideoWithOutputURL:(NSURL *)outputURLメソッドを起動します。
3つの操作モード-画面
 |  |  |
ヘッダーファイルでは、ビデオ録画のキャンセルとビデオ録画の正常終了を処理するためのビデオデリゲートプロトコルを記述する必要があります。
これがVideoRecorderController.hヘッダーファイルの外観です
#import <UIKit/UIKit.h> #import <Foundation/Foundation.h> #import <CoreMedia/CoreMedia.h> #import <AVFoundation/AVFoundation.h> #import <AudioToolbox/AudioToolbox.h> #import <AVKit/AVKit.h> @protocol VideoRecorderDelegate <NSObject> // , - (void)videoRecorderDidFinishRecordingVideoWithOutputPath:(NSString *)outputPath; // , - (void)videoRecorderDidCancelRecordingVideo; @end @interface VideoRecorderController : UIViewController @property (nonatomic, retain) NSString *outputPath; // @property (nonatomic, assign) id<VideoRecorderDelegate> delegate; @end
VideoRecorderController.m実装ファイルで、ビデオ録画用のいくつかの定数を設定し、インターフェイスデザイナーでバインドする必要があるプロパティとメソッドを説明します。 私も必要になります:
- AVCaptureSessionビデオキャプチャセッション
- AVCaptureMovieFileOutputビデオ出力ファイル
- AVCaptureDeviceInputビデオ入力デバイス
- リアルタイムビデオを表示するレイヤーAVCaptureVideoPreviewLayer
- タイマーと記録時間インジケーターの時間
VideoRecorderController.m実装ファイル-変数宣言
#import "VideoRecorderController.h" #define TOTAL_RECORDING_TIME 60*20 // #define FRAMES_PER_SECOND 30 // #define FREE_DISK_SPACE_LIMIT 1024 * 1024 // () #define MAX_VIDEO_FILE_SIZE 160 * 1024 * 1024 // () #define CAPTURE_SESSION_PRESET AVCaptureSessionPreset352x288 // #define BeginVideoRecording 1117 // #define EndVideoRecording 1118 // @interface VideoRecorderController () <AVCaptureFileOutputRecordingDelegate> { BOOL WeAreRecording; // , AVCaptureSession *CaptureSession; AVCaptureMovieFileOutput *MovieFileOutput; AVCaptureDeviceInput *VideoInputDevice; } // @property (retain) IBOutlet UILabel *timeLabel; // @property (retain) IBOutlet UIButton *startButton; // Start / Stop @property (retain) IBOutlet UIImageView *circleImage; // Start @property (retain) IBOutlet UIButton *cancelButton; // Cancel @property (retain) IBOutlet UIButton *useVideoButton; // Use Video @property (retain) IBOutlet UIView *bottomView; // @property (retain) IBOutlet UIButton *playVideoButton; // Play Video - (IBAction)startStopButtonPressed:(id)sender; // Start / Stop - (IBAction)cancel:(id)sender; // Cancel - (IBAction)useVideo:(id)sender; // Use Video - (IBAction)playVideo:(id)sender; // Play Video @property (retain) AVCaptureVideoPreviewLayer *PreviewLayer; // @property (retain) NSTimer *videoTimer; @property (assign) NSTimeInterval elapsedTime; @end
viewDidLoadメソッドが機能した後、次の手順を実行する必要があります。
- outputPathビデオファイルへのパスを設定し、前のレコードを削除します
- アプリケーションに終了ハンドラーを追加UIApplicationDidEnterBackgroundNotification
- AVCaptureSessionを初期化する
- デフォルトのビデオデバイスAVCaptureDeviceを見つけて、ビデオ入力デバイスAVCaptureDeviceInputを作成します
- ビデオ入力デバイスを追加する前に、必ず電話する必要があります
[CaptureSession beginConfiguration]メソッド - 次に、ビデオ入力デバイスをAVCaptureSessionに追加します
- ビデオ入力デバイスを追加したら、必ず[CaptureSession commitConfiguration]メソッドを呼び出す必要があります
- デフォルトのAVCaptureDeviceオーディオデバイスを見つけ、AVCaptureDeviceInputオーディオ入力デバイスを作成し、このデバイスをAVCaptureSessionに追加します
- リアルタイムビデオが表示されるAVCaptureVideoPreviewLayerレイヤーを作成し、AVCaptureSessionセッションにバインドし、アスペクト比を維持しながらこのレイヤーを画面全体に引き伸ばします(フレームの端は画面に表示されません)
- デバイスの向きに応じてAVCaptureVideoPreviewLayerレイヤーのサイズを再計算し、このレイヤーを背景に送信して、すべてのパネルとコントロールボタンがその上に表示されるようにします
- AVCaptureMovieFileOutputファイルへのビデオ出力を初期化します
- 秒あたりのフレームレート、最大ビデオ長を設定します
- 最大ビデオ長をバイト単位で設定します
- 空きディスク容量の最小サイズをバイト単位で設定します
- AVCaptureSessionのファイルにビデオ出力を追加します
- AVCaptureSessionのビデオ品質を設定します
- 最後に、AVCaptureMovieFileOutputビデオ出力ファイルとAVCaptureVideoPreviewLayerビデオ表示レイヤーの正しい方向を設定します
別のアプリケーションに切り替えると、ビデオがある場合は停止します。 viewWillAppearメソッドが機能した後、AVCaptureSessionセッションを開始する必要があります。リアルタイムビデオが画面に表示され始めます。 ただし、ビデオを視聴した後にこの画面に遷移した場合は、AVCaptureSessionを実行する必要はありません。ビデオファイルがないことを確認する必要があります。
VideoRecorderController.m実装ファイル-View Controllerのロード
@implementation VideoRecorderController - (void)viewDidLoad { [super viewDidLoad]; self.outputPath = [[NSString alloc] initWithFormat:@"%@%@", NSTemporaryDirectory(), @"output.mov"]; [self deleteVideoFile]; [[NSNotificationCenter defaultCenter] addObserver: self selector: @selector(applicationDidEnterBackground:) name: UIApplicationDidEnterBackgroundNotification object: nil]; CaptureSession = [[AVCaptureSession alloc] init]; AVCaptureDevice *VideoDevice = [AVCaptureDevice defaultDeviceWithMediaType:AVMediaTypeVideo]; if (VideoDevice) { NSError *error = nil; VideoInputDevice = [AVCaptureDeviceInput deviceInputWithDevice:VideoDevice error:&error]; if (!error) { [CaptureSession beginConfiguration]; if ([CaptureSession canAddInput:VideoInputDevice]) { [CaptureSession addInput:VideoInputDevice]; } [CaptureSession commitConfiguration]; } } AVCaptureDevice *audioDevice = [AVCaptureDevice defaultDeviceWithMediaType:AVMediaTypeAudio]; NSError *error = nil; AVCaptureDeviceInput *audioInput = [AVCaptureDeviceInput deviceInputWithDevice:audioDevice error:&error]; if (audioInput) { [CaptureSession addInput:audioInput]; } [self setPreviewLayer:[[AVCaptureVideoPreviewLayer alloc] initWithSession:CaptureSession]]; [self.PreviewLayer setVideoGravity:AVLayerVideoGravityResizeAspectFill]; [self setupLayoutInRect:[[[self view] layer] bounds]]; UIView *CameraView = [[UIView alloc] init]; [[self view] addSubview:CameraView]; [self.view sendSubviewToBack:CameraView]; [[CameraView layer] addSublayer:self.PreviewLayer]; MovieFileOutput = [[AVCaptureMovieFileOutput alloc] init]; CMTime maxDuration = CMTimeMakeWithSeconds(TOTAL_RECORDING_TIME, FRAMES_PER_SECOND); MovieFileOutput.maxRecordedDuration = maxDuration; MovieFileOutput.maxRecordedFileSize = MAX_VIDEO_FILE_SIZE; MovieFileOutput.minFreeDiskSpaceLimit = FREE_DISK_SPACE_LIMIT; if ([CaptureSession canAddOutput:MovieFileOutput]) { [CaptureSession addOutput:MovieFileOutput]; } if ([CaptureSession canSetSessionPreset:CAPTURE_SESSION_PRESET]) { [CaptureSession setSessionPreset:CAPTURE_SESSION_PRESET]; } [self cameraSetOutputProperties]; } - (void)applicationDidEnterBackground:(UIApplication *)application { if (WeAreRecording) { [self stopRecording]; } } - (void)viewWillAppear:(BOOL)animated { [super viewWillAppear:animated]; if (![[NSFileManager defaultManager] fileExistsAtPath:self.outputPath]) { WeAreRecording = NO; [CaptureSession startRunning]; } }
画面の回転は、セッションが実行されており、記録が継続していない場合にのみ許可されます。 画面を切り替える前に、向きに応じて画面サイズを再計算する必要があります。 回転後、ビデオ出力ファイルAVCaptureMovieFileOutputおよびビデオ表示レイヤーAVCaptureVideoPreviewLayerの正しい方向を設定する必要があります。
VideoRecorderController.m実装ファイル-コーナー処理
- (BOOL)shouldAutorotate { return (CaptureSession.isRunning && !WeAreRecording); } - (UIInterfaceOrientationMask)supportedInterfaceOrientations { return (UIInterfaceOrientationMaskPortrait | UIInterfaceOrientationMaskLandscape | UIInterfaceOrientationMaskPortraitUpsideDown); } - (void)viewWillTransitionToSize:(CGSize)size withTransitionCoordinator:(id<UIViewControllerTransitionCoordinator>)coordinator { [self setupLayoutInRect:CGRectMake(0, 0, size.width, size.height)]; [super viewWillTransitionToSize:size withTransitionCoordinator:coordinator]; [coordinator animateAlongsideTransition:^(id<UIViewControllerTransitionCoordinatorContext> context) { } completion:^(id<UIViewControllerTransitionCoordinatorContext> context) { [self cameraSetOutputProperties]; }]; } // // viewWillTransitionToSize, iOS 7 - (void)didRotateFromInterfaceOrientation:(UIInterfaceOrientation)fromInterfaceOrientation { [self setupLayoutInRect:[[[self view] layer] bounds]]; [self cameraSetOutputProperties]; } // - (void)setupLayoutInRect:(CGRect)layoutRect { [self.PreviewLayer setBounds:layoutRect]; [self.PreviewLayer setPosition:CGPointMake(CGRectGetMidX(layoutRect), CGRectGetMidY(layoutRect))]; } // - (void)cameraSetOutputProperties { AVCaptureConnection *videoConnection = nil; for ( AVCaptureConnection *connection in [MovieFileOutput connections] ) { for ( AVCaptureInputPort *port in [connection inputPorts] ) { if ( [[port mediaType] isEqual:AVMediaTypeVideo] ) { videoConnection = connection; } } } if ([videoConnection isVideoOrientationSupported]) { if ([UIApplication sharedApplication].statusBarOrientation == UIInterfaceOrientationPortrait) { self.PreviewLayer.connection.videoOrientation = AVCaptureVideoOrientationPortrait; [videoConnection setVideoOrientation:AVCaptureVideoOrientationPortrait]; } else if ([UIApplication sharedApplication].statusBarOrientation == UIInterfaceOrientationPortraitUpsideDown) { self.PreviewLayer.connection.videoOrientation = AVCaptureVideoOrientationPortraitUpsideDown; [videoConnection setVideoOrientation:AVCaptureVideoOrientationPortraitUpsideDown]; } else if ([UIApplication sharedApplication].statusBarOrientation == UIInterfaceOrientationLandscapeLeft) { self.PreviewLayer.connection.videoOrientation = AVCaptureVideoOrientationLandscapeLeft; [videoConnection setVideoOrientation:AVCaptureVideoOrientationLandscapeLeft]; } else { self.PreviewLayer.connection.videoOrientation = AVCaptureVideoOrientationLandscapeRight; [videoConnection setVideoOrientation:AVCaptureVideoOrientationLandscapeRight]; } } }
開始/停止ボタンを押すと、記録が進行中でない場合に記録が開始されます。 記録が既に進行中の場合、記録は停止します。 [キャンセル]ボタンを押すと、videoRecorderDidCancelRecordingVideoビデオデリゲートメソッドがトリガーされます。 [リテイク]ボタンを押すと、タイマーがリセットされ、ボタンの名前が変わり、[ビデオを使用]ボタンが非表示になり、ビデオキャプチャセッションが再び開始されます。 [ビデオを使用]ボタンを押すと、videoRecorderDidFinishRecordingVideoWithOutputPathビデオデリゲートメソッドがトリガーされ、ビデオファイルへのパスを転送する必要があります。 [ビデオの再生]ボタンを押すと、キャプチャされたビデオの撮影がAVPlayerを使用して開始されます。 ビデオタイマーがオフになると、上部パネルの時間インジケーターが更新されます。 ビデオ録画ファイルのデリゲートメソッドは、ファイルサイズが最大値に達するか、録画時間が最大値に達するとトリガーされます。 この時点で、記録は停止します。
VideoRecorderController.m実装ファイル-ボタンクリック処理、デリゲートメソッドAVCaptureFileOutputRecordingDelegate
- (IBAction)startStopButtonPressed:(id)sender { if (!WeAreRecording) { [self startRecording]; } else { [self stopRecording]; } } - (IBAction)cancel:(id)sender { if ([CaptureSession isRunning]) { if (self.delegate) { [self.delegate videoRecorderDidCancelRecordingVideo]; } } else { self.circleImage.hidden = NO; self.startButton.hidden = NO; self.useVideoButton.hidden = YES; [self.cancelButton setTitle:@"Cancel" forState:UIControlStateNormal]; self.timeLabel.text = @"00:00"; self.elapsedTime = 0; [CaptureSession startRunning]; } } - (IBAction)useVideo:(id)sender { if (self.delegate) { [self.delegate videoRecorderDidFinishRecordingVideoWithOutputPath:self.outputPath]; } } - (IBAction)playVideo:(id)sender { if ([[NSFileManager defaultManager] fileExistsAtPath:self.outputPath]) { NSURL *outputFileURL = [[NSURL alloc] initFileURLWithPath:self.outputPath]; AVPlayer *player = [AVPlayer playerWithURL:outputFileURL]; AVPlayerViewController *controller = [[AVPlayerViewController alloc] init]; [self presentViewController:controller animated:YES completion:nil]; controller.player = player; controller.allowsPictureInPicturePlayback = NO; [player play]; } } // - (void)startRecording { // AudioServicesPlaySystemSound(BeginVideoRecording); WeAreRecording = YES; [self.cancelButton setHidden:YES]; [self.bottomView setHidden:YES]; [self.startButton setImage:[UIImage imageNamed:@"StopVideo"] forState:UIControlStateNormal]; self.timeLabel.text = @"00:00"; self.elapsedTime = 0; self.videoTimer = [NSTimer scheduledTimerWithTimeInterval:1 target:self selector:@selector(updateTime) userInfo:nil repeats:YES]; // , , [self deleteVideoFile]; // NSURL *outputURL = [[NSURL alloc] initFileURLWithPath:self.outputPath]; [MovieFileOutput startRecordingToOutputFileURL:outputURL recordingDelegate:self]; } - (void)deleteVideoFile { NSFileManager *fileManager = [NSFileManager defaultManager]; if ([fileManager fileExistsAtPath:self.outputPath]) { NSError *error = nil; if ([fileManager removeItemAtPath:self.outputPath error:&error] == NO) { // } } } // - (void)stopRecording { // AudioServicesPlaySystemSound(EndVideoRecording); WeAreRecording = NO; [CaptureSession stopRunning]; self.circleImage.hidden = YES; self.startButton.hidden = YES; [self.cancelButton setTitle:@"Retake" forState:UIControlStateNormal]; [self.cancelButton setHidden:NO]; [self.bottomView setHidden:NO]; [self.startButton setImage:[UIImage imageNamed:@"StartVideo"] forState:UIControlStateNormal]; // [self.videoTimer invalidate]; self.videoTimer = nil; // [MovieFileOutput stopRecording]; } - (void)updateTime { self.elapsedTime += self.videoTimer.timeInterval; NSInteger seconds = (NSInteger)self.elapsedTime % 60; NSInteger minutes = ((NSInteger)self.elapsedTime / 60) % 60; self.timeLabel.text = [NSString stringWithFormat:@"%02ld:%02ld", (long)minutes, (long)seconds]; } - (void)captureOutput:(AVCaptureFileOutput *)captureOutput didFinishRecordingToOutputFileAtURL:(NSURL *)outputFileURL fromConnections:(NSArray *)connections error:(NSError *)error { if (WeAreRecording) { [self stopRecording]; } BOOL RecordedSuccessfully = YES; if ([error code] != noErr) { // , , // , id value = [[error userInfo] objectForKey:AVErrorRecordingSuccessfullyFinishedKey]; if (value != nil) { RecordedSuccessfully = [value boolValue]; } } if (RecordedSuccessfully) { // , Use Video self.useVideoButton.hidden = NO; } } - (void)viewDidUnload { [super viewDidUnload]; CaptureSession = nil; MovieFileOutput = nil; VideoInputDevice = nil; } @end
ここで、私のプロジェクトのソースコードを見つけて、アプリケーションの動作を試すことができます。
ソースへの参照: