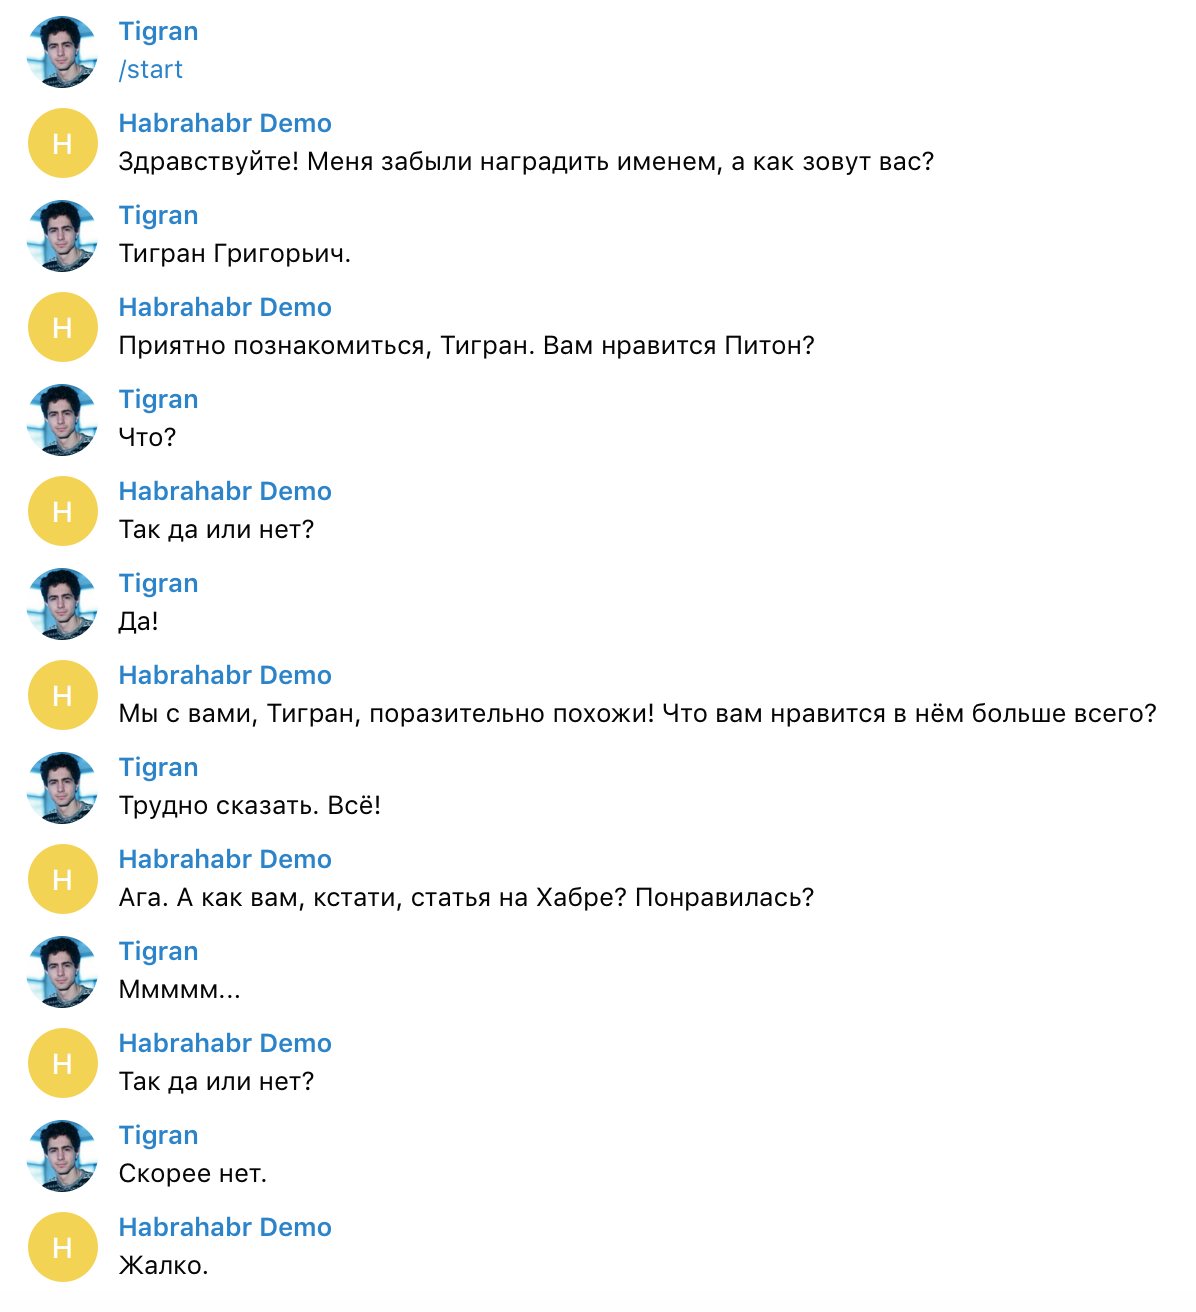
もちろん、このトピックはHabréで繰り返し取り上げられました。ボットは、竜巻 、 Node.js 、 特別なgemを備えた Ruby 、 Ruby on Rails 、 WCFを備えたC# 、さらにはPHPを備えたPythonで記述されました 。 ボットは、 RSSフィード 、 サイトの監視 、 リモートでのコンピューターの電源投入、およびおそらくはるかに多くの目的で作成されました。
それでも、このトピックをもう一度旅する自由を取り、これに加えて、Pythonの魔法をいくつか示します。 python-telegram-botパッケージに基づいて重要なダイアログボットを簡単に作成するためのフレームワーク™を作成します。
ボットを想像する方法は?
公式文書がこの質問に最もよく答えています。 プロセスは次のようになります。

シンプルでしょ? (慎重になり、説得力のある理由なしに良いニックネームを使用しないでください!)
最も簡単なボット
まず、基本パッケージのチュートリアルを見て、単純なボットがどのように開始されるかを理解してください 。 次のコード
# -*- coding: utf-8 -*- from telegram.ext import Updater # python-telegram-bot, Python- from telegram.ext import CommandHandler # - telegram ¯\_(ツ)_/¯ def start(bot, update): # update: https://core.telegram.org/bots/api#update bot.sendMessage(chat_id=update.message.chat_id, text=".") updater = Updater(token='TOKEN') # , ! start_handler = CommandHandler('start', start) # # /start updater.dispatcher.add_handler(start_handler) # updater.start_polling() # !
「スタート」ボタンをクリックすると(または
/start
コマンドを手動で入力して)ドライに「Hello」と応答するボットを作成します。
したがって、テキストメッセージまたはコマンドのハンドラーをハングアップする場合は、次のように記述する必要があります。
from telegram.ext import Filters, MessageHandler def handle_text(bot, update): # ... def handle_command(bot, update): # ... # MessageHandler -- , text_handler = MessageHandler(Filters.text, self.handle_text) command_handler = MessageHandler(Filters.command, self.handle_command) # updater.dispatcher.add_handler(text_handler) # , updater.dispatcher.add_handler(command_handler) # ()
(詳細については、明確な良心で、 python-telegram-botのドキュメントを参照してください。)
この理論上の最小値をロードすると、ついに重要なボットの書き方を考えることができます。 まず、問題のステートメントに戻りましょう。 対話ボットとは、主にユーザーとの通常のテキスト対話を行うボットを意味します-質問、回答、非線形プロット、失望の結末など(「 Endless Summer 」をプレイしましたか?) Telegramの機能をさまざまな方法で拡張するボット(「いいね!」のボットなど ); したがって、インラインモード 、 ゲーム 、 オンザフライでのコントロールの更新など、あらゆる種類のグッズの追加は省略します 。
複雑なダイアログボットの問題は、重要なダイアログでは状態を保存する必要があることです。 非同期ダイアログの操作では、ユーザーからのメッセージを待つために一定の割り込みが必要です。 状態を保存してから復元し、次のメッセージの処理を担当するコードにジャンプする必要があります。 一般的に、コードの整理は非常に気のめいる問題になります。 中断して続行します... それでは、
yield
magicを使用して、示された問題をエレガントに回避する方法を見てみましょう。
収量50シェード
yield
について何を知っていますか? さて、ジェネレーターを作成すること、つまり、怠zyで潜在的に無限のリストのようなものを作成することは非常に重要です。
def fibonacci(): a, b = 1, 1 while True: yield a a, b = b, a + b f = fibonacci()
ここで、オブジェクト
f
はそのような魔法の箱です。
next(f)
を書くために
list(f)
を書くために
ジェネレータは高速で便利で、非常にPythonスタイルであることがわかっています。 すべての味と色のジェネレーターを提供する
itertools
モジュールがあります。 しかし、私たちには何か他のものがあります。
yield
という単語のあまり知られていないスキルは、値を返し、例外をスローする能力です! はい、はい、私たちが書くなら:
f.throw(Exception)
フィボナッチ数の計算は、最も悲劇的な方法で終了します-
yield
例外です。
次に、
f.send(something)
を呼び出すと、
yield
コンストラクトが値を返し、すぐに
next(f)
返します。 渡された値を取得するには、
yield
変数を同等にするだけで十分です。
def doubler(start): while True: start = yield (start, start) d = doubler(42) print(next(d)) # (42, 42) print(next(d)) # (None, None), - ! print(d.send(43)) # (43, 43) -- yield 43, yield
しかし、それだけではありません。 Python 3.3以降では、ジェネレーターは
yield from
:構造を代わりに使用して、実行を相互に委任できます
def concatenate(iterable1, iterable2): for item in iterable1: yield item for item in iterable2: yield item
彼女は私たちに書いてもらう
def concatenate(iterable1, iterable2): yield from iterable1 yield from iterable2
しかし、
yield from
使用するとループのコード行のみを保存できると言っても過言ではありません。 実際には、
send
と
throw
も処理します。呼び出された場合、それらは
concatenate
関数ではなく、制御を転送する2つのジェネレーターの1つと対話します。 (ジェネレーターではないことが判明した場合...まあ、おっと。)
また、
yield from
は値を返す方法も知っています。このため、ジェネレーター関数は非自明(つまり、実行を終了するだけでなく何かを返す)の権利を
return
。
def despaired_person(): yield None yield None yield None return "I'm tired of my uselessness" def despair_expresser(): result = yield from despaired_person() print(result) print(list(f())) # # I'm tired of my uselessness # [None, None, None]
なぜ私はこれをすべてしているのですか? そうそう。 これらのトリックを組み合わせることで、ダイアログボットを簡単かつ自然に作成できます。
ラッパーの作成
したがって、各ユーザーとの対話はジェネレーターによって行われます。
yield
は、ユーザーに送信する必要のあるメッセージを提供し、応答が表示されたらすぐに内部に返します。 これを行うことができる単純なクラスを書きましょう。
import collections from telegram.ext import Filters from telegram.ext import MessageHandler from telegram.ext import Updater class DialogBot(object): def __init__(self, token, generator): self.updater = Updater(token=token) # handler = MessageHandler(Filters.text | Filters.command, self.handle_message) self.updater.dispatcher.add_handler(handler) # self.handlers = collections.defaultdict(generator) # "id -> " def start(self): self.updater.start_polling() def handle_message(self, bot, update): print("Received", update.message) chat_id = update.message.chat_id if update.message.text == "/start": # /start, -- # , self.handlers.pop(chat_id, None) if chat_id in self.handlers: # , .send(), # try: answer = self.handlers[chat_id].send(update.message) except StopIteration: # -- , del self.handlers[chat_id] # ( , , ) return self.handle_message(bot, update) else: # . defaultdict # , .next() # (.send() yield) answer = next(self.handlers[chat_id]) # print("Answer: %r" % answer) bot.sendMessage(chat_id=chat_id, text=answer)
さて、対話を構成することは残っています。 Pythonについて話しましょう。
def dialog(): answer = yield "! , ?" # , # , name = answer.text.rstrip(".!").split()[0].capitalize() likes_python = yield from ask_yes_or_no(" , %s. ?" % name) if likes_python: answer = yield from discuss_good_python(name) else: answer = yield from discuss_bad_python(name) def ask_yes_or_no(question): """ , «» «». : bool """ answer = yield question while not ("" in answer.text.lower() or "" in answer.text.lower()): answer = yield " ?" return "" in answer.text.lower() def discuss_good_python(name): answer = yield " , %s, ! ?" % name likes_article = yield from ask_yes_or_no(". , , ? ?") if likes_article: answer = yield "!" else: answer = yield "." return answer def discuss_bad_python(name): answer = yield "--. %s, ! ?" % name likes_article = yield from ask_yes_or_no( " . " " , , ?") if likes_article: answer = yield " ." else: answer = yield " «»? «, » «, »?" answer = yield ", ." return answer if __name__ == "__main__": dialog_bot = DialogBot(sys.argv[1], dialog) dialog_bot.start()
そしてそれは動作します! 結果は次のようになります。
マークアップを追加
テレグラムボットは、ユーザーにHTMLおよびMarkdownマーキングをスローできるという点で強力です。 この機会を回避することはできません。 マークアップメッセージの送信方法を理解するために、
Bot.sendMessage
関数の説明を見てみましょう。
def sendMessage(self, chat_id, text, parse_mode=None, disable_web_page_preview=None, disable_notification=False, reply_to_message_id=None, reply_markup=None, timeout=None, **kwargs): """Use this method to send text messages. Args: chat_id (str): ... text (str): ... parse_mode (Optional[str]): Send Markdown or HTML, if you want Telegram apps to show bold, italic, fixed-width text or inline URLs in your bot's message. disable_web_page_preview (Optional[bool]): ... disable_notification (Optional[bool]): ... reply_to_message_id (Optional[int]): ... reply_markup (Optional[:class:`telegram.ReplyMarkup`]): Additional interface options. A JSON-serialized object for an inline keyboard, custom reply keyboard, instructions to hide reply keyboard or to force a reply from the user. timeout (Optional[float]): ... ... """
うん! 引数
parse_mode="HTML"
または
parse_mode="Markdown"
を渡すだけで十分です。 これを呼び出しに追加することもできますが、もう少しダメージを与えましょう。マークアップの使用を引き起こすためにyieldする必要がある特別なオブジェクトを追加します。
class Message(object): def __init__(self, text, **options): self.text = text self.options = options class Markdown(Message): def __init__(self, text, **options): super(Markup, self).__init__(text, parse_mode="Markdown", **options) class HTML(Message): def __init__(self, text, **options): super(HTML, self).__init__(text, parse_mode="HTML", **options)
メッセージの送信は次のようになります。
def handle_message(self, bot, update): # ...... print("Answer: %r" % answer) self._send_answer(bot, chat_id, answer) def _send_answer(self, bot, chat_id, answer): if isinstance(answer, str): answer = Message(answer) bot.sendMessage(chat_id=chat_id, text=answer.text, **answer.options)
デモのために、
ask_yes_or_no()
変更しましょう。
def ask_yes_or_no(question): answer = yield question while not ("" in answer.text.lower() or "" in answer.text.lower()): answer = yield HTML(" <b></b> <b></b>?") return "" in answer.text.lower()
結果は明らかです。

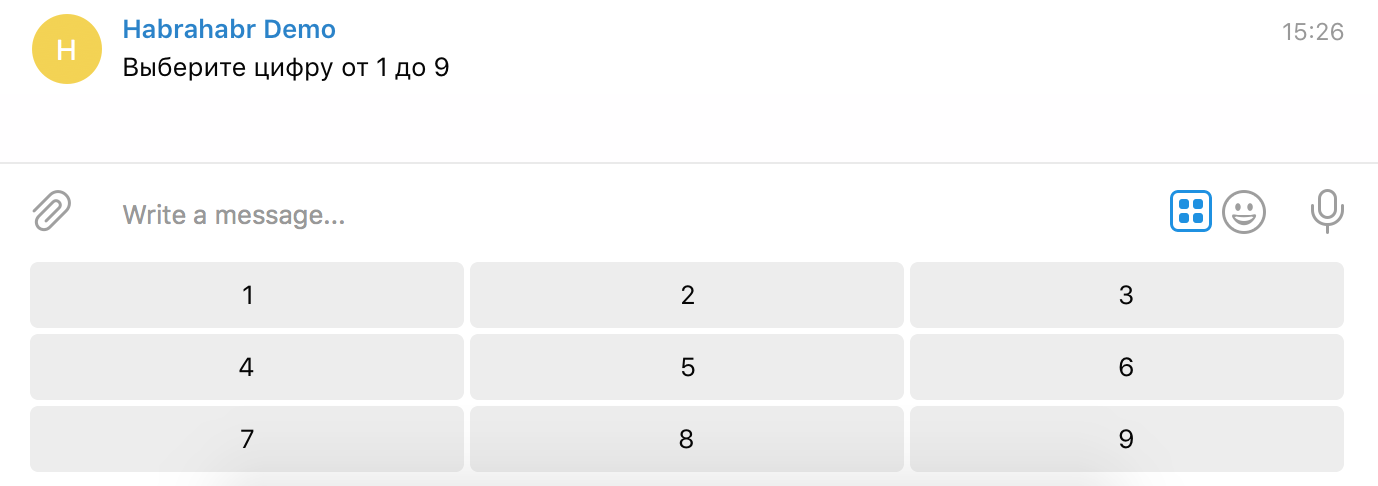
ボタンを追加
ダイアログボットを作成する際に非常に役立つ可能性がある唯一のものは、回答オプションを選択できるキーボードです。 キーボードを作成するには、
reply_markup
キーを追加するだけです。 ただし、可能な限りジェネレーター内のコードを単純化および抽象化してみましょう。 ここでの解決策は簡単です。 たとえば、
yield
は1つのオブジェクトではなく、一度に複数のオブジェクトを生成します。 それらの中に文字列を含むリストまたはリストのリストがある場合、例えば:
answer = yield ( " 1 9", [ ["1", "2", "3"], ["4", "5", "6"], ["7", "8", "9"], ] )
、その後、これらはキーボードボタンであると信じており、次のようなものを取得したいと考えています。
_send_answer()
は、次のように変換されます。
def _send_answer(self, bot, chat_id, answer): print("Sending answer %r to %s" % (answer, chat_id)) if isinstance(answer, collections.abc.Iterable) and not isinstance(answer, str): # -- answer = list(map(self._convert_answer_part, answer)) else: # -- answer = [self._convert_answer_part(answer)] # , , # «» -- - current_message = None for part in answer: if isinstance(part, Message): if current_message is not None: # , # ( ) options = dict(current_message.options) options.setdefault("disable_notification", True) bot.sendMessage(chat_id=chat_id, text=current_message.text, **options) current_message = part if isinstance(part, ReplyMarkup): # , ! . # -- , . current_message.options["reply_markup"] = part # . if current_message is not None: bot.sendMessage(chat_id=chat_id, text=current_message.text, **current_message.options) def _convert_answer_part(self, answer_part): if isinstance(answer_part, str): return Message(answer_part) if isinstance(answer_part, collections.abc.Iterable): # ? answer_part = list(answer_part) if isinstance(answer_part[0], str): # ! . # , -- . return ReplyKeyboardMarkup([answer_part], one_time_keyboard=True) elif isinstance(answer_part[0], collections.abc.Iterable): # ? if isinstance(answer_part[0][0], str): # ! return ReplyKeyboardMarkup(map(list, answer_part), one_time_keyboard=True) return answer_part
デモンストレーションとして、
ask_yes_or_no()
および
discuss_bad_python()
変更し
ask_yes_or_no()
。
def ask_yes_or_no(question): """ , «» «». : bool """ answer = yield (question, [".", "."]) while not ("" in answer.text.lower() or "" in answer.text.lower()): answer = yield HTML(" <b></b> <b></b>?") return "" in answer.text.lower() def discuss_bad_python(name): answer = yield "--. %s, ! ?" % name likes_article = yield from ask_yes_or_no( " . " " , , ?") if likes_article: answer = yield " ." else: answer = yield ( " «»? «, » «, »?", [", !", ", !"] ) answer = yield ", ." return answer
結果:

おわりに
Pythonのジェネレーターは強力なツールであり、適切な状況で使用すると、コードを大幅に削減および簡素化できます。 たとえば、「はい」または「いいえ」という質問を別の機能に入れて、ユーザーとの追加のコミュニケーションを行う権利を残して、どれだけ美しくするかをご覧ください。 また、別の関数で名前の質問を取り出し、ユーザーに彼が正しく理解したかどうかなどをユーザーに明確にするように教えることができます。 ジェネレーター自体がダイアログ状態を維持し、必要な瞬間から対話状態を継続できます。 すべてが私たちのためです!
この記事が誰かに役立つことを願っています。 いつものように、PMでのタイプミス、スペルミス、文法エラーをすべて報告することをheしないでください。 この記事のすべてのコードは、 Githubのリポジトリーにあります (ブランチ
habrahabr-316666
)。 ボットへのリンクを提供せず、ボットを生き続けさせません。もちろん、近い将来にはありません。そうしないと、Habraエフェクトがそれをコンピューターでカバーします。 対話ボットの作成に成功😉