Flaskは優れたPythonベースのマイクロWebフレームワークです。 Flaskrは、 公式の Flask ガイドで説明されているミニブログです。 私はそれを認めることができる以上、このガイドを何度も経験しました。 ただし、このガイドを次のステップに使用し、 テストによる開発 ( テスト駆動開発 )と少しのjQueryを追加します。
FlaskやWeb開発全般に不慣れな場合は、次の基本概念を理解することが重要です。
- GetリクエストとPostリクエストの違い、およびそれらを処理するアプリケーションの機能。
- リクエストとは何ですか?
- ブラウザでHTMLページを表示して訪問者に返す方法。
**注**:このガイドはhttps://realpython.comプロジェクトによって提供されます。 http://www.realpython.com/coursesコースでPythonトレーニングとDjangoとFlaskを使用したWeb開発を購入して、このオープンソースプロジェクトをサポートしてください。
内容
- テストによる開発?
- Pythonをダウンロード
- プロジェクトのインストール
- 最初のテスト
- Flaskrをインストールする
- 二次試験
- データベースのインストール
- テンプレートとビュー
- 色を追加する
- テスト
- jQuery
- 展開
- 別のテスト!
- ブートストラップ
- SQLAlchemy
- おわりに
必要条件
このマニュアルでは、次のソフトウェアを使用しています。
- Python v3.5.1
- フラスコv0.10.1
- Flask-SQLAlchemy v2.1
- gunicorn v19.4.5
テストによる開発?
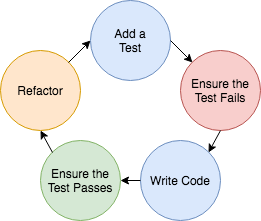
テストによる開発(tdd)は、関数自体を作成する前に自動テストを作成する開発の一種です。 つまり、テストとコード記述の組み合わせです。 このプロセスは、コードの正確性を確保するのに役立つだけでなく、プロジェクトの設計とアーキテクチャを絶えず制御しながら開発することもできます。
TDDは通常、上の図に示すように、Red-Green-Refactoringスキームに従います。
- 書き込みテスト
- テストを実行します(そして失敗します)
- テストに合格するためのコードを書く
- コードのリファクタリングと再テスト(何度も)
Pythonをダウンロード
開始する前に、 Python 3.5の最新バージョンがインストールされていることを確認してください。これはhttp://www.python.org/download/からダウンロードできます。
注 :このガイドではPython V 3.5.1を使用しています。
Pythonと一緒に、以下を配置する必要もあります。
- pipは、RubyまたはNodeのgemまたはnpmにそれぞれ似たPythonのパッケージ管理システムです。
- pyvenv-開発環境で隔離された環境を作成するために使用されます。 これは標準的な方法です。 常に、そして何度も、常に仮想環境を使用します。 そうしないと、さまざまな依存関係間の互換性の問題が発生します。
プロジェクトのインストール
プロジェクトを保存する新しいフォルダーを作成します。
$ mkdir flaskr-tdd $ cd flaskr-tdd
仮想環境を作成してアクティブ化します。
$ pyvenv-3.5 env $ source env/bin/activate
注 :
仮想環境内にいる場合、端末は$アイコンの前に碑文(env)を表示します。 仮想環境を終了するには、deactivate
コマンドを使用し、必要に応じてアクティブ化し、目的のディレクトリに移動してコマンドsource env/bin/activate
ます。
pipを使用したFlaskのインストール:
$ pip3 install Flask
最初のテスト
簡単なHello Worldプログラムから始めましょう。
テストファイルを作成します。
$ touch app-test.py
お気に入りのテキストエディタでこのファイルを開きます。 そして、次の行をapp-test.pyファイルに追加します。
from app import app import unittest class BasicTestCase(unittest.TestCase): def test_index(self): tester = app.test_client(self) response = tester.get('/', content_type='html/text') self.assertEqual(response.status_code, 200) self.assertEqual(response.data, b'Hello, World!') if __name__ == '__main__': unittest.main()
実際、「200」というコードの回答が届くかどうか、「hello、world」が表示されるかどうかを確認します。
テストを実行します。
$ python app-test.py
すべてが順調であれば、テストは失敗します。
ここで、次の行をapp.pyファイルに追加して、テストに合格します。
$ touch app.py
コード:
from flask import Flask app = Flask(__name__) @app.route("/") def hello(): return "Hello, World!" if __name__ == "__main__": app.run()
アプリを実行します。
$ python app.py
http:// localhost:5000 /で対処します 。 「Hello、World!」という行が表示されます。 画面に。
ターミナルに戻り、Ctrl + Cを使用して開発サーバーを停止しましょう。
テストを再度実行します。
$ python app-test.py . ---------------------------------------------------------------------- Ran 1 test in 0.016s OK
素晴らしい、あなたが必要なもの。
Flaskrをインストールする
構造を追加
プロジェクトのルートに「静的」と「テンプレート」のいくつかのフォルダーを追加します。 次の構造を取得する必要があります。
├── app-test.py ├── app.py ├── static └── templates
SQLスキーマ
「schema.sql」という名前の新しいファイルを作成し、次のコードを追加します。
drop table if exists entries; create table entries ( id integer primary key autoincrement, title text not null, text text not null );
これにより、「id」、「title」、「text」の3つのフィールドを持つテーブルが作成されます。 SQLiteは標準のPythonライブラリに組み込まれ、構成を必要としないため、SQLiteはDBMSに使用されます。
二次試験
アプリケーションを実行するベースファイルを作成しましょう。 ただし、最初にテストを作成する必要があります。
最初のテストからapp-test.pyを変更するだけです:
from app import app import unittest class BasicTestCase(unittest.TestCase): def test_index(self): tester = app.test_client(self) response = tester.get('/', content_type='html/text') self.assertEqual(response.status_code, 404) if __name__ == '__main__': unittest.main()
したがって、404(エラー)コードを取得する予定です。 テストを実行します。 テストは失敗しました。 テストが失敗したのはなぜですか? すべてがシンプルです。 404を期待していましたが、実際にはこのルートから200コードを取得します。
app.pyを変更します 。
# imports import sqlite3 from flask import Flask, request, session, g, redirect, url_for, \ abort, render_template, flash, jsonify # configuration DATABASE = 'flaskr.db' DEBUG = True SECRET_KEY = 'my_precious' USERNAME = 'admin' PASSWORD = 'admin' # create and initialize app app = Flask(__name__) app.config.from_object(__name__) if __name__ == '__main__': app.run()
ここで、必要なモジュールをインポートし、グローバル変数の構成セクションを作成し、アプリケーションを初期化してから起動します。
だから、それを実行します:
$ python app.py
サーバーを起動します。 ルートがなく、その表現が存在しないため、「/」ルートにアクセスするときに404エラーメッセージが表示されるはずです。 ターミナルに戻りましょう。 開発サーバーを停止します。 次に、単体テストを実行します。 エラーなしで合格するはずです。
データベースのインストール
私たちの目標は、データベースへの接続を作成し、スキームに基づいてデータベースを作成し、まだ存在しない場合は、テストを実行するたびに接続を閉じることです。
データベースファイルの存在を確認するにはどうすればよいですか? app-test.pyを更新します。
import unittest import os from app import app class BasicTestCase(unittest.TestCase): def test_index(self): tester = app.test_client(self) response = tester.get('/', content_type='html/text') self.assertEqual(response.status_code, 404) def test_database(self): tester = os.path.exists("flaskr.db") self.assertTrue(tester) if __name__ == '__main__': unittest.main()
これを実行して、テストが失敗し、データベースが存在しないことを確認します。
次に、 app.pyに次のコードを追加します。
# connect to database def connect_db(): """Connects to the database.""" rv = sqlite3.connect(app.config['DATABASE']) rv.row_factory = sqlite3.Row return rv # create the database def init_db(): with app.app_context(): db = get_db() with app.open_resource('schema.sql', mode='r') as f: db.cursor().executescript(f.read()) db.commit() # open database connection def get_db(): if not hasattr(g, 'sqlite_db'): g.sqlite_db = connect_db() return g.sqlite_db # close database connection @app.teardown_appcontext def close_db(error): if hasattr(g, 'sqlite_db'): g.sqlite_db.close()
そして、
init_db ()
関数をapp.py
の最後に追加して、init_db ()
新しいデータベースでサーバーを起動するようにします:
if __name__ == '__main__': init_db() app.run()
これで、Python Shellを使用してデータベースを作成し、
init_db()
をインポートして呼び出すことができます。
>>> from app import init_db >>> init_db()
シェルを閉じて、テストを再度実行します。 テストに合格しましたか? これで、データベースが作成されたと確信できました。
テンプレートとビュー
次に、ルートを定義するテンプレートと対応するビューを構成する必要があります。 ユーザーの観点から考えてください。 ユーザーがブログに出入りできるようにする必要があります。 ログイン後、ユーザーは投稿を作成できるはずです。 そして最後に、これらの投稿を表示できるはずです。
まず第一に、これについていくつかのテストを書きます。
単体テスト
最終的なコードを見てください。 説明のためにコメントを追加しました。
import unittest import os import tempfile import app class BasicTestCase(unittest.TestCase): def test_index(self): """ . , """ tester = app.app.test_client(self) response = tester.get('/', content_type='html/text') self.assertEqual(response.status_code, 200) def test_database(self): """ , , """ tester = os.path.exists("flaskr.db") self.assertEqual(tester, True) class FlaskrTestCase(unittest.TestCase): def setUp(self): """ """ self.db_fd, app.app.config['DATABASE'] = tempfile.mkstemp() app.app.config['TESTING'] = True self.app = app.app.test_client() app.init_db() def tearDown(self): """ """ os.close(self.db_fd) os.unlink(app.app.config['DATABASE']) def login(self, username, password): """ """ return self.app.post('/login', data=dict( username=username, password=password ), follow_redirects=True) def logout(self): """ """ return self.app.get('/logout', follow_redirects=True) # (assert) def test_empty_db(self): """, """ rv = self.app.get('/') assert b'No entries here so far' in rv.data def test_login_logout(self): """ """ rv = self.login( app.app.config['USERNAME'], app.app.config['PASSWORD'] ) assert b'You were logged in' in rv.data rv = self.logout() assert b'You were logged out' in rv.data rv = self.login( app.app.config['USERNAME'] + 'x', app.app.config['PASSWORD'] ) assert b'Invalid username' in rv.data rv = self.login( app.app.config['USERNAME'], app.app.config['PASSWORD'] + 'x' ) assert b'Invalid password' in rv.data def test_messages(self): """, """ self.login( app.app.config['USERNAME'], app.app.config['PASSWORD'] ) rv = self.app.post('/add', data=dict( title='<Hello>', text='<strong>HTML</strong> allowed here' ), follow_redirects=True) assert b'No entries here so far' not in rv.data assert b'<Hello>' in rv.data assert b'<strong>HTML</strong> allowed here' in rv.data if __name__ == '__main__': unittest.main()
ここでテストを実行すると、test_database() `:を除くすべてがクラッシュします。
python app-test.py .FFFF ====================================================================== FAIL: test_index (__main__.BasicTestCase) initial test. ensure flask was set up correctly ---------------------------------------------------------------------- Traceback (most recent call last): File "app-test.py", line 13, in test_index self.assertEqual(response.status_code, 200) AssertionError: 404 != 200 ====================================================================== FAIL: test_empty_db (__main__.FlaskrTestCase) Ensure database is blank ---------------------------------------------------------------------- Traceback (most recent call last): File "app-test.py", line 51, in test_empty_db assert b'No entries here so far' in rv.data AssertionError ====================================================================== FAIL: test_login_logout (__main__.FlaskrTestCase) Test login and logout using helper functions ---------------------------------------------------------------------- Traceback (most recent call last): File "app-test.py", line 59, in test_login_logout assert b'You were logged in' in rv.data AssertionError ====================================================================== FAIL: test_messages (__main__.FlaskrTestCase) Ensure that user can post messages ---------------------------------------------------------------------- Traceback (most recent call last): File "app-test.py", line 84, in test_messages assert b'<Hello>' in rv.data AssertionError ---------------------------------------------------------------------- Ran 5 tests in 0.088s FAILED (failures=4)
テストをパスさせましょう...
レコードを表示
最初に、 app.pyのエントリを表示するビューを追加します。
@app.route('/') def show_entries(): """Searches the database for entries, then displays them.""" db = get_db() cur = db.execute('select * from entries order by id desc') entries = cur.fetchall() return render_template('index.html', entries=entries)
次に、「テンプレート」フォルダーに移動して、このコンテンツのindex.htmlファイルを追加します。
<!DOCTYPE html> <html> <head> <title>Flaskr</title> <link rel="stylesheet" type="text/css" href="{{ url_for('static', filename='style.css') }}"> </head> <body> <div class="page"> <h1>Flaskr-TDD</h1> <div class="metanav"> {% if not session.logged_in %} <a href="{{ url_for('login') }}">log in</a> {% else %} <a href="{{ url_for('logout') }}">log out</a> {% endif %} </div> {% for message in get_flashed_messages() %} <div class="flash">{{ message }}</div> {% endfor %} {% block body %}{% endblock %} {% if session.logged_in %} <form action="{{ url_for('add_entry') }}" method="post" class="add-entry"> <dl> <dt>Title:</dt> <dd><input type="text" size="30" name="title"></dd> <dt>Text:</dt> <dd><textarea name="text" rows="5" cols="40"></textarea></dd> <dd><input type="submit" value="Share"></dd> </dl> </form> {% endif %} <ul class="entries"> {% for entry in entries %} <li><h2>{{ entry.title }}</h2>{{ entry.text|safe }}</li> {% else %} <li><em>No entries yet. Add some!</em></li> {% endfor %} </ul> </div> </body> </html>
テストを実行します。 以下が表示されるはずです。
Ran 5 tests in 0.131s FAILED (failures=2, errors=2)
ユーザー認証
app.pyファイルに追加します。
@app.route('/login', methods=['GET', 'POST']) def login(): """User login/authentication/session management.""" error = None if request.method == 'POST': if request.form['username'] != app.config['USERNAME']: error = 'Invalid username' elif request.form['password'] != app.config['PASSWORD']: error = 'Invalid password' else: session['logged_in'] = True flash('You were logged in') return redirect(url_for('index')) return render_template('login.html', error=error) @app.route('/logout') def logout(): """User logout/authentication/session management.""" session.pop('logged_in', None) flash('You were logged out') return redirect(url_for('index'))
上記の
login()
関数には、ルートがGetまたはPostリクエストを受け入れることができることを示すデコレーターがあります。 簡単に言えば、url/login
にアクセスすると、ユーザーから認証リクエストが始まり/login
。 これらのタイプのリクエストの違いは簡単です。Getはサイトへのアクセスに使用され、POSTはサーバーへの情報の送信に使用されます。 したがって、ユーザーが単に/login
にアクセスするときは、Getリクエストを使用しますが、ログインしようとすると、Postリクエストが使用されます。
ファイル「login.html」をテンプレートフォルダーに追加します。
<!DOCTYPE html> <html> <head> <title>Flaskr-TDD | Login</title> <link rel="stylesheet" type="text/css" href="{{ url_for('static', filename='style.css') }}"> </head> <body> <div class="page"> <h1>Flaskr</h1> <div class="metanav"> {% if not session.logged_in %} <a href="{{ url_for('login') }}">log in</a> {% else %} <a href="{{ url_for('logout') }}">log out</a> {% endif %} </div> {% for message in get_flashed_messages() %} <div class="flash">{{ message }}</div> {% endfor %} {% block body %}{% endblock %} <h2>Login</h2> {% if error %} <p class="error"><strong>Error:</strong> {{ error }}</p> {% endif %} <form action="{{ url_for('login') }}" method="post"> <dl> <dt>Username:</dt> <dd><input type="text" name="username"></dd> <dt>Password:</dt> <dd><input type="password" name="password"></dd> <dd><input type="submit" value="Login"></dd> </dl> </form> </div> </body> </html>
テストを再度実行します。
それでもいくつかのエラーが表示されるはずです! エラーの1つを考慮してください
werkzeug.routing.BuildError: Could not build url for endpoint 'index'. Did you mean 'login' instead?
werkzeug.routing.BuildError: Could not build url for endpoint 'index'. Did you mean 'login' instead?
基本的に、存在しない
index()
関数にアクセスしようとしています。show_entries()
関数の名前をapp.pyファイルのindex()
関数に変更し、テストを再度実行します。
Ran 5 tests in 0.070s FAILED (failures=1, errors=2)
次に、ビューにレコードを追加する関数を追加します。
@app.route('/add', methods=['POST']) def add_entry(): """Add new post to database.""" if not session.get('logged_in'): abort(401) db = get_db() db.execute( 'insert into entries (title, text) values (?, ?)', [request.form['title'], request.form['text']] ) db.commit() flash('New entry was successfully posted') return redirect(url_for('index'))
テストを繰り返します:
これが表示されるはずです。
====================================================================== FAIL: test_empty_db (__main__.FlaskrTestCase) Ensure database is blank ---------------------------------------------------------------------- Traceback (most recent call last): File "app-test.py", line 49, in test_empty_db assert b'No entries here so far' in rv.data AssertionError ---------------------------------------------------------------------- Ran 5 tests in 0.072s FAILED (failures=1)
このエラーは、ルートにアクセスすると、「ここまでエントリがありません」
/
メッセージが返されると主張して/
ます。 index.htmlテンプレートを確認してください。 テキストには、「エントリはまだありません。追加してください!」と書かれています。 そのため、テストを更新して、テストを再度実行します。
Ran 5 tests in 0.156s OK
素晴らしい。
色を追加する
「静的」フォルダーのstyle.cssという名前の新しいファイルに次のスタイルを保存します。
body { font-family: sans-serif; background: #eee; } a, h1, h2 { color: #377BA8; } h1, h2 { font-family: 'Georgia', serif; margin: 0; } h1 { border-bottom: 2px solid #eee; } h2 { font-size: 1.2em; } .page { margin: 2em auto; width: 35em; border: 5px solid #ccc; padding: 0.8em; background: white; } .entries { list-style: none; margin: 0; padding: 0; } .entries li { margin: 0.8em 1.2em; } .entries li h2 { margin-left: -1em; } .add-entry { font-size: 0.9em; border-bottom: 1px solid #ccc; } .add-entry dl { font-weight: bold; } .metanav { text-align: right; font-size: 0.8em; padding: 0.3em; margin-bottom: 1em; background: #fafafa; } .flash { background: #CEE5F5; padding: 0.5em; border: 1px solid #AACBE2; } .error { background: #F0D6D6; padding: 0.5em; }
テスト
アプリケーションを起動し、ログイン(login / password = "admin")し、投稿を作成して、ブログを終了します。 次に、テストを実行して、すべてが引き続き機能することを確認します。
jQuery
ここでjQueryを追加して、サイトをもう少しインタラクティブにします。
index.htmlを開き、最初の
<li
>を次のように変更します。
<li class="entry"><h2 id={{ entry.id }}>{{ entry.title }}</h2>{{ entry.text|safe }}</li>
これで、各
<li>
jQueryを使用できます。 最初に、次のスクリプトをドキュメントの終了Bodyタグの直前に追加する必要があります。
<script src="//code.jquery.com/jquery-1.10.2.min.js"></script> <script src="//netdna.bootstrapcdn.com/bootstrap/3.0.0/js/bootstrap.min.js"></script> <script type="text/javascript" src="{{url_for('static', filename='main.js') }}"></script>
「静的」ディレクトリにmain.jsファイルを作成し、次のコードを書き込みます。
$(function() { console.log( "ready!" ); // sanity check $('.entry').on('click', function() { var entry = this; var post_id = $(this).find('h2').attr('id'); $.ajax({ type:'GET', url: '/delete' + '/' + post_id, context: entry, success:function(result) { if(result.status === 1) { $(this).remove(); console.log(result); } } }); }); });
データベースからメッセージを削除できるように、 app.pyに新しい関数を追加します。
@app.route('/delete/<post_id>', methods=['GET']) def delete_entry(post_id): '''Delete post from database''' result = {'status': 0, 'message': 'Error'} try: db = get_db() db.execute('delete from entries where id=' + post_id) db.commit() result = {'status': 1, 'message': "Post Deleted"} except Exception as e: result = {'status': 0, 'message': repr(e)} return jsonify(result)
最後に、新しいテストを作成します。
def test_delete_message(self): """Ensure the messages are being deleted""" rv = self.app.get('/delete/1') data = json.loads((rv.data).decode('utf-8')) self.assertEqual(data['status'], 1)
import json
を必ず追加してください
サーバーを起動し、2つの新しいエントリを追加して、これを手動で確認します。 それらのいずれかをクリックします。 レコードは、domとデータベースから削除する必要があります。 これを再確認してください。
次に、テストを実行します。 テスト結果は次のようになります。
$ python app-test.py ...... ---------------------------------------------------------------------- Ran 6 tests in 0.132s OK
展開
アプリケーションは動作しています。そこで停止して、アプリケーションをHerokuにデプロイしないでください。
これを行うには、最初に登録してからHeroku Toolbeltをインストールします。
次に、 gunicornというWebサーバーをインストールします。
$ pip install gunicorn
プロジェクトのルートにProcfileを作成します。
$ touch Procfile
次のコードを追加します。
web: gunicorn app:app
requirements.txtファイルを作成して、アプリケーションが機能するためにインストールする必要がある外部依存関係を指定します。
$ pip freeze > requirements.txt
.gitignoreファイルを作成します。
$ touch .gitignore
バージョン管理システムに含めるべきではないファイルとフォルダーを追加します。
env *.pyc *.DS_Store __pycache__
ローカルリポジトリを追加します。
$ git init $ git add -A $ git commit -m "initial"
Herokuを展開します。
$ heroku create $ git push heroku master $ heroku open
テスト(もう一度!)
クラウドでテストを実行します。 heroku open
コマンドは、ブラウザでアプリケーションを開きます。
ブートストラップ
Bootstrap 3からスタイルを更新しましょう。
index.htmlおよびlogin.htmlの style.cssとそのリンクを削除し、このスタイルを両方のファイルに追加します
<link rel="stylesheet" type="text/css" href="//netdna.bootstrapcdn.com/bootstrap/3.0.3/css/bootstrap.min.css">
これで、すべてのBootstrapヘルパークラスに完全にアクセスできます。
login.htmlファイルのコードを次のように置き換えます。
<!DOCTYPE html> <html> <head> <title>Flaskr-TDD | Login</title> <link rel="stylesheet" type="text/css" href="//netdna.bootstrapcdn.com/bootstrap/3.0.3/css/bootstrap.min.css"> </head> <body> <div class="container"> <h1>Flaskr</h1> {% for message in get_flashed_messages() %} <div class="flash">{{ message }}</div> {% endfor %} <h3>Login</h3> {% if error %}<p class="error"><strong>Error:</strong> {{ error }}{% endif %}</p> <form action="{{ url_for('login') }}" method="post"> <dl> <dt>Username:</dt> <dd><input type="text" name="username"></dd> <dt>Password:</dt> <dd><input type="password" name="password"></dd> <br><br> <dd><input type="submit" class="btn btn-default" value="Login"></dd> <span>Use "admin" for username and password</span> </dl> </form> </div> <script src="//code.jquery.com/jquery-1.10.2.min.js"></script> <script src="//netdna.bootstrapcdn.com/bootstrap/3.0.0/js/bootstrap.min.js"></script> <script type="text/javascript" src="{{url_for('static', filename='main.js') }}"></script> </body> </html>
そしてindex.htmlのコードを変更します:
<!DOCTYPE html> <html> <head> <title>Flaskr</title> <link rel="stylesheet" type="text/css" href="//netdna.bootstrapcdn.com/bootstrap/3.0.3/css/bootstrap.min.css"> </head> <body> <div class="container"> <h1>Flaskr-TDD</h1> {% if not session.logged_in %} <a href="{{ url_for('login') }}">log in</a> {% else %} <a href="{{ url_for('logout') }}">log out</a> {% endif %} {% for message in get_flashed_messages() %} <div class="flash">{{ message }}</div> {% endfor %} {% if session.logged_in %} <form action="{{ url_for('add_entry') }}" method="post" class="add-entry"> <dl> <dt>Title:</dt> <dd><input type="text" size="30" name="title"></dd> <dt>Text:</dt> <dd><textarea name="text" rows="5" cols="40"></textarea></dd> <br><br> <dd><input type="submit" class="btn btn-default" value="Share"></dd> </dl> </form> {% endif %} <br> <ul class="entries"> {% for entry in entries %} <li class="entry"><h2 id={{ entry.id }}>{{ entry.title }}</h2>{{ entry.text|safe }}</li> {% else %} <li><em>No entries yet. Add some!</em></li> {% endfor %} </ul> </div> <script src="//code.jquery.com/jquery-1.10.2.min.js"></script> <script src="//netdna.bootstrapcdn.com/bootstrap/3.0.0/js/bootstrap.min.js"></script> <script type="text/javascript" src="{{url_for('static', filename='main.js') }}"></script> </body> </html>
変更を確認してください!
SQLAlchemy
データベースの管理を改善するために、 Flask-SQLAlchemyを試してみましょう。
SQLAlchemyをインストールする
Flask-SQLAlchemyインストールを実行します。
$ pip install Flask-SQLAlchemy
create_db.pyファイルを作成し、次のコードをそこに貼り付けます。
# create_db.py from app import db from models import Flaskr # create the database and the db table db.create_all() # commit the changes db.session.commit()
このファイルは、新しいデータベースを作成するために使用されます。 さらに、古い( flaskr.db )およびschema.sqlを削除します
次に、新しいスキーマを生成する新しいmodels.pyファイルに次のコンテンツを追加します。
from app import db class Flaskr(db.Model): __tablename__ = "flaskr" post_id = db.Column(db.Integer, primary_key=True) title = db.Column(db.String, nullable=False) text = db.Column(db.String, nullable=False) def __init__(self, title, text): self.title = title self.text = text def __repr__(self): return '<title {}>'.format(self.body)
app.pyを更新する
# imports from flask import Flask, request, session, g, redirect, url_for, \ abort, render_template, flash, jsonify from flask.ext.sqlalchemy import SQLAlchemy import os # grabs the folder where the script runs basedir = os.path.abspath(os.path.dirname(__file__)) # configuration DATABASE = 'flaskr.db' DEBUG = True SECRET_KEY = 'my_precious' USERNAME = 'admin' PASSWORD = 'admin' # defines the full path for the database DATABASE_PATH = os.path.join(basedir, DATABASE) # the database uri SQLALCHEMY_DATABASE_URI = 'sqlite:///' + DATABASE_PATH # create app app = Flask(__name__) app.config.from_object(__name__) db = SQLAlchemy(app) import models @app.route('/') def index(): """Searches the database for entries, then displays them.""" entries = db.session.query(models.Flaskr) return render_template('index.html', entries=entries) @app.route('/add', methods=['POST']) def add_entry(): """Adds new post to the database.""" if not session.get('logged_in'): abort(401) new_entry = models.Flaskr(request.form['title'], request.form['text']) db.session.add(new_entry) db.session.commit() flash('New entry was successfully posted') return redirect(url_for('index')) @app.route('/login', methods=['GET', 'POST']) def login(): """User login/authentication/session management.""" error = None if request.method == 'POST': if request.form['username'] != app.config['USERNAME']: error = 'Invalid username' elif request.form['password'] != app.config['PASSWORD']: error = 'Invalid password' else: session['logged_in'] = True flash('You were logged in') return redirect(url_for('index')) return render_template('login.html', error=error) @app.route('/logout') def logout(): """User logout/authentication/session management.""" session.pop('logged_in', None) flash('You were logged out') return redirect(url_for('index')) @app.route('/delete/<int:post_id>', methods=['GET']) def delete_entry(post_id): """Deletes post from database""" result = {'status': 0, 'message': 'Error'} try: new_id = post_id db.session.query(models.Flaskr).filter_by(post_id=new_id).delete() db.session.commit() result = {'status': 1, 'message': "Post Deleted"} flash('The entry was deleted.') except Exception as e: result = {'status': 0, 'message': repr(e)} return jsonify(result) if __name__ == '__main__': app.run()
上部の設定の変更と、各ビュー関数でデータベースにアクセスして管理する手段に注意してください-埋め込みSQLではなくSQLAlchemyを使用して。
データベースを作成する
コマンドを実行して、データベースを作成および初期化します。
$ python create_db.py
index.htmlを更新する
この行を更新します。
<li class="entry"><h2 id={{ entry.post_id }}>{{ entry.title }}</h2>{{ entry.text|safe }}</li>
post_id
注意してpost_id
。 データベースを調べて、対応するフィールドが存在することを確認してください。
テスト
最後に、テストを更新します。
import unittest import os from flask import json from app import app, db TEST_DB = 'test.db' class BasicTestCase(unittest.TestCase): def test_index(self): """initial test. ensure flask was set up correctly""" tester = app.test_client(self) response = tester.get('/', content_type='html/text') self.assertEqual(response.status_code, 200) def test_database(self): """initial test. ensure that the database exists""" tester = os.path.exists("flaskr.db") self.assertTrue(tester) class FlaskrTestCase(unittest.TestCase): def setUp(self): """Set up a blank temp database before each test""" basedir = os.path.abspath(os.path.dirname(__file__)) app.config['TESTING'] = True app.config['SQLALCHEMY_DATABASE_URI'] = 'sqlite:///' + \ os.path.join(basedir, TEST_DB) self.app = app.test_client() db.create_all() def tearDown(self): """Destroy blank temp database after each test""" db.drop_all() def login(self, username, password): """Login helper function""" return self.app.post('/login', data=dict( username=username, password=password ), follow_redirects=True) def logout(self): """Logout helper function""" return self.app.get('/logout', follow_redirects=True) # assert functions def test_empty_db(self): """Ensure database is blank""" rv = self.app.get('/') self.assertIn(b'No entries yet. Add some!', rv.data) def test_login_logout(self): """Test login and logout using helper functions""" rv = self.login(app.config['USERNAME'], app.config['PASSWORD']) self.assertIn(b'You were logged in', rv.data) rv = self.logout() self.assertIn(b'You were logged out', rv.data) rv = self.login(app.config['USERNAME'] + 'x', app.config['PASSWORD']) self.assertIn(b'Invalid username', rv.data) rv = self.login(app.config['USERNAME'], app.config['PASSWORD'] + 'x') self.assertIn(b'Invalid password', rv.data) def test_messages(self): """Ensure that user can post messages""" self.login(app.config['USERNAME'], app.config['PASSWORD']) rv = self.app.post('/add', data=dict( title='<Hello>', text='<strong>HTML</strong> allowed here' ), follow_redirects=True) self.assertNotIn(b'No entries here so far', rv.data) self.assertIn(b'<Hello>', rv.data) self.assertIn(b'<strong>HTML</strong> allowed here', rv.data) def test_delete_message(self): """Ensure the messages are being deleted""" rv = self.app.get('/delete/1') data = json.loads(rv.data) self.assertEqual(data['status'], 1) if __name__ == '__main__': unittest.main()
setUp()
tearDown()
.
, , .
, ( pip freeze > requirements.txt
), heroku!
おわりに
- ? .
- Heroku . やった!
- Flask? Real Python .
- - ? . やった!
* : Flask