最初の記事では、Erlangとn2oフレームワークに出会いました。 この部分では、私たちは私たちのブログをやっていきます。
- facebookを介して承認を追加します。このために、クライアントからサーバー上の関数を呼び出します。
- 私たちは、NoSQLのベースでのコメントや位置を維持します。
- DigitalOceanに関するブログを拡張し、パフォーマンスを測定します( ネタバレ -1300 リクエスト/秒 )。
記事のコードはhttps://github.com/denys-potapov/n2o-blog-exampleで、完成したプロジェクトはhttp://46.101.118.21:8001/で見ることができます。
構成ファイル
承認のために、facebook_app_idをどこかに保存する必要があります。Erlangアプリケーションでは、構成はsys.configに保存され、そこにfacebook_app_idを追加します
[{n2o, [ {port,8001}, {route,routes}, {log_modules,sample} ]}, {sample, [ {facebook_app_id, "631083680327759"} ]} ].
これで、アプリケーションの値get_env(sample、facebook_app_id、 "")を取得できます
サーバーコード呼び出し
n2oプロジェクトのソーシャルネットワークを介した承認には、Twitter、Google、Facebook、Github、Microsoftの承認をサポートするavzライブラリがあります。 ただし、avzではデータベースに特定のスキームが必要です。これはまだありません。そのため、独自に承認をリリースします。
wf:wire関数(#api {name = login})を使用すると、クライアントのログイン関数への呼び出しをイベントに添付できます。
サーバー上のapi_event(ログイン、応答、用語)。
login.erlファイルを追加します。
-module(login). -compile(export_all). -include_lib("n2o/include/wf.hrl"). -include_lib("nitro/include/nitro.hrl"). -include_lib("records.hrl"). main() -> wf:wire(#api{name=login}), #dtl{file="login", bindings=[{app_id, application:get_env(sample, facebook_app_id, "")}]}. api_event(login, Response, Term) -> {Props} = jsone:decode(list_to_binary(Response)), User = binary_to_list(proplists:get_value(<<"name">>, Props)), wf:user(User), wf:redirect("/").
main / 0関数では、ログインイベントを宣言し、api_eventで処理します。 json文字列をデコードし、ユーザーを認証して、メインページにリダイレクトします。 priv / templates / login.htmlで、コードはfacebookのサンプルからコピーされます 。メインマジックは、 ログイン(応答)の呼び出しにあります 。
priv / templates / login.html
{% extends "base.html" %} {% block title %}Login{% endblock %} {% block content %} <h1>Login</h1> <p id="status"></p> <button id="login" class="btn btn-primary" onclick="onLoginClick();"> Login with facebook </button> <script> // This is called with the results from from FB.getLoginStatus(). function statusChangeCallback(response) { console.log('statusChangeCallback'); if (response.status === 'connected') { // Logged into your app and Facebook. FB.api('/me', function(response) { login(response); }); } else if (response.status === 'not_authorized') { document.getElementById('status').innerHTML = 'Please log ' + 'into this app.'; } else { document.getElementById('status').innerHTML = 'Please log ' + 'into Facebook.'; } } window.fbAsyncInit = function() { FB.init({ appId : '{{ app_id }}', cookie : true, version : 'v2.2' // use version 2.2 }); FB.getLoginStatus(function(response) { statusChangeCallback(response); }); }; // Load the SDK asynchronously (function(d, s, id) { var js, fjs = d.getElementsByTagName(s)[0]; if (d.getElementById(id)) return; js = d.createElement(s); js.id = id; js.src = "//connect.facebook.net/en_US/sdk.js"; fjs.parentNode.insertBefore(js, fjs); }(document, 'script', 'facebook-jssdk')); function onLoginClick() { FB.login(function(response) { statusChangeCallback(response); }, {scope: 'public_profile,email'});<source lang="html"> {% extends "base.html" %} {% block title %}Login{% endblock %} {% block content %} <h1>Login</h1> <p id="status"></p> <button id="login" class="btn btn-primary" onclick="onLoginClick();"> Login with facebook </button> <script> // This is called with the results from from FB.getLoginStatus(). function statusChangeCallback(response) { console.log('statusChangeCallback'); if (response.status === 'connected') { // Logged into your app and Facebook. FB.api('/me', function(response) { login(response); }); } else if (response.status === 'not_authorized') { document.getElementById('status').innerHTML = 'Please log ' + 'into this app.'; } else { document.getElementById('status').innerHTML = 'Please log ' + 'into Facebook.'; } } window.fbAsyncInit = function() { FB.init({ appId : '{{ app_id }}', cookie : true, version : 'v2.2' // use version 2.2 }); FB.getLoginStatus(function(response) { statusChangeCallback(response); }); }; // Load the SDK asynchronously (function(d, s, id) { var js, fjs = d.getElementsByTagName(s)[0]; if (d.getElementById(id)) return; js = d.createElement(s); js.id = id; js.src = "//connect.facebook.net/en_US/sdk.js"; fjs.parentNode.insertBefore(js, fjs); }(document, 'script', 'facebook-jssdk')); function onLoginClick() { FB.login(function(response) { statusChangeCallback(response); }, {scope: 'public_profile,email'}); }; </script> {% endblock %}
クライアントのコンポーネントを更新する
次に、サーバー上のクライアントのコンポーネントを更新しようとします。 これを行うために、メイン(index.erl)にヘッダーを作成し、その上に終了ボタンがあります。 セッションデータがクリアされると、ヘッダーが更新されます。
buttons() -> case wf:user() of undefined -> #li{body=#link{body = "Login", url="/login"}}; _ -> [ #p{class=["navbar-text"], body="Hello, " ++ wf:user()}, #li{body=#link{body = "New post", url="/new"}}, #li{body=#link{body = "Logout", postback=logout}} ] end. header() -> #ul{id=header, class=["nav", "navbar-nav", "navbar-right"], body = buttons()}. main() -> #dtl{file="index", bindings=[{posts, posts()}, {header, header()}]}. event(logout) -> wf:user(undefined), wf:update(header, header()).
イベントイベント(ログアウト)では、セッションデータをクリアし、コンポーネントを更新します。
データベースと依存関係
データベースにアクセスするには、 kvsを使用します。 kvsを使用すると、リンクリストを保存し、さまざまなバックエンド(Mnesia、Riak、KAI、Redis、MongoDB)をサポートできます。 さらにこの例では、 mnesiaを使用します。これは、パッケージに付属しており、構成する必要がないためです。
Erlangプロジェクトの依存関係はrebar.configファイルにあり、そこにkvを追加します。
{kvs, ".*", {git, "git://github.com/synrc/kvs", {tag, "2.9"} }}
sys.configでは、使用するバックエンドとスキームを指定します。 スキームはmnesiaにのみ必要であり、他のバックエンドには必要ありません。
{kvs, {dba,store_mnesia}, {schema,[sample]} ]}
このスキームは、sample.erlのmetainfo / 0関数で説明されています。
metainfo() -> #schema{name=sample,tables=[ #table{name=id_seq,fields=record_info(fields,id_seq),keys=[thing]}, #table{name=post,fields=record_info(fields,post)} ]}.
2つのテーブルがあることを示します:postはpost型のpostを含み、id_seqはkvsが自動インクリメント値を格納することを示します。
すぐにinit / 1関数のsample.erlでkvsへの接続を追加します。
init([]) -> case cowboy:start_http(http,3,port(),env()) of {ok, _} -> ok; {error,_} -> halt(abort,[]) end, sup(), kvs:join().
アプリケーションを再起動すると、テーブルが表示されます。
2> kvs:dir(). [{table,post},{table,id_seq},{table,schema}]
読み書き
モジュール/src/new.erlには、1つのイベントイベント(post)があります。これは、kvs:put / 1関数を使用してデータベースに投稿を書き込みます。
-module(new). -compile(export_all). -include_lib("n2o/include/wf.hrl"). -include_lib("nitro/include/nitro.hrl"). -include_lib("records.hrl"). main() -> case wf:user() of undefined -> wf:header(<<"Location">>, wf:to_binary("/login")), wf:state(status,302), []; _ -> #dtl{file="new", bindings=[{button, #button{id=send, class=["btn", "btn-primary"], body="Add post",postback=post,source=[title,text]} }]} end. event(post) -> Id = kvs:next_id("post",1), Post = #post{id=Id,author=wf:user(),title=wf:q(title),text=wf:q(text)}, kvs:put(Post), wf:redirect("/post?id=" ++ wf:to_list(Id)).
/priv/templates/new.html
{% extends "base.html" %} {% block title %}New Post{% endblock %} {% block content %} <h1>Add new post</h1> <h3>Title</h3> <input id="title" class="form-control"> <h3>Body</h3> <textarea id="text" maxlength="1000" class="form-control" rows=10> </textarea> {{ button }} {% endblock %}
post.erlファイルで、投稿を受信する機能を置き換えました。投稿が見つからない場合、404エラーが返されます。
main() -> case kvs:get(post, post_id()) of {ok, Post} -> #dtl{file="post", bindings=[ {title, wf:html_encode(Post#post.title)}, {text, wf:html_encode(Post#post.text)}, {author, wf:html_encode(Post#post.author)}, {comments, comments()}]}; _ -> wf:state(status,404), "Post not found" end.
index.erlメインページのモジュールでは、kvs:all(post)を呼び出してすべての投稿を取得します。
posts() -> [ #panel{body=[ #h2{body = #link{body = wf:html_encode(P#post.title), url = "/post?id=" ++ wf:to_list(P#post.id)}}, #p{body = wf:html_encode(P#post.text)} ]} || P <- kvs:all(post)].
コンテナとイテレータ
コンテナとイテレータの概念は、リンクリストをkvsに保存するために使用されます。 イテレータは二重にリンクされたリストへのポインタを格納し、コンテナはリストの先頭と末尾へのポインタを格納します。
records.hrlのレコードを更新して、イテレーターコメントとコンテナー投稿を追加します。
-record(post, {?CONTAINER, title, text, author}). -record(comment, {?ITERATOR(post), text, author}).
スキームの更新:
metainfo() -> #schema{name=sample,tables=[ #table{name=id_seq,fields=record_info(fields,id_seq),keys=[thing]}, #table{name=post,container=true,fields=record_info(fields,post)}, #table{name=comment,container=post,fields=record_info(fields,comment)} ]}.
データベーススキーマを再作成します。
2> kvs:destroy(). ok 3> kvs:join(). ok
post.erlモジュールで、コメントロジックを更新します。
comments() -> case wf:user() of undefined -> #link{body = "Login to add comment", url="/login"}; _ -> [ #textarea{id=comment, class=["form-control"], rows=3}, #button{id=send, class=["btn", "btn-default"], body="Post comment",postback=comment,source=[comment]} ] end. event(init) -> [event({client,Comment}) || Comment <- kvs:entries(kvs:get(post, post_id()),comment,undefined) ], wf:reg({post, post_id()}); event(comment) -> Comment = #comment{id=kvs:next_id("comment",1),author=wf:user(),feed_id=post_id(),text=wf:q(comment)}, kvs:add(Comment), wf:send({post, post_id()}, {client, Comment}); event({client, Comment}) -> wf:insert_bottom(comments, #blockquote{body = [ #p{body = wf:html_encode(Comment#comment.text)}, #footer{body = wf:html_encode(Comment#comment.author)} ]}).
コメント()関数では、ユーザーが許可されているかどうかを確認します。 イベント(init)では、この投稿に関連するすべてのコメントを選択し、それらをイベントイベント({client、Comment})に渡します。つまり、コメントはページの読み込み後に読み込まれます。
イベントイベント(コメント)では、コメントを表示するだけでなく、データベースに保存します。
独自のアイテムを作成する
ページナビゲーションのために、DSLにページネーション要素を追加します。 ファイル/apps/sample/include/elements.hrlに、この要素の表示を担当するモジュールを示すエントリを追加します。
-include_lib("nitro/include/nitro.hrl"). -record(pagination, {?ELEMENT_BASE(element_pagination), active, count, url}).
出力モジュールelement_pagination.erl自体は非常に単純です。
-module(element_pagination). -compile(export_all). -include_lib("nitro/include/nitro.hrl"). -include_lib("elements.hrl"). link(Class, Body, Url) -> #li{class=[Class], body=#link{body=Body, url=Url}}. disabled(Body) -> link("disabled", Body, "#"). left_arrow(#pagination{active = 1}) -> disabled("«"); left_arrow(#pagination{active = Active, url = Url}) -> link("", "«", Url ++ wf:to_list(Active - 1)). right_arrow(#pagination{active = Count, count = Count}) -> disabled("»"); right_arrow(#pagination{active = Active, url = Url}) -> link("", "»", Url ++ wf:to_list(Active + 1)). left(0, P) -> [left_arrow(P)]; left(I, P) -> S = wf:to_list(I), left(I - 1, P) ++ [link("", S, P#pagination.url ++ S)]. right(I, P = #pagination{count = Count}) when I > Count -> [right_arrow(P)]; right(I, P) -> S = wf:to_list(I), [link("", S, P#pagination.url ++ S) | right(I + 1, P)]. render_element(P = #pagination{}) -> wf:render(#nav{body=#ul{class=["pagination"], body=[ left(P#pagination.active - 1, P), link("active", wf:to_list(P#pagination.active), "#"), right(P#pagination.active + 1, P) ]}}).
しない方法
Kvsはリンクリストを保存するように設計されているため、ページナビゲーションには適していません。
Kvsは、現代のウェブのページネーションについて厳しいコメントをしています 
しかし、実験の純度のために、ページネーションを追加します。 投稿を保存するフィードコンテナを追加します
-record(feed, {?CONTAINER}). -record(post, {?ITERATOR(feed), title, text, author}). -record(comment, {?ITERATOR(feed), text, author}).
そして、回路を更新します。
metainfo() -> #schema{name=sample,tables=[ #table{name=id_seq,fields=record_info(fields,id_seq),keys=[thing]}, #table{name=feed,container=true,fields=record_info(fields,feed)}, #table{name=post,container=feed,fields=record_info(fields,post)}, #table{name=comment,container=feed,fields=record_info(fields,comment)} ]}.
コメントを{post、post_id()}の形式のフィードコンテナーに保存します。
Comment = #comment{id=kvs:next_id("comment",1),author=wf:user(),feed_id={post, post_id()},text=wf:q(comment)},
そして、このコンテナからコメントを受け取ります:
[event({client,Comment}) || Comment <- kvs:entries(kvs:get(feed, {post, post_id()}),comment,undefined) ];
メインページのページ出力を制限しましょう。 繰り返しになりますが、kvsはページ単位のナビゲーションにはあまり適していません。このコードは、不適切なツールを使用すると混乱を招くコードの例にすぎません。
-define(POST_PER_PAGE, 3). page() -> case wf:q(<<"page">>) of undefined -> 1; Page -> wf:to_integer(Page) end. pages() -> Pages = kvs:count(post) div ?POST_PER_PAGE, case kvs:count(post) rem ?POST_PER_PAGE of 0 -> Pages; _ -> Pages + 1 end. posts() -> [ #panel{body=[ #h2{body = #link{body = wf:html_encode(P#post.title), url = "/post?id=" ++ wf:to_list(P#post.id)}}, #p{body = wf:html_encode(P#post.author)} ]} || P <- lists:reverse(kvs:traversal(post, kvs:count(post) - (page() - 1) * ?POST_PER_PAGE, ?POST_PER_PAGE, #iterator.prev))].
展開とパフォーマンス
Madを使用すると、バンドルを作成できます。1つのファイルには、アプリケーションに必要なコードとすべてのファイル(テンプレート、静的)が保存されます。 作成してリモートサーバーにアップロードします。
mad deps compile plan bundle sample scp sample root@46.101.117.36:/var/www/sample/
リモートサーバーにErlangをインストールし、アプリケーションを実行します。
wget https://packages.erlang-solutions.com/erlang/esl-erlang/FLAVOUR_1_general/esl-erlang_18.0-1~ubuntu~trusty_amd64.deb dpkg -i esl-erlang_18.0-1~ubuntu~trusty_amd64.deb escript sample
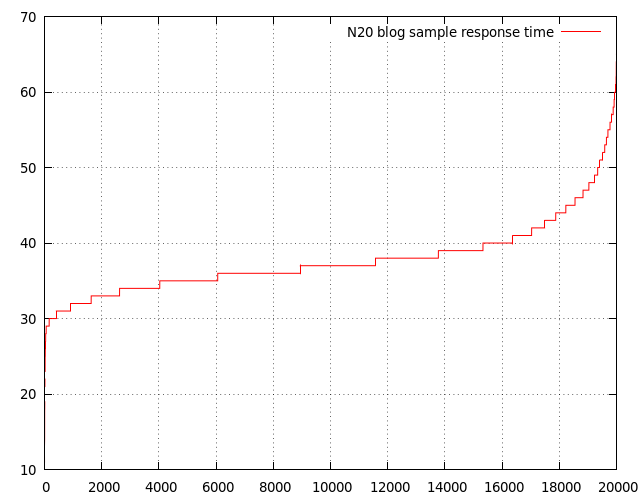
パフォーマンステストのために、DigitalOceanに最小のドロップレット(512 MBメモリ/ 20 GBディスク)を作成しました。 このテストでは、2万件のクエリを作成し、50件を並行して実行します。
 root @ ubuntu-1gb-fra1-01:〜#ab -l -n 20000 -c 50 -g gnuplot.dat http://46.101.118.21:8001/
 ...
並行性レベル:50
テストにかかった時間:15.131秒
完全なリクエスト:20,000
失敗したリクエスト:0
転送された合計:78279988バイト
転送されるHTML:76399988バイト
 1秒あたりのリクエスト:1321.80 [#/秒](平均)
リクエストあたりの時間:37.827 [ms](平均)
リクエストごとの時間:0.757 [ms](平均、すべての同時リクエスト全体)
転送速度:5052.26 [キロバイト/秒]受信

接続時間(ミリ秒)
              最小平均[+/- sd]最大中央値
接続:0 0 0.3 0 9
処理中:9 37 4.9 37 65
待機中:9 37 4.9 37 65
合計:11 38 4.9 37 65

特定の時間内に処理されたリクエストの割合(ミリ秒)
   50%37
   66%38
   75%39
   80%40
   90%44
   95%47
   98%53
   99%56
  100%65(最長リクエスト)
サーバーは1秒間に約1300のリクエストを処理し、リクエストの95%は50ミリ秒未満で完了しました。これは、月額5ドルのホスティングに非常に適しています。 グラフと同じ: