また、このトピックを無視しませんでした。アプリケーションの1つでは、テキストを選択してコピーする機能をできる限り便利にするために一生懸命努力しなければなりませんでした。 このレシピの秘密を一般に公開したいと思います。
さあ、行こう!
テキストを選択するタスクに直面している場合、TextViewには、単一のTextView内のテキストを選択できるsetTextIsSelectable(boolean selectable)メソッドがあることがわかります。 しかし、複数の画面にテキストがある場合(ニュース記事など)はどうでしょうか。 1つのTextViewにすべてのテキストを配置し、少なくともすべてを非合理的にスクロールします。 したがって、通常は、RecyclerViewを作成し、テキストを段落に分割して、段落ごとにRecyclerViewに追加し始めます。
段落内のテキストを選択するようにユーザーに強制することは、あまり「フレンドリー」ではありません。 問題は、2つ以上の段落を一度に選択する方法ですか? しかし、テキストに画像または他の要素がある場合はどうでしょうか?

トータルコントロール
まず最初に、選択プロセスを管理し、そのすべての段階を制御するクラスを作成します。 カスタムのSelectableRecyclerViewで初期化し、recyclerViewとそのLayoutManagerの状態をコントローラーに渡す必要があります。 まず、ViewGroupをSelectionControllerのコンストラクターに転送します。このコンストラクターでテキストが選択されます。
public class SelectionController { private ViewGroup selectableViewGroup; public SelectionController(ViewGroup selectableViewGroup) { this.selectableViewGroup = selectableViewGroup; } }
カスタムLayoutManager:
public class SelectableLayoutManager extends LinearLayoutManager { private SelectionController sh; public SelectableLayoutManager(Context context) { super(context); } public SelectableLayoutManager(Context context, int orientation, boolean reverseLayout) { super(context, orientation, reverseLayout); } public SelectableLayoutManager(Context context, AttributeSet attrs, int defStyleAttr, int defStyleRes) { super(context, attrs, defStyleAttr, defStyleRes); } public void setSelectionController(SelectionController selectionController) { sh = selectionController; } }
カスタムRecyclerView:
public class SelectableRecyclerView extends RecyclerView { private SelectionController sh; public SelectableRecyclerView(Context context) { super(context); } public SelectableRecyclerView(Context context, AttributeSet attrs) { super(context, attrs); } public SelectableRecyclerView(Context context, AttributeSet attrs, int defStyle) { super(context, attrs, defStyle); } @Override protected void onFinishInflate() { super.onFinishInflate(); sh = new SelectionController(this); } @Override public void setLayoutManager(LayoutManager layout) { super.setLayoutManager(layout); if (layout instanceof SelectableLayoutManager) { ((SelectableLayoutManager) layout).setSelectionController(sh); } } }
ユーザーをフォローします
通常、テキスト選択モードはロングタップでアクティブになるため、SelectableRecyclerViewでロングタップを定義する必要があります。 GestureDetectorはこれを支援します。これは、SelectionControllerのコンストラクターで初期化され、テキスト選択モードをすでにオンにする時間であることを通知します。
private void initGesture() { gestureDetector = new GestureDetector(selectableViewGroup.getContext(), new GestureDetector.SimpleOnGestureListener() { @Override public void onLongPress(MotionEvent event) { if (!selectInProcess) { startSelection(event); } } }); }
これで、ユーザーがテキストの強調表示を開始したいと判断し、ユーザーが開始したい場所を知っているMotionEventができました。
簡単な操作により、ユーザーが画面のどこにテープを貼ったかを判断できます。
selectableViewGroup.getLocationOnScreen(location); int evX = (int) (event.getX() + location[0]); int evY = (int) (event.getY() + location[1]);
これで座標ができたので、ユーザーがどのTextViewにアクセスしたかを判断する必要があります。そのために、SelectableTextViewを作成します。ここにはメソッドがあります。
public boolean isInside(int evX, int evY) { int[] location = new int[2]; getLocationOnScreen(location); int left = location[0]; int right = left + getWidth(); int top = location[1]; int bottom = top + getHeight(); return left <= evX && right >= evX && top <= evY && bottom >= evY; }
RecyclerViewはViewgroupであるため、すべての子を取得して繰り返し処理し、ヒットした子を確認します。
シンプルすぎますか?
確かにあなたは考えました。そして、子がSelectableTextViewではなく、一般にRecyclerViewが非常に動的であり、彼の子が変更できる場合、 LayoutManagerもそれを制御し 、すべてがスクロールします。 本当の考えなので、これについては少し後で検討します=)
それまでの間、続けてください...
そのため、目的のSelectableTextViewが見つかり、ユーザーがテープを貼った場所がわかりました。 テキストを選択する必要があります。このためには、選択が読み取られるテキスト内の文字を見つける必要があります。
始めましょう。
y座標に沿ったテキストの行を取得します。
private int getLineAtCoordinate(float y) { y -= getTotalPaddingTop(); y = Math.max(0.0f, y); y = Math.min(getHeight() - getTotalPaddingBottom() - 1, y); y += getScrollY(); return getLayout().getLineForVertical((int) y); }
行が見つかりました。この行にx座標があります(getlayout()メソッドで混乱している人のために)。
private int getOffsetAtCoordinate(int line, float x) { x = convertToLocalHorizontalCoordinate(x); return getLayout().getOffsetForHorizontal(line, x); } private float convertToLocalHorizontalCoordinate(float x) { x -= getTotalPaddingLeft(); x = Math.max(0.0f, x); x = Math.min(getWidth() - getTotalPaddingRight() - 1, x); x += getScrollX(); return x; }
ドキュメントを読む場合、getLayout()はnullを返すことができるため、最終的にテキスト内の位置を取得するメソッドは次のようになります。
public int getOffsetForPosition(int x, int y) { if (getLayout() == null) return -1; final int line = getLineAtCoordinate(y); return getOffsetAtCoordinate(line, x); }
最後に、SelectableTextViewを使用して、テキスト内の位置を取得し、SelectionControllerに戻ることができます。
ほとんどの場合、ユーザーは具体的に単語の先頭または末尾を目指していませんが、全体として選択したいので、単語全体を選択し、開始位置と終了位置を返します(SelectionController'eのメソッドを使用):
private int[] getHandlesPosition(final String text, final int pos) { final int[] handlesPosition = new int[2]; final int textLength = text.length(); handlesPosition[0] = 0; for (int i = pos; i >= 0; i--) { if (!LetterDigitPattern.matcher(String.valueOf(text.charAt(i))).matches()){ handlesPosition[0] = i + 1; break; } } handlesPosition[1] = textLength - 1; for (int i = pos; i < textLength; i++) { if (!LetterDigitPattern.matcher(String.valueOf(text.charAt(i))).matches()){ handlesPosition[1] = i; break; } } return handlesPosition; }
その結果、選択範囲の開始位置と終了位置を取得したため、これらの位置の座標を取得してカーソルを描画します。
public void draw(Canvas canvas) { canvas.drawBitmap(handleImage, x, y, paint); }
しかし、SelectionControllerでそれらを描画しますが、彼は描画とキャンバスとは何の関係もありません。 したがって、SelectionRecyclerViewでdispatchDrawメソッドを再定義し、SelectionController.drawHandlesにSelectionRecyclerViewのカーソルを描画するように依頼します。
@Override protected void dispatchDraw(Canvas canvas) { super.dispatchDraw(canvas); sh.drawHandles(canvas); } SelectionController.java public void drawHandles(Canvas canvas) { if (!selectInProcess) return; rightHandle.draw(canvas); leftHandle.draw(canvas); }
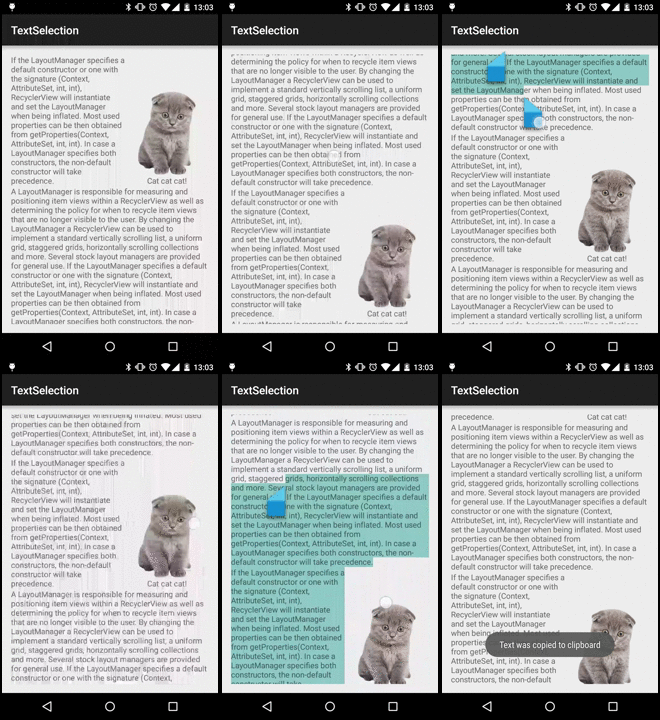
取得したものは次のとおりです。

選択した領域にマークを付けて、選択したテキストのように見えるようにします。これには2つの方法があります。
1. SpannableString経由;
2.キャンバスで描画します。
SpannableStringは大量の選択されたテキストで十分に長い時間レンダリングされるため、カーソルの滑らかな動きを忘れることができるため、すべてをキャンバスで描画します。 開始位置と終了位置の座標があるので、塗りつぶしたい領域を簡単に計算できます。

運動は人生です!
最後に、ユーザーは満足していますが、カーソルを動かしてさらにテキストを選択したいと考えています。 したがって、指の動きに追従するカーソルの新しい座標を計算する必要があります。
1.カーソルが移動した場所を確認します(onTouchEvent)。
2.カーソルが取得するテキスト内の位置を見つけます。
3.この位置の座標を見つけて、そこにカーソルを引きます。
4.描きます。
次のようになります。
public boolean onTouchEvent(MotionEvent ev) { if (gestureDetector != null) gestureDetector.onTouchEvent(ev); boolean dispatched = false; if (selectInProcess) { boolean right = rightHandleListener.onTouchHandle(ev); boolean left = leftHandleListener.onTouchHandle(ev); dispatched = right || left; } return dispatched; } public boolean onTouchHandle(MotionEvent event) { switch (event.getAction() & MotionEvent.ACTION_MASK) { case MotionEvent.ACTION_DOWN: // handle.isMoving = handle.contains(event.getX(), event.getY()); if (handle.isMoving) { // yDelta = (int) (event.getY() - handle.y + 1); xDelta = (int) (event.getX() - handle.x + handle.correctX); // , parent' touchevent' selectableViewGroup.getParent().requestDisallowInterceptTouchEvent(true); } break; case MotionEvent.ACTION_UP: handle.isMoving = false; selectableViewGroup.getParent().requestDisallowInterceptTouchEvent(false); break; case MotionEvent.ACTION_POINTER_DOWN: break; case MotionEvent.ACTION_POINTER_UP: break; case MotionEvent.ACTION_MOVE: if (handle.isMoving) { // x = (int) (event.getRawX() - xDelta); y = (int) (event.getRawY() - yDelta); int oldHandlePos = handle.position; // handle.position = getCursorPosition(x, y, handle.position); if (handle.position != oldHandlePos) { // setHandleCoordinate(handle); // , setSelectionText(); // backround , // checkBackground(); // selectableViewGroup.invalidate(); } } break; } return handle.isMoving; }
シングルタップの場合、GestureDetector.onSingleTapUpはテキスト選択モードをオフにし、すべてのSelectableTextViewを通過し、そこから選択したテキストをコピーしてクリップボードに配置します。
@Override public boolean onSingleTapUp(MotionEvent e) { if (selectInProcess) { copyToClipBoard(stopSelection().toString()); } return super.onSingleTapUp(e); } private void copyToClipBoard(String s) { ClipboardManager clipboard = (ClipboardManager) selectableViewGroup.getContext().getSystemService(Context.CLIPBOARD_SERVICE); ClipData clip = ClipData.newPlainText("Article", s); clipboard.setPrimaryClip(clip); Toast.makeText(selectableViewGroup.getContext(), "Text was copied to clipboard", Toast.LENGTH_LONG).show(); }
すべてがとてもダイナミックです
そして、RecyclerView、LayoutManager、多数の要素があり、すべてがスクロールし、すべてのビューが再利用され、一般的に魔法が発生することを思い出してください。
2つの重大な問題が発生するため:
1.スクロール時にビューを再利用する場合、選択内容をビューに保存する方法は?
2.スクロールでカーソルを移動する方法は?
簡単な問題から始めましょう-スクロールに沿ってカーソルを移動します。 LayoutManagerに関する記事を読んだ場合、それがLayoutManagerスクロールの原因であることがわかります。これは、offsetChildrenVertical(int dy)メソッドを呼び出します。 したがって、それを再定義し、SelectionControllerにコンテンツがスクロールすることを知らせ、カーソルを移動する必要があります。 ビューの座標は変更されましたが、テキスト内の位置は変更されました。 したがって、よく知られたアルゴリズムを使用します。
3.この位置の座標を見つけて、そこにカーソルを引きます。
4.次を描画します。
public void checkHandlesPosition() { if (!selectInProcess) return; setHandleCoordinate(rightHandle); setHandleCoordinate(leftHandle); selectableViewGroup.postInvalidate(); } private void setHandleCoordinate(Handle handle) { Selectable textView = null; int totalPos = 0; for (SelectableInfo selectableInfo : selectableInfos) { String text = selectableInfo.getText().toString(); int length = text.length(); if (handle.position >= totalPos && handle.position < totalPos + length) { textView = selectableInfo.getSelectable(); break; } totalPos += length; } if (textView == null) { handle.visible = false; return; } if (!isSvgParent((View)textView)) { handle.visible = false; checkSelectableList(); return; } handle.visible = true; float[] coordinate = new float[2]; coordinate = textView.getPositionForOffset(handle.position - totalPos, coordinate); int[] location = new int[2]; selectableViewGroup.getLocationOnScreen(location); if (coordinate[0] == -1 || coordinate[1] == -1) return; handle.x = coordinate[0] - location[0] + handle.correctX; handle.y = coordinate[1] - location[1]; }
コードには素晴らしいselectableInfoがあり、問題の解決に役立ちます1. SelectableInfoには、選択されたテキスト、SelectableTextViewの種類、および含まれているテキストの種類に関する情報が含まれています。
public class SelectableInfo { private int start; private int end; private String selectedText; private String text; private String key; private Selectable selectable; public SelectableInfo(Selectable selectable) { this.start = 0; this.end = 0; this.selectedText = ""; this.selectable = selectable; this.text = selectable.getText(); this.key = selectable.getKey(); } }
「ヘイビュー! あなたはそこに行かない、ここに行く!」
コンテンツをスクロールし、ビューを再利用することを覚えています。 ビューが削除されるか、RecyclerViewに追加されるたびに、その状態とリンク(Selectable)をSelectableInfosに保存します。
Selectable - , SelectableTextView. public interface Selectable { int getOffsetForPosition(int x, int y); int getVisibility(); CharSequence getText(); void setText(CharSequence text); void getLocationOnScreen(int[] location); int getHeight(); int getWidth(); float[] getPositionForOffset(int offset, float[] position); void selectText(int start, int end); CharSequence getSelectedText(); boolean isInside(int evX, int evY); void setColor(int selectionColor); int getStartSelection(); int getEndSelection(); String getKey(); void setKey(String key); }
したがって、選択したテキストに関するデータの現在の配列を保存します。
しかし、再利用されているビューにどのように接続するのでしょうか?
これを行うには、追加されたばかりのビューが特定のSelectableInfoに属していることを確認する必要があります。 したがって、キー(Selectable.getKey()/ setKey(String key))を追加します。これにより、ビューが必要なものであることがわかります。 LayoutManagerでホルダーをバインドするときに、ビューにこのキーを設定します。
@Override public void onBindViewHolder(VHolder viewHolder, int position) { viewHolder.textView.setText(sampleText); viewHolder.textView.setKey(" pos: " + position + sampleText); }
問題は、LayoutManagerがどの時点でビューをRecyclerViewに追加するかであり、これを行うにはaddView(View child、int index)メソッドを呼び出します。
@Override public void addView(View child, int index) { super.addView(child, index); sh.addViewToSelectable(child); }
また、RecyclerViewに追加されるビューはTextViewであるだけでなく、複雑なレイアウトを持つこともできることに注意する必要があります。 さまざまなレベルの複数のTextViewを含めることができるため、ビューツリーがある場合は、再帰的にビューツリー全体を走査します。
public void addViewToSelectable(View view) { checkSelectableList(); if (view instanceof Selectable){ addSelectableToSelectableInfos((Selectable) view); } else if (view instanceof ViewGroup){ findSelectableTextView((ViewGroup) view); } } public void findSelectableTextView(ViewGroup viewGroup) { for (int i = 0; i < viewGroup.getChildCount(); i++){ View view = viewGroup.getChildAt(i); if (view instanceof Selectable){ addSelectableToSelectableInfos((Selectable) view); continue; } if (view instanceof ViewGroup){ findSelectableTextView((ViewGroup) view); } } }
ビューの追加は簡単です。 getKey()に関する情報がある場合は、そのリンクを保存するだけです(選択可能)。 そうでない場合は、新しいSelectableInfoを作成し、selectableInfosリストに追加します。
private void addSelectableToSelectableInfos(Selectable selectable) { boolean found = false; for (SelectableInfo selectableInfo : selectableInfos) { if (selectableInfo.getKey().equals(selectable.getKey())) { selectableInfo.setSelectable(selectable); found = true; break; } } if (!found) { final SelectableInfo selectableInfo = new SelectableInfo(selectable); selectableInfos.add(selectableInfo); } }
ビューは再利用されるため、再利用時には、古いSelectableInfoのselectableInfo.removeSelectable()リンクを削除する必要があります。
新しいビューを追加するときは、リストの関連性を確認することをお勧めします。 ビューへのリンクが無関係である場合、2つのケースがあります。
1.ビューはすでに再利用されており、zabindinsには新しい値があり、それに応じて新しいキー(getKey())があります。
2.視聴者はプールに入って、必要になるまで待機します。ユーザーが画面上にないビューからテキストを選択できる可能性は低いため、必要ありません=)。
したがって、キーがビュー内で予想と実際に同じであるかどうかを確認する必要があります。2番目のケースでは、親の存在を確認します。
public void checkSelectableList() { for (SelectableInfo selectableInfo : selectableInfos) { if (selectableInfo.getSelectable() != null) { if (!selectableInfo.getSelectable().getKey().equals(selectableInfo.getKey())) { selectableInfo.removeSelectable(); continue; } if (!isSvgParent((View) selectableInfo.getSelectable())) { selectableInfo.removeSelectable(); } } } }
したがって、ビューに関する最新の情報リスト(SelectableInfo)を取得しました。このリストには、スクロール時にテキスト選択を復元するためのすべてのデータがあります。
最後にシール!
ビューですべてのSelectableTextViewを再帰的に検索したため、さまざまなテキストレイアウトでさまざまなレイアウトを実行でき、さらには写真を使用することもできます。 テキストの選択は引き続き機能します!

結論として、大規模で複雑なタスクは、ViewライフサイクルとRecyclerView-LayoutManagerバンドルがどのように機能するかを知っていれば、非常に簡単に解決できるように思えます。 この記事が、開発者がテキストハイライトを実装する興味深い方法を採用するのに役立つことを願っています。 良い一日を過ごし、開発に幸運を。
関連リンク:
サンプルを使用したプロジェクトへのリンクhttps://github.com/qw1nz/TextSelection.git