たぶん私は、最も不適切な瞬間にばかげた仕事に幸運だ。 それはそのようなカルマですか?! まあ...
この「休暇」の投稿では、3gモデムとラップトップを使用して、IPカメラからサイトへのブロードキャストを実装する方法について説明します。
ToasterでGoogleに何をすべきかを教えてくれなかったのなら、投稿自体は書きません。
何がありますか?
- 手に持ってさえいなかった高価なIPカメラAXIS Q1755。 カメラ自体は都市「A」にあり、3gブレーキモデムを介して接続されています。
- ほとんど死んだCore2Duoで動作するDebian 7上のサーバー。 それほど死んではいませんが、彼はこれらの仕事にはあまり適していません。 ああ、サーバー自体はBに住んでいます。
- プレーヤーを掛けたいサイト。 同じ都市Bの別の生産性の高いサーバーにあります。
- 私は、都市Bにいて、ラップトップ、3gモデム、および4gbのトラフィックが制限されています。
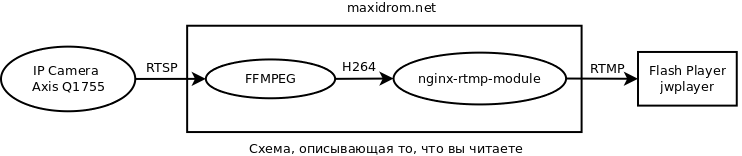
私たち全員がこれを実現するのは何ですか? カメラ自体がRTSPを介してストリームを送信し、FFmpegがストリームを受信してRTMPに変換します。JWPlayerを使用すると、このストリームを「サイトでハングアップ」できます。
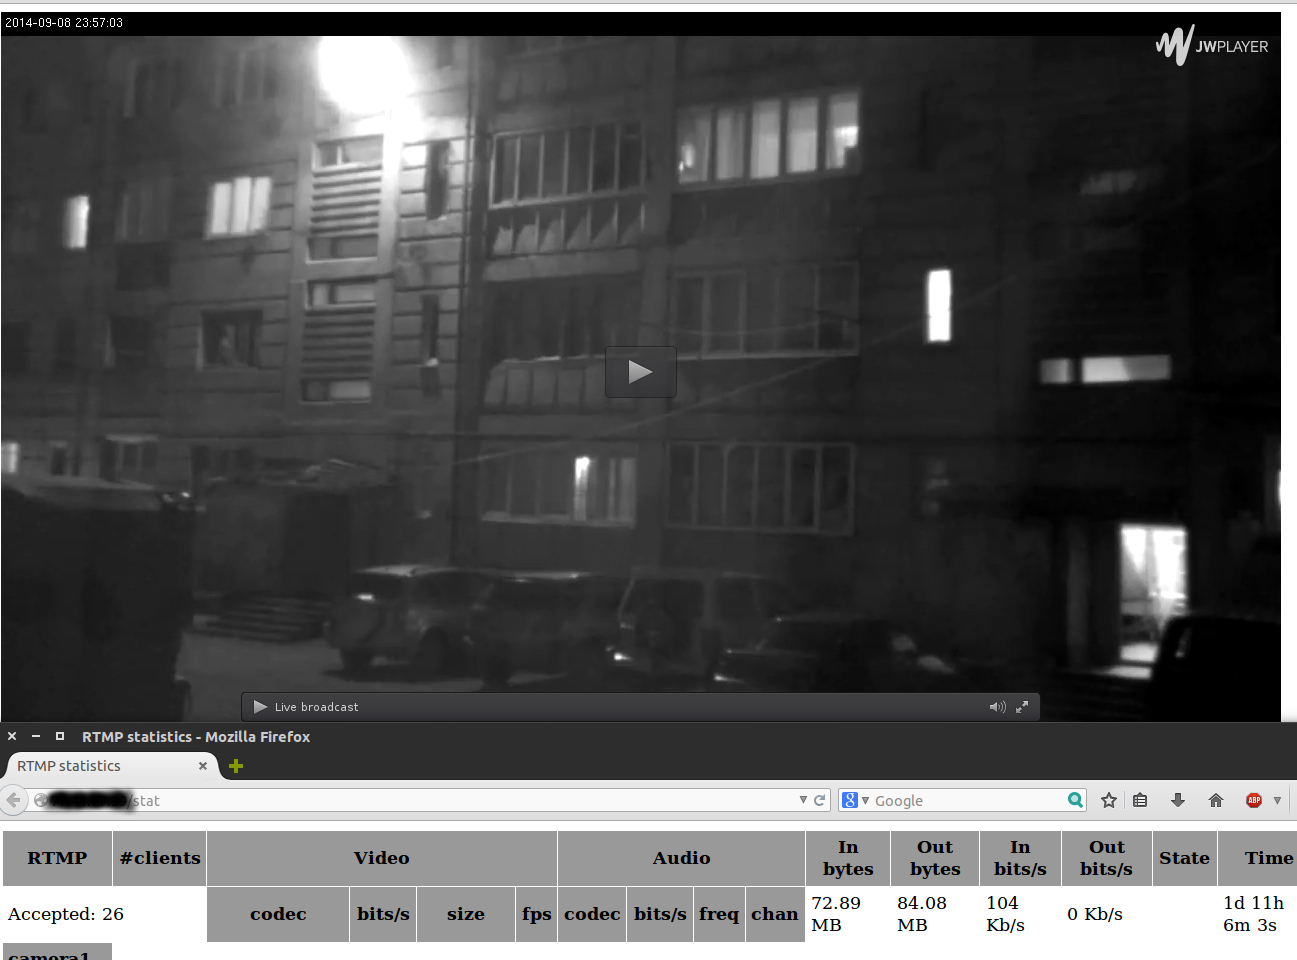
明らかにそれが好きな人のために-取得:
さて、今主なことは、そのようなことを手に入れるために何をする必要があるのでしょうか?
準備する
まず、すべてを準備し、必要なパッケージをインストールする必要があります。 たとえば、Nginxをビルドするには、Perl正規表現ライブラリとOpenSSLヘッダーが必要です。
apt-get install libpcre3 libpcre3-dev libssl-dev
rtmpdumpユーティリティもインストールします。これにより、rtmpが機能するかどうかを理解できます。
apt-get install rtmpdump
次に、安定版1.6.0であるNginxのソースをダウンロードし、展開します。
wget http://nginx.org/download/nginx-1.6.0.tar.gz tar -xzvf nginx-1.6.0.tar.gz
Nginxのコンパイルに必要なモジュールについても同じことを行います。
wget https://github.com/arut/nginx-rtmp-module/zipball/master -O nginx-rtmp-module-master.zip unzip nginx-rtmp-module-master.zip -d nginx-rtmp-module-master
rtmpをサポートするNginxアセンブリ
アセンブリを開始しましょう。 まず、Nginxを構成する必要があります。
cd nginx-1.6.0 ./configure --prefix=/usr --add-module=../nginx-rtmp-module-master/arut-nginx-rtmp-module-0bb2323/ --pid-path=/var/run/nginx.pid --conf-path=/etc/nginx/nginx.conf --error-log-path=/var/log/nginx/error.log --http-log-path=/var/log/nginx/access.log --with-http_ssl_module
途中で、次のようになります。
... <pre>configuring additional modules <strong>adding module in ../nginx-rtmp-module-master/arut-nginx-rtmp-module-0bb2323/</strong> <strong> + ngx_rtmp_module was configured</strong> checking for PCRE library ... found checking for PCRE JIT support ... found checking for OpenSSL library ... found checking for zlib library ... found creating objs/Makefile</pre> <pre>Configuration summary + using system PCRE library + using system OpenSSL library + md5: using OpenSSL library + sha1: using OpenSSL library + using system zlib library</pre> <pre><strong> nginx path prefix: "/usr"</strong> <strong> nginx binary file: "/usr/sbin/nginx"</strong> <strong> nginx configuration prefix: "/etc/nginx"</strong> <strong> nginx configuration file: "/etc/nginx/nginx.conf"</strong> <strong> nginx pid file: "/var/run/nginx.pid"</strong> <strong> nginx error log file: "/var/log/nginx/error.log"</strong> <strong> nginx http access log file: "/var/log/nginx/access.log"</strong> <strong> nginx http client request body temporary files: "client_body_temp"</strong> <strong> nginx http proxy temporary files: "proxy_temp"</strong> <strong> nginx http fastcgi temporary files: "fastcgi_temp"</strong> <strong> nginx http uwsgi temporary files: "uwsgi_temp"</strong> <strong> nginx http scgi temporary files: "scgi_temp"</strong>
rtmpモジュール自体が接続されており、ログ、構成、およびバイナリへのパスが正しいことが重要です。 上記で、チェックする必要があるものを強調しました。 すべてが順調であれば、コンパイルしてインストールします。
make make install
stat.xslファイルをソースフォルダーからnginxフォルダーにコピーします。
cp nginx-rtmp-module-master/arut-nginx-rtmp-module-0bb2323/stat.xsl /etc/nginx/
そして、nginx自体の動作を確認します。
service nginx start
http:// ip_serveraに移動します。 Nginxの挨拶をご覧ください。 その後、すべてが順調です。
FFmpegのインストールと動作確認
rtspストリームをfvlに変換できるようにするには、ffmpegが必要です。
はい、ところで、Ubuntuでこれらすべての手順を実行する場合、このUbuntuではFFmpegが非推奨であり、代わりにavconvを使用することをお勧めします。 心配しないでください、「石鹸で縫った」を交換しても何も壊れません、すべてが動作します。
OK、FFmpegリポジトリを接続してセットアップします。
apt-add-repository ppa:jon-severinsson/ffmpeg apt-get update apt-get install ffmpeg
次に、ffmpegがカメラにどの程度接続しているかを確認しましょう。 たとえば、ルーターのポート554へのアクセスを開くのを忘れていました。
ffmpeg -i rtsp://admin:admin@10.10.10.11/axis-media/media.amp
出力では、次のようなものが得られます。
ffmpeg version 1.0.10 Copyright (c) 2000-2014 the FFmpeg developers built on Jul 25 2014 07:50:40 with gcc 4.7 (Debian 4.7.2-5) configuration: --prefix=/usr --extra-cflags='-g -O2 -fstack-protector --param=ssp-buffer-size=4 -Wformat -Werror=format-security ' --extra-ldflags='-Wl,-z,relro' --cc='ccache cc' --enable-shared --enable-libmp3lame --enable-gpl --enable-nonfree --enable-libvorbis --enable-pthreads --enable-libfaac --enable-libxvid --enable-postproc --enable-x11grab --enable-libgsm --enable-libtheora --enable-libopencore-amrnb --enable-libopencore-amrwb --enable-libx264 --enable-libspeex --enable-nonfree --disable-stripping --enable-libvpx --enable-libschroedinger --disable-encoder=libschroedinger --enable-version3 --enable-libopenjpeg --enable-librtmp --enable-avfilter --enable-libfreetype --enable-libvo-aacenc --disable-decoder=amrnb --enable-libvo-amrwbenc --enable-libaacplus --libdir=/usr/lib/x86_64-linux-gnu --disable-vda --enable-libbluray --enable-libcdio --enable-gnutls --enable-frei0r --enable-openssl --enable-libass --enable-libopus --enable-fontconfig --enable-libfdk-aac --enable-libdc1394 --disable-altivec --dis libavutil 51. 73.101 / 51. 73.101 libavcodec 54. 59.100 / 54. 59.100 libavformat 54. 29.104 / 54. 29.104 libavdevice 54. 2.101 / 54. 2.101 libavfilter 3. 17.100 / 3. 17.100 libswscale 2. 1.101 / 2. 1.101 libswresample 0. 15.100 / 0. 15.100 libpostproc 52. 0.100 / 52. 0.100 [rtsp @ 0x19d6cc0] Estimating duration from bitrate, this may be inaccurate Input #0, rtsp, from 'rtsp://admin:admin@10.10.10.11/axis-media/media.amp': Metadata: title : Media Presentation Duration: N/A, start: 0.570122, bitrate: N/A Stream #0:0: Video: h264 (Baseline), yuvj420p, 1280x720 [SAR 1:1 DAR 16:9], 25 tbr, 90k tbn, 180k tbc At least one output file must be specified
これは、カメラが動作しており、rtspストリームをブロードキャストし、ffmpegが動作していることを証明しています。
Nginxの構成とその動作の検証
ここで、お気に入りのエディターでnginx構成ファイルを開きます(私はvimを持っています):
vim /etc/nginx.conf
そして、次の状態にします。
user nginx; # nproc worker_processes 2; error_log /var/log/nginx/error.log warn; pid /var/run/nginx.pid; events { worker_connections 1024; } http { include /etc/nginx/mime.types; default_type application/octet-stream; log_format main '$remote_addr - $remote_user [$time_local] "$request" ' '$status $body_bytes_sent "$http_referer" ' '"$http_user_agent" "$http_x_forwarded_for"'; access_log /var/log/nginx/access.log main; sendfile on; #tcp_nopush on; keepalive_timeout 65; #gzip on; server { listen 80; # rtmp stat location /stat { rtmp_stat all; rtmp_stat_stylesheet stat.xsl; } location /stat.xsl { # you can move stat.xsl to a different location root /etc/nginx/; } location / { rtmp_control all; } error_page 500 502 503 504 /50x.html; location = /50x.html { root html; } # locations location /image/cam1/ { proxy_pass "http://10.10.10.11/axis-cgi/jpg/image.cgi"; } } include /etc/nginx/conf.d/*.conf; } rtmp { access_log /var/log/nginx/rtmp_access.log; server { listen 1935; ping 30s; notify_method get; application cam1 { live on; exec_pull ffmpeg -i rtsp://admin:admin@10.10.10.11/axis-media/media.amp -threads 2 -f flv -r 25 -s 1280x720 -an rtmp://localhost:1935/cam1/stream 2>>/var/log/nginx/ffmpeg.log; } } }
保存、閉じ、確認:
nginx -t nginx: the configuration file /etc/nginx/nginx.conf syntax is ok nginx: configuration file /etc/nginx/nginx.conf test is successful service nginx restart
次のコマンドを使用して、NGINXに基づいたRTMPサーバーの正しい動作を確認できます。
rtmpdump -r "rtmp://127.0.0.1:1935/cam1/stream" -v
ビデオ出力をコンソールに直接取得します。
ストリームをJWPlayerに接続します
さて、最後に行う必要があるのは、 www.jwplayer.comサイトに登録し、プレーヤーコードを取得して次のフォームに持ってくることです。
<div id='player...'></div> <script type='text/javascript'> jwplayer('player...').setup({ file: 'rtmp://10.10.10.11:1935/cam1/stream', image: 'http://10.10.10.11/image/cam1/', width: '1280', height: '720', aspectratio: '16:9' }); </script>
すべて、タスクが完了しました、お楽しみください!
ソースおよびその他のサポートリソース
 RTMP Webカメラブロードキャスト
サイトでのビデオ放送の組織。 VLC + Erlyvideo + HLS + nginx。
RTMP Webカメラブロードキャスト
サイトでのビデオ放送の組織。 VLC + Erlyvideo + HLS + nginx。
 ネットワークカメラからビデオをキャプチャする、パート1
ネットワークカメラからビデオをキャプチャする、パート2
Nginxベースのオンラインブロードキャストサーバー
nginxを使用してオンラインビデオをブロードキャストする
再びビデオ監視、カメラ、RTSP、onvifについて。 そして、「バイク」!
本格的なDIYビデオホスティングの作成(nginx + php5-fpm + ffmpeg + cumulusclips)
nginxを使用して独自のプライベートRTMPサーバーをセットアップする方法
help.ubuntu.com/community/FFmpeg
github.com/arut/nginx-rtmp-module
toster.ru/q/128005
jwplayer.com
support.jwplayer.com:RTMPストリーミングの使用
JW Player Webサイト用の無料プレーヤー:クラウド接続
ネットワークカメラからビデオをキャプチャする、パート1
ネットワークカメラからビデオをキャプチャする、パート2
Nginxベースのオンラインブロードキャストサーバー
nginxを使用してオンラインビデオをブロードキャストする
再びビデオ監視、カメラ、RTSP、onvifについて。 そして、「バイク」!
本格的なDIYビデオホスティングの作成(nginx + php5-fpm + ffmpeg + cumulusclips)
nginxを使用して独自のプライベートRTMPサーバーをセットアップする方法
help.ubuntu.com/community/FFmpeg
github.com/arut/nginx-rtmp-module
toster.ru/q/128005
jwplayer.com
support.jwplayer.com:RTMPストリーミングの使用
JW Player Webサイト用の無料プレーヤー:クラウド接続