ネットワークの概念から始めましょう。
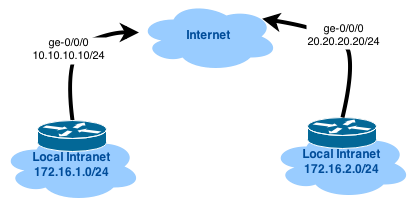
この図は、両方のデバイスがge-0 / 0/0インターフェイスを介してプロバイダーに接続され、各SRXが独自のプライベートネットワーク(ge-0 / 0/1に接続)を持っていることを示しています。 私たちの目標は、IPSecトンネルを構築し、172.16.1.0 / 24と172.16.2.0/24ネットワーク間のトラフィックを許可することです。
設定を簡素化するために、外部インターフェイスがDHCPを介してアドレスを受信することを前提としています。
猫に興味がある人は誰でも聞いてください。
IPSecを構成する前に、まずルーターの1つの構成を確認し、どこから始めればよいかをお勧めします。
ルート@ gw-jvsrx-a#show
version 12.1X46-D10.2; system { host-name gw-jvsrx-a; root-authentication { encrypted-password "$1$XXX"; ## SECRET-DATA } services { ssh { protocol-version v2; client-alive-count-max 5; client-alive-interval 120; connection-limit 5; rate-limit 2; } dhcp { default-lease-time 21600; pool 172.16.1.0/27 { address-range low 172.16.1.2 high 172.16.1.30; router { 172.16.1.1; } propagate-settings ge-0/0/1.0; } } } ntp { server 0.pool.ntp.org prefer; server 1.pool.ntp.org; server 2.pool.ntp.org; server 3.pool.ntp.org; } } interfaces { ge-0/0/0 { unit 0 { family inet { dhcp; } } } ge-0/0/1 { unit 0 { family inet { address 172.16.1.1/27; } } } lo0 { unit 0 { family inet { address 172.31.255.1/32; } } } } security { nat { source { rule-set trust-to-untrust { from zone trust; to zone untrust; rule source-nat { match { source-address 0.0.0.0/0; } then { source-nat { interface; } } } } } } policies { from-zone trust to-zone untrust { policy trust-to-untrust { match { source-address any; destination-address any; application any; } then { permit; } } } from-zone trust to-zone trust { policy trust-to-trust { match { source-address any; destination-address any; application any; } then { permit; } } } } zones { security-zone untrust { tcp-rst; interfaces { ge-0/0/0.0 { host-inbound-traffic { system-services { dhcp; ping; ssh; } } } } } security-zone trust { interfaces { ge-0/0/1.0 { host-inbound-traffic { system-services { all; } protocols { all; } } } lo0.0 { host-inbound-traffic { system-services { ping; } } } } } } }
2番目のデバイスの構成は、DHCPサーバー設定とlo0インターフェイスを除いて類似しています。 この状況では、通常のルーターを扱っています。
Wikipediaで IPSec(たとえば)の詳細を読むことができます。
トンネルを設定しましょう。
トンネルインターフェース
まず、トンネルの構築に使用される仮想インターフェイスを作成します。
set interfaces st0 unit 0 family inet address 172.16.0.1/30
なぜなら 2つのデバイス用のトンネルを構築するだけで、ネットワーク/ 30で十分です。
第一段階
IKEネイティブモードを使用するようにIKEを構成します。
set security ike proposal ike-proposal authentication-method pre-shared-keys set security ike proposal ike-proposal dh-group group14 set security ike proposal ike-proposal authentication-algorithm sha-256 set security ike proposal ike-proposal encryption-algorithm aes-128-cbc set security ike proposal ike-proposal lifetime-seconds 3600 set security ike policy ike-policy mode main set security ike policy ike-policy pre-shared-key ascii-text "YOUR_PRE_SHARED_KEY" set security ike policy ike-policy proposals ike-proposal set security ike gateway gw-jvsrx-b ike-policy ike-policy set security ike gateway gw-jvsrx-b address 20.20.20.20 set security ike gateway gw-jvsrx-b external-interface ge-0/0/0.0
詳細:
認証方法の事前共有キー -事前共有キーの使用を有効にします。
dh-group group14-安全でないチャネルでデータを交換するときに共有秘密鍵を生成する必要があります(詳細はこちらで説明します ) 。2048ビットモジュールを使用しています。
authentication-algorithm sha-256-認証にsha-256を使用します。
encryption-algorithm aes-128-cbc-最初のフェーズでデータを暗号化しますaes-128-cbc;
lifetime-seconds 3600-第1フェーズの秘密鍵(接続の初期化時に自動的に生成された)の寿命。
モードmain-メインモード
pre-shared-key ascii- text-キー自体(たとえば、 openssl rand -base64 32のように、十分に大きく生成することをお勧めします)
アドレス20.20.20.20-2番目のSRXのパブリックアドレス
external-interface ge-0 / 0 / 0.0 -IPSecトラフィックが通過するインターフェイス。
第二段階
この段階で、IPSecトンネル自体が作成されます。
set security ipsec proposal ipsec-proposal protocol esp set security ipsec proposal ipsec-proposal authentication-algorithm hmac-sha-256-128 set security ipsec proposal ipsec-proposal encryption-algorithm aes-128-cbc set security ipsec proposal ipsec-proposal lifetime-seconds 7200 set security ipsec policy ipsec-policy perfect-forward-secrecy keys group14 set security ipsec policy ipsec-policy proposals ipsec-proposal set security ipsec vpn gw-jvsrx-b bind-interface st0.0 set security ipsec vpn gw-jvsrx-b ike gateway gw-jvsrx-b set security ipsec vpn gw-jvsrx-b ike ipsec-policy ipsec-policy set security ipsec vpn gw-jvsrx-b establish-tunnels immediately
詳細:
protocol esp -ESP(Encapsulated Security Payload header)を使用します( ここで詳細に説明します )。
authentication-algorithm hmac-sha-256-128 -IPSec認証アルゴリズム。
encryption-algorithm aes-128-cbc-暗号化アルゴリズム。
lifetime-seconds 7200-第2フェーズの秘密鍵(接続の初期化時に自動的に生成された)の寿命。
完全転送秘密鍵group14 -dh-groupに似ています。
bind-interface st0.0 -IPSecトンネルを構築するための仮想インターフェイス。
すぐにトンネルを確立 -今すぐトンネルを作成します。
同様の設定を2番目のルーターに適用する必要があります(IPアドレスをst0.0とikeゲートウェイに置き換えます)。
フィニッシュライン
これでIPSecトンネルの構成は完了しましたが、 SRXシリーズはファイアウォールでもあるため、これらのパラメーターを使用するとトンネルは立ち上がらず、ファイアウォールはトンネルを確立しようとしてすべてのパケットを破棄します。 そのため、パーツのファイアウォール設定を変更します。
set security zones security-zone untrust interfaces ge-0/0/0.0 host-inbound-traffic system-services ike set security zones security-zone trust interfaces st0.0 host-inbound-traffic system-services all set security zones security-zone trust interfaces st0.0 host-inbound-traffic protocols all
最初のコマンドは、外部インターフェイス(プロバイダーの方向)でIKEトラフィックを許可します。 2番目と3番目は、すべてのトラフィックがIPSecトンネルを通過できるようにします。
これでトンネルが上がります。確認してみましょう。
root@gw-jvsrx-a# run show security ike security-associations detail IKE peer 20.20.20.20, Index 2116322, Gateway Name: gw-jvsrx-b Role: Responder, State: UP Initiator cookie: 1fa7a8730c817511, Responder cookie: 2a3e1f8c554ddb85 Exchange type: Main, Authentication method: Pre-shared-keys Local: 10.10.10.10:500, Remote: 20.20.20.20:500 Lifetime: Expires in 2291 seconds Peer ike-id: 20.20.20.20 Xauth assigned IP: 0.0.0.0 Algorithms: Authentication : hmac-sha256-128 Encryption : aes128-cbc Pseudo random function: hmac-sha256 Diffie-Hellman group : DH-group-14 Traffic statistics: Input bytes : 1244 Output bytes : 948 Input packets: 6 Output packets: 4 Flags: IKE SA is created IPSec security associations: 1 created, 1 deleted Phase 2 negotiations in progress: 0 Negotiation type: Quick mode, Role: Responder, Message ID: 0 Local: 10.10.10.10:500, Remote: 20.20.20.20:500 Local identity: 10.10.10.10 Remote identity: 20.20.20.20 Flags: IKE SA is created root@gw-jvsrx-a# run show security ipsec security-associations detail ID: 131073 Virtual-system: root, VPN Name: gw-jvsrx-b Local Gateway: 10.10.10.10, Remote Gateway: 20.20.20.20 Local Identity: ipv4_subnet(any:0,[0..7]=0.0.0.0/0) Remote Identity: ipv4_subnet(any:0,[0..7]=0.0.0.0/0) Version: IKEv1 DF-bit: clear Bind-interface: st0.0 Port: 500, Nego#: 2, Fail#: 0, Def-Del#: 0 Flag: 0x600a29 Last Tunnel Down Reason: Delete payload received Direction: inbound, SPI: ea287d13, AUX-SPI: 0 , VPN Monitoring: - Hard lifetime: Expires in 5884 seconds Lifesize Remaining: Unlimited Soft lifetime: Expires in 5295 seconds Mode: Tunnel(0 0), Type: dynamic, State: installed Protocol: ESP, Authentication: hmac-sha256-128, Encryption: aes-cbc (128 bits) Anti-replay service: counter-based enabled, Replay window size: 64 Direction: outbound, SPI: 14a16181, AUX-SPI: 0 , VPN Monitoring: - Hard lifetime: Expires in 5884 seconds Lifesize Remaining: Unlimited Soft lifetime: Expires in 5295 seconds Mode: Tunnel(0 0), Type: dynamic, State: installed Protocol: ESP, Authentication: hmac-sha256-128, Encryption: aes-cbc (128 bits) Anti-replay service: counter-based enabled, Replay window size: 64
あなたはまだ昔ながらの方法を確認できます:
root@gw-jvsrx-a# run ping 172.16.0.2 count 5 interface st0.0 PING 172.16.0.2 (172.16.0.2): 56 data bytes 64 bytes from 172.16.0.2: icmp_seq=0 ttl=64 time=14.274 ms 64 bytes from 172.16.0.2: icmp_seq=1 ttl=64 time=10.420 ms 64 bytes from 172.16.0.2: icmp_seq=2 ttl=64 time=10.448 ms 64 bytes from 172.16.0.2: icmp_seq=3 ttl=64 time=10.448 ms 64 bytes from 172.16.0.2: icmp_seq=4 ttl=64 time=10.439 ms --- 172.16.0.2 ping statistics --- 5 packets transmitted, 5 packets received, 0% packet loss round-trip min/avg/max/stddev = 10.420/11.206/14.274/1.534 ms
トンネルの使用に関する統計は、次のように表示できます。
root@gw-jvsrx-a# run show security ipsec statistics ESP Statistics: Encrypted bytes: 85052 Decrypted bytes: 41088 Encrypted packets: 553 Decrypted packets: 512 AH Statistics: Input bytes: 0 Output bytes: 0 Input packets: 0 Output packets: 0 Errors: AH authentication failures: 0, Replay errors: 0 ESP authentication failures: 0, ESP decryption failures: 0 Bad headers: 0, Bad trailers: 0
しかし、それだけではありません! 結局、「別のルーターの後」にネットワークへのルートを登録する必要があります。 私たちは怠け者であり、過度の仕事が好きではありませんか(右?)、OSPFを使用します。
set protocols ospf area 0.0.0.0 interface ge-0/0/1.0 set protocols ospf area 0.0.0.0 interface st0.0
いつものように、コミットすることを忘れないでください(そして、トンネルのもう一方の端に対称設定を適用します)、そうでなければ何も動作しません:
root@gw-jvsrx-a# commit check configuration check succeeds root@gw-jvsrx-a# commit commit complete