機会自体はもちろん素晴らしいですが、このサイトでは実験の結果をビデオの形で保存することはできません。 この迷惑な迷惑を修正するだけでなく、修正するだけでなく、iOSプログラムとして実装することで、iPhoneまたはiPadを、コンテンツを消費するのではなく作成するデバイスに変えることができました。
仕組み
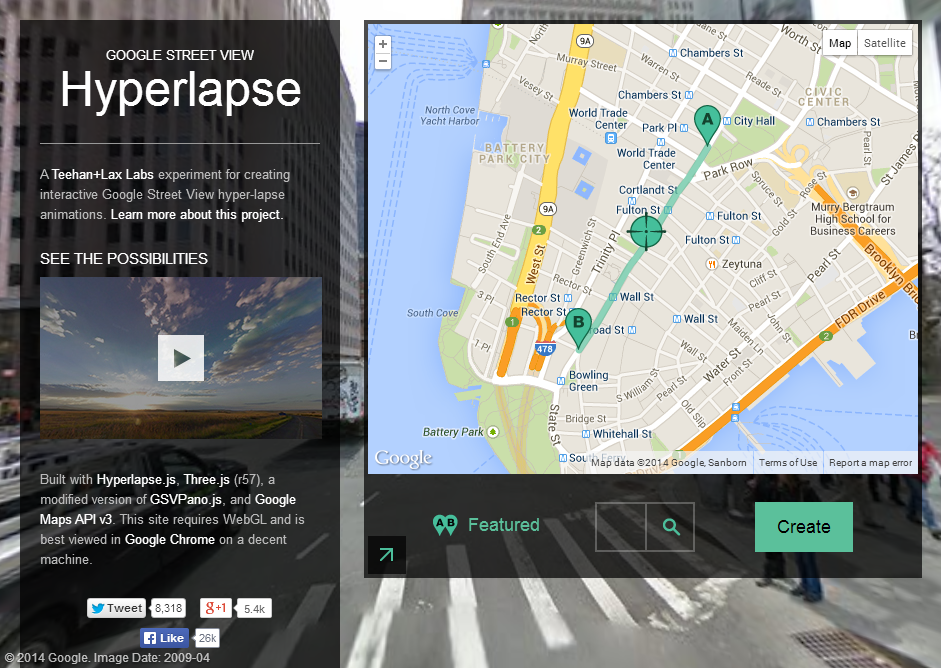
そのため、今日、Street Videoを撮影できるリソースがいくつかあります。 まず、これはhyperlapse.tllabs.ioです 。これにより、2つのポイントをマークし、それらの間にルートを描き、ループアニメーションを楽しむことができます。
ストリートビデオを視聴できる2番目のサイトはhttp://track-kit.netです
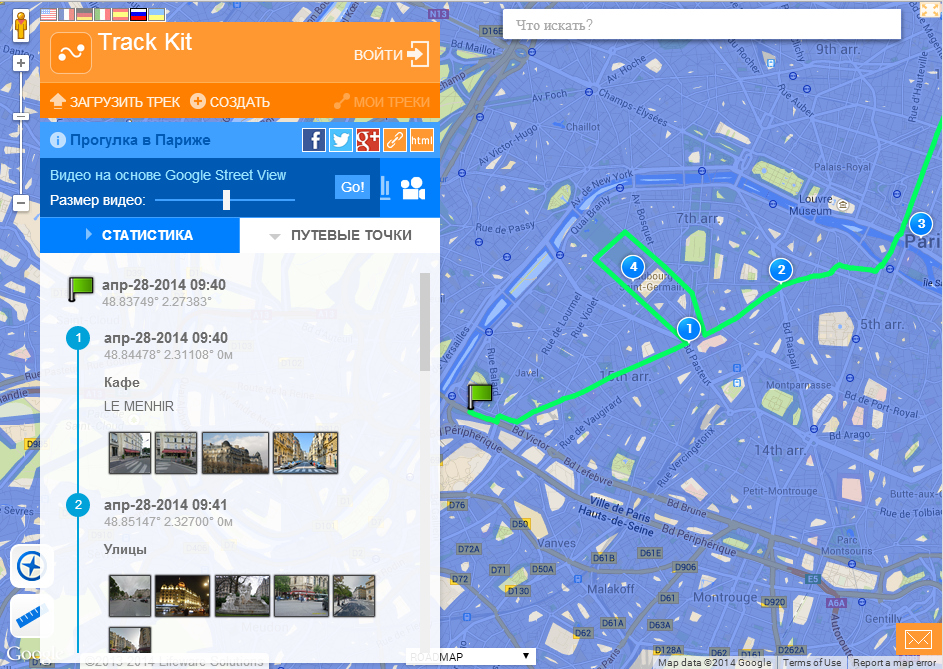
このサイトでは、作成またはインポートされたトラックのビデオを表示できます。 ここではStreet Videoが主な機能ではないという事実にもかかわらず、技術用のビデオへの直接リンクを生成できます。 たとえば、これ:
http://track-kit.net/maps_s3/index.php?track=8821.gpx&svv=134
確かに、私のMacでは多かれ少なかれChromeでしか動作しません。
ただし、これらのリソースではビデオを保存できません。 この問題を今すぐ解決します。
ビデオを準備するには、いくつかの問題を解決する必要があります。
- A地点からB地点までの道順を取得します。Googleストリートビューの空き状況を表示することをお勧めします。
- パノラマフレームをダウンロード
- たとえば、カメラをオブジェクトに向けることにより、ユーザーがパノラマを編集できるようにします。
- フレームビデオを生成
- 多くの典型的なiOSの問題を解決します。
ルートを取得
これを行うには、iOS用Google Maps SDKとGoogle Direction APIを使用します
Google Direction APIを使用して、エンコードされた形式のパスの開始点と終了点の間の一連のポイントをGoogleに要求します。
Googleが緯度と経度で受け取ったエンコードされたポイントのリストを変換するには、iOS用のGoogle Maps SDK(GMSPathクラス)が必要です。
Googleと通信するには、AFNetworkingが使用されます。
static NSString *kLWSDirectionsURL = @"http://maps.googleapis.com/maps/api/directions/json?"; - (void)loadDirectionsForWaypoints:(NSArray *)waypoints{ NSString *origin = [waypoints objectAtIndex:0]; int waypointCount = [waypoints count]; int destinationPos = waypointCount -1; NSString *destination = [waypoints objectAtIndex:destinationPos]; NSString *sensor = @"false"; NSMutableString *url = [NSMutableString stringWithFormat:@"%@&origin=%@&destination=%@&sensor=%@", kLWSDirectionsURL,origin,destination, sensor]; if(waypointCount>2) { [url appendString:@"&waypoints=optimize:true"]; int wpCount = waypointCount-2; for(int i=1;i<wpCount;i++){ [url appendString: @"|"]; [url appendString:[waypoints objectAtIndex:i]]; } } url = [NSMutableString stringWithString:[url stringByAddingPercentEscapesUsingEncoding: NSASCIIStringEncoding]]; _directionsURL = [NSURL URLWithString:url]; [self startDownloadDataForURL:_directionsURL]; } AFHTTPRequestOperation *requestOperation; NSMutableArray* coordinatesArr; -(void)startDownloadDataForURL:(NSURL*)url{ [self stopLoadingForUserInfo:userInfo]; requestOperation = [manager GET:[url absoluteString] parameters:nil success:^(AFHTTPRequestOperation *operation, id responseObject) { NSString* status = [responseObject objectForKey:@"status"]; NSArray* routesArr = [responseObject objectForKey:@"routes"]; if ([status isEqualToString:@"OK"] && [routesArr count] > 0) { NSDictionary *routes = [responseObject objectForKey:@"routes"][0]; NSDictionary *route = [routes objectForKey:@"overview_polyline"]; NSString *overview_route = [route objectForKey:@"points"]; GMSPath *path = [GMSPath pathFromEncodedPath:overview_route]; coordinatesArr = [NSMutableArray array]; for (int i = 0; i < [path count]; ++i) { CLLocationCoordinate2D coord = [path coordinateAtIndex:i]; [coordinatesArr addObject:[NSValue valueWithMKCoordinate:coord]]; } } } failure:^(AFHTTPRequestOperation *operation, NSError *error) { }]; }
axesArrリストでダウンロードが成功した場合、パスのポイントの座標セットを保存します。
PS Google方向APIには1つのニュアンスがあります。2経由ではなく、たとえば20ポイント経由でルーティングする必要がある場合は、ウェイポイントの間隔に対して複数のリクエストを行う必要があります。「&ウェイポイント」エラーを返します。
パノラマをダウンロード
パノラマを読み込むには、 cbk0.google.com / cbk?output = json&ll = latitude 、経度の形式のリクエストを使用できます
緯度と経度の座標を持つポイントに最も近いパノラマに関する情報が返されます。
取得できる最も重要なものは「panoId」です。これは必要なパノラマのIDです(panoIDに加えて、パノラマのオフセット角度に関する情報も取得できます。これは、パノラマを特定の方向に回転する必要がある場合に役立ちます)。
NSString* panoID; -(void)loadMyWebViewForCoord:(CLLocationCoordinate2D)arg{ @try { if (!manager) { manager = [AFHTTPRequestOperationManager manager]; } NSString* urlStr = [NSString stringWithFormat:@"http://cbk0.google.com/cbk?output=json&ll=%f,%f",arg.latitude,arg.longitude]; request = [manager GET:urlStr parameters:nil success:^(AFHTTPRequestOperation *operation, id responseObject) { id location = [responseObject objectForKey:@"Location"]; id projection = [responseObject objectForKey:@"Projection"]; if (location && projection) { panoID = [location objectForKey:@«panoId»]; } } failure:^(AFHTTPRequestOperation *operation, NSError *error) { }]; }
さらに、取得したパノラマIDを使用して、リクエストを通じて次のことができます。
cbk0.google.com/cbk?output=tile&panoid=panoid&zoom=zoom&x=x&y=y
すでに必要なパノラマタイルを取得します。panoIdは以前に取得したパノラマ識別子、zoomはパノラマスケール(そのサイズ)、xとyはパノラマタイルの縦と横の番号、パノラマタイルの数は入力したズームによって異なります。 たとえば、ズーム= 3を選択すると、パノラマは幅7タイル、高さ3タイルで構成されます。
つまり、パノラマ全体を取得するには、すべてのタイルをダウンロードする必要があります。
-(void)loadImagesForPanoPoint:(PanoPoint*)currentPanoPointArg { @try { int zoom; int maxX; int maxY; if ([StreetViewSettings instance].hiQualityPano) { zoom = 3; maxX = 7; maxY = 3; } else { zoom = 2; maxX = 4; maxY = 2; } __block int allImages = maxX; for (int x = 0; x < maxX; ++x) { dispatch_async(dispatch_get_global_queue(DISPATCH_QUEUE_PRIORITY_HIGH, 0), ^{ NSMutableArray* imForCurrentCoodY = [NSMutableArray array]; for (int y = 0; y < maxY; ++y) { @autoreleasepool { NSString* pathStr = [NSString stringWithFormat:@"http://cbk0.google.com/cbk?output=tile&panoid=%@&zoom=%d&x=%d&y=%d",currentPanoPointArg.panoID,zoom,x,y]; NSString* tempDirectory = NSTemporaryDirectory(); NSString* imPath = [NSString stringWithFormat:@"%@/panoLoadCash/%@zoom=%dx=%dy=%d_%d",tempDirectory,currentPanoPointArg.panoID,zoom,x,y,currentCoordArrIndex]; NSData* im = nil; NSFileManager* fM = [NSFileManager defaultManager]; BOOL isD; if (![fM fileExistsAtPath:imPath isDirectory:&isD]) { im = [self imgByPath:pathStr]; } else { [imForCurrentCoodY addObject:imPath]; } if (im) { pakSize += im.length; if (![fM fileExistsAtPath:[NSTemporaryDirectory() stringByAppendingString:@"panoLoadCash"] isDirectory:&isD]) { NSError* err; [fM createDirectoryAtPath:[NSTemporaryDirectory() stringByAppendingString:@"panoLoadCash"] withIntermediateDirectories:YES attributes:[NSDictionary dictionary] error:&err]; } [im writeToFile:imPath atomically:YES]; [imForCurrentCoodY addObject:imPath]; } } } [imForCurrentCoordV addObject:@(x)]; [imForCurrentCoordTemp addObject:imForCurrentCoodY]; --allImages; }); } }
したがって、Googleから受け取ったルートのすべてのポイントを通過した後、それらのパノラマをダウンロードして、ビデオの形式でユーザーに表示できます。
ビデオを生成します
これを行うには、AVFoundationライブラリが必要です。
#import <AVFoundation/AVFoundation.h>
そこから3つのクラスのみを取ります。
AVAssetWriter-メディアデータをファイルに書き込む
AVAssetWriterInput-ファイルに書き込むためにメディアパッケージをAVAssetWriterに追加します
AVAssetWriterInputPixelBufferAdaptor - AVAssetWriterInputのビデオパッケージ(CVPixelBuffer)を提供します
したがって、どこかで定義する必要があります。
AVAssetWriter* videoWriter; AVAssetWriterInput* writerInput; AVAssetWriterInputPixelBufferAdaptor* adaptor;
さらに初期化:
NSError *error = nil; videoWriter = [[AVAssetWriter alloc] initWithURL:[NSURL fileURLWithPath:videoPath] fileType:AVFileTypeQuickTimeMovie error:&error]; NSDictionary *videoSettings = [[NSDictionary alloc] initWithObjectsAndKeys: AVVideoCodecH264, AVVideoCodecKey, [NSNumber numberWithInt:videoSize.width], AVVideoWidthKey, [NSNumber numberWithInt:videoSize.height], AVVideoHeightKey, nil]; writerInput = [AVAssetWriterInput assetWriterInputWithMediaType:AVMediaTypeVideo outputSettings:videoSettings]; adaptor = [AVAssetWriterInputPixelBufferAdaptor assetWriterInputPixelBufferAdaptorWithAssetWriterInput:writerInput sourcePixelBufferAttributes:nil]; [videoWriter addInput:writerInput]; [videoWriter startWriting]; [videoWriter startSessionAtSourceTime:kCMTimeZero]
その後、すべてのビデオ録画の準備が整います。
AVAssetWriterInputには次の機能があります。
(void)requestMediaDataWhenReadyOnQueue:(dispatch_queue_t)queue usingBlock:(void(^)(void))ブロック
新しいデータチャンクが必要になるたびにBlockを呼び出します。
[writerInput requestMediaDataWhenReadyOnQueue:assetWriterQueue usingBlock:^ if (buffer == NULL) { CVPixelBufferPoolCreatePixelBuffer (NULL, adaptor.pixelBufferPool, &buffer); } UIImage *image = [self imageForIndex:currentIndexForBuff]; if (image) { buffer = [self pixelBufferFromCGImage:image.CGImage]; CMTime presentationTime= CMTimeMakeWithSeconds(speed*currentIndexForBuff, 33); if (![adaptor appendPixelBuffer:buffer withPresentationTime:presentationTime]) { [self finishVideo]; return; } CVPixelBufferRelease(buffer); if (currentIndexForBuff < imagesPathsForVideo.count) { } else { [self finishVideo]; } } else { if (currentIndexForBuff < imagesPathsForVideo.count) { } else { [self finishVideo]; } return; } ++currentIndexForBuff; }];
ビデオ再生速度は、presentationTime変数を使用して制御されます。これは、出力ファイルのフレーム時間を示します
UIImage * imageは現在のフレームです
すべてのフレームがビデオに記録されると、ビデオの記録を停止する必要があることをvideoWriterおよびwriterInputに通知します。
-(void)finishVideo { [writerInput markAsFinished]; [videoWriter finishWritingWithCompletionHandler:^(){}]; }
画像からCVPixelBufferRefを取得する関数:
- (CVPixelBufferRef) pixelBufferFromCGImage: (CGImageRef) image { if (image) { NSDictionary *options = [[NSDictionary alloc] initWithObjectsAndKeys: [NSNumber numberWithBool:YES], kCVPixelBufferCGImageCompatibilityKey, [NSNumber numberWithBool:YES], kCVPixelBufferCGBitmapContextCompatibilityKey, nil]; CVPixelBufferRef pxbuffer = NULL; CVPixelBufferCreate(kCFAllocatorDefault, CGImageGetWidth(image), CGImageGetHeight(image), kCVPixelFormatType_32ARGB, (__bridge CFDictionaryRef) options, &pxbuffer); CVPixelBufferLockBaseAddress(pxbuffer, 0); void *pxdata = CVPixelBufferGetBaseAddress(pxbuffer); CGColorSpaceRef rgbColorSpace = CGColorSpaceCreateDeviceRGB(); CGContextRef context = CGBitmapContextCreate(pxdata, CGImageGetWidth(image), CGImageGetHeight(image), 8, 4*CGImageGetWidth(image), rgbColorSpace, kCGImageAlphaNoneSkipFirst); CGContextDrawImage(context, CGRectMake(0, 0, CGImageGetWidth(image), CGImageGetHeight(image)), image); CGColorSpaceRelease(rgbColorSpace); CGContextRelease(context); CVPixelBufferUnlockBaseAddress(pxbuffer, 0); return pxbuffer; } else { return nil; } }
バックグラウンドで作業する
アプリケーションがバックグラウンドにあるときにビデオが引き続き生成されるようにするには、 長時間実行されるバックグラウンドタスクを使用できます。これには、適切なクラスを使用することをお勧めします
https://github.com/vaskravchuk/VideoMaker/
少しオプションを追加すると、そのようなソフトウェア製品が手に入ります。
itunes.apple.com/us/app/street-video-maker-free-create/id788610126?mt=8
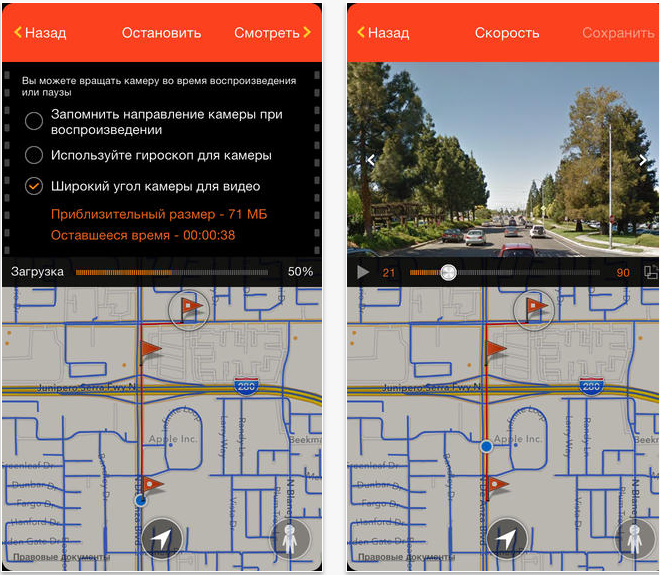
そのようなプログラムを使用して作成されたビデオの例を次に示します。
ストリートビデオの興味深い用途の1つは、360度後半のLangstrasseサイトです。 残りは単なるビデオです:
このテクノロジーを使用すると、興味深い拡張現実プロジェクトを作成したり、地理調査を実施したりできます。 楽しんでください。 最後に、Gunther Wegnerによるプロの微速度撮影