はじめに
年末年始は長く過ぎました。次の2015年のNGに備えましょう。
だから、私はArduinとトリミングRGBテープで軽音楽(花輪)のアイデアと実装を共有するのを急いでいます。
アイデアは、いつものように、NGの8時間前に予定通りに来ました。 アパートを飾るときに、焼けた花輪の残骸で自分の部屋を飾ることができないことに気付きました!
そして、祖父と父と中国の花輪の儀式のはんだ付けはすでに得られています。 新しいものが欲しかった!
目的
RGBテープをArduinoに接続し、コンピューターから音楽に合わせて踊らせます。
結果
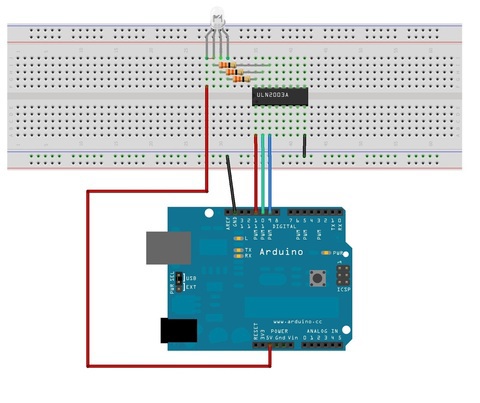
何が必要ですか?
- 12V電源(電力はテープの長さに比例します。P= 7.2W / m * 1.2mです);
- RGB LEDストリップのスライスとワイヤー4本のワイヤー。
- Arduino UNO;
- ULN2003A(または他の適切なトランジスタアセンブリ);
タスク
1.テープは12Vであるため、ダーリントントランジスタアセンブリULN2003Aを介してArduinsのピン(5V)に接続します(どうしたのか!)。
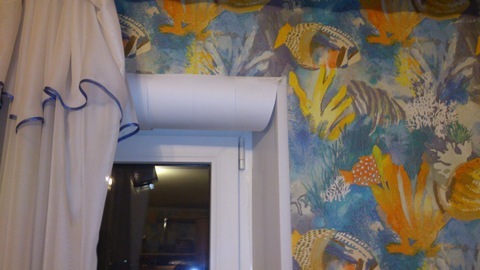
2.目立つ場所にテープを貼り付けて飾ります。 普通紙は光で驚異的です! 私はさまざまな種類のプラスチックやガラスについて話しているのではありません。
3. SerialPort処理でArduin(下記参照)にスケッチを注ぎます
4. SerialPortに軽い音楽を表示します。私の場合は、Minim Processsingライブラリを使用しました。 Winamp / AIMPの上に座ることができましたが、時間がなくなっていました!
5.病気にならないように音楽を設定します。 または、音楽が適切な場合はその逆です!
6.ダンス、瞑想、NGを満たす!
進捗状況
1.スキームは非常に単純ですが、決してわかりません。
2.スコッチと紙が彼らの仕事をしました! ライトは滑らかで快適になり、デザインはシンプルでわかりやすく、曲がって貼り付けられたA4シートでも作業中に美しく見えます!
3.ソフトウェアの部分(想像力の余地があります)
Arduinoスケッチとテストスケッチは、以下からダウンロードできます。
「最小」ライブラリを使用した処理:
import ddf.minim.*; import ddf.minim.analysis.*; import processing.serial.*; Serial port; Minim minim; AudioPlayer song; BeatDetect beat; BeatListener bl; float kickSize, snareSize, hatSize; class BeatListener implements AudioListener { private BeatDetect beat; private AudioPlayer source; BeatListener(BeatDetect beat, AudioPlayer source) { this.source = source; this.source.addListener(this); this.beat = beat; } void samples(float[] samps) { beat.detect(source.mix); } void samples(float[] sampsL, float[] sampsR) { beat.detect(source.mix); } } void setup() { size(512, 200, P3D); minim = new Minim(this); println("Available serial ports:"); println(Serial.list()); // check on the output monitor wich port is available on your machine port = new Serial(this, Serial.list()[0], 9600); song = minim.loadFile("1.mp3", 2048); // , ! *.mp3 song.play(); // a beat detection object that is FREQ_ENERGY mode that // expects buffers the length of song's buffer size // and samples captured at songs's sample rate beat = new BeatDetect(song.bufferSize(), song.sampleRate()); // set the sensitivity to 300 milliseconds // After a beat has been detected, the algorithm will wait for 300 milliseconds // before allowing another beat to be reported. You can use this to dampen the // algorithm if it is giving too many false-positives. The default value is 10, // which is essentially no damping. If you try to set the sensitivity to a negative value, // an error will be reported and it will be set to 10 instead. beat.setSensitivity(300); kickSize = snareSize = hatSize = 0; // make a new beat listener, so that we won't miss any buffers for the analysis bl = new BeatListener(beat, song); textFont(createFont("Helvetica", 16)); textAlign(CENTER); } boolean k1,k2,k3; void draw() { float s=10; background(0); fill(255); if ( beat.isKick()) k1 = true; if ( beat.isSnare()) k2 = true; if ( beat.isHat()) k3 = true; // textSize(kickSize/8); // text("KICK", width/4, height/2); // textSize(snareSize/8); // text("SNARE", width/2, height/2); // textSize(hatSize/8); // text("HAT", 3*width/4, height/2); port.write('R'); port.write((int)kickSize); port.write('G'); port.write((int)snareSize); port.write('B'); port.write((int)hatSize); if (k1) kickSize = constrain(kickSize+5, 20, 255); else kickSize = constrain(kickSize -5, 20, 255); if (kickSize==255) k1=false; if (k2) snareSize = constrain(snareSize+15, 40, 255); else snareSize = constrain(snareSize-15, 40, 255); if (snareSize==255) k2=false; if (k3) hatSize = constrain(hatSize+s, 20, 255); else hatSize = constrain(hatSize-s, 20, 255); if (hatSize==255) k3=false; }
おわりに
それで、ここで私たちはお祝いと楽しみのシンプルな雰囲気を作っています。 即興の素材から入手しました! ターゲットの購入には、すべて50ドルかかります
ファイルをダウンロードする:
***こちらをクリック***アーカイブには、Arduinaのスケッチ、RGBのテストスケッチ、およびプログラム自体があります。 minimライブラリーは非常に重く、そこに収まりません。自分でダウンロードしてインストールしてください。読んでくれてありがとう!