Pablo Ruizによって書かれ、 raywenderlich.comで見つけた記事の翻訳を紹介します。
このチュートリアルでは、Cocos2Dを使用してゼロからタワーディフェンスゲームを作成する方法を示します。
その過程で、次のことを学びます。
- 敵の波を作成し、敵の出現時間を調整する方法。
- これらの敵を特定のポイント(ウェイポイント)に沿って移動させる方法。
- マップ上の指定されたエリアにタワーを構築する方法。
- タワーを敵に撃つ方法。
- ウェイポイントを視覚化し、タワーの半径を攻撃する方法。
レッスンの最後には、このタイプのゲームを作成するための独自のフレームワークがあり、新しいタイプの敵、タワー、マップを追加することで拡張できます。
このチュートリアルを理解するには、Cocos2Dの基本的な理解が必要です。 初心者の場合は、 RayのWebサイトで簡単なチュートリアルをご覧ください 。
アイボリータワーからの眺め
ジャンルに慣れていない場合、タワーディフェンスは戦略ゲームであり、プレイヤーは基地に到達して破壊しようとする敵の波を阻止するために、戦略ポイントに武装したタワーを購入して配置します。
敵の次の波は通常、前の波よりも強くなります。これは、武器に対する抵抗力を高め、より速く動く能力によって達成されます。 敵の波がすべて生き残ったとき(勝利!)、または敵が基地に到着して破壊した場合(負け!)にゲームは終了します。
以下は、レッスンの最後に書き終えるゲームのスクリーンショットです。

写真でわかるように、画面の左上から敵が現れ、プレーヤーの基地まで緑のルートをたどります。
道路に沿って、プレイヤーがタワーを設置できる多くのプラットフォームがあります。 プレイヤーは、金の埋蔵量が許す限りのタワーを購入できます。 タワーの攻撃半径は白い円で示されています。敵がこの円の内側にいる場合、タワーは破壊されるまで敵を撃ちます。敵が攻撃の半径を離れないようにします。
リソース準備
空のCocos2Dテンプレートと、レッスンで使用するほとんどのリソースを含むスタートアッププロジェクトが既に用意されています。
スタートアッププロジェクトには、基本的なCocos2D 1.1テンプレートが含まれています。このテンプレートは、HelloWorldLayerと画面中央の行を含む作業アプリケーションを提供します。 独自のインターフェイスを作成するため、HelloWorldLayerは使用しませんが、このクラスは提供されているため、この段階ですべてが機能することを確認できます。
Xcodeでプロジェクトを開き、コンパイルして実行します。 「Hello World」というテキストはプロジェクトから削除されたため、起動プロセス中に黒い画面が表示され、エラーが発生することはありません。
プロジェクトの構造を見てください。 TowerDefenseフォルダー内には次のものがあります。
- ゲームで使用されるすべてのクラス
- Cocos2Dライブラリフォルダー
- 必要なグラフィックとサウンドを含むリソースフォルダー
これで、マップのカスタマイズを開始し、タワーを作成できます!
タワーの設置
最初に、背景画像をシーンに追加します。 HelloWorldLayer.mクラスを開き、initメソッドのif条件内に次のコード行を追加します。
// 1 - self.isTouchEnabled = YES; CGSize wins = [CCDirector sharedDirector].winSize; // 2 - CCSprite * background = [CCSprite spriteWithFile:@"Bg.png"]; [self addChild:background]; [background setPosition:ccp(wins.width/2,wins.height/2)];
セクション#1の最初の行では、レイヤーがタッチイベントを受け入れることができます。 セクション2の残りのコードは、シーンに背景スプライトを追加します。
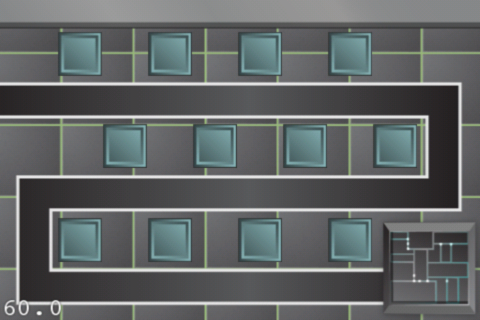
背景画像は、プレイヤーがタワーを設置できる場所を確認するのに役立ちます。 次に、プレイヤーがタワーを構築できるようにタッチして、画面上にいくつかのポイントを設定する必要があります。
アクションの意味を保持するために、すべてのポイントは「.plist」ファイルに配置され、簡単に変更できます。 TowerPosition.plistはResourcesフォルダーにあり、既に内部にタワーを構築するためのいくつかの位置が含まれています。
このファイルを参照すると、「x」と「y」の2つのキーのみを含む辞書の配列が見つかります。 各辞書は、画面上の座標に従ってタワーの位置を表します。 次に、このファイルを登録し、マップ上のタワーのベースをインストールする必要があります。
HelloWorldLayer.hを開き、次の変数を追加します(ラインインターフェイスの後に中かっこ内):
NSMutableArray * towerBases;
HelloWorldLayer.mに次の変更を加えます。
コード
// "init" -(void)loadTowerPositions { NSString* plistPath = [[NSBundle mainBundle] pathForResource:@"TowersPosition" ofType:@"plist"]; NSArray * towerPositions = [NSArray arrayWithContentsOfFile:plistPath]; towerBases = [[NSMutableArray alloc] initWithCapacity:10]; for(NSDictionary * towerPos in towerPositions) { CCSprite * towerBase = [CCSprite spriteWithFile:@"open_spot.png"]; [self addChild:towerBase]; [towerBase setPosition:ccp([[towerPos objectForKey:@"x"] intValue],[[towerPos objectForKey:@"y"] intValue])]; [towerBases addObject:towerBase]; } } // init, #2 // 3 - [self loadTowerPositions]; // dealloc, ( super) [towerBases release];
アプリケーションをコンパイルして実行すると、道路の両側に正方形が表示され、タワーを設置するためのベースとして機能します。
これで基地の準備ができました。いくつかの塔を建設しましょう!
まず、 HelloWorldLayer.hを開き、中括弧を閉じた後に次の行を追加します。
@property (nonatomic,retain) NSMutableArray *towers;
HelloWorldLayer.mの@implementation行の下にあるtower変数を合成します。
@synthesize towers;
次に、タワーを表す新しいクラスを作成します。 iOS \ Cocoa Touch \ Objective-Cテンプレートから新しいファイルを追加します。 クラスにTowerという名前を付け、 CCNodeのサブクラスにします 。
Tower.hの内容を次のものに置き換えます。
コード
#import "cocos2d.h" #import "HelloWorldLayer.h" #define kTOWER_COST 300 @class HelloWorldLayer, Enemy; @interface Tower: CCNode { int attackRange; int damage; float fireRate; } @property (nonatomic,assign) HelloWorldLayer *theGame; @property (nonatomic,assign) CCSprite *mySprite; +(id)nodeWithTheGame:(HelloWorldLayer*)_game location:(CGPoint)location; -(id)initWithTheGame:(HelloWorldLayer *)_game location:(CGPoint)location; @end
次に、 Tower.mの内容を次のように置き換えます。
コード
#import "Tower.h" @implementation Tower @synthesize mySprite,theGame; +(id) nodeWithTheGame:(HelloWorldLayer*)_game location:(CGPoint)location { return [[[self alloc] initWithTheGame:_game location:location] autorelease]; } -(id) initWithTheGame:(HelloWorldLayer *)_game location:(CGPoint)location { if( (self=[super init])) { theGame = _game; attackRange = 70; damage = 10; fireRate = 1; mySprite = [CCSprite spriteWithFile:@"tower.png"]; [self addChild:mySprite]; [mySprite setPosition:location]; [theGame addChild:self]; [self scheduleUpdate]; } return self; } -(void)update:(ccTime)dt { } -(void)draw { glColor4f(255, 255, 255, 255); ccDrawCircle(mySprite.position, attackRange, 360, 30, false); [super draw]; } -(void)dealloc { [super dealloc]; } @end
タワークラスには、いくつかの変数が含まれています。スプライトは、タワーの視覚的表現、簡単にアクセスできる親レイヤーへのリンク、および3つの変数です。
- attackRange:タワーが敵を攻撃できる距離を決定します
- ダメージ:タワーが敵に与えるダメージを決定します
- fireRate:タワーのリロードに必要な時間を決定します
これらの3つの変数を使用すると、さまざまな種類の攻撃を伴う非常に多様な種類のタワーを作成できます。 最後に、コードには、テストを容易にするためにタワーの攻撃範囲をレンダリングするメソッドが含まれています。
プレイヤーにタワーを追加させましょう!
HelloWorldLayer.mを開き、次の変更を行います。
コード
// : #import "Tower.h" //dealloc: [towers release]; // dealloc : -(BOOL)canBuyTower { return YES; } - (void)ccTouchesBegan:(NSSet *)touches withEvent:(UIEvent *)event { for( UITouch *touch in touches ) { CGPoint location = [touch locationInView: [touch view]]; location = [[CCDirector sharedDirector] convertToGL: location]; for(CCSprite * tb in towerBases) { if([self canBuyTower] && CGRectContainsPoint([tb boundingBox],location) && !tb.userData) { // . Tower * tower = [Tower nodeWithTheGame:self location:tb.position]; [towers addObject:tower]; tb.userData = tower; } } } }
ccTouchesBegan :画面のタッチをキャプチャします。 次に、コードはtowerBases配列を反復処理し、タワーのベースにタッチポイントが含まれているかどうかを確認します。
ただし、タワーを作成する前に、次の2つのことを確認する必要があります。
- プレイヤーはそのような喜びを許すことができますか? canBuyTowerメソッドは、タワーを購入するのに十分なゴールドがあるかどうかを確認します。 ただし、現時点では、プレイヤーはフォートノックスのゴールドをすべて持っているため、メソッドは常にYESを返します。
- プレイヤーは建設の規則に違反していますか? tb.UserDataが指定されている場合、タワーは既にその場所に立っており、新しいタワーを構築することはできません。
すべての条件が満たされている場合、新しいタワーが作成され、ベースにインストールされ、タワーのアレイに追加されます。
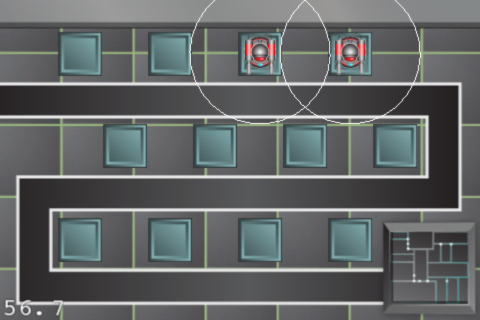
ゲームをコンパイルして実行します。 任意のベースをタッチすると、タワーが追加され、その周りに白い円が表示され、攻撃の半径が表示されます。
しかし、なぜ「悪者」のいないこの武器すべてを、パーティーに呼びましょうか!
ゲームポリシー:敵、波、ウェイポイント
敵を作成する前に、敵の道を切り開きましょう。 敵はウェイポイントからルートをたどります。ウェイポイントは基本的に相互接続されたポイントであり、ワールド内の敵の移動経路を決定します。 敵は最初のウェイポイントに現れ、リスト内の次のものを探して移動し、最後に到達するまで繰り返します-あなたのベース! これが起こると、ダメージを受けます。
iOS \ Cocoa Touch \ Objective-Cクラステンプレートから新しいファイルを作成して、ウェイポイントのリストを作成します。 Waypointクラスに名前を付けて、 CCNodeのサブクラスにします 。
Waypoint.hの内容を次のものに置き換えます。
コード
#import "cocos2d.h" #import "HelloWorldLayer.h" @interface Waypoint: CCNode { HelloWorldLayer *theGame; } @property (nonatomic,readwrite) CGPoint myPosition; @property (nonatomic,assign) Waypoint *nextWaypoint; +(id)nodeWithTheGame:(HelloWorldLayer*)_game location:(CGPoint)location; -(id)initWithTheGame:(HelloWorldLayer *)_game location:(CGPoint)location; @end
次に、Waypoint.mの内容を置き換えます。
コード
#import "Waypoint.h" @implementation Waypoint @synthesize myPosition, nextWaypoint; +(id)nodeWithTheGame:(HelloWorldLayer*)_game location:(CGPoint)location { return [[[self alloc] initWithTheGame:_game location:location] autorelease]; } -(id)initWithTheGame:(HelloWorldLayer *)_game location:(CGPoint)location { if( (self=[super init])) { theGame = _game; [self setPosition:CGPointZero]; myPosition = location; [theGame addChild:self]; } return self; } -(void)draw { glColor4f(0, 255, 0, 255); ccDrawCircle(myPosition, 6, 360, 30, false); ccDrawCircle(myPosition, 2, 360, 30, false); if(nextWaypoint) ccDrawLine(myPosition, nextWaypoint.myPosition); [super draw]; } -(void)dealloc { [super dealloc]; } @end
最初に、コードはウェイポイントオブジェクトを作成し、HelloWorldLayerオブジェクトを参照し、ウェイポイントの位置であるCGPointを定義します。
各ウェイポイントには次へのリンクが含まれ、これによりウェイポイントのリンクリストが作成されます。 各ウェイポイントはリスト内の次のポイントを「認識」しており、ウェイポイントのチェーンに沿って移動することで敵を最終目標に導くことができます。
最後に、レンダリングメソッドはウェイポイントがどこにあるかを示し、テスト目的でウェイポイント間の接続線を描画します。
ウェイポイントのリストを作成します。 HelloWorldLayer.hを開き、次の変数を追加します。
コード
HelloWorldLayer.mに次のコードを追加します。
@property (nonatomic,retain) NSMutableArray *waypoints;
HelloWorldLayer.mに次のコードを追加します。
// : #import "Waypoint.h" // synthesise @synthesize waypoints; // init -(void)addWaypoints { waypoints = [[NSMutableArray alloc] init]; Waypoint * waypoint1 = [Waypoint nodeWithTheGame:self location:ccp(420,35)]; [waypoints addObject:waypoint1]; Waypoint * waypoint2 = [Waypoint nodeWithTheGame:self location:ccp(35,35)]; [waypoints addObject:waypoint2]; waypoint2.nextWaypoint =waypoint1; Waypoint * waypoint3 = [Waypoint nodeWithTheGame:self location:ccp(35,130)]; [waypoints addObject:waypoint3]; waypoint3.nextWaypoint =waypoint2; Waypoint * waypoint4 = [Waypoint nodeWithTheGame:self location:ccp(445,130)]; [waypoints addObject:waypoint4]; waypoint4.nextWaypoint =waypoint3; Waypoint * waypoint5 = [Waypoint nodeWithTheGame:self location:ccp(445,220)]; [waypoints addObject:waypoint5]; waypoint5.nextWaypoint =waypoint4; Waypoint * waypoint6 = [Waypoint nodeWithTheGame:self location:ccp(-40,220)]; [waypoints addObject:waypoint6]; waypoint6.nextWaypoint =waypoint5; } // init: // 4 - Add waypoints [self addWaypoints]; // dealloc [waypoints release];
ゲームをコンパイルして実行します。
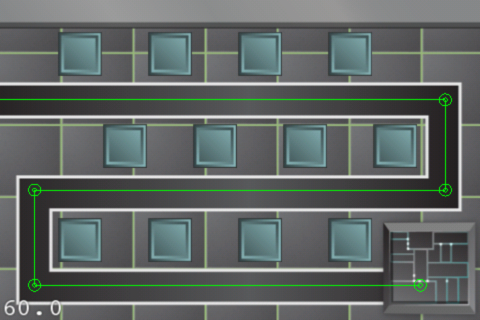
マップには6つのウェイポイントがあり、敵はこの経路をたどります。 友達にゲームに負けさせる前に、いくつかのヘルパーメソッドを追加する必要があります。
開始するには、ヘッダーファイルにメソッドの説明を追加して、コンパイラからの警告なしに他のクラスがこれらのメソッドを使用できるようにします。
HelloWorldLayer.hを開き、「 end 」行の前に次のメソッドの説明を追加します。
コード
次に、 HelloWorldLayer.mを開き、次の行をファイルの最後 ( endの前)に追加します。
-(BOOL)circle:(CGPoint)circlePoint withRadius:(float)radius collisionWithCircle:(CGPoint)circlePointTwo collisionCircleRadius:(float)radiusTwo; void ccFillPoly(CGPoint *poli, int points, BOOL closePolygon);
次に、 HelloWorldLayer.mを開き、次の行をファイルの最後 ( endの前)に追加します。
void ccFillPoly( CGPoint *poli, int points, BOOL closePolygon ) { // GL: GL_TEXTURE_2D, GL_VERTEX_ARRAY, GL_COLOR_ARRAY, GL_TEXTURE_COORD_ARRAY // : GL_VERTEX_ARRAY, // : GL_TEXTURE_2D, GL_TEXTURE_COORD_ARRAY, GL_COLOR_ARRAY glDisable(GL_TEXTURE_2D); glDisableClientState(GL_TEXTURE_COORD_ARRAY); glDisableClientState(GL_COLOR_ARRAY); glVertexPointer(2, GL_FLOAT, 0, poli); if( closePolygon ) glDrawArrays(GL_TRIANGLE_FAN, 0, points); else glDrawArrays(GL_LINE_STRIP, 0, points); // restore default state glEnableClientState(GL_COLOR_ARRAY); glEnableClientState(GL_TEXTURE_COORD_ARRAY); glEnable(GL_TEXTURE_2D); } -(BOOL)circle:(CGPoint) circlePoint withRadius:(float) radius collisionWithCircle:(CGPoint) circlePointTwo collisionCircleRadius:(float) radiusTwo { float xdif = circlePoint.x - circlePointTwo.x; float ydif = circlePoint.y - circlePointTwo.y; float distance = sqrt(xdif*xdif+ydif*ydif); if(distance <= radius+radiusTwo) return YES; return NO; }
collisionWithCircleメソッドは、2つの円が衝突または交差するタイミングを見つけるのに役立ちます。 これは、敵がウェイポイントに到達したかどうかを理解し、タワーの攻撃範囲内にいる敵を特定するのに役立ちます。
ccFillPolyメソッドは、OpenGLを使用して塗りつぶされたポリゴンを描画します。 Cocos2dでは、空白のポリゴンのみを描画できます。 ccFillPolyメソッドは、敵のヘルスバーを描画するために使用されます。
敵を手放す時です。
HelloWorldLayer.hを開き、次のコードを追加します。
コード
HelloWorldLayer.mに次の変更を加えます。
// int wave; CCLabelBMFont *ui_wave_lbl; // property @property (nonatomic,retain) NSMutableArray *enemies;
HelloWorldLayer.mに次の変更を加えます。
// Synthesize enemies @synthesize enemies; // dealloc [enemies release];
敵に関するすべての情報を含むクラスを作成し、画面上の敵の動きを制御します。 新しいiOS \ Cocoa Touch \ Objective-Cファイルを作成します。 クラスにEnemyという名前を付け、 CCNodeのサブクラスにします 。
Enemy.hの内容を置き換えます。
コード
#import "cocos2d.h" #import "HelloWorldLayer.h" #import "GameConfig.h" @class HelloWorldLayer, Waypoint, Tower; @interface Enemy: CCNode { CGPoint myPosition; int maxHp; int currentHp; float walkingSpeed; Waypoint *destinationWaypoint; BOOL active; } @property (nonatomic,assign) HelloWorldLayer *theGame; @property (nonatomic,assign) CCSprite *mySprite; +(id)nodeWithTheGame:(HelloWorldLayer*)_game; -(id)initWithTheGame:(HelloWorldLayer *)_game; -(void)doActivate; -(void)getRemoved; @end
Enemy.mのコンテンツ:
コード
#import "Enemy.h" #import "Tower.h" #import "Waypoint.h" #import "SimpleAudioEngine.h" #define HEALTH_BAR_WIDTH 20 #define HEALTH_BAR_ORIGIN -10 @implementation Enemy @synthesize mySprite, theGame; +(id)nodeWithTheGame:(HelloWorldLayer*)_game { return [[[self alloc] initWithTheGame:_game] autorelease]; } -(id)initWithTheGame:(HelloWorldLayer *)_game { if ((self=[super init])) { theGame = _game; maxHp = 40; currentHp = maxHp; active = NO; walkingSpeed = 0.5; mySprite = [CCSprite spriteWithFile:@"enemy.png"]; [self addChild:mySprite]; Waypoint * waypoint = (Waypoint *)[theGame.waypoints objectAtIndex:([theGame.waypoints count]-1)]; destinationWaypoint = waypoint.nextWaypoint; CGPoint pos = waypoint.myPosition; myPosition = pos; [mySprite setPosition:pos]; [theGame addChild:self]; [self scheduleUpdate]; } return self; } -(void)doActivate { active = YES; } -(void)update:(ccTime)dt { if(!active)return; if([theGame circle:myPosition withRadius:1 collisionWithCircle:destinationWaypoint.myPosition collisionCircleRadius:1]) { if(destinationWaypoint.nextWaypoint) { destinationWaypoint = destinationWaypoint.nextWaypoint; }else { // . [theGame getHpDamage]; [self getRemoved]; } } CGPoint targetPoint = destinationWaypoint.myPosition; float movementSpeed = walkingSpeed; CGPoint normalized = ccpNormalize(ccp(targetPoint.x-myPosition.x,targetPoint.y-myPosition.y)); mySprite.rotation = CC_RADIANS_TO_DEGREES(atan2(normalized.y,-normalized.x)); myPosition = ccp(myPosition.x+normalized.x * movementSpeed,myPosition.y+normalized.y * movementSpeed); [mySprite setPosition:myPosition]; } -(void)getRemoved { [self.parent removeChild:self cleanup:YES]; [theGame.enemies removeObject:self]; // [theGame enemyGotKilled]; } -(void)draw { glColor4f(255, 0, 0, 255); CGPoint healthBarBack[] = {ccp(mySprite.position.x -10,mySprite.position.y+16),ccp(mySprite.position.x+10,mySprite.position.y+16),ccp(mySprite.position.x+10,mySprite.position.y+14),ccp(mySprite.position.x-10,mySprite.position.y+14)}; ccFillPoly(healthBarBack, 4, YES); glColor4f(0, 255, 0, 255); CGPoint healthBar[] = {ccp(mySprite.position.x + HEALTH_BAR_ORIGIN,mySprite.position.y+16),ccp(mySprite.position.x+HEALTH_BAR_ORIGIN+(float)(currentHp * HEALTH_BAR_WIDTH) / maxHp,mySprite.position.y+16),ccp(mySprite.position.x+HEALTH_BAR_ORIGIN+(float)(currentHp * HEALTH_BAR_WIDTH) / maxHp,mySprite.position.y+14),ccp(mySprite.position.x+HEALTH_BAR_ORIGIN,mySprite.position.y+14)}; ccFillPoly(healthBar, 4, YES); } -(void)dealloc { [super dealloc]; } @end
これは印象的なコードですが、簡単に理解できます。 HelloWorldLayerが参照すると、最初に敵が作成されます。 initメソッドの中には、いくつかの重要な変数があります。
- maxHP:敵が耐えられるヒット数を決定します
- walkingSpeed:敵の移動速度を決定します
- mySprite:敵(スプライト)の視覚的表現を保存します
- destinationWaypoint:次の出口点へのリンクを保存します
更新メソッドはフレームごとに呼び出されます。まず、前述のcollisionWithCircleメソッドを使用して、敵が次のウェイポイントに到達したかどうかを確認します。 これが発生した場合、最後のウェイポイントに到達するまで次の方向に進み、プレーヤーにダメージを与えます。
あるウェイポイントから別のウェイポイントへの直線に沿ったスプライトの移動、それぞれの移動速度は、次のアルゴリズムによって実現されます。
- 現在の位置からターゲットまでのベクトルが計算され、作業の便宜上、値1が割り当てられます(正規化された変数)。
- 正規化されたベクトルに移動速度を掛けて、このフレームで克服するパスの量を計算します。 彼は、次を取得するために現在の位置を割り当てられます。
最後に、レンダリングメソッドはスプライト上にヘルスバーを作成します。 最初に、敵の現在のHPの量に応じて、彼は赤の背景を描き、次に緑で覆います。
敵のクラスの準備ができました。画面に表示できます!
HelloWorldLayer.hを開き、次のメソッドの説明を追加します。
-(void)enemyGotKilled;
HelloWorldLayer.mに切り替えて、メソッドを説明します。
コード
// : #import "Enemy.h" // init: -(BOOL)loadWave { NSString* plistPath = [[NSBundle mainBundle] pathForResource:@"Waves" ofType:@"plist"]; NSArray * waveData = [NSArray arrayWithContentsOfFile:plistPath]; if(wave >= [waveData count]) { return NO; } NSArray * currentWaveData =[NSArray arrayWithArray:[waveData objectAtIndex:wave]]; for(NSDictionary * enemyData in currentWaveData) { Enemy * enemy = [Enemy nodeWithTheGame:self]; [enemies addObject:enemy]; [enemy schedule:@selector(doActivate) interval:[[enemyData objectForKey:@"spawnTime"]floatValue]]; } wave++; [ui_wave_lbl setString:[NSString stringWithFormat:@"WAVE: %d",wave]]; return YES; } -(void)enemyGotKilled { if ([enemies count]<=0) //If there are no more enemies. { if(![self loadWave]) { NSLog(@"You win!"); [[CCDirector sharedDirector] replaceScene:[CCTransitionSplitCols transitionWithDuration:1 scene:[HelloWorldLayer scene]]]; } } } // init: // 5 - enemies = [[NSMutableArray alloc] init]; [self loadWave]; // 6 - ui_wave_lbl = [CCLabelBMFont labelWithString:[NSString stringWithFormat:@"WAVE: %d",wave] fntFile:@"font_red_14.fnt"]; [self addChild:ui_wave_lbl z:10]; [ui_wave_lbl setPosition:ccp(400,wins.height-12)]; [ui_wave_lbl setAnchorPoint:ccp(0,0.5)];
上記はすべて説明に値します。 最も重要な部分はLoadWaveメソッドです。 Waves.plistからデータを読み取ります。
Waves.plistを見ると、3つの配列が含まれていることがわかります。 それらはそれぞれ波であり、それは一緒に現れる敵のグループです。 最初の配列には6つの辞書が含まれています。 各辞書は敵を表します。 このレッスンでは、辞書には敵が出現した時間のみが保存されますが、敵のタイプ、彼の能力、健康などを含めることができます。
loadWaveメソッドは、次のウェーブが表示されるかどうかを確認し、ウェーブに関する情報に基づいて適切な敵を作成し、それに応じて発生時刻をスケジュールします。
enemyGotKilledメソッドは、画面上の敵の数をチェックします;敵がいない場合、次の波を引き起こします。 後で、同じ方法を使用してプレイヤーの勝利を確認します。
今すぐゲームをコンパイルして実行します。 敵があなたの基地に移動しています!

タワー攻撃
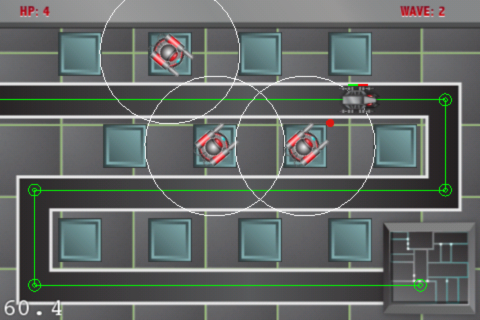
タワーは設置されていますか? ご覧ください。 敵は動きますか? 再確認してください! これらの不作法を捨てる時です。
各タワーは、その敗北の範囲内に敵がいるかどうかをチェックします。 その場合、タワーは、敵が手の届かないところに行くか、敵が破壊されるという2つのことのいずれかが起こるまで、発砲を開始します。 その後、タワーは新しい犠牲者を探し始めます。
基地の防衛を始めましょう!
Tower.hを開き、次の変更を行います。
コード
Tower.mで :
// BOOL attacking; Enemy *chosenEnemy; // -(void)targetKilled;
Tower.mで :
// Enemy #import "Enemy.h" // init: -(void)attackEnemy { [self schedule:@selector(shootWeapon) interval:fireRate]; } -(void)chosenEnemyForAttack:(Enemy *)enemy { chosenEnemy = nil; chosenEnemy = enemy; [self attackEnemy]; [enemy getAttacked:self]; } -(void)shootWeapon { CCSprite * bullet = [CCSprite spriteWithFile:@"bullet.png"]; [theGame addChild:bullet]; [bullet setPosition:mySprite.position]; [bullet runAction:[CCSequence actions:[CCMoveTo actionWithDuration:0.1 position:chosenEnemy.mySprite.position],[CCCallFunc actionWithTarget:self selector:@selector(damageEnemy)],[CCCallFuncN actionWithTarget:self selector:@selector(removeBullet:)], nil]]; } -(void)removeBullet:(CCSprite *)bullet { [bullet.parent removeChild:bullet cleanup:YES]; } -(void)damageEnemy { [chosenEnemy getDamaged:damage]; } -(void)targetKilled { if(chosenEnemy) chosenEnemy =nil; [self unschedule:@selector(shootWeapon)]; } -(void)lostSightOfEnemy { [chosenEnemy gotLostSight:self]; if(chosenEnemy) chosenEnemy =nil; [self unschedule:@selector(shootWeapon)]; }
最後に、空の更新メソッドを次のように置き換えます。
コード
-(void)update:(ccTime)dt { if (chosenEnemy){ // CGPoint normalized = ccpNormalize(ccp(chosenEnemy.mySprite.position.x-mySprite.position.x,chosenEnemy.mySprite.position.y-mySprite.position.y)); mySprite.rotation = CC_RADIANS_TO_DEGREES(atan2(normalized.y,-normalized.x))+90; if(![theGame circle:mySprite.position withRadius:attackRange collisionWithCircle:chosenEnemy.mySprite.position collisionCircleRadius:1]) { [self lostSightOfEnemy]; } } else { for(Enemy * enemy in theGame.enemies) { if([theGame circle:mySprite.position withRadius:attackRange collisionWithCircle:enemy.mySprite.position collisionCircleRadius:1]) { [self chosenEnemyForAttack:enemy]; break; } } } }
たくさんのコードがあります。 さらに、コードを追加すると、コンパイラからの警告の数が増えていることに気づいたと思います。 最初に、不足しているビットをいくつか追加して、警告に対処しましょう。
Enemy.hを開き、次の変更を行います。
コード
// NSMutableArray *attackedBy; // -(void)getAttacked:(Tower *)attacker; -(void)gotLostSight:(Tower *)attacker; -(void)getDamaged:(int)damage;
Enemy.mで :
コード
// initWithTheGame: ( "if") attackedBy = [[NSMutableArray alloc] initWithCapacity:5]; // getRemoved: -(void)getRemoved { for(Tower * attacker in attackedBy) { [attacker targetKilled]; } [self.parent removeChild:self cleanup:YES]; [theGame.enemies removeObject:self]; // , , [theGame enemyGotKilled]; } // -(void)getAttacked:(Tower *)attacker { [attackedBy addObject:attacker]; } -(void)gotLostSight:(Tower *)attacker { [attackedBy removeObject:attacker]; } -(void)getDamaged:(int)damage { currentHp -=damage; if(currentHp <=0) { [self getRemoved]; } }
コードで最も重要な部分は、Towerクラスのupdateメソッドです。 タワーは、攻撃範囲内で敵の存在を常にチェックします。 ある場合、タワーは彼に向きを変え、撃ち始めます。
敵がターゲットとしてマークされるとすぐに、この方法は、発射速度に応じてタワーの射撃スケジュールを設定します。 各敵には彼を撃っている塔のリストが含まれており、敵が死んだ場合、すべての敵にこの事実が通知され、撃ちます。
アプリケーションをコンパイルして実行します。 マップ上にいくつかの塔を配置します。 タワーが半径内を通過する敵をどのように撃ち始め、彼らのヘルスのストリップが死ぬまでどのように変化するかがわかります。

タワーディフェンスの完成版を取得するために、いくつかの詳細を追加するだけです。 音響効果を追加し、敵にダメージを与え、プレイヤーのゴールドの量を制限するようにベースに教えるといいでしょう。
最後の仕上げ
プレイヤーが残したライフの数と、終了時に何が起こるかを表示することから始めましょう!
HelloWorldLayer.h :
コード
playerHp , CCLabelBMFont , . gameEnded , ! :
HelloWorldLayer.m :
int playerHp; CCLabelBMFont *ui_hp_lbl; BOOL gameEnded;
playerHp , CCLabelBMFont , . gameEnded , ! :
-(void)getHpDamage; -(void)doGameOver;
HelloWorldLayer.m :
// init: // 7 - playerHp = 5; ui_hp_lbl = [CCLabelBMFont labelWithString:[NSString stringWithFormat:@"HP: %d",playerHp] fntFile:@"font_red_14.fnt"]; [self addChild:ui_hp_lbl z:10]; [ui_hp_lbl setPosition:ccp(35,wins.height-12)]; // : -(void)getHpDamage { playerHp--; [ui_hp_lbl setString:[NSString stringWithFormat:@"HP: %d",playerHp]]; if (playerHp <=0) { [self doGameOver]; } } -(void)doGameOver { if (!gameEnded) { gameEnded = YES; [[CCDirector sharedDirector] replaceScene:[CCTransitionRotoZoom transitionWithDuration:1 scene:[HelloWorldLayer scene]]]; } }
, , , . , !
getHpDamage , . update Enemy.m .
. . , , .
!
“zero-sum”, . , .
HelloWorldLayer.h :
int playerGold; CCLabelBMFont *ui_gold_lbl;
, (playerGold) (ui_gold_lbl). :
-(void)awardGold:(int)gold;
HelloWorldLayer.m :
コード
// init: -(void)awardGold:(int)gold { playerGold += gold; [ui_gold_lbl setString:[NSString stringWithFormat:@"GOLD: %d",playerGold]]; } // init: // 8 - playerGold = 1000; ui_gold_lbl = [CCLabelBMFont labelWithString:[NSString stringWithFormat:@"GOLD: %d",playerGold] fntFile:@"font_red_14.fnt"]; [self addChild:ui_gold_lbl z:10]; [ui_gold_lbl setPosition:ccp(135,wins.height-12)]; [ui_gold_lbl setAnchorPoint:ccp(0,0.5)]; // canBuyTower: -(BOOL)canBuyTower { if (playerGold - kTOWER_COST >=0) return YES; return NO; } // ccTouchesBegan, "if", , : playerGold -= kTOWER_COST; [ui_gold_lbl setString:[NSString stringWithFormat:@"GOLD: %d",playerGold]];
, , . , , . .
getDamaged: ( “if”) Enemy.m :
[theGame awardGold:200];
, , . . , ?

!
HelloWorldLayer.m :
コード
// : #import "SimpleAudioEngine.h" // init: ( 'if') [[SimpleAudioEngine sharedEngine] playBackgroundMusic:@"8bitDungeonLevel.mp3" loop:YES]; // ccTouchesBegan, Tower: [[SimpleAudioEngine sharedEngine] playEffect:@"tower_place.wav"]; // getHpDamage [[SimpleAudioEngine sharedEngine] playEffect:@"life_lose.wav"];
Enemy.m :
コード
// : #import "SimpleAudioEngine.h" // getDamaged: [[SimpleAudioEngine sharedEngine] playEffect:@"laser_shoot.wav"];
それだけです! ! , ?!
: TowerDefenseFinished.zip