threadingbuildingblocks.org Webサイトからダウンロードできる最近リリースされたIntel TBBライブラリtbb41_20121112ossには、Windowsストアの実験的なアプリケーションサポートが追加されています。 そのようなアプリケーションの開発には、承認されたプログラミングインターフェイスのみを使用します。
そして、インテルTBBを使用して簡単なアプリケーションを構築するために何をする必要がありますか。
このリリースはソースでのみ配布されるため、最初にライブラリを解凍してコンパイルする必要があります。 gnu makeがあることが理解されています。studio2012のコマンドラインでコマンドを実行します。
gnumake tbb tbbmalloc target_ui=win8ui target_ui_mode=production
図書館から、すべて、スタジオに行きます。
標準テンプレート「Visual C ++」->「Windowsストア」を使用して、新しいプロジェクト「Blank App(XAML)」を作成します。 簡単にするために、デフォルトのプロジェクト名「App1」のままにします。
ここで、ディレクトリ<tbbディレクトリ> / includeをプロジェクトプロパティ "Additional Include Directories"および "Additional Library Directories"の組み込みライブラリtbb.libを含むディレクトリに追加します。
次に、メインページ(App1.MainPageクラス)にいくつかのボタンを追加します。 その後、XAMLページファイルは次のようになります。
<Page x:Class="App1.MainPage" xmlns="http://schemas.microsoft.com/winfx/2006/xaml/presentation" xmlns:x="http://schemas.microsoft.com/winfx/2006/xaml" xmlns:local="using:App1" xmlns:d="http://schemas.microsoft.com/expression/blend/2008" xmlns:mc="http://schemas.openxmlformats.org/markup-compatibility/2006" mc:Ignorable="d"> <Grid Background="{StaticResource ApplicationPageBackgroundThemeBrush}"> <Button Name="SR" Margin="167,262,0,406" Height="100" Width="300" Content="Press to run Simple Reduction"></Button> <Button Name="DR" Margin="559,262,0,406" Height="100" Width="300" Content="Press to run Deterministic Reduction"></Button> </Grid> </Page>
ところで、ライブラリを接続する前に、ここまでコードを台無しにする時間がなく、開発者の必要な権利とライセンスがすべてあることを確認しておくといいでしょう。 これを行うには、アプリケーションをビルドして実行し、ボタンが押されて何も落ちないことを確認する必要があります。 結果が正の場合、ライブラリの接続に進みます。
TBBを接続し、ボタンクリックハンドラーを追加します。 たとえば、リダクションアルゴリズム(tbb :: parallel_reduce)と決定されたリダクション (tbb :: parallel_deterministic_reduce)を使用して、MainPage.xaml.cppをメインページのソースファイルに追加します。
#include "tbb/tbb.h" void App1::MainPage::SR_Click(Platform::Object^ sender, Windows::UI::Xaml::RoutedEventArgs^ e) { int N=1000000; float fr = 1.0f/(float)N; float sum = tbb::parallel_reduce( tbb::blocked_range<int>(0,N), 0.0f, [=](const tbb::blocked_range<int>& r, float sum)->float { for( int i=r.begin(); i!=r.end(); ++i ) sum += fr; return sum; }, []( float x, float y )->float { return x+y; } ); SR->Content="Press to run Simple Reduction\nThe result is " + sum.ToString(); } void App1::MainPage::DR_Click(Platform::Object^ sender, Windows::UI::Xaml::RoutedEventArgs^ e) { int N=1000000; float fr = 1.0f/(float)N; float sum = tbb::parallel_deterministic_reduce( tbb::blocked_range<int>(0,N), 0.0f, [=](const tbb::blocked_range<int>& r, float sum)->float { for( int i=r.begin(); i!=r.end(); ++i ) sum += fr; return sum; }, []( float x, float y )->float { return x+y; } ); DR->Content="Press to run Deterministic Reduction\nThe result is " + sum.ToString(); }
そして、メインページのXAMLファイルは次のようになります。
<Page x:Class="App1.MainPage" xmlns="http://schemas.microsoft.com/winfx/2006/xaml/presentation" xmlns:x="http://schemas.microsoft.com/winfx/2006/xaml" xmlns:local="using:App1" xmlns:d="http://schemas.microsoft.com/expression/blend/2008" xmlns:mc="http://schemas.openxmlformats.org/markup-compatibility/2006" mc:Ignorable="d"> <Grid Background="{StaticResource ApplicationPageBackgroundThemeBrush}"> <Button Name="SR" Margin="167,262,0,406" Height="100" Width="300" Content="Press to run Simple Reduction" Click="SR_Click"></Button> <Button Name="DR" Margin="559,262,0,406" Height="100" Width="300" Content="Press to run Deterministic Reduction" Click="DR_Click"></Button> </Grid> </Page>
tbb.dllおよびtbbmalloc.dllライブラリをアプリケーションコンテナに追加します。 これを行うには、プロジェクトにファイルを追加し(プロジェクト->既存のアイテムを追加)、「コンテンツ」プロパティを「はい」に設定します。 この場合、ファイルはアプリケーション内のコンテナー(AppX)にコピーされ、アプリケーションの起動時とその後の両方でロードできます。
できた シミュレーターを実行して、アプリケーションの動作を確認できます。
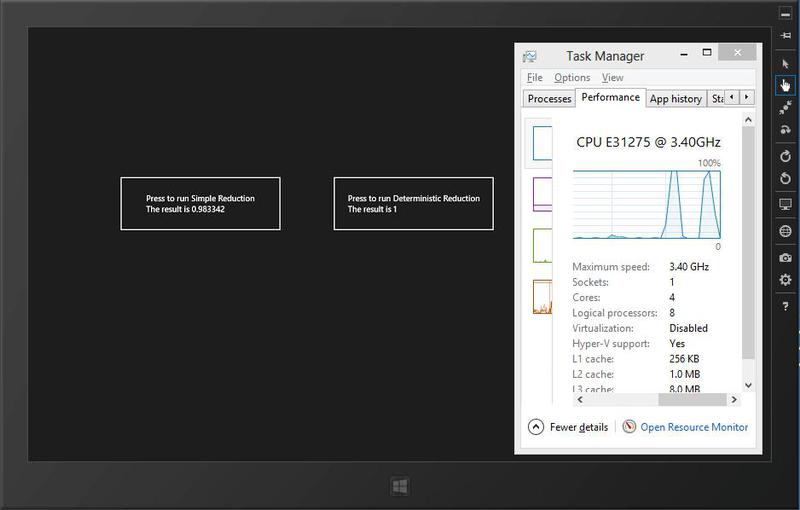
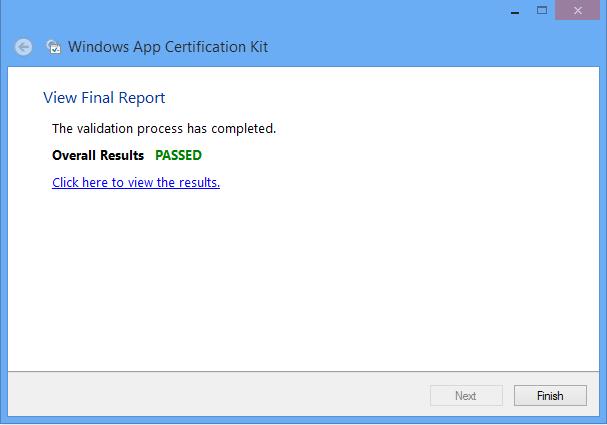
次のステップは、「Windows App Cert Kit」を起動し、アプリケーションが正常に認定をパスすることを確認することです。
以上です! 簡単なアプリケーションの準備が整いました。これで複雑になります。
興味がある人のために、試してみてください:
インテルスレッディングビルディングブロックライブラリ(オープンソースバージョン)をダウンロードします。
threadingbuildingblocks.org
Intel TBBの商用バージョン(機能的に違いはありません):
software.intel.com/en-us/intel-tbb
Intel TBBに関する英語およびロシア語のブログ
software.intel.com/en-us/tags/17207
software.intel.com/en-us/tags/17220
そしてもちろん、私たちのフォーラム、
software.intel.com/en-us/forums/intel-threading-building-blocks