これは、ほとんどの機能がAPIを通じて実装されるWebアプリケーションです。 たとえば、ログインした場合、API関数を介してデータを送信すると、APIはすでに結果の成功またはエラーを返します。 APIのもう1つの特徴は、APIがユーザーの状態に依存しないことです。
なぜこれが必要ですか?
Web開発者として、テクノロジーは日々進化しています。 そして誰もが、人々がPCのブラウザだけでなく、Android、アップル、Windows Phone、その他のガジェットを使用して、お気に入りのサイトにインターネットにアクセスしていることを知っています。
では、APIはどこから来たのでしょうか?
API中心のアプリケーションを作成する利点の1つは、ブラウザー、携帯電話、タブレット、さらにはデスクトップアプリケーションなど、他のデバイスで使用できる機能の構築に役立つことです。 必要なことは、これらのすべてのデバイスがAPIとやり取りできるようにAPIを作成することだけです。

この方法でアプリケーションを作成することにより、さまざまな環境やさまざまな人々でそれを使用できます。 この記事では、単純なTODOアプリケーションと、サーバーとやり取りするクライアント部分を作成します。 始めましょう!
ステップ1.機能を計画する
これから行うtodoアプリケーションでは、crud操作を実装します。
- TODOアイテムを作成する
- TODOアイテムを読む
- TODOアイテムを更新する
- TODOアイテムを削除する
各TODOアイテムには以下が含まれます。
- 見出し
- 終了日
- 説明
TODOアイテムが完了したことを示すチェックマーク
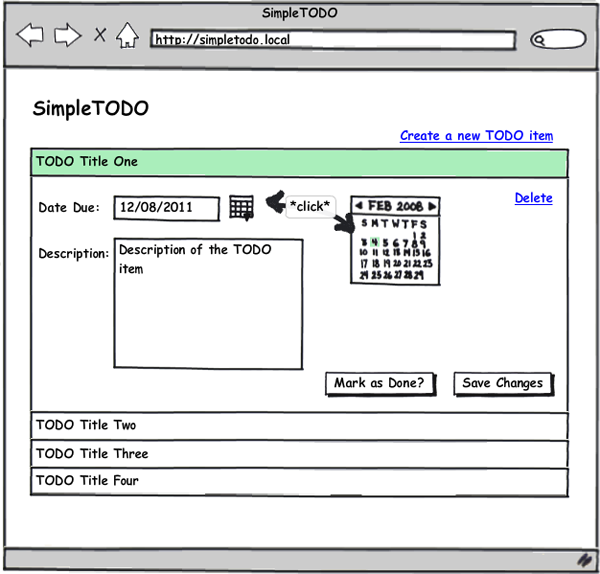
アプリケーションのレイアウトを作成しましょう
ステップ2.サーバーAPIの作成
2つのプロジェクトを作成しましょう:APIサーバー(バックエンド)とクライアント部分(フロントエンド)
simpletodo_apiフォルダーを作成し、その中にindex.phpファイルを作成します。 APIのメインコントローラー(フロントコントローラー)になり、APIサーバーへのすべてのリクエストがこのファイルを介して実行されます。 それを開き、次のコードを貼り付けます。
<?php // Define path to data folder define('DATA_PATH', realpath(dirname(__FILE__).'/data')); //include our models include_once 'models/TodoItem.php'; //wrap the whole thing in a try-catch block to catch any wayward exceptions! try { //get all of the parameters in the POST/GET request $params = $_REQUEST; //get the controller and format it correctly so the first //letter is always capitalized $controller = ucfirst(strtolower($params['controller'])); //get the action and format it correctly so all the //letters are not capitalized, and append 'Action' $action = strtolower($params['action']).'Action'; //check if the controller exists. if not, throw an exception if( file_exists("controllers/{$controller}.php") ) { include_once "controllers/{$controller}.php"; } else { throw new Exception('Controller is invalid.'); } //create a new instance of the controller, and pass //it the parameters from the request $controller = new $controller($params); //check if the action exists in the controller. if not, throw an exception. if( method_exists($controller, $action) === false ) { throw new Exception('Action is invalid.'); } //execute the action $result['data'] = $controller->$action(); $result['success'] = true; } catch( Exception $e ) { //catch any exceptions and report the problem $result = array(); $result['success'] = false; $result['errormsg'] = $e->getMessage(); } //echo the result of the API call echo json_encode($result); exit();
基本的に、次のようなシンプルなフロントコントローラーを構築しました。
- 任意の数のパラメーターでAPI呼び出しを受け入れます
- APIを呼び出すためのコントローラーとアクションを取得します
- コントローラーとアクションの存在に必要なチェックを行います
- API呼び出しを行う
- エラーをキャッチ
- 結果を送信します
また、フォルダーコントローラー、モデル、およびデータを作成します。
controllersフォルダーには、APIサーバーが使用するすべてのコントローラーが含まれます。 APIサーバーをクリーンで柔軟にするために、mvcアーキテクチャを構築します。
モデルフォルダーには、すべてのAPIサーバーのモデルが含まれます
データフォルダーにはすべてのデータが格納されます
controllersフォルダーに移動してtodo.phpを作成しましょう
これは、他のTODO関連タスクリストのコントローラーになります。 クラスブランクとアプリケーションの機能を作成します。
<?php class Todo { private $_params; public function __construct($params) { $this->_params = $params; } public function createAction() { //create a new todo item } public function readAction() { //read all the todo items } public function updateAction() { //update a todo item } public function deleteAction() { //delete a todo item } }
次に、アクションアクションに必要な機能を追加します。 createActionメソッドを作成します。 気分が良い場合は、他のアクションの機能を作成できます。インターフェイスを提供しました。
public function createAction() { //create a new todo item $todo = new TodoItem(); $todo->title = $this->_params['title']; $todo->description = $this->_params['description']; $todo->due_date = $this->_params['due_date']; $todo->is_done = 'false'; //pass the user's username and password to authenticate the user $todo->save($this->_params['username'], $this->_params['userpass']); //return the todo item in array format return $todo->toArray(); }
モデルにtodoItem.phpを作成して、「リストアイテムの作成」を実装するコードを作成できるようにします。 ところで、この例では-データベースなし(ファイル上)です。 もちろん、制限することはできません。
<?php class TodoItem { public $todo_id; public $title; public $description; public $due_date; public $is_done; public function save($username, $userpass) { //get the username/password hash $userhash = sha1("{$username}_{$userpass}"); if( is_dir(DATA_PATH."/{$userhash}") === false ) { mkdir(DATA_PATH."/{$userhash}"); } //if the $todo_id isn't set yet, it means we need to create a new todo item if( is_null($this->todo_id) || !is_numeric($this->todo_id) ) { //the todo id is the current time $this->todo_id = time(); } //get the array version of this todo item $todo_item_array = $this->toArray(); //save the serialized array version into a file $success = file_put_contents(DATA_PATH."/{$userhash}/{$this->todo_id}.txt", serialize($todo_item_array)); //if saving was not successful, throw an exception if( $success === false ) { throw new Exception('Failed to save todo item'); } //return the array version return $todo_item_array; } public function toArray() { //return an array version of the todo item return array( 'todo_id' => $this->todo_id, 'title' => $this->title, 'description' => $this->description, 'due_date' => $this->due_date, 'is_done' => $this->is_done ); } }
createActionメソッドは、todoItemモデルの2つの関数を呼び出します。
- Save() -todoItemをファイルに保存し、必要に応じてtodoItemのtodo_idも作成します。
- toArray() -todoItemを配列として返します。その変数は変数です
localhost / simpletodo_api /?controller = todo&action = create&title = test%20title&description = test%20description&due_date = 12/08/2011&username = nikko&userpass = test1234

おめでとうございます! APIサーバーを正常に作成し、API呼び出しを行いました。
ステップ3. APIサーバーをアプリIDとアプリシークレットで保護します。
これで、APIサーバーはすべての要求を受け入れます。 サーバーへのアクセスを制限して、独自のクライアントのみがAPIリクエストを行えるようにする必要があります。 FacebookおよびTwtterアプリケーションの動作と同様に、ユーザーがAPIサーバーにアクセスできる独自のアプリケーションを作成できるシステムを作成することもできます。
まず、サーバーを使用するクライアント用にIDとキーのペアを作成します。 これはデモなので、ランダムな32文字の文字列を使用できます。 APP IDについては、「app001」としましょう。
index.phpを開いて変更します。
<?php // Define path to data folder define('DATA_PATH', realpath(dirname(__FILE__).'/data')); //Define our id-key pairs $applications = array( 'APP001' => '28e336ac6c9423d946ba02d19c6a2632', //randomly generated app key ); //include our models include_once 'models/TodoItem.php'; //wrap the whole thing in a try-catch block to catch any wayward exceptions! try { //*UPDATED* //get the encrypted request $enc_request = $_REQUEST['enc_request']; //get the provided app id $app_id = $_REQUEST['app_id']; //check first if the app id exists in the list of applications if( !isset($applications[$app_id]) ) { throw new Exception('Application does not exist!'); } //decrypt the request $params = json_decode(trim(mcrypt_decrypt(MCRYPT_RIJNDAEL_256, $applications[$app_id], base64_decode($enc_request), MCRYPT_MODE_ECB))); //check if the request is valid by checking if it's an array and looking for the controller and action if( $params == false || isset($params->controller) == false || isset($params->action) == false ) { throw new Exception('Request is not valid'); } //cast it into an array $params = (array) $params; ... ... ...
公開鍵と秘密鍵の認証を使用してユーザーを認証する非常に簡単な方法の簡単な実装を行いました。 これは次のようなものです。
- API呼び出しが行われ、$ APP_IDと$ enc_requestが提供されます
- $ enc_requestには、APP KEYを使用して暗号化されたAPI呼び出しパラメーターが含まれています。 APP KEYはサーバーに送信されることはなく、リクエストの暗号化にのみ使用されます。 ところで、APP KEYを使用してリクエストを復号化できます。
- 呼び出しがサーバーに到達すると、サーバーは自身のアプリケーションのリストでAPP IDを確認します。
- それを見つけると、APIサーバーはキーを使用して要求を復号化しようとします。
- 復号化が成功した場合、プログラムの実行は継続します
ステップ4.フロントエンドを作成する
新しいディレクトリsimpletodo_client_browserを作成しましょう。
そして、index.php:
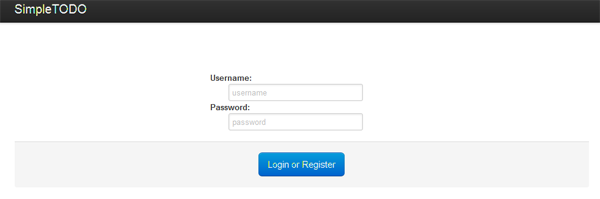
<!DOCTYPE html> <html> <head> <title>SimpleTODO</title> <link rel="stylesheet" href="css/reset.css" type="text/css" /> <link rel="stylesheet" href="css/bootstrap.min.css" type="text/css" /> <script src="js/jquery.min.js"></script> <script src="js/jquery-ui-1.8.16.custom.min.js"></script> <style> body { padding-top: 40px; } #main { margin-top: 80px; text-align: center; } </style> </head> <body> <div class="topbar"> <div class="fill"> <div class="container"> <a class="brand" href="index.php">SimpleTODO</a> </div> </div> </div> <div id="main" class="container"> <form class="form-stacked" method="POST" action="login.php"> <div class="row"> <div class="span5 offset5"> <label for="login_username">Username:</label> <input type="text" id="login_username" name="login_username" placeholder="username" /> <label for="login_password">Password:</label> <input type="password" id="login_password" name="login_password" placeholder="password" /> </div> </div> <div class="actions"> <button type="submit" name="login_submit" class="btn primary large">Login or Register</button> </div> </form> </div> </body> </html>
次のようになります。
ところで、2つのjsファイルと1つのcssファイルを含めました
- bootstrap.min.cssはTwitterブートストラップです
- jquery.min.jsは最新のjQueryライブラリです
- jquery-ui-1.8.16.custom.min.js最新のjQuery UIライブラリ
次に、login.phpを作成して、セッション内にユーザー名とパスワードを保存します。
<?php //get the form values $username = $_POST['login_username']; $userpass = $_POST['login_password']; session_start(); $_SESSION['username'] = $username; $_SESSION['userpass'] = $userpass; header('Location: todo.php'); exit();
ここでは、入力したユーザー名とパスワードに基づいて新しいユーザーセッションを作成するだけです。 このアクションは、保存されたTODOリストにアクセスするための単純なキーの組み合わせです。 次に、todo.phpにリダイレクトして、APIサーバーとの対話を開始します。 todo.phpを作成する前に、最初にApiCallerクラスを定義しましょう。これは、要求の暗号化を含む、必要なすべてのAPI呼び出しメソッドをカプセル化します。
apicaller.phpを作成します。
<?php class ApiCaller { //some variables for the object private $_app_id; private $_app_key; private $_api_url; //construct an ApiCaller object, taking an //APP ID, APP KEY and API URL parameter public function __construct($app_id, $app_key, $api_url) { $this->_app_id = $app_id; $this->_app_key = $app_key; $this->_api_url = $api_url; } //send the request to the API server //also encrypts the request, then checks //if the results are valid public function sendRequest($request_params) { //encrypt the request parameters $enc_request = base64_encode(mcrypt_encrypt(MCRYPT_RIJNDAEL_256, $this->_app_key, json_encode($request_params), MCRYPT_MODE_ECB)); //create the params array, which will //be the POST parameters $params = array(); $params['enc_request'] = $enc_request; $params['app_id'] = $this->_app_id; //initialize and setup the curl handler $ch = curl_init(); curl_setopt($ch, CURLOPT_URL, $this->_api_url); curl_setopt($ch, CURLOPT_RETURNTRANSFER, 1); curl_setopt($ch, CURLOPT_POST, count($params)); curl_setopt($ch, CURLOPT_POSTFIELDS, $params); //execute the request $result = curl_exec($ch); //json_decode the result $result = @json_decode($result); //check if we're able to json_decode the result correctly if( $result == false || isset($result['success']) == false ) { throw new Exception('Request was not correct'); } //if there was an error in the request, throw an exception if( $result['success'] == false ) { throw new Exception($result['errormsg']); } //if everything went great, return the data return $result['data']; } }
ApiCallerクラスを使用して、APIサーバーにリクエストを送信します。 したがって、CURLのすべての必要な暗号化と初期化は1か所で行われ、コードの繰り返しもありません。
コンストラクターには3つのパラメーターが含まれています。
- $ app_id-クライアントのAPP ID(APP001)
- $ app_key-クライアントのアプリキー(28e336ac6c9423d946ba02d19c6a2632)
- $ api_url-APIサーバーURL、 localhost / simpletodo_api /
sendRequest()関数:
- APIサーバーが復号化するのと同じ順序でmcryptライブラリを使用してリクエストパラメータを暗号化します
- APIサーバーに送信される$ _POSTパラメーターを生成します
- CURLを介してAPI呼び出しを行います
- 呼び出しの結果を確認します(成功したかどうか)
- すべてが正常に送信されたときにデータを返します。
それでは、todo.phpを作成しましょう。 つまり、ユーザーantonのtodoアイテムのリストとパスワードhabr_helloを返すコードを作成します。
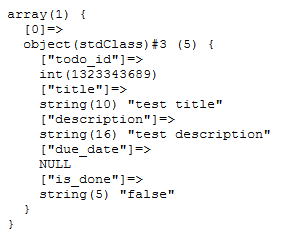
<?php session_start(); include_once 'apicaller.php'; $apicaller = new ApiCaller('APP001', '28e336ac6c9423d946ba02d19c6a2632', 'http://localhost/simpletodo_api/'); $todo_items = $apicaller->sendRequest(array( 'controller' => 'todo', 'action' => 'read', 'username' => $_SESSION['username'], 'userpass' => $_SESSION['userpass'] )); echo ''; var_dump($todo_items);
メインに移動して、antonとhabr_helloでログインすると、var_dumpの結果が表示されます。 おめでとうございます! API server'yへのAPIリクエストを正常に完了しました。 このコードでは、次のことを行います。
- セッションを作成しました
- アプリID、アプリキーをtodo.phpに渡すことにより、ApiCallerクラスのインスタンスを作成しました。
いくつかの機能を追加してページを変更しましょう。
ちなみに、varダンプを削除することを忘れないでください^ _ ^。
<!DOCTYPE html> <html> <head> <title>SimpleTODO</title> <link rel="stylesheet" href="css/reset.css" type="text/css" /> <link rel="stylesheet" href="css/bootstrap.min.css" type="text/css" /> <link rel="stylesheet" href="css/flick/jquery-ui-1.8.16.custom.css" type="text/css" /> <script src="js/jquery.min.js"></script> <script src="js/jquery-ui-1.8.16.custom.min.js"></script> <style> body { padding-top: 40px; } #main { margin-top: 80px; } .textalignright { text-align: right; } .marginbottom10 { margin-bottom: 10px; } #newtodo_window { text-align: left; display: none; } </style> <script> $(document).ready(function() { $("#todolist").accordion({ collapsible: true }); $(".datepicker").datepicker(); $('#newtodo_window').dialog({ autoOpen: false, height: 'auto', width: 'auto', modal: true }); $('#newtodo').click(function() { $('#newtodo_window').dialog('open'); }); }); </script> </head> <body> <div class="topbar"> <div class="fill"> <div class="container"> <a class="brand" href="index.php">SimpleTODO</a> </div> </div> </div> <div id="main" class="container"> <div class="textalignright marginbottom10"> <span id="newtodo" class="btn info">Create a new TODO item</span> <div id="newtodo_window" title="Create a new TODO item"> <form method="POST" action="new_todo.php"> <p>Title:<br /><input type="text" class="title" name="title" placeholder="TODO title" /></p> <p>Date Due:<br /><input type="text" class="datepicker" name="due_date" placeholder="MM/DD/YYYY" /></p> <p>Description:<br /><textarea class="description" name="description"></textarea></p> <div class="actions"> <input type="submit" value="Create" name="new_submit" class="btn primary" /> </div> </form> </div> </div> <div id="todolist"> <?php foreach($todo_items as $todo): ?> <h3><a href="#"><?php echo $todo->title; ?></a></h3> <div> <form method="POST" action="update_todo.php"> <div class="textalignright"> <a href="delete_todo.php?todo_id=<?php echo $todo->todo_id; ?>">Delete</a> </div> <div> <p>Date Due:<br /><input type="text" id="datepicker_<?php echo $todo->todo_id; ?>" class="datepicker" name="due_date" value="12/09/2011" /></p> <p>Description:<br /><textarea class="span8" id="description_<?php echo $todo->todo_id; ?>" class="description" name="description"><?php echo $todo->description; ?></textarea></p> </div> <div class="textalignright"> <?php if( $todo->is_done == 'false' ): ?> <input type="hidden" value="false" name="is_done" /> <input type="submit" class="btn" value="Mark as Done?" name="markasdone_button" /> <?php else: ?> <input type="hidden" value="true" name="is_done" /> <input type="button" class="btn success" value="Done!" name="done_button" /> <?php endif; ?> <input type="hidden" value="<?php echo $todo->todo_id; ?>" name="todo_id" /> <input type="hidden" value="<?php echo $todo->title; ?>" name="title" /> <input type="submit" class="btn primary" value="Save Changes" name="update_button" /> </div> </form> </div> <?php endforeach; ?> </div> </div> </body> </html>
次のようになります。
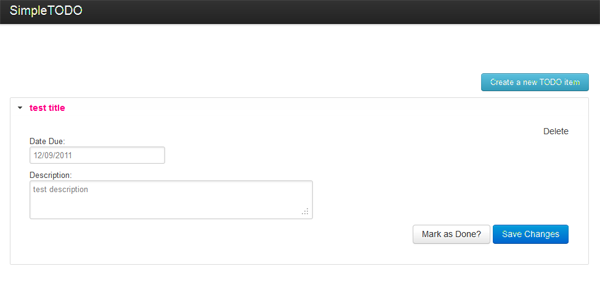
良さそうですね。 次に、同じ機能new_todo.phpを追加します
呼び出しtodo / createを含み、新しいTODOアイテム要素を作成します。 他のページの作成:(update_todo.phpおよびdelete_todo.php)は簡単なはずです。
new_todo.phpを開きます。
<?php session_start(); include_once 'apicaller.php'; $apicaller = new ApiCaller('APP001', '28e336ac6c9423d946ba02d19c6a2632', 'http://localhost/simpletodo_api/'); $new_item = $apicaller->sendRequest(array( 'controller' => 'todo', 'action' => 'create', 'title' => $_POST['title'], 'due_date' => $_POST['due_date'], 'description' => $_POST['description'], 'username' => $_SESSION['username'], 'userpass' => $_SESSION['userpass'] )); header('Location: todo.php'); exit(); ?>
ご覧のとおり、new_todo.phpはApiCallerを使用してtodo / createリクエストをserver'y APIに送信します。
- セッション開始
- ApiCallerクラスの初期化
- sendRequest()を使用してリクエストを送信する
- todo.phpにリダイレクトします
おめでとうございます! API中心のWebアプリケーションが正常に作成されました。
結論:
APIで作成されたアプリケーションを開発することには多くの利点があります。 SimpleTODOのAndroidバージョンを作成する場合、必要になる可能性のある機能はすべてAPIサーバーに既にあるため、Androidクライアントを作成するだけです! 一部のクラスを再編成または最適化したいですか? 問題ありません-出力が同じであることを確認してください。 さらに機能を追加する必要がありますか? クライアントコードを変更せずにこれを行うことができます!
インスピレーションはnettutsの記事でした。
間違えた場合に書いて、何が改善できるかについてコメントしてください