はじめに
この記事は、「iPhone Core Data Recipesの解析」シリーズの2番目と最後の記事です。 記事の最初の部分はこちらで読むことができます 。 このシリーズの記事の目標は、初心者のiOS開発者が、iPhone Core Data Recipesの例を使用して、Core Dataを使用してSQLiteデータベースを操作する方法を理解できるようにすることです。 最後の記事では、データベースからレコードを追加、編集、削除する機能について検討します。
前提条件
このアプリケーションのソースコードを独立して調査するには、標準のツールセットが必要です。
- Mac OS X
- Xcode
このセットを使用すると、シミュレータでアプリケーションを表示、変更、および実行できます。 実際のiPhoneで実行する場合は、iOS Developer Programへの参加が必要です。
また、重要なこととして、Objective-C言語とアプリケーションの構造に関する基本的な理解が必要です。
使用される材料とツールへのリンクは、「参考文献」セクションに記載されています。
新しいレシピを作成する方法
したがって、最初に必要なことは、新しいレシピを作成することです。 View Controller-RecipeAddViewControllerは、このプロジェクトで新しいレシピを作成します。 その内容を考慮してください。
RecipeAddViewController.h
@protocol RecipeAddDelegate; @class Recipe; @interface RecipeAddViewController : UIViewController <UITextFieldDelegate> { @private // Recipe, managedObjectContext Recipe *recipe; // UITextField *nameTextField; id <RecipeAddDelegate> delegate; } @property(nonatomic, retain) Recipe *recipe; @property(nonatomic, retain) IBOutlet UITextField *nameTextField; @property(nonatomic, assign) id <RecipeAddDelegate> delegate; // - (void)save; // - (void)cancel; @end @protocol RecipeAddDelegate <NSObject> // recipe == nil on cancel - (void)recipeAddViewController:(RecipeAddViewController *)recipeAddViewController didAddRecipe:(Recipe *)recipe; @end
RecipeAddViewController.m
#import "RecipeAddViewController.h" #import "Recipe.h" @implementation RecipeAddViewController @synthesize recipe; @synthesize nameTextField; @synthesize delegate; - (void)viewDidLoad { // navigation bar self.navigationItem.title = @"Add Recipe"; // Cancel cancel UIBarButtonItem *cancelButtonItem = [[UIBarButtonItem alloc] initWithTitle:@"Cancel" style:UIBarButtonItemStyleBordered target:self action:@selector(cancel)]; self.navigationItem.leftBarButtonItem = cancelButtonItem; [cancelButtonItem release]; // Save save UIBarButtonItem *saveButtonItem = [[UIBarButtonItem alloc] initWithTitle:@"Save" style:UIBarButtonItemStyleDone target:self action:@selector(save)]; self.navigationItem.rightBarButtonItem = saveButtonItem; [saveButtonItem release]; [nameTextField becomeFirstResponder]; } ... // - (void)save { recipe.name = nameTextField.text; NSError *error = nil; if (![recipe.managedObjectContext save:&error]) { NSLog(@"Unresolved error %@, %@", error, [error userInfo]); abort(); } [self.delegate recipeAddViewController:self didAddRecipe:recipe]; } // - (void)cancel { [recipe.managedObjectContext deleteObject:recipe]; NSError *error = nil; if (![recipe.managedObjectContext save:&error]) { NSLog(@"Unresolved error %@, %@", error, [error userInfo]); abort(); } [self.delegate recipeAddViewController:self didAddRecipe:nil]; } //.. ARC, - (void)dealloc { [recipe release]; [nameTextField release]; [super dealloc]; } @end
その結果、新しいレシピを追加するためのフォームは次のとおりです。
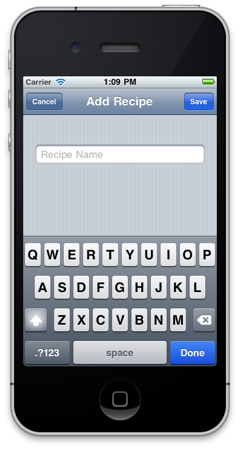
保存およびキャンセルアクションの詳細については、以下で説明します。
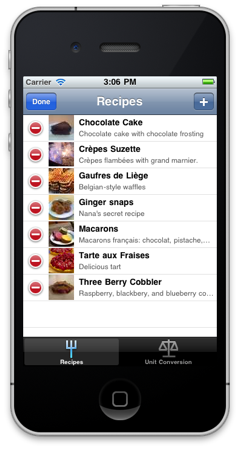
新しいレシピを作成するためのフォームを開きます
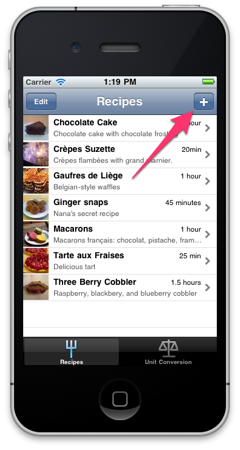
新しいレシピを作成するためのボタンは、アプリケーションのメインウィンドウにあります(上のスクリーンショットを参照)。 もっと慎重に検討してください。
このボタンは、RecipeListTableViewControllerコントローラーのviewDidLoadメソッドで作成されます。
UIBarButtonItem *addButtonItem = [[UIBarButtonItem alloc] initWithBarButtonSystemItem:UIBarButtonSystemItemAdd target:self action:@selector(add:)]; self.navigationItem.rightBarButtonItem = addButtonItem; [addButtonItem release];
追加アクションはこのボタンにアタッチされます。このボタンはRecipeListTableViewControllerコントローラーにもあります(ソースコードのコメントを参照)。
- (void)add:(id)sender { // RecipeAddViewController RecipeAddViewController *addController = [[RecipeAddViewController alloc] initWithNibName:@"RecipeAddView" bundle:nil]; // RecipeListTableViewController addController.delegate = self; // managedObjectContext Recipe NSEntityDescription, - Recipe Recipe *newRecipe = [NSEntityDescription insertNewObjectForEntityForName:@"Recipe" inManagedObjectContext:self.managedObjectContext]; // Recipe RecipeAddViewController addController.recipe = newRecipe; // RecipeAddViewController UINavigationController *navigationController = [[UINavigationController alloc] initWithRootViewController:addController]; [self presentModalViewController:navigationController animated:YES]; [navigationController release]; [addController release]; }
このアクションを実行すると、上記の新しいレシピを追加するためのフォームが開きます。 このフォームでは、ユーザーが保存とキャンセルの2つのアクションを使用できます。
新しいレシピを保存します。
- (void)save { // name Recipe recipe.name = nameTextField.text; NSError *error = nil; // if (![recipe.managedObjectContext save:&error]) { NSLog(@"Unresolved error %@, %@", error, [error userInfo]); abort(); } // RecipeDetailViewController ( . " ") [self.delegate recipeAddViewController:self didAddRecipe:recipe]; }
新しいレシピの保存をキャンセル
- (void)cancel { // Recipe, , [recipe.managedObjectContext deleteObject:recipe]; NSError *error = nil; if (![recipe.managedObjectContext save:&error]) { NSLog(@"Unresolved error %@, %@", error, [error userInfo]); abort(); } // [self.delegate recipeAddViewController:self didAddRecipe:nil]; }
作成したレシピを表示する
- (void)recipeAddViewController:(RecipeAddViewController *)recipeAddViewController didAddRecipe:(Recipe *)recipe { if (recipe) { // Recipe nil - [self showRecipe:recipe animated:NO]; } [self dismissModalViewControllerAnimated:YES]; } - (void)showRecipe:(Recipe *)recipe animated:(BOOL)animated { // , RecipeDetailViewController *detailViewController = [[RecipeDetailViewController alloc] initWithStyle:UITableViewStyleGrouped]; detailViewController.recipe = recipe; [self.navigationController pushViewController:detailViewController animated:animated]; [detailViewController release]; }
新しい成分を作成する方法
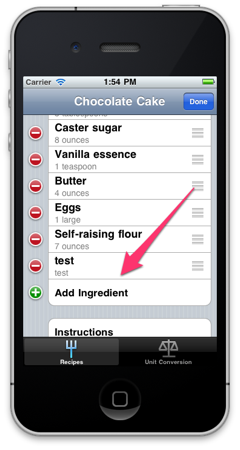
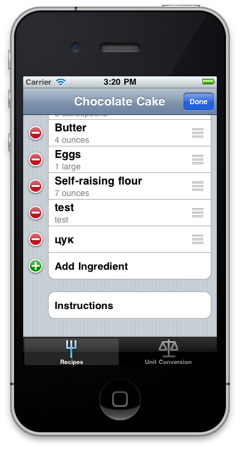
上記のスクリーンショットでわかるように、編集モードでレシピに関する詳細情報を表示すると、「成分の追加」リンクが利用できます。 メソッドで作成されます
- (UITableViewCell *)tableView:(UITableView *)tableView cellForRowAtIndexPath:(NSIndexPath *)indexPath
RecipeDetailViewController
static NSString *AddIngredientCellIdentifier = @"AddIngredientCell"; cell = [tableView dequeueReusableCellWithIdentifier:AddIngredientCellIdentifier]; if (cell == nil) { // Create a cell to display "Add Ingredient". cell = [[[UITableViewCell alloc] initWithStyle:UITableViewCellStyleDefault reuseIdentifier:AddIngredientCellIdentifier] autorelease]; cell.accessoryType = UITableViewCellAccessoryDisclosureIndicator; } cell.textLabel.text = @"Add Ingredient";
IngredientDetailViewControllerは、成分の追加と編集を担当します。
IngredientDetailViewController.h
@class Recipe, Ingredient, EditingTableViewCell; @interface IngredientDetailViewController : UITableViewController { @private Recipe *recipe; Ingredient *ingredient; EditingTableViewCell *editingTableViewCell; } @property (nonatomic, retain) Recipe *recipe; @property (nonatomic, retain) Ingredient *ingredient; @property (nonatomic, assign) IBOutlet EditingTableViewCell *editingTableViewCell; @end
IngredientDetailViewController.m
... - (id)initWithStyle:(UITableViewStyle)style { if (self = [super initWithStyle:style]) { UINavigationItem *navigationItem = self.navigationItem; navigationItem.title = @"Ingredient"; UIBarButtonItem *cancelButton = [[UIBarButtonItem alloc] initWithBarButtonSystemItem:UIBarButtonSystemItemCancel target:self action:@selector(cancel:)]; self.navigationItem.leftBarButtonItem = cancelButton; [cancelButton release]; UIBarButtonItem *saveButton = [[UIBarButtonItem alloc] initWithBarButtonSystemItem:UIBarButtonSystemItemSave target:self action:@selector(save:)]; self.navigationItem.rightBarButtonItem = saveButton; [saveButton release]; } return self; } ... - (BOOL)shouldAutorotateToInterfaceOrientation:(UIInterfaceOrientation)interfaceOrientation { return (interfaceOrientation != UIInterfaceOrientationPortraitUpsideDown); } ... - (NSInteger)tableView:(UITableView *)tableView numberOfRowsInSection:(NSInteger)section { // , return 2; } // - (UITableViewCell *)tableView:(UITableView *)tableView cellForRowAtIndexPath:(NSIndexPath *)indexPath { static NSString *IngredientsCellIdentifier = @"IngredientsCell"; EditingTableViewCell *cell = (EditingTableViewCell *)[tableView dequeueReusableCellWithIdentifier:IngredientsCellIdentifier]; if (cell == nil) { [[NSBundle mainBundle] loadNibNamed:@"EditingTableViewCell" owner:self options:nil]; cell = editingTableViewCell; self.editingTableViewCell = nil; } if (indexPath.row == 0) { cell.label.text = @"Ingredient"; cell.textField.text = ingredient.name; cell.textField.placeholder = @"Name"; } else if (indexPath.row == 1) { cell.label.text = @"Amount"; cell.textField.text = ingredient.amount; cell.textField.placeholder = @"Amount"; } return cell; } ... - (void)save:(id)sender { NSManagedObjectContext *context = [recipe managedObjectContext]; /* - */ if (!ingredient) { self.ingredient = [NSEntityDescription insertNewObjectForEntityForName:@"Ingredient" inManagedObjectContext:context]; [recipe addIngredientsObject:ingredient]; ingredient.displayOrder = [NSNumber numberWithInteger:[recipe.ingredients count]]; } /* */ EditingTableViewCell *cell; cell = (EditingTableViewCell *)[self.tableView cellForRowAtIndexPath:[NSIndexPath indexPathForRow:0 inSection:0]]; ingredient.name = cell.textField.text; cell = (EditingTableViewCell *)[self.tableView cellForRowAtIndexPath:[NSIndexPath indexPathForRow:1 inSection:0]]; ingredient.amount = cell.textField.text; /* */ NSError *error = nil; if (![context save:&error]) { NSLog(@"Unresolved error %@, %@", error, [error userInfo]); abort(); } [self.navigationController popViewControllerAnimated:YES]; } ... @end
材料を追加するためのフォームは次のとおりです
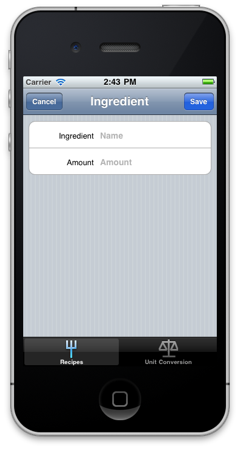
[保存]ボタンをクリックすると、材料がデータベースに保存され、リストに表示されます。 [キャンセル]ボタンをクリックすると、新しい材料は保存されません。
既存のレシピを削除する方法
RecipeListTableViewControllerコントローラーには、レシピの削除をサポートする次のコードが含まれています
- (void)viewDidLoad { ... // Edit self.navigationItem.leftBarButtonItem = self.editButtonItem; ... } ... // UITableView - (void)tableView:(UITableView *)tableView commitEditingStyle:(UITableViewCellEditingStyle)editingStyle forRowAtIndexPath:(NSIndexPath *)indexPath { if (editingStyle == UITableViewCellEditingStyleDelete) { // NSManagedObjectContext *context = [fetchedResultsController managedObjectContext]; [context deleteObject:[fetchedResultsController objectAtIndexPath:indexPath]]; // NSError *error; if (![context save:&error]) { NSLog(@"Unresolved error %@, %@", error, [error userInfo]); abort(); } } }
これで、[編集]ボタンをクリックするか、UITableViewCellでジェスチャーを実行すると、UITableViewが編集モードになり、レシピを削除できます(下のスクリーンショットを参照)。
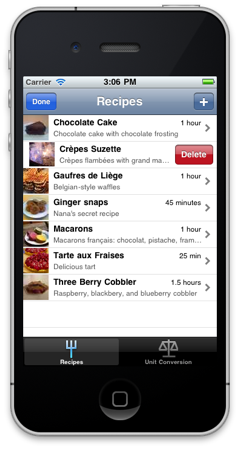
レシピを削除すると、データベース内のすべての関連オブジェクト(成分と写真)も削除されます。
既存の成分を除去する方法
RecipeDetailViewControllerコントローラーでは、写真を追加する以外はすべて同じように配置されます(考慮されません)。
- (UITableViewCellEditingStyle)tableView:(UITableView *)tableView editingStyleForRowAtIndexPath:(NSIndexPath *)indexPath { UITableViewCellEditingStyle style = UITableViewCellEditingStyleNone; // Only allow editing in the ingredients section. // , (. tableView:cellForRowAtIndexPath:), , , if (indexPath.section == INGREDIENTS_SECTION) { if (indexPath.row == [recipe.ingredients count]) { style = UITableViewCellEditingStyleInsert; } else { style = UITableViewCellEditingStyleDelete; } } return style; } - (void)tableView:(UITableView *)tableView commitEditingStyle:(UITableViewCellEditingStyle)editingStyle forRowAtIndexPath:(NSIndexPath *)indexPath { // if ((editingStyle == UITableViewCellEditingStyleDelete) && (indexPath.section == INGREDIENTS_SECTION)) { // Ingredient *ingredient = [ingredients objectAtIndex:indexPath.row]; [recipe removeIngredientsObject:ingredient]; [ingredients removeObject:ingredient]; NSManagedObjectContext *context = ingredient.managedObjectContext; [context deleteObject:ingredient]; [self.tableView deleteRowsAtIndexPaths:[NSArray arrayWithObject:indexPath] withRowAnimation:UITableViewRowAnimationTop]; } }
成分の追加と除去の形式は次のとおりです
おわりに
この記事では、レシピの画像を作成することを特に検討しませんでした-読者がこの機能を独自に研究することを想定しています(RecipeDetailViewControllerコントローラーのphotoTappedメソッドを参照)。 指定されたソースコードの例は抜粋であり、プロジェクトをダウンロードすることでソースコードを完全に学習できます(「参考文献」セクションを参照)。 このシリーズの記事を執筆する際に私が行った仕事があなたにとって役立つことを願っています-親愛なる読者! ご清聴ありがとうございました。