はじめに
この記事の目的は、初心者のiOS開発者が、iPhone Core Data Recipesの例を使用して、Core Dataを使用してSQLiteデータベースを正しく操作する方法を理解できるようにすることです。 一連の記事の最初の部分では、アプリケーションとデータベースの相互作用、および関連するレコード(関係)の操作について検討します。
前提条件
このアプリケーションのソースコードを独立して調査するには、標準のツールセットが必要です。
- Mac OS X
- Xcode
このセットを使用すると、シミュレータでアプリケーションを表示、変更、および実行できます。 実際のiPhoneで実行する場合は、iOS Developer Programへの参加が必要です。
また、重要なこととして、Objective-C言語とアプリケーションの構造に関する基本的な理解が必要です。
使用される材料とツールへのリンクは、「参考文献」セクションに記載されています。
iPhone Core Data Recipesとは何ですか?
Xcodeは、iPhoneアプリケーションでView Controller、Table View、Core Dataを使用する方法の一般的なアイデアを提供するApple開発者のプロジェクトです。 もちろん、このプロジェクトはiPadにも関連していますが、iPadで正しく表示するにはインターフェースを変更する必要があります。
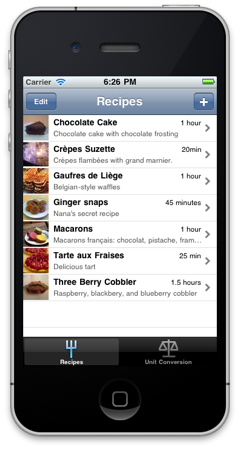
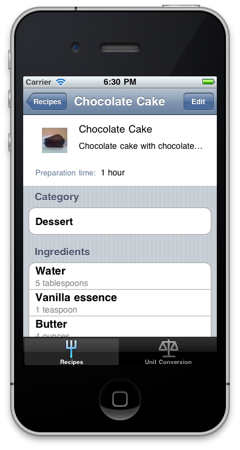
iPhone Core Data Recipesスクリーンショット
以下のスクリーンショットは、アプリケーションインターフェイスの概要を示しています。 メインの[レシピ]ウィンドウに、完成品のリストが表示されます。 それらのいずれかをクリックすると、アプリケーションはこの製品を調理する方法、そのカテゴリ、必要な時間、必要な材料と量、および調理のテキストの指示を表示するボタンに関する情報を表示します(スクリーンショットは表示されていません)。 また、アプリケーションでは、温度の対応表(摂氏と華氏)だけでなく、グラム、ポンド、オンスの間で値を変換する可能性があります。
データベース構造
データベース構造の一般的な考え方は、以下のスクリーンショットから取得できます。
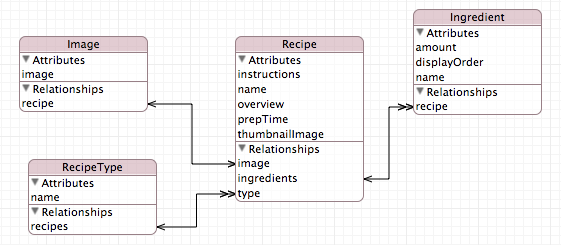
XcodeでRecipes.xcdatamodelファイルを開くと、構造をさらに詳しく調べることができます。
テーブルの説明
レシピテーブルには、次の属性が含まれています。
- タイプStringの命令
- タイプStringの名前
- String型の概要
- String型のprepTime
- TransformableタイプのthumbnailImage
Ingredientテーブルには、次の属性が含まれています。
- タイプStringの量
- 整数16型のdisplayOrder
- タイプStringの名前
RecipeTypeテーブルには、次の属性が含まれています。
- タイプStringの名前
Imageテーブルには、次の属性が含まれています。
- 変換可能タイプの画像
標準型ではすべてが明確だと思います。 しかし、これはどのような変換可能ですか? Core Dataは、文字列、日付、数値など、さまざまな標準タイプをサポートしています。 ただし、値が直接サポートされていない属性を作成する必要がある場合があります。 たとえば、NSImageおよびNSColorクラスのインスタンスである画像または色を保存する場合。 このためには、Transformableタイプが必要です。このタイプの詳細な説明は、iOS Developer Library Webサイトの非標準の永続属性セクションで参照できます(参照セクションのリンクを参照)。
テーブル間の関係
データベース構造には、3つの他のさまざまなタイプの接続を持つメインレシピテーブルがあります。 たとえば、RecipeテーブルにはIngredientテーブルと1対多の関係があります。 通信のタイプと方向は、矢印とその番号によって理解できます。 たとえば、RecipeテーブルはRecipeTypeテーブルと1対1の関係がありますが、RecipeTypeテーブルはRecipeテーブルと1対多の関係があります。 双方向通信は同じタイプではありません。 つまり、RecipeテーブルのレコードはRecipeTypeテーブルの1つのレコードにのみ関連付けることができますが、同時にRecipeTypeテーブルのレコードはRecipeテーブルの多くのレコードに関連付けることができます。 この特定の例では、簡単な言葉で言えば、製品は1つのカテゴリにしか入れることができず、別の製品は同じカテゴリ、たとえばデザートカテゴリに入れることもできます。
Core Dataは関係、つまり モデルでそれらを正しく構築するだけです。
関係のタイプは、データモデルインスペクターの関係プロパティで設定されます(以下の例を参照)。

データベースの構造を設計するときは、接続プロパティの削除規則を忘れないことが重要です。 この例では、製品が削除されると、その成分がすべて削除されます。
クラス
データベースの設計が完了したら、モデルのObjective-Cクラスを生成する必要があります。 この場合、RecipeテーブルとIngredientテーブルのクラスがあります。
Recipe.h
@interface ImageToDataTransformer : NSValueTransformer { } @end @interface Recipe : NSManagedObject { } @property (nonatomic, retain) NSString *instructions; @property (nonatomic, retain) NSString *name; @property (nonatomic, retain) NSString *overview; @property (nonatomic, retain) NSString *prepTime; @property (nonatomic, retain) NSSet *ingredients; @property (nonatomic, retain) UIImage *thumbnailImage; @property (nonatomic, retain) NSManagedObject *image; @property (nonatomic, retain) NSManagedObject *type; @end @interface Recipe (CoreDataGeneratedAccessors) - (void)addIngredientsObject:(NSManagedObject *)value; - (void)removeIngredientsObject:(NSManagedObject *)value; - (void)addIngredients:(NSSet *)value; - (void)removeIngredients:(NSSet *)value; @end
Ingredient.h
@class Recipe; @interface Ingredient : NSManagedObject { } @property (nonatomic, retain) NSString *name; @property (nonatomic, retain) NSString *amount; @property (nonatomic, retain) Recipe *recipe; @property (nonatomic, retain) NSNumber *displayOrder; @end
ソースコード
アプリケーションとデータベースの相互作用が発生すると、ソースの調査を開始します。
RecipesAppDelegate.hファイルには、データベースの操作に必要なNSManagedObjectModel、NSManagedObjectContext、およびNSPersistentStoreCoordinatorプロパティの宣言が含まれています。
@class RecipeListTableViewController; @interface RecipesAppDelegate : NSObject <UIApplicationDelegate> { NSManagedObjectModel *managedObjectModel; NSManagedObjectContext *managedObjectContext; NSPersistentStoreCoordinator *persistentStoreCoordinator; } @property (nonatomic, retain, readonly) NSManagedObjectModel *managedObjectModel; @property (nonatomic, retain, readonly) NSManagedObjectContext *managedObjectContext; @property (nonatomic, retain, readonly) NSPersistentStoreCoordinator *persistentStoreCoordinator; - (NSString *)applicationDocumentsDirectory; @end
RecipesAppDelegate.mファイルはこれらのプロパティを管理し、データの一貫性を確保します。
... - (void)applicationDidFinishLaunching:(UIApplication *)application { recipeListController.managedObjectContext = self.managedObjectContext; ... } // , , - (void)applicationWillTerminate:(UIApplication *)application { NSError *error; if (managedObjectContext != nil) { if ([managedObjectContext hasChanges] && ![managedObjectContext save:&error]) { NSLog(@"Unresolved error %@, %@", error, [error userInfo]); abort(); } } } // NSManagedObjectContext, - (NSManagedObjectContext *)managedObjectContext { if (managedObjectContext != nil) { return managedObjectContext; } NSPersistentStoreCoordinator *coordinator = [self persistentStoreCoordinator]; if (coordinator != nil) { managedObjectContext = [NSManagedObjectContext new]; [managedObjectContext setPersistentStoreCoordinator: coordinator]; } return managedObjectContext; } // NSManagedObjectModel, - (NSManagedObjectModel *)managedObjectModel { if (managedObjectModel != nil) { return managedObjectModel; } managedObjectModel = [[NSManagedObjectModel mergedModelFromBundles:nil] retain]; return managedObjectModel; } // NSPersistentStoreCoordinator, . NSPersistentStoreCoordinator - (NSPersistentStoreCoordinator *)persistentStoreCoordinator { if (persistentStoreCoordinator != nil) { return persistentStoreCoordinator; } NSString *storePath = [[self applicationDocumentsDirectory] stringByAppendingPathComponent:@"Recipes.sqlite"]; /* , , . . */ NSFileManager *fileManager = [NSFileManager defaultManager]; if (![fileManager fileExistsAtPath:storePath]) { NSString *defaultStorePath = [[NSBundle mainBundle] pathForResource:@"Recipes" ofType:@"sqlite"]; if (defaultStorePath) { [fileManager copyItemAtPath:defaultStorePath toPath:storePath error:NULL]; } } NSURL *storeUrl = [NSURL fileURLWithPath:storePath]; NSError *error; persistentStoreCoordinator = [[NSPersistentStoreCoordinator alloc] initWithManagedObjectModel: [self managedObjectModel]]; if (![persistentStoreCoordinator addPersistentStoreWithType:NSSQLiteStoreType configuration:nil URL:storeUrl options:nil error:&error]) { NSLog(@"Unresolved error %@, %@", error, [error userInfo]); abort(); } return persistentStoreCoordinator; } // Documents - (NSString *)applicationDocumentsDirectory { return [NSSearchPathForDirectoriesInDomains(NSDocumentDirectory, NSUserDomainMask, YES) lastObject]; } ...
次に、メインアプリケーションウィンドウに製品のリストを表示する必要があります。 RecipeListTableViewController.mファイル(RecipeListTableViewControllerインターフェイス)には必要なコードが含まれています
... // Recipe - (NSFetchedResultsController *)fetchedResultsController { if (fetchedResultsController == nil) { NSFetchRequest *fetchRequest = [[NSFetchRequest alloc] init]; NSEntityDescription *entity = [NSEntityDescription entityForName:@"Recipe" inManagedObjectContext:managedObjectContext]; [fetchRequest setEntity:entity]; // NSSortDescriptor *sortDescriptor = [[NSSortDescriptor alloc] initWithKey:@"name" ascending:YES]; NSArray *sortDescriptors = [[NSArray alloc] initWithObjects:sortDescriptor, nil]; [fetchRequest setSortDescriptors:sortDescriptors]; NSFetchedResultsController *aFetchedResultsController = [[NSFetchedResultsController alloc] initWithFetchRequest:fetchRequest managedObjectContext:managedObjectContext sectionNameKeyPath:nil cacheName:@"Root"]; aFetchedResultsController.delegate = self; self.fetchedResultsController = aFetchedResultsController; [aFetchedResultsController release]; [fetchRequest release]; [sortDescriptor release]; [sortDescriptors release]; } return fetchedResultsController; } ... - (UITableViewCell *)tableView:(UITableView *)tableView cellForRowAtIndexPath:(NSIndexPath *)indexPath { // RecipeTableViewCell . RecipeTableViewCell UITableViewCell static NSString *RecipeCellIdentifier = @"RecipeCellIdentifier"; RecipeTableViewCell *recipeCell = (RecipeTableViewCell *)[tableView dequeueReusableCellWithIdentifier:RecipeCellIdentifier]; if (recipeCell == nil) { recipeCell = [[[RecipeTableViewCell alloc] initWithStyle:UITableViewCellStyleDefault reuseIdentifier:RecipeCellIdentifier] autorelease]; recipeCell.accessoryType = UITableViewCellAccessoryDisclosureIndicator; } [self configureCell:recipeCell atIndexPath:indexPath]; return recipeCell; } - (void)configureCell:(RecipeTableViewCell *)cell atIndexPath:(NSIndexPath *)indexPath { // Recipe *recipe = (Recipe *)[fetchedResultsController objectAtIndexPath:indexPath]; cell.recipe = recipe; } ...
すべて、このコードはメインウィンドウに製品のリストを表示するのに十分です。 もちろん、ここではすべてのコードを提供したのではなく、その抜粋のみを提供したことを忘れないでください。 たとえば、ファイルRecipeListTableViewController.mを開くと、アプリケーションが変更を監視する方法を調べることができます(didChangeSection、didChangeObject、controllerWillChangeContent、commitEditingStyleなど)。
材料のリストを表示します。 このために、RecipeDetailViewControllerインターフェースがあります。このインターフェースには、次のプロパティがあります
Recipe *recipe; NSMutableArray *ingredients; @property (nonatomic, retain) Recipe *recipe; @property (nonatomic, retain) NSMutableArray *ingredients;
現在のレシピをRecipeListTableViewControllerインターフェースからRecipeDetailViewControllerインターフェースに渡す
... // - (void)tableView:(UITableView *)tableView didSelectRowAtIndexPath:(NSIndexPath *)indexPath { Recipe *recipe = (Recipe *)[fetchedResultsController objectAtIndexPath:indexPath]; [self showRecipe:recipe animated:YES]; } ... - (void)showRecipe:(Recipe *)recipe animated:(BOOL)animated { RecipeDetailViewController *detailViewController = [[RecipeDetailViewController alloc] initWithStyle:UITableViewStyleGrouped]; // detailViewController.recipe = recipe; [self.navigationController pushViewController:detailViewController animated:animated]; [detailViewController release]; } ...
レシピを表示する
- (void)viewWillAppear:(BOOL)animated { [super viewWillAppear:animated]; [photoButton setImage:recipe.thumbnailImage forState:UIControlStateNormal]; self.navigationItem.title = recipe.name; nameTextField.text = recipe.name; overviewTextField.text = recipe.overview; prepTimeTextField.text = recipe.prepTime; [self updatePhotoButton]; // NSSortDescriptor *sortDescriptor = [[NSSortDescriptor alloc] initWithKey:@"displayOrder" ascending:YES]; NSArray *sortDescriptors = [[NSArray alloc] initWithObjects:&sortDescriptor count:1]; NSMutableArray *sortedIngredients = [[NSMutableArray alloc] initWithArray:[recipe.ingredients allObjects]]; [sortedIngredients sortUsingDescriptors:sortDescriptors]; self.ingredients = sortedIngredients; [sortDescriptor release]; [sortDescriptors release]; [sortedIngredients release]; [self.tableView reloadData]; }
tableView cellForRowAtIndexPathで、レシピを表示するセルを作成します
static NSString *IngredientsCellIdentifier = @"IngredientsCell"; cell = [tableView dequeueReusableCellWithIdentifier:IngredientsCellIdentifier]; if (cell == nil) { cell = [[[UITableViewCell alloc] initWithStyle:UITableViewCellStyleSubtitle reuseIdentifier:IngredientsCellIdentifier] autorelease]; cell.accessoryType = UITableViewCellAccessoryNone; }
それだけです、このコードは成分のリストを表示するのに十分です。 その意味は、メインウィンドウからRecipeオブジェクトを、材料のリストを表示するウィンドウに渡すということです。 同時に、データベースから成分のリストを取得するために、新しいNSEntityDescriptionを作成する必要はありません。recipient.ingredientsプロパティに移動するだけで、Core Dataは必要な成分をデータベースから自動的に返します。
おわりに
もちろん、この記事はこのプロジェクトの完全な説明ではありません。 読者の皆さん、興味をお持ちの方は、このプロジェクトでデータベース内のオブジェクトを追加、削除、変更する方法を説明するために、たとえば次の記事で続きます。 ご清聴ありがとうございました。