
今日は、HTML5とJavaScriptを所有するWindows Phone用のアプリケーションを開発するための追加の機会についてお話したいと思います。
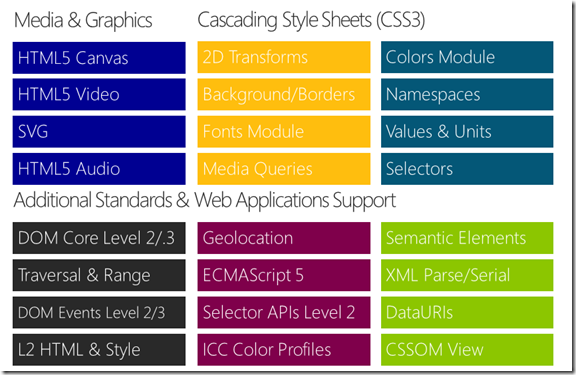
まず、これがどのように可能かを考えてみましょう。 Windows PhoneのHTML5 + JS開発に関連するすべての可能性は、機内のInternet Explorerの存在に関連しています。InternetExplorer 9はデスクトップInternet Explorer 9と機能が似ています。 以下は、ブラウザでサポートされている主な(すべてではない)機能です。
このようなサポートを備えたモバイルブラウザーの存在は、モバイルプラットフォーム上での基本的な可能性、つまりリッチモバイルサイトの作成を既に提供しています。 しかし、アプリケーションを書きたかったのです! 開発者が利用できるWebBrowserコントロールを使用すると、アプリケーションを開発できます。
<phone:WebBrowser Grid.Row="1" Name="MyBrowser" IsGeolocationEnabled="True" IsScriptEnabled="True" Background="{StaticResource PhoneBackgroundBrush}"/>
完全に機能するモバイルサイトの存在と、アプリケーションにWebBrowesコントロールを挿入する機能により、 Windows Phone用の最初のタイプのHTML5アプリケーションにアクセスできます。WebBrowserコントロールでモバイルWebサイトをホストし、プラットフォームに関連する追加サービス機能(プッシュ通知など)を追加するアプリケーション 。
そのようなアプリケーションの例を書いてみましょう。 Yandexモバイルサイトをホストします。 簡単にするために、追加のサービスを発明しませんが、私たちの意見では最も一般的な機能へのアクセスを提供するApplicationBarといくつかのボタンを追加します。
いつものように、Windows Phoneアプリケーションテンプレートに基づいてアプリケーションを作成することから始めます。 NuGetを使用して、Silverlight for Windows Phone Toolkitパッケージをアプリケーションに追加します。 その後、WebBrowserコントロールとPerformanceProgressBarをMainPaige.xamlアプリケーションのメインページに追加して、ページの読み込みプロセスを表示します。 その結果、XAMLコードは次のようになります。
<toolkit:PerformanceProgressBar Name="Progress" Height="10" IsIndeterminate="False" Background="{StaticResource PhoneBackgroundBrush}"/> <phone:WebBrowser Grid.Row="1" Name="Yandex" IsGeolocationEnabled="True" IsScriptEnabled="True" Background="{StaticResource PhoneBackgroundBrush}"/>
Silverlight for Windows Phone Toolkitのコントロールを使用するための名前空間リンクを追加することを忘れないでください:
xmlns:toolkit="clr-namespace:Microsoft.Phone.Controls;assembly=Microsoft.Phone.Controls.Toolkit"
Windows Phoneスタイルのアプリケーションを作成してボタンを追加するには、ApplicationBarのコメントを外し、記事「Windows Phoneアプリケーションのアイコンの入手先 」の情報を使用して、アプリケーションに必要なアイコンを見つけました。 また、ApplicationBarのボタンにすぐにイベントハンドラーを追加しました。 XAMLの結果、アプリケーションのMainPage.xamlページのコードは次のようになり始めました。
<phone:PhoneApplicationPage x:Class="MyYandexWithBJ.MainPage" xmlns="http://schemas.microsoft.com/winfx/2006/xaml/presentation" xmlns:x="http://schemas.microsoft.com/winfx/2006/xaml" xmlns:phone="clr-namespace:Microsoft.Phone.Controls;assembly=Microsoft.Phone" xmlns:shell="clr-namespace:Microsoft.Phone.Shell;assembly=Microsoft.Phone" xmlns:d="http://schemas.microsoft.com/expression/blend/2008" xmlns:mc="http://schemas.openxmlformats.org/markup-compatibility/2006" xmlns:toolkit="clr-namespace:Microsoft.Phone.Controls;assembly=Microsoft.Phone.Controls.Toolkit" mc:Ignorable="d" d:DesignWidth="480" d:DesignHeight="696" FontFamily="{StaticResource PhoneFontFamilyNormal}" FontSize="{StaticResource PhoneFontSizeNormal}" Foreground="{StaticResource PhoneForegroundBrush}" SupportedOrientations="Portrait" Orientation="Portrait" shell:SystemTray.IsVisible="True"> <!--LayoutRoot is the root grid where all page content is placed--> <Grid x:Name="LayoutRoot" Background="Transparent"> <Grid.RowDefinitions> <RowDefinition Height="Auto"/> <RowDefinition Height="*"/> </Grid.RowDefinitions> <toolkit:PerformanceProgressBar Name="Progress" Height="10" IsIndeterminate="False" Background="{StaticResource PhoneBackgroundBrush}"/> <phone:WebBrowser Grid.Row="1" Name="Yandex" IsGeolocationEnabled="True" IsScriptEnabled="True" Background="{StaticResource PhoneBackgroundBrush}"/> </Grid> <!--Sample code showing usage of ApplicationBar--> <phone:PhoneApplicationPage.ApplicationBar> <shell:ApplicationBar IsVisible="True" IsMenuEnabled="True"> <shell:ApplicationBarIconButton IconUri="/icons/appbar.back.rest.png" Text="" lick="ApplicationBarBackButton_Click"/> <shell:ApplicationBarIconButton IconUri="/icons/appbar.home.png" Text="" Click="ApplicationBarHomeButton_Click"/> <shell:ApplicationBarIconButton IconUri="/icons/appbar.plane.rotated.45.png" Text="" Click="ApplicationBarFlightsButton_Click"/> <shell:ApplicationBarIconButton IconUri="/icons/appbar.next.rest.png" Text="" Click="ApplicationBarForwardButton_Click"/> </shell:ApplicationBar> </phone:PhoneApplicationPage.ApplicationBar> </phone:PhoneApplicationPage>
プロジェクトのアイコンフォルダーにアイコンが追加され、コンテンツタイプがコンテンツに設定され、新しい場合はコピーで出力にコピーされます。 起動時のアプリケーション自体は次のようになります。
アプリケーションのダウンロード時に、家でボタンをクリックしてYandexモバイルページを開き、飛行機をクリックしたときにフライトスケジュールでモバイルページを切り離すコードを追加します。
// Constructor public MainPage() { InitializeComponent(); Loaded += new RoutedEventHandler(MainPage_Loaded); } void MainPage_Loaded(object sender, RoutedEventArgs e) { Yandex.Navigate(new Uri("http://m.yandex.ru")); } private void ApplicationBarHomeButton_Click(object sender, EventArgs e) { Yandex.Navigate(new Uri("http://m.yandex.ru")); } private void ApplicationBarFlightsButton_Click(object sender, EventArgs e) { Yandex.Navigate(new Uri("http://m.rasp.yandex.ru/station?plane=1")); }
これで、起動時にアプリケーションがYandexモバイルページを開き、飛行機でボタンをクリックすると、フライトスケジュールが記載されたモバイルページが開きます。
ページに移動するときに、ボタンの処理を前後に追加し、ProgressBarの表示を追加します。 ProgressBar表示を追加するには、WebBrowserコントロールのNavigatingおよびNavigatedイベントハンドラーを追加する必要があります。
void MainPage_Loaded(object sender, RoutedEventArgs e) { Yandex.Navigated += new EventHandler<System.Windows.Navigation.NavigationEventArgs>(Yandex_Navigated); Yandex.Navigating += new EventHandler<NavigatingEventArgs>(Yandex_Navigating); Yandex.Navigate(new Uri(http://m.yandex.ru)); } void Yandex_Navigating(object sender, NavigatingEventArgs e) { Progress.IsIndeterminate = true; } void Yandex_Navigated(object sender, System.Windows.Navigation.NavigationEventArgs e) { Progress.IsIndeterminate = false; }
前後のボタンの押下を処理するために、アプリケーションコードから呼び出す機能とともに、JavaScriptと履歴オプションを使用します。
private void ApplicationBarBackButton_Click(object sender, EventArgs e) { Yandex.InvokeScript("eval", "history.go(-1)"); } private void ApplicationBarForwardButton_Click(object sender, EventArgs e) { Yandex.InvokeScript("eval", "history.go(1)"); }
これで、ホームボタンとフライトスケジュールを備えた独自のアプリケーション「モバイルYandex」ができました。 演習の良い結論は、実際に遷移を実行できる場合にのみアクティブになるように、戻る/進むボタンを移動する機能の定義を追加することです。
このアプリケーションは、リモートHTML5 + JSコンテンツを使用します。論理的な次のステップは、 Windows Phoneの2番目のタイプのHTML5アプリケーションです 。
そのようなアプリケーションの例を書いてみましょう。 これは、JSによってアクティブコンテンツが生成されるローカルHTML5ページになります。 開発を簡素化するために、jQueryライブラリーを使用します。
いつものように、Windows Phoneアプリケーションテンプレートに基づいてアプリケーションを作成することから始めます。 HTML5アプリケーションを自分で記述しないために、TechEd Russia 2011でKostya KichinskyのレポートからSVGの例を取り上げました。
プロジェクトで、コンテンツフォルダーを作成し、 svgdemo.htmおよびjquery-1.7.min.jsファイルを追加します。 svgdemo.htmlファイルで、jquery-1.7.min.jsスクリプトパスを変更して、techスクリプトが次のようになるようにします。
<script src="jquery-1.7.min.js" type="text/javascript"></script>
svgdemo.htmおよびjquery-1.7.min.jsファイルの方が新しい場合は、コンテンツでビルドアクションを設定し、コピーで出力にコピーすることも必要です。
次に、WebBrowserコントロールをアプリケーションのメインページに追加して、すべてのスペースを埋めます。 その結果、XAMLコードは次のようになります。
<phone:PhoneApplicationPage x:Class="IE9HTML.MainPage" xmlns="http://schemas.microsoft.com/winfx/2006/xaml/presentation" xmlns:x="http://schemas.microsoft.com/winfx/2006/xaml" xmlns:phone="clr-namespace:Microsoft.Phone.Controls;assembly=Microsoft.Phone" xmlns:shell="clr-namespace:Microsoft.Phone.Shell;assembly=Microsoft.Phone" xmlns:d="http://schemas.microsoft.com/expression/blend/2008" xmlns:mc="http://schemas.openxmlformats.org/markup-compatibility/2006" mc:Ignorable="d" d:DesignWidth="480" d:DesignHeight="768" FontFamily="{StaticResource PhoneFontFamilyNormal}" FontSize="{StaticResource PhoneFontSizeNormal}" Foreground="{StaticResource PhoneForegroundBrush}" SupportedOrientations="Portrait" Orientation="Portrait" shell:SystemTray.IsVisible="True"> <!--LayoutRoot is the root grid where all page content is placed--> <Grid x:Name="LayoutRoot" Background="Transparent"> <Grid.RowDefinitions> <RowDefinition Height="Auto"/> <RowDefinition Height="*"/> </Grid.RowDefinitions> <!--ContentPanel - place additional content here--> <Grid x:Name="ContentPanel" Grid.Row="1" Margin="12,0,12,0"> <phone:WebBrowser Name="myBrowser" IsScriptEnabled="True" /> </Grid> </Grid> </phone:PhoneApplicationPage>
実際、一見、開発は完了しています(完成したHTML5アプリケーションを取得したという事実を考慮に入れています)が、まだ1つの微妙な点が残っています。 実際には、アプリケーションがデプロイされた後のHTMLおよびJSファイルは、分離ストレージにないため、WebBrowserコントロールで使用できません。 したがって、アプリケーションを起動するときに、HTML5アプリケーションを分離ストレージに展開する必要があります。 このために、MSDNのサンプルコードを使用して、その中のファイルセットを独自のものに変更します。
private void SaveFilesToIsoStore() { //These files must match what is included in the application package, //or BinaryStream.Dispose below will throw an exception. string[] files = { "content/svgdemo.htm", "content/jquery-1.7.min.js" }; IsolatedStorageFile isoStore = IsolatedStorageFile.GetUserStoreForApplication(); if (false == isoStore.FileExists(files[0])) { foreach (string f in files) { StreamResourceInfo sr = Application.GetResourceStream(new Uri(f, UriKind.Relative)); using (BinaryReader br = new BinaryReader(sr.Stream)) { byte[] data = br.ReadBytes((int)sr.Stream.Length); SaveToIsoStore(f, data); } } } } private void SaveToIsoStore(string fileName, byte[] data) { string strBaseDir = string.Empty; string delimStr = "/"; char[] delimiter = delimStr.ToCharArray(); string[] dirsPath = fileName.Split(delimiter); //Get the IsoStore. IsolatedStorageFile isoStore = IsolatedStorageFile.GetUserStoreForApplication(); //Re-create the directory structure. for (int i = 0; i < dirsPath.Length - 1; i++) { strBaseDir = System.IO.Path.Combine(strBaseDir, dirsPath[i]); isoStore.CreateDirectory(strBaseDir); } //Remove the existing file. if (isoStore.FileExists(fileName)) { isoStore.DeleteFile(fileName); } //Write the file. using (BinaryWriter bw = new BinaryWriter(isoStore.CreateFile(fileName))) { bw.Write(data); bw.Close(); } }
SaveFilesToIsoStore()メソッドは、指定されたファイルが分離ストレージにないことを確認し、補助SaveToIsoStoreメソッドを使用してそれらをコピーします。
これで、HTML5アプリケーションの初期化を完了するコードを作成する準備がすべて整いました。
// Constructor public MainPage() { InitializeComponent(); this.Loaded += new RoutedEventHandler(MainPage_Loaded); } void MainPage_Loaded(object sender, RoutedEventArgs e) { SaveFilesToIsoStore(); myBrowser.Navigate(new Uri("content/svgdemo.htm", UriKind.Relative)); }
ファイルをIsolatedStorageに保存し、WebBrowserコントロールにメインのHTML5ファイルを表示します。 動作中のアプリケーションは次のとおりです。
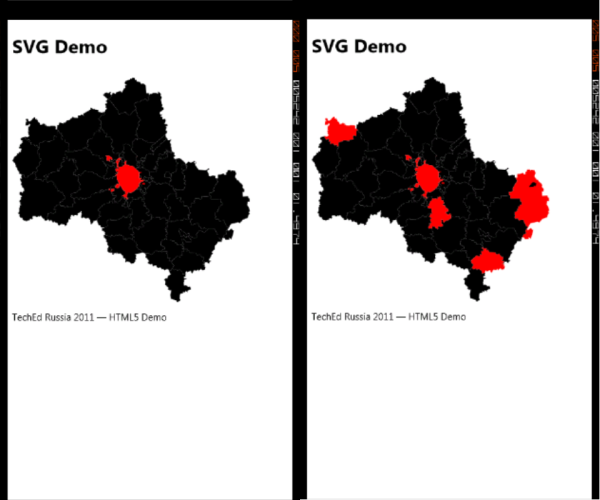
これは素晴らしい例のように思えます。 Kostya( kichik )に感謝します。
純粋なHTML5 + JSが不要になり、ブラウザの制御を超えたい場合、Windows Phoneの3番目のタイプのHTML5アプリケーションについて話すことができます。これは、電話のローカルコンテンツだけでなく、機能を使用してWebBrowserの制御も超えます。プラットフォーム(例:加速度計) プラットフォームに何が起きているかを通知する機能(window.external.notify / ScriptNotify)を使用するか、C#コード(WebBrowser.InvokeScript)からJSスクリプトを呼び出す機能を使用して、このようなアプリケーションを独自に「ゼロから」作成できます。 ただし、既存のソリューションであるPhoneGapを使用する方が適切です。
執筆時点では、バージョン1.3が利用可能でした。 ウェブサイトphonegap.comからダウンロードできます。ドキュメントもあります。 ダウンロード後、アーカイブを解凍し、Windows PhoneフォルダーからPhoneGapCustom.zipおよびPhoneGapStarter.zipファイルをVisual Studio 2010 \ Templates \フォルダーにコピーし、実行中のすべてのバージョンのVisual Studioをアンロードします。 Visual Studioを起動すると、新しいタイプのプロジェクトが表示されます。
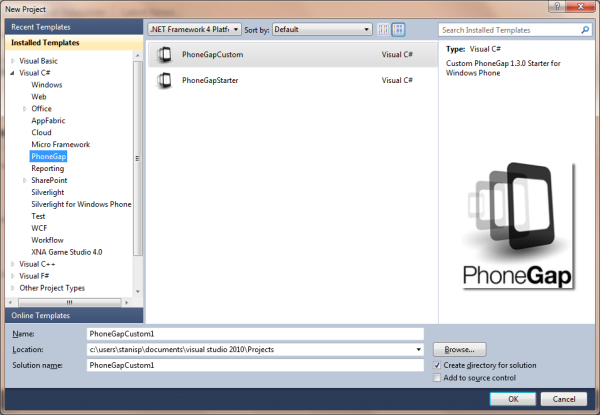
PhoneGapStarterに基づいてプロジェクトを作成しましょう。 プロジェクトの構成を確認します。

実際、PhoneGap自体はJSファイルphonegap-1.3.0.jsとそれに応答する.NET CFライブラリWP7GapClassLibです。 さらに、組み込みのWebBrowser要素の代わりに、同じWP7GapClassLibにあるPGViewコントロールが使用されます。
補助ファイルManifestProcessor.jsは、コンテンツファイルのリスト(プロジェクトのwwwディレクトリ)を含むGapSourceDictionary.xmlファイルを更新するために使用されます。これは、前の例で既に知っているように、アプリケーションをビルドする前に分離ストレージにデプロイする必要があります
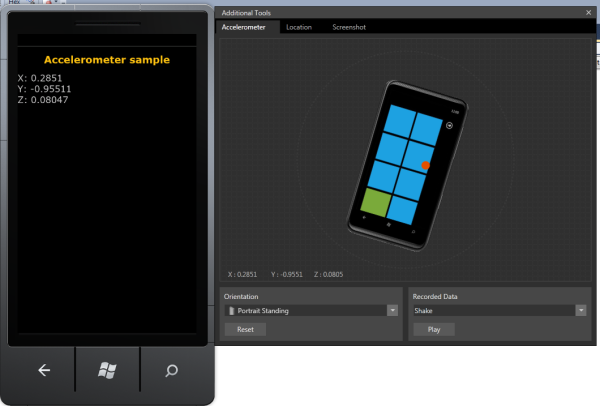
加速度計データを読み取り、ページに表示する簡単なアプリケーションを作成します。 これを行うには、index.htmlファイルのタグの内容を次のものに置き換えます。
<h1>Accelerometer sample</h1> <div id="valueX"></div> <div id="valueY"></div> <div id="valueZ"></div>
次に、このページのスクリプトを、加速度計で動作する独自のスクリプトに置き換える必要があります(コードは、David Roussetによる記事: PhoneGapのおかげでWindows PhoneでHTML5アプリケーションを作成する方法から取得されます) 。
<script type="text/javascript"> document.addEventListener("deviceready", onDeviceReady, false); // variable to output the current x, y & z values of the accelerometer var valueX; var valueY; var valueZ; // when PhoneGap tells us everything is ready, start watching the accelerometer function onDeviceReady() { valueX = document.getElementById("valueX"); valueY = document.getElementById("valueY"); valueZ = document.getElementById("valueZ"); startWatch(); } // start monitoring the state of the accelerometer function startWatch() { var options = { frequency: 500 }; navigator.accelerometer.watchAcceleration(onSuccess, onError, options); } // if the z-axis has moved outside of our sensitivity threshold, move the aarvark's head in the appropriate direction function onSuccess(acceleration) { valueX.innerHTML = "X: " + acceleration.x; valueY.innerHTML = "Y: " + acceleration.y; valueZ.innerHTML = "Z: " + acceleration.z; } function onError() { alert('onError!'); } </script>
実際、説明する必要があるのはナビゲータオブジェクトのみで、これにより加速度計に接続できます。 これは実際にはPhoneGapの一部です。 phonegap.comで PhoneGap APIの詳細を読むことができます。
アプリケーションを実行し、動作することを確認するためだけに残ります。
プラットフォームの機能の例として、David Roussetによる同じ記事のHTML5ゲームのスクリーンショットを提供します。

プロジェクトの例 :
ミヤンデックス
SVGデモ
Phonegap Accelerometrサンプル
便利なリンク:
ライブタイルとバックグラウンドエージェント
MSDNのWindows Phone開発センター(Windows Phoneコース)
Windows Phone SDK 7.1
ロシア語でのWindows Phone開発フォーラム