一般に、数晩後に、最も基本的なパターン(デコレーター、オブザーバー、ファクトリー、メディエーター、メモ化)のJavaScriptでの説明と実装を得ました(パターンではなく、技術ですが、このシリーズに完全に適合するようです)。 。
デコレータ
気の利いた素敵なパターンを使用すると、いくつかの条件に応じて、オブジェクトの動作をオンザフライで変更できます。
次のようなコードがあるとしましょう:
function Ball( param ) { this._radius = param.radius; this._color = param.color; } Ball.prototype = { constructor: Ball, INCREMENTATION_STEP: 5, draw: function(){console.log("ball drawn with radius:" + this._radius + " and color: " + this._color)}, inc: function(){ this._radius += this.INCREMENTATION_STEP } } new Ball({ radius:100, color:"red"});
ここで新しい赤いボールを作成しますが、ボールが赤だけでなく赤のストライプが必要な場合はどうでしょうか? デコレータがシーンに入る場所です。
特別な魅力は、元のボールが彼が縞模様になったり、そこにある種のデコレーターを持っているかもしれないと全く疑っていないという事実によって与えられます。
パターンを実装するには、いくつかの方法があります。
最初の方法は統合されています
function StripedBall( ball ) { this._ball = ball } StripedBall.prototype = { constructor: StripedBall, draw: function() { this._ball.draw(); console.log("and with stripes"); }, inc: function() { return this._ball.inc(); } } function SpeckledBall( ball ) { this._ball = ball } SpeckledBall.prototype = { constructor: SpeckledBall, draw: function() { this._ball.draw(); console.log("and with dots!"); }, inc: function() { return this._ball.inc(); } }
各デコレータでは、親オブジェクトにある必要があるすべての関数を再作成する必要があり、動作を変更したくない関数では、リクエストを親にリダイレクトするだけです。 この方法は、1〜2の機能に影響する大きな変更が発生した場合に最適です。
簡単なテストを作成します。
var ball1 = new SpeckledBall( new StripedBall( new Ball({ radius:100, color:"red"}))); var ball2 = new StripedBall( new SpeckledBall( new Ball({ radius:100, color:"green"}))); ball1.draw(); ball1.inc(); ball1.draw(); ball2.draw();
深呼吸、およびチェック:
ball drawn with radius:100 and color: red and with stripes and with dots! ball drawn with radius:105 and color: red and with stripes and with dots! ball drawn with radius:100 and color: green and with dots! and with stripes
無駄に私は心配していました-すべてが正常に動作します。
方法2-軽量
function MakeStripedBall( ball ) { var function_name = "draw"; var prev_func = ball[ function_name ]; ball[ function_name ] = function() { prev_func.apply( this, arguments ) console.log("and with stripes"); }; return ball; } function MakeSpeckledBall( ball ) { var function_name = "draw"; var prev_func = ball[function_name]; ball[function_name] = function () { prev_func.apply(this, arguments) console.log("and with dots!"); }; return ball; }
もちろん、必要なコードは最初の場合よりも少なくなりますが、1-2個を超える変数関数または複雑な変更がある場合、それを把握するのははるかに困難になります。
私たちはテストを書いています:
var ball3 = MakeStripedBall( MakeSpeckledBall( new Ball({ radius: 150, color: "blue" }))); var ball4 = MakeSpeckledBall( MakeStripedBall(new Ball({ radius: 150, color: "blue" }))); ball3.draw(); ball3.inc(); ball3.draw(); ball4.draw();
そして、それがすべてどのように機能するかを確認してください:
ball drawn with radius:150 and color: blue and with dots! and with stripes ball drawn with radius:155 and color: blue and with dots! and with stripes ball drawn with radius:150 and color: blue and with stripes and with dots!
すべてがそうであるように。
工場
実際、静的に型付けされた言語のファクトリーの主なタスクは、状況に応じて同じインターフェースで異なるオブジェクトを作成することです。JavaScriptではこの問題はそれほど深刻ではないため、疑問が生じます。なぜこのファクトリーが必要なのでしょうか?
すべてが単純です-この最初の目標に加えて、2番目の目標もあります-ファクトリはオブジェクトの初期化を実行できます。
たとえば、Daddy、Mammy、およびladというオブジェクトがあり、ちょうど言うことができるファクトリーを使用してそれらを作成するとします-familyfactory.createLad(); familyfactory.createDaddy() 、およびそれらが両方とも赤で210 cmであるという事実。 成長、工場が私たちのために決定します-私たちはこれらのパラメータを設定しません。
実際、ファクトリーが何らかのオブジェクトを作成できるようにするには、最初にコンストラクターを設定しておくとよいでしょう(この例では、オブジェクトは残念ながら上記の数行ほど興味深いものではありません):
var Shapes = { Circle: function (param) { console.log("new " + param.color + " circle created with radius " + param.radius + "px"); }, Square: function (param) { console.log("new " + param.color + " square created with " + param.side + "px on a side "); }, Triangle: function (param) { console.log("new " + param.color + " triangle created with " + param.side + "px on a side "); } }
そして今、あなたは工場自体を作ることができます-それはこのように見えるかもしれません:
function ShapeFactory(size, color) { this.size = size; this.color = color; } ShapeFactory.prototype = { constructor: ShapeFactory, makeCircle: function () { return new Shapes.Circle({ radius: this.size / 2, color: this.color }); }, makeSquare: function () { return new Shapes.Square({ side: this.size, color: this.color }); }, makeTrinagle: function () { return new Shapes.Triangle({ side: this.size, color: this.color }); } }
控えめなテストを作成します。
var factory = new ShapeFactory(100, "red") factory.makeSquare(); factory.makeSquare(); factory.makeTrinagle(); factory.makeCircle(); factory.makeTrinagle();
そして、コンソールを見てください:
new red square created with 100px on a side new red square created with 100px on a side new red triangle created with 100px on a side new red circle created with radius 50px new red triangle created with 100px on a side
すべてが機能する
シングルトン
シングルトンとは何ですか? 説明は複雑で、長く、自明ではありません-これは、1つのインスタンスのシステム内にあるオブジェクトです。 Tadaamは説明の終わりです。
これも実際にはパターンだとは思わないことがよくあります。 それを適用する前に、慎重に考える必要があることを言う価値があります-実際、それほど頻繁ではないシングルトンが必要です。
それにはいくつかの方法があります。
最初の方法は簡単です
var singleton_A = { log: function( text ){ console.log(text); } }
これは単純で視覚的で効果的な方法であり、私の意見では説明すら必要ありません。
2番目の方法-自慢
その主なタスクは、クラスメートや他の後輩にあなたがどれだけクールかを示すことです。 さらに、もちろん非常に便利です-このアプローチでは、計画が変更され、プロジェクトの途中でシングルトンを複数のオブジェクトに置き換えることを決めた場合、再構築が容易です
var Singleton_B; (function(){ var instance; var anticlone_proxy; Singleton_B = function(){ if( instance ){ return instance; } instance = { _counter: 0, log: function( text ){ this._counter++; console.log( text + this._counter ); } } anticlone_proxy = { log: function( text ){ return instance.log( text ); } } return anticlone_proxy; }; })();
彼のトリックは、オブジェクトを作成するだけであり、彼がシングルトンであるかどうかにかかわらず、私たちはあまり気にしません。
function NonSingleton() { } NonSingleton.prototype = { consturctor: NonSingleton, scream: function(){console.log("Woooohoooooo!")} } var singleton = new Singleton_B(); var nonsingleton = new NonSingleton(); singleton.log("3..2..1... ignition!"); nonsingleton.scream();
このコードが実行されると、コンソールに以下が表示されます。
3..2..1... ignition! Woooohoooooo!
メモ化
非常にシンプルで便利なテクニック-その本質は、結果を計算するのに長い時間がかかる可能性がある関数に対して、小さな応答キャッシュを作成することです。 もちろん、これは、同じ入力パラメーターで、関数の結果も同じでなければならない場合にのみ機能します。
この手法を使用するある種の低速関数を作成します。
function calculation(x, y) { var key = x.toString() + "|" + y.toString(); var result = 0; if (!calculation.memento[key]) { for (var i = 0; i < y; ++i) result += x; calculation.memento[key] = result; } return calculation.memento[key]; } calculation.memento = {};
そして、勝てる時間を確認してください。
console.profile(); console.log('result:' + calculation(2, 100000000)); console.profileEnd(); console.profile(); console.log('result:' + calculation(2, 100000000)); console.profileEnd(); console.profile(); console.log('result:' + calculation(2, 10000000)); console.profileEnd();
このコードがFirebugでFFで実行されると、次の統計が表示されます。
Profile1: 626.739ms result:200000000 0.012ms result:200000000 63.055msresult:20000000
ログからわかるように、リクエストを繰り返したとき、多くの時間を節約しました。
調停者
メディエーターは、オブジェクト間の相互作用の特に高度なケースで役立つものです。たとえば、多かれ少なかれ異なるタイプのオブジェクトが5つある場合など、何らかの理由で誰もがお互いを知っている場合、メディエーターについて真剣に考える価値があります。
準備として、最初にメディエーターが将来使用するいくつかのクラスを作成します(この場合のヒントは、メディエーターはkitchenと呼ばれます:)
function Daddy() { } Daddy.prototype = { constructor: Daddy, getBeer: function () { if (!kitchen.tryToGetBeer()) { console.log("Daddy: Who the hell drank all my beer?"); return false; } console.log("Daddy: Yeeah! My beer!"); kitchen.oneBeerHasGone(); return true; }, argue_back: function () { console.log("Daddy: it's my last beer, for shure!"); } } function Mammy() { } Mammy.prototype = { constructor: Mammy, argue: function () { console.log("Mammy: You are f*king alconaut!"); kitchen.disputeStarted(); } } function BeerStorage(beer_bottle_count) { this._beer_bottle_count = beer_bottle_count; } BeerStorage.prototype = { constructor: BeerStorage, takeOneBeerAway: function () { if (this._beer_bottle_count == 0) return false; this._beer_bottle_count--; return true; } }
そして、今度はpick自体を書くときです。
var kitchen = { daddy: new Daddy(), mammy: new Mammy(), refrigerator: new BeerStorage(3), stash: new BeerStorage(2), tryToGetBeer: function () { if (this.refrigerator.takeOneBeerAway()) return true; if (this.stash.takeOneBeerAway()) return true; return false }, oneBeerHasGone: function (){ this.mammy.argue(); }, disputeStarted: function (){ this.daddy.argue_back(); } }
そのため、4つのオブジェクトがあり、それらの相互作用を伴う作業は、メディエーターを通過しなかった場合に良い罰に変わる可能性があります。
確認コードを作成します。
var round_counter = 0; while (kitchen.daddy.getBeer()) { round_counter++ console.log( round_counter + " round passed"); }
コンソールがすべてが計画どおりに進んでいるかどうかを確認します。
Daddy: Yeeah! My beer! Mammy: You are f*king alconaut! Daddy: it's my last beer, for shure! 1 round passed ... Daddy: Yeeah! My beer! Mammy: You are f*king alconaut! Daddy: it's my last beer, for shure! 5 round passed Daddy: Who the hell drank all my beer?
私はこの感情的な会話の一部を切り取りましたが、一般的には、すべてが正常に行われています。
オブザーバー
これは、特に考えなくても1日に50回使用するパターンと同じですか?-$(#some_useful_button).click(blah_blah_blah)-おなじみのデザインですか? その中で、クリックはイベントであり、blah_blah_blahはこのイベントを監視するのと同じオブザーバーです。
陰湿な計画のために、独自のイベントとオブザーバーのシステムを実装できます。これにより、ユーザーのアクションだけでなく、他の何かにも対応できます。
その主要なコンポーネントはイベントオブジェクトです。
Event = function() { this._observers = []; } Event.prototype = { raise: function (data) { for (var i in this._observers) { var item = this._observers[i]; item.observer.call(item.context, data); } }, subscribe: function (observer, context) { var ctx = context || null; this._observers.push({ observer: observer, context: ctx }); }, unsubscribe: function (observer, context ) { for (var i in this._observers) if ( this._observers[i].observer == observer && this._observers[i].context == context ) delete this._observers[i]; } }
一般的には、スクリーンショットやリンクがなくて退屈だと思ったので、今回は2つの例があります。
最初は簡単です
var someEvent = new Event(); someEvent.subscribe(function ( data ) { console.log("wohoooooo " + data ) }); var someObject = { _topSecretInfo: 42, observerFunction: function () { console.log("Top Secret:" + this._topSecretInfo) } } someEvent.subscribe(someObject.observerFunction, someObject); someEvent.raise("yeaah!"); someEvent.raise();
そして、コンソールはすべてが機能していることを確認します。
wohoooooo yeaah! Top Secret:42 wohoooooo undefined Top Secret:42
そして2つ目も...シンプルですがきれいです
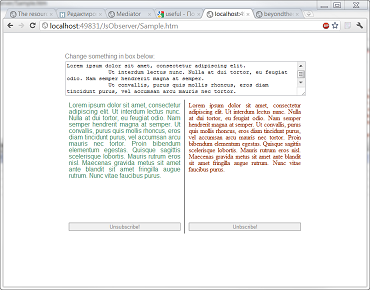
ここに触れることができます
今日はすべてだと思います。 Observerを除くすべてのソースはここで表示でき、Observerは別のフォルダーです