Introduction
Three.js is a powerful tool. It helps to use 3D design in a browser with acceptable performance. Getting started Three.js can be tricky, especially if you've never plunged into the world of 3D programming before.
I have some basic experience with the Unity and C # game engine, but still, many of the concepts are new to me. I came to the conclusion that now there are very few resources for beginner developers, so I decided to write this article. In it, we will consider the basic elements of Three.js scenes from polygonal meshes and materials to geometry, loaders, and much more.
At the end of this article, you will have a solid understanding of the basic aspects needed to add an extra dimension to your future web project.
Three.js examples from Ben Houston , Thomas Diewald and StrykerDoesAnimation .
Vectors and containers - basic building blocks
Often there are two main classes in Three.js - Vector3 and Box3 . If you are new to 3D, this may sound a bit abstract, but you will meet them many more times.
Vector3
The most basic 3D class containing three numbers: x, y, and z . Numbers are the coordinates of a point in 3D space or the direction and length. For example:
const vect = new THREE.Vector3(1, 1, 1);
Most of the constructors in Three.js accept objects of type Vector3 as input arguments, for example Box3
Box3
This class represents cuboid (3D container). Its main task is to create a container around other objects - and that’s all, the smallest cuboid into which a 3D object will fit. Each Box3 is aligned about the x, y, and z axes . An example of how to create a container using Vector3 :
const vect = new THREE.Vector3(1, 1, 1); const box = new THREE.Box3(vect);
An example of how to create a container around an existing 3D object:
const box = new THREE.Box3(); box.setFromObject(object);
You can create grids without this in-depth knowledge, but as soon as you start to come up with or change your models, these classes will definitely come in handy. Now we will move away from abstractions to more visible things.
Polygon mesh
In Three.js, the main visual element on the stage is Mesh . This is a 3D object made up of triangular rectangles (polygonal mesh). It is built using two objects:
Geometry - determines its shape, Material - determines the appearance.
Their definitions may seem a bit confusing (for example, the Geometry class may contain information about color), but the main difference is exactly that.
Geometry
Based on the task you want to achieve, you might want to define the geometry inside Three.js or import another from a file.
Using functions like THREE.TorusKnotGeometry , we can create complex objects with a single line of code. We will get to this soon, but first consider simpler forms.
The simplest 3D shape, cuboid or container, can be specified by the width , height and depth parameters.
const geometry = new THREE.BoxGeometry( 20, 20, 20 );
For a sphere, the value of the radius , widthSegments, and heightSegments parameters is minimal . The last two variables indicate how many triangles the model should use to represent the sphere: the larger the number, the more smooth it will look.
const geometry = new THREE.SphereGeometry( 20, 64, 64 );
If we want to make sharp or triangular shapes, then we can use a cone. His arguments are a combination of the arguments of the two previous figures. Below, we prescribe radius , widthSegments and radialSegments .
const geometry = new THREE.ConeBufferGeometry( 5, 20, 32 );
This is only part of the most common figures. Three.js has a lot of shapes inside the box, which can be found in the documentation. In this article, we will look at more interesting shapes built on the basis of the TorusKnotGeometry method.
Why do these shapes look exactly the way they look? This question is beyond the scope of this article, but I urge you to experiment with parameter values, because you can get very interesting shapes with one line of code!
const geometry = new THREE.TorusKnotGeometry(10, 1.3, 500, 6, 6, 20);
https://codepen.io/BretCameron/pen/gOYqORg
Materials
Geometry defines the shape of our 3D objects, but not their appearance. To fix this, we need materials.
Three.js offers 10 materials out of the box, each of which has its own advantages and customizable parameters. We will consider only some of the most useful.
MeshNormalMaterial
Useful for quick start and start.
We will start with MeshNormalMaterial , the multicolor material we used in the examples above. It corresponds to the normal vectors in the RGB panel, in other words, colors are used to determine the position of the vector in 3D space.
const material = new THREE.MeshNormalMaterial();
Note that if you want to change the color of the material, you can use the CSS filter and change the saturation:
filter: hue-rotate(90deg) .
In my experience, this material is more useful for a quick stratum and launch. For more control of your objects, it is better to use something else.
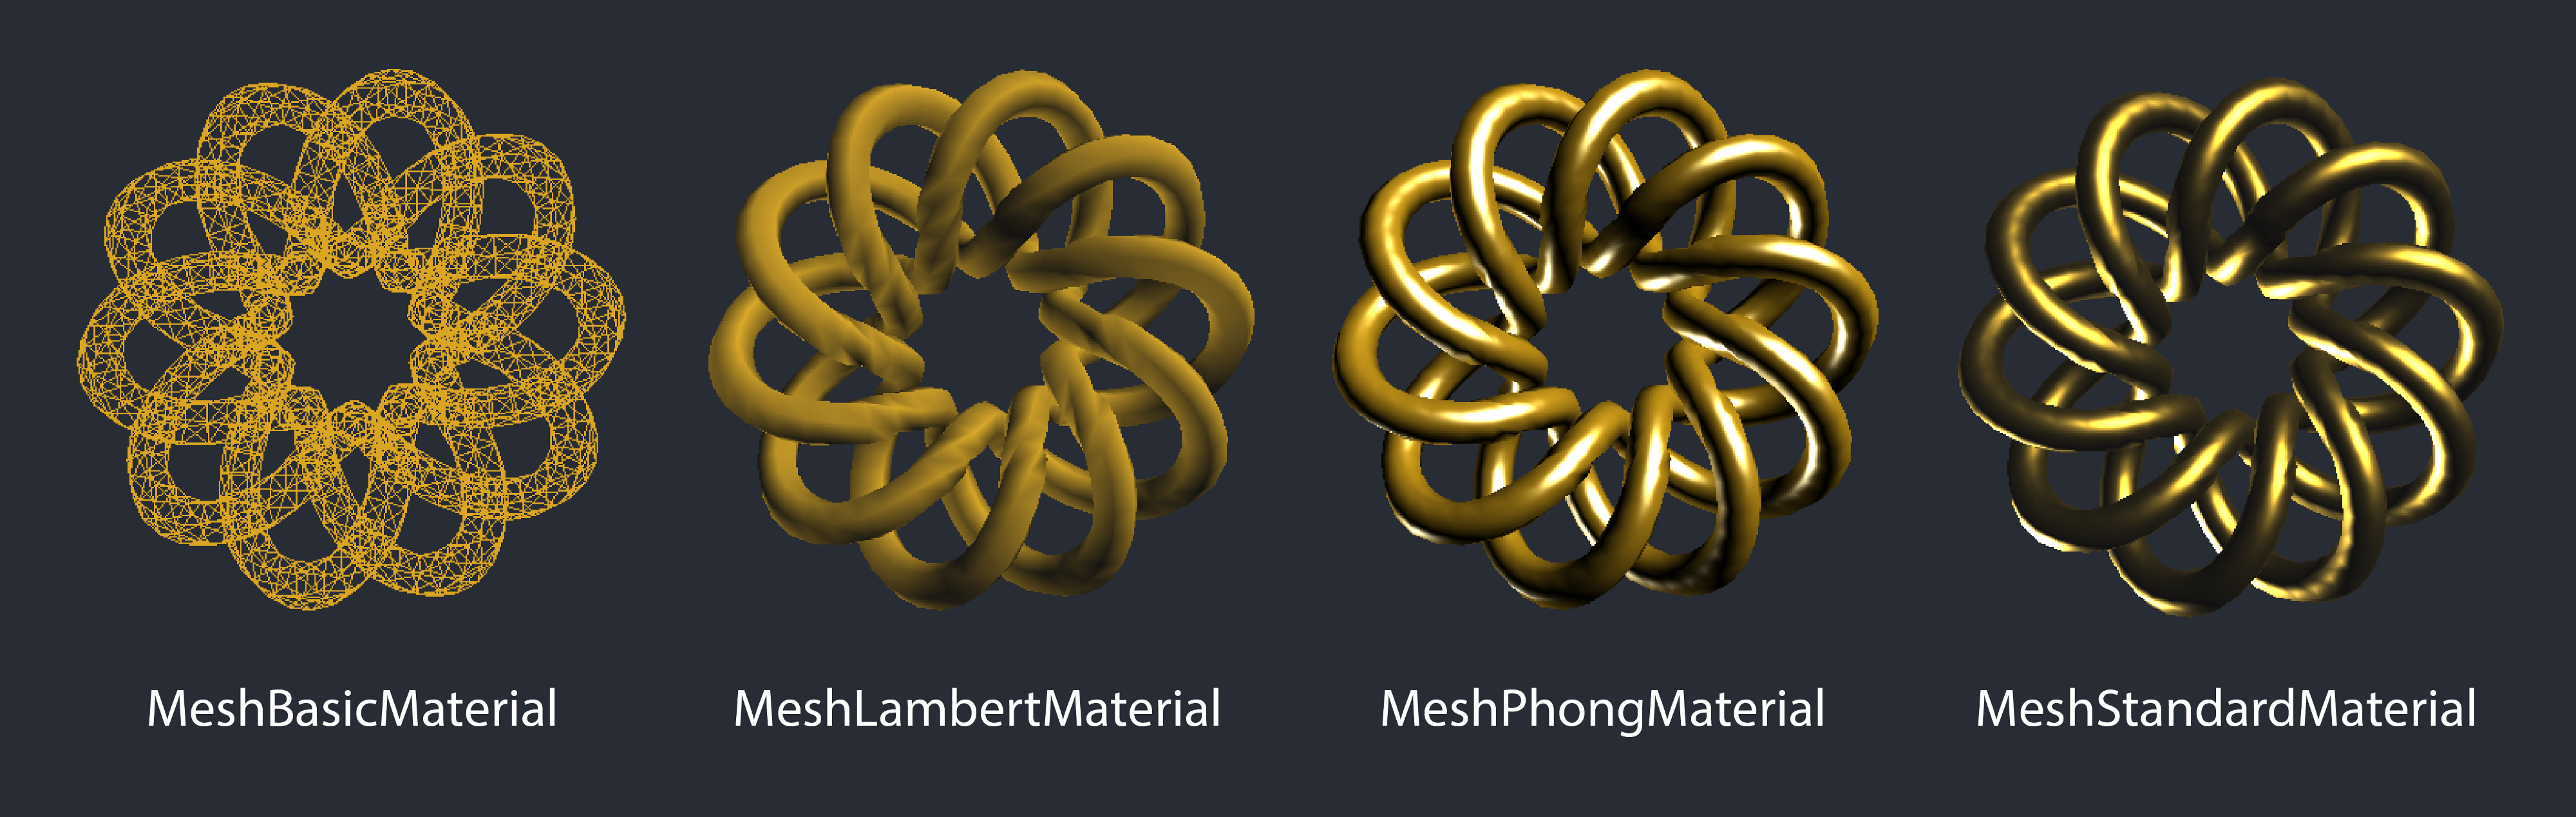
Meshbasicmaterial
Useful when displaying only the skeleton.
If you want to give the figure a single color, then you can use MeshBasicMaterial only if lighting is not applied. I found it useful to use that material in rendering the skeleton of the model. To draw only the skeleton, you need to pass {wireframe: true} as a parameter.
const material = new THREE.MeshBasicMaterial({ wireframe: true, color: 0xdaa520 });
The main disadvantage of this material is that information about the depth of the material is completely lost. Each material has the option to display only the skeleton, but only one material solves the problem of lack of depth - MeshDepthMaterial
MeshLambertMaterial
Useful for high performance but low accuracy.
This is the first material that takes light into account, so you need to add some light to our scene. In the code below, we add spotlights with a yellow tint to create a warmer effect.
const scene = new THREE.Scene(); const frontSpot = new THREE.SpotLight(0xeeeece); frontSpot.position.set(1000, 1000, 1000); scene.add(frontSpot); const frontSpot2 = new THREE.SpotLight(0xddddce); frontSpot2.position.set(-500, -500, -500); scene.add(frontSpot2);
Now add material for our figure. Since our figure is like a decoration, I suggest adding a more golden color. Another parameter, emissive , is the color of the object coming from the object itself (without a light source). Often it works better as a dark color - for example, as dark shades of gray, as in the example below
const material = new THREE.MeshLambertMaterial({ color: 0xdaa520, emissive: 0x111111, });
As you can see in the example below, the color is more or less correct, but the way it interacts with the light does not add realism. To fix this, we need to use MeshPhongMaterial or MeshStandardMaterial.
MeshPhongMaterial
Useful for medium performance and medium accuracy.
This material offers a compromise between performance and rendering accuracy, so this material is a good option for an application that needs to be productive along with more accurate rendering than with MeshLambertMaterial.
Now we can change the specular property which affects the brightness and color of the surface reflection. If the emissive property is usually dark, then specular works best for light colors. Below we use light gray.
const material = new THREE.MeshPhongMaterial({ color: 0xdaa520, emissive: 0x000000, specular: 0xbcbcbc, });
Visually, the image from above reflects the light more convincingly, but still not perfect. White light is too bright and the material looks more ribbed than metallic (and we strive for this). We can get a better result using MeshStandardMaterial.
MeshStandartMaterial
Useful for high accuracy but low productivity.
This is the most accurate material of all, although its use will entail the costs of using more power. MeshStandartMaterial is used with additional metalness and roughness parameters, each of which takes a value between 0 and 1.
The metalness parameter affects how the object reflects, becoming closer to the nature of the metal. This is because conductive materials like metals have different reflective properties, unlike dielectrics such as ceramics.
Roughness adds an extra layer for customization. You can imagine it as the opposite of glossy: 0 - very glossy, 1 - very matte.
const material = new THREE.MeshStandardMaterial({ color: 0xfcc742, emissive: 0x111111, specular: 0xffffff, metalness: 1, roughness: 0.55, });
This is the most realistic material presented in Three.js, but also the most resource-intensive.
The materials that we discussed below are the ones that I met most often and you can see all the options in the dock.
Loaders
As we discussed above, you can manually define geometry and polygon meshes. In practice, people often load their geometries from files. Fortunately, Three.js has few supported downloaders that support many 3D formats.
The main ObjectLoader loads the JSON file using the JSON Object / Scene format . Most bootloaders need to be imported manually. You can find a complete list of supported bootloaders here and import them. Below is a small list of what you can import.
// GLTF import { GLTFLoader } from 'three/examples/jsm/loaders/GLTFLoader.js'; // OBJ import { OBJLoader } from 'three/examples/jsm/loaders/OBJLoader.js'; // STL import { STLLoader } from 'three/examples/jsm/loaders/STLLoader.js'; // FBX import { FBXLoader } from 'three/examples/jsm/loaders/FBXLoader.js'; // 3MF import { 3MFLoader } from 'three/examples/jsm/loaders/3MFLoader.js';
The recommended format for online viewing is GLTF, because the format is “aimed at delivering assets in runtime, compact for transfer, and fast for download”.
Of course, there can be many reasons to prefer a certain type of file (for example, if quality is a priority or accuracy is needed for 3D printing). The best online performance will be when importing GLTF.
import { GLTFLoader } from 'three/examples/jsm/loaders/GLTFLoader.js'; import model from '../models/sample.gltf'; let loader = new GLTFLoader(); loader.load(model, function (geometry) { // if the model is loaded successfully, add it to your scene here }, undefined, function (err) { console.error(err); });
Putting it all together
One of the reasons why Three.js may seem intimidating is that you can create something from scratch with just a couple of lines of code. In each example above, we needed to create a scene and a camera. To simplify, I kept this code outside the scope of the review, but for now we will see how it will look together.
The way you organize your code is up to you. In simpler examples, such as in this article, it makes sense to write all the code in one place. But in practice, it is useful to separate the individual elements for the possibility of expanding the code base and its management.
For simplicity, we will consider elements that are drawn as a single object, so we will put all the code in one file.
// Import dependencies import * as THREE from 'three'; import { OrbitControls } from 'three/examples/jsm/controls/OrbitControls.js'; // const scene = new THREE.Scene(); scene.background = new THREE.Color(0x282c34); // , const camera = new THREE.PerspectiveCamera(75, window.innerWidth / window.innerHeight, 0.1, 10000); camera.position.z = 5; // "" const renderer = new THREE.WebGLRenderer(); renderer.setSize(window.innerWidth, window.innerHeight); // DOM renderer.domElement document.getElementById('threejs').appendChild(renderer.domElement); // , DOM let controls = new OrbitControls(camera, document.getElementById('threejs')); controls.target.set(0, 0, 0); controls.rotateSpeed = 0.5; controls.update(); // ( ) const geometry = new THREE.TorusKnotGeometry(10, 1.3, 500, 6, 6, 20); // const material = new THREE.MeshStandardMaterial({ color: 0xfcc742, emissive: 0x111111, specular: 0xffffff, metalness: 1, roughness: 0.55, }); // , const mesh = new THREE.Mesh(geometry, material); mesh.scale.x = 0.1; mesh.scale.y = 0.1; mesh.scale.z = 0.1; scene.add(mesh); // , const frontSpot = new THREE.SpotLight(0xeeeece); const frontSpot2 = new THREE.SpotLight(0xddddce); frontSpot.position.set(1000, 1000, 1000); frontSpot2.position.set(-500, -500, -500); scene.add(frontSpot); scene.add(frontSpot2); // , const animate = function () { requestAnimationFrame(animate); mesh.rotation.x += 0.005; mesh.rotation.y += 0.005; mesh.rotation.z += 0.005; renderer.render(scene, camera); }; // animate();
Do I need to use a framework?
Finally, it's time to discuss whether to use Three.js with your favorite framework? At the moment, there is a good react-three-fiber package for React. For React users, there are obvious advantages to using a package like this - you maintain a structure for working with components that allows you to reuse code.
For beginners, I recommend starting with the usual Vanila JS , because most of the online material written about Three.js relates to Three.js on Vanila JS. Based on my learning experience, this can be confusing and difficult to learn through a package - for example, you will have to translate Three.js objects and methods to components and props. (as soon as you learn Three.js you can use any package).
How to add Three.js to the framework
Three.js provides an HTML object (most often called renderer.domElement ) that can be added to any HTML object in your application. For example, if you have a div with id = ”threejs” you can simply include the following code in your Three.js code:
document.getElementById('threejs').appendChild(renderer.domElement);
Some frameworks have preferred paths to access the DOM nodes of the tree. For example, ref in React, $ ref in Vue or ngRef in Angular and it looks like a massive plus against the background of direct access to DOM elements. As an example, let's look at a quick implementation for React.
Strategy for React
If you use React, then there is one way to embed Three.js files into one of your components. In the file ThreeEntryPoint.js we will write the following code:
export default function ThreeEntryPoint(sceneRef) { let renderer = new THREE.WebGLRenderer(); // ... sceneRef.appendChild(renderer.domElement); }
We export this as a function that takes one argument: a reference to an element in our component. Now we can create our component
import React, { Component } from 'react'; import ThreeEntryPoint from './threejs/ThreeEntryPoint'; export default class ThreeContainer extends Component { componentDidMount() { ThreeEntryPoint(this.scene); } render() { return ( <> <div ref={element => this.scene = element} /> </> ); } }
The imported ThreeEntryPoint function must be called in the componentDidMount method and pass the new div as an argument using references
As an example of this approach in action, you can clone the repository and try it yourself: https://github.com/BretCameron/three-js-sample .
Conclusion
There is still a lot that I can talk about Three.js, but I hope that this article has given you enough information to start using this powerful technology. When I started to learn Three.js, I could not find a single resource like this article, so I hope I helped make this technology more accessible for beginners.