The world is becoming more interconnected - the number of people with access to the Internet has grown to 4.5 billion .

But this data does not reflect the number of people who have a slow or broken Internet connection. Even in the United States, 4.9 million homes cannot access wired Internet access at speeds of over 3 megabits per second.
The rest of the world — those with reliable Internet access — is still prone to losing connectivity. Some factors that may affect the quality of your network connection include:
- Bad coverage from the provider.
- Extreme weather conditions.
- Power outages.
- Users who fall into dead zones, such as buildings that block their network connections.
- Train travel and tunnel travel.
- Connections that are controlled by a third party and are time limited.
- Cultural practices that require limited or no Internet access at specific times or days.
Given this, it is clear that we must take into account autonomous experience when developing and creating applications.
I recently had the opportunity to add autonomy to an existing application using service workers, cache storage and IndexedDB. The technical work necessary for the application to work offline was reduced to four separate tasks, which I will discuss in this post.
This article was translated with the support of EDISON Software, a company that performs excellent orders from South China , and also develops web applications and sites .
Service workers
Applications created for offline use should not be highly network dependent. Conceptually, this is only possible if emergency options exist in the event of a failure.
If the web application fails to load, we must take the resources for the browser somewhere (HTML / CSS / JavaScript). Where do these resources come from, if not from a network request? How about a cache. Most people would agree that it is better to provide a potentially outdated user interface than a blank page.
The browser constantly queries data. The data caching service as a fallback still requires us to somehow intercept browser requests and write caching rules. This is where service workers come into play - think of them as an intermediary.
Service worker is just a JavaScript file in which we can subscribe to events and write our own rules for caching and handling network failures.
Let's start.
Please note: our demo application
Throughout this post, we will add stand-alone functions to the demo application. The demo application is a simple page for taking / renting books in the library. Progress will be presented as a series of GIFs, and the use of offline Chrome DevTools simulations.
Here is the initial state:

Task 1 - Caching Static Resources
Static resources are resources that do not change often. HTML, CSS, JavaScript, and images may fall into this category. The browser tries to load static resources using requests that can be intercepted by the service worker.
Let's start by registering our service worker.
if ('serviceWorker' in navigator) { window.addEventListener('load', function() { navigator.serviceWorker.register('/sw.js'); }); }
Service workers are web workers under the hood and therefore must be imported from a separate JavaScript file. Registration takes place using the
register
method after loading the site.
Now that we have a service worker loaded, let's cache our static resources.
var CACHE_NAME = 'my-offline-cache'; var urlsToCache = [ '/', '/static/css/main.c9699bb9.css', '/static/js/main.99348925.js' ]; self.addEventListener('install', function(event) { event.waitUntil( caches.open(CACHE_NAME) .then(function(cache) { return cache.addAll(urlsToCache); }) ); });
Since we control the URLs of static resources, we can cache them immediately after the service worker’s initialization using
Cache Storage
.
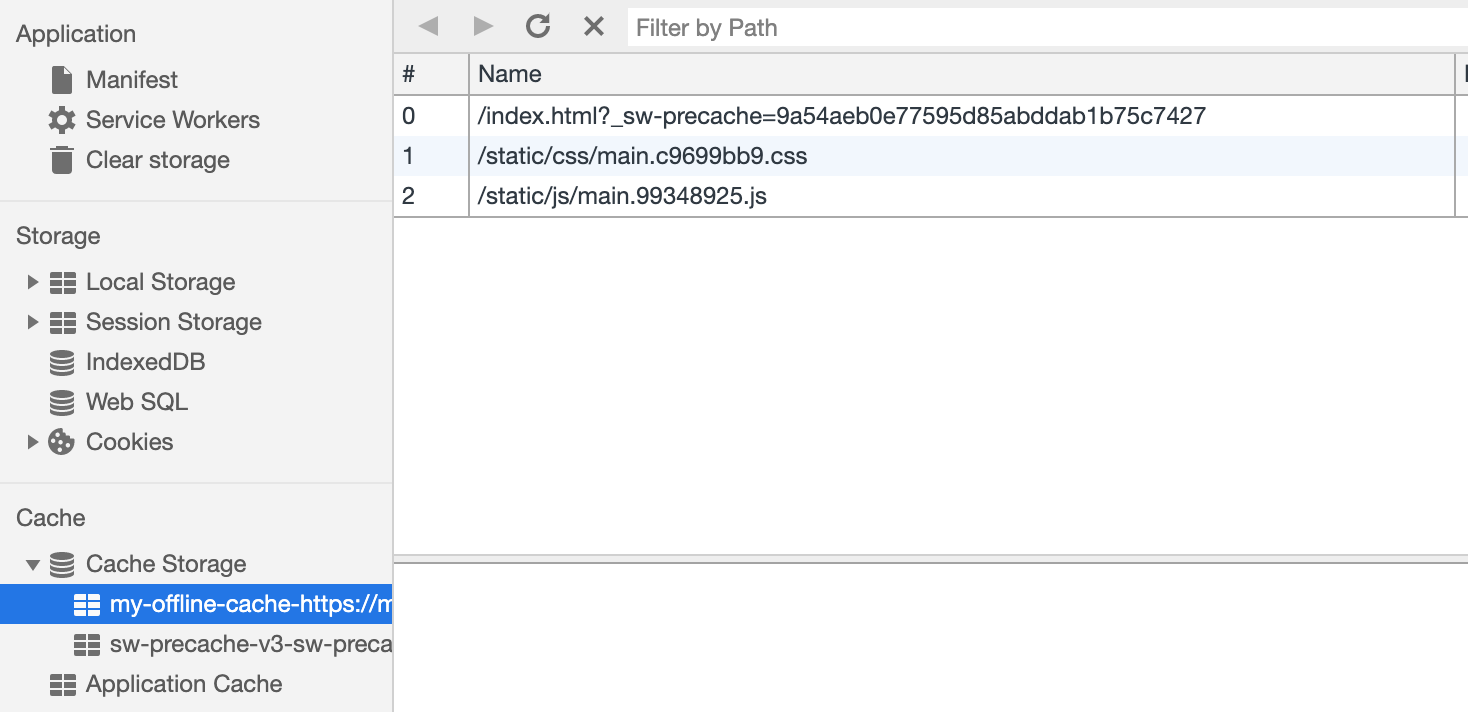
Now that our cache is full of the most recently requested static resources, let's load these resources from the cache in the event of a request failure.
self.addEventListener('fetch', function(event) { event.respondWith( fetch(event.request).catch(function() { caches.match(event.request).then(function(response) { return response; } ); ); });
The
fetch
event is fired every time the browser makes a request. Our new
fetch
event handler now has additional logic for returning cached responses in case of network outages.
Demo number 1

Our demo application can now serve static resources offline! But where is our data?
Task 2 - Caching Dynamic Resources
Single-page applications (SPA) usually request data gradually after the initial loading of the page, and our demo application is no exception - the list of books is not loaded immediately. This data usually comes from XHR requests that return responses that change frequently to provide a new state for the application — thus they are dynamic.
Caching dynamic resources is actually very similar to caching static resources - the main difference is that we need to update the cache more often. Generating a complete list of all possible dynamic XHR requests is also quite difficult, so we will cache them as they arrive, rather than having a predefined list, as we did for static resources.
Take a look at our
fetch
handler:
self.addEventListener('fetch', function(event) { event.respondWith( fetch(event.request).catch(function() { caches.match(event.request).then(function(response) { return response; } ); ); });
We can customize this implementation by adding some code that caches successful requests and responses. This ensures that we constantly add new requests to our cache and constantly update cached data.
self.addEventListener('fetch', function(event) { event.respondWith( fetch(event.request) .then(function(response) { caches.open(CACHE_NAME).then(function(cache) { cache.put(event.request, response); }); }) .catch(function() { caches.match(event.request).then(function(response) { return response; } ); ); });
Our
Cache Storage
currently has several entries.

Demo number 2

Our demo now looks the same on boot, regardless of our network status!
Fine. Let's now try to use our application.
Unfortunately, error messages are everywhere. It seems that all our interactions with the interface do not work. I can not choose or hand over the book! What needs to be fixed?
Task 3 - Build an Optimistic User Interface
At the moment, the problem with our application is that our data collection logic is still highly dependent on network responses. The check-in or check-out action sends a request to the server and expects a successful response. This is great for data consistency, but bad for our standalone experience.
For these interactions to work offline, we need to make our application more optimistic . Optimistic interactions do not require a response from the server and willingly display an updated view of the data. The usual optimistic operation in most web applications is
delete
- why not give the user instant feedback if we already have all the necessary information?
Disconnecting our application from the network using an optimistic approach is relatively easy to implement.
case CHECK_OUT_SUCCESS: case CHECK_OUT_FAILURE: list = [...state.list]; list.push(action.payload); return { ...state, list, }; case CHECK_IN_SUCCESS: case CHECK_IN_FAILURE; list = [...state.list]; for (let i = 0; i < list.length; i++) { if (list[i].id === action.payload.id) { list.splice(i, 1, action.payload); } } return { ...state, list, };
The key is to handle user actions the same way - regardless of whether the network request is successful or not. The above code fragment is taken from the redux reducer of our application,
SUCCESS
and
FAILURE
launched depending on the availability of the network. Regardless of how the network request is completed, we are going to update our list of books.
Demo number 3
User interaction now occurs online (not literally). The “check-in” and “check-out” buttons update the interface accordingly, although the console’s red messages show that network requests are not being executed.
Good! There is only one small problem with optimistic offline rendering ...
Don't we lose our change !?

Task 4 - Queue user actions for synchronization
We need to track the actions performed by the user when he was offline, so that we can synchronize them with our server when the user returns to the network. There are several storage mechanisms in the browser that can act as a queue of actions, and we are going to use IndexedDB. IndexedDB provides a few things you won’t get from LocalStorage:
- Asynchronous non-blocking operations
- Significantly higher storage limits
- Transaction management
Look at our old reducer code:
case CHECK_OUT_SUCCESS: case CHECK_OUT_FAILURE: list = [...state.list]; list.push(action.payload); return { ...state, list, }; case CHECK_IN_SUCCESS: case CHECK_IN_FAILURE; list = [...state.list]; for (let i = 0; i < list.length; i++) { if (list[i].id === action.payload.id) { list.splice(i, 1, action.payload); } } return { ...state, list, };
Let's modify it to store the check-in and check-out events in IndexedDB on the
FAILURE
event.
case CHECK_OUT_FAILURE: list = [...state.list]; list.push(action.payload); addToDB(action); // QUEUE IT UP return { ...state, list, }; case CHECK_IN_FAILURE; list = [...state.list]; for (let i = 0; i < list.length; i++) { if (list[i].id === action.payload.id) { list.splice(i, 1, action.payload); addToDB(action); // QUEUE IT UP } } return { ...state, list, };
Here is the implementation of creating IndexedDB along with the addToDB
addToDB
.
let db = indexedDB.open('actions', 1); db.onupgradeneeded = function(event) { let db = event.target.result; db.createObjectStore('requests', { autoIncrement: true }); }; const addToDB = action => { var db = indexedDB.open('actions', 1); db.onsuccess = function(event) { var db = event.target.result; var objStore = db .transaction(['requests'], 'readwrite') .objectStore('requests'); objStore.add(action); }; };
Now that all of our offline user actions are stored in the browser’s memory, we can use the
online
browser event listener to synchronize data when the connection is restored.
window.addEventListener('online', () => { const db = indexedDB.open('actions', 1); db.onsuccess = function(event) { let db = event.target.result; let objStore = db .transaction(['requests'], 'readwrite') .objectStore('requests'); objStore.getAll().onsuccess = function(event) { let requests = event.target.result; for (let request of requests) { send(request); // sync with the server } }; }; });
At this stage, we can clear the queue of all requests that we successfully sent to the server.
Demo number 4
The final demo looks a little more complicated. On the right, in the dark terminal window, all API activity is logged. The demo involves going offline, selecting multiple books and returning online.
It is clear that requests made offline were queued and sent at once when the user returns online.
This reproduction approach is a bit naive - for example, we probably don't need to make two requests if we take and return the same book. It will also not work if several people use the same application.
It's all
Get out and make your web applications offline! This post demonstrates some of the many things you can do to add standalone features to your applications, and is definitely not exhaustive.
To learn more, check out Google Web Fundamentals . To see another offline implementation, check out this talk .