
The last two years I have been developing my own IoT platform and today I am ready to show its alpha version.
Together with a partner, we create and support IoT devices. We dismantled more than one rake shed in the process of this activity. ThingJS was born not so much out of desire as out of the need to make life easier for us, but at the same time, I hope, to you as well.
The article will be interesting to people who are close to the topic of IoT and they have already done something in this area. An important note is that the platform should be of interest (suddenly) to JavaScript developers, as this language is chosen as the basis of the platform. Of course, C / C ++ developers will also have something to read.
First, I’ll talk about what key problems we encountered while developing IoT devices, then I will describe how the platform handles them, and in the end, it’s all boring: the video , the technical part, and you can touch everything live .
IoT issues:
- The problem of short arms
IoT is based on an ecosystem. The development of its concept and technical architecture is really a lot of work. In addition, you still need to develop a bunch of firmware for heterogeneous devices. To invent and implement transport for the exchange of data between devices on various physical and logical principles. Expand cloud resources. Work out user interfaces. Etc. etc.
Even if an individual specialist has the necessary skills to do this, then he simply does not have enough time (hands) to implement such an idea. While he will cut it, she will become obsolete.
- The problem of the tower of Babel
Developing a full-fledged IoT ecosystem requires a very wide technological stack. Being a full stack in IoT is straightforward ... difficult. Need experience everywhere. Not everyone can boast of such a wide range of knowledge, and even experience. And here the question is not in mental abilities. This is an obvious conclusion from the short-hand problem.
To create a truly wealthy ecosystem requires the work of many fairly narrow specialists, but with in-depth knowledge in their field. These specialists speak different languages, use different patterns, and often they understand elementary terms in different ways. And given that IoT is based on devices with limited resources, effective communications are critical to the realization of what is intended.
- The problem of Stockholm syndrome
Today there are vendors who develop their ecosystems. These are Google, Microsoft, Yandex, Megaphone, MTS, etc. Some of them allow you to integrate your own things into their ecosystems on their terms. This largely covers the problems described above. But creates a new one - addiction. And vendors like to change the conditions for integration. And even more so, there is no question of self-realization in this paradigm.
Problem solution:
- Community, addiction, fashionable, youth
The problems described above, in fact, block access to IoT development for individuals. The development of the platform was launched with the awareness of these problems. The foundation was laid for the development of the platform through the community.
To implement this idea, the platform, of course, comes with an open code base, and also has a dependency paradigm on all layers.
If you don't know what addictions are, it's time to get to know them. But if you try to explain it very simply, then the module you are developing may depend on another that your friend writes. And you will access its module via a predefined interface.
Thus, at the same time, independently, many people can develop their own platform components and reuse existing ones developed by someone. This fundamentally solves the problem of short hands.

Also, the problem of the “Tower of Babel” is being solved. Dependencies are built so that the various levels of the platform, developed in different languages, have a predetermined mechanism for building dependencies among themselves.
For example, a C developer can take advantage of a ready-made front-end component by providing him with the required interface. Or, on the contrary, the front-end developer can use a ready-made component written in C. That is everyone will do what he knows best.
- More promises and abstractions
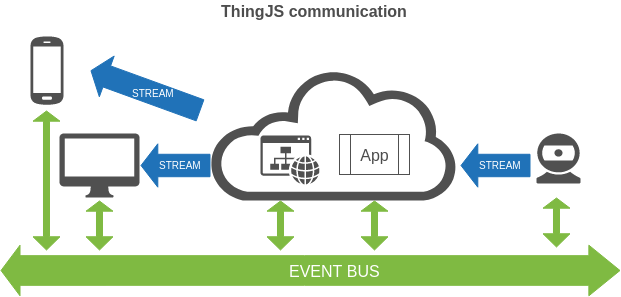
Communication protocol between devices is undefined. Instead, there is an abstraction - a data bus. The device can send an event to the bus or listen to the bus. It is not clear who writes to the bus and who receives, in advance. And when too. Asynchronous data exchange and delivery is not guaranteed. In general - hell. No panic. So conceived.
The thing is that the ecosystem is a group of separate, self-sufficient devices. At any given time, some devices may not be available. For various reasons. To stop the activity of other devices if a part is unavailable is not the best scenario. It is necessary to legalize that which cannot be prevented.
The platform implements the paradigm of promises to provide events. The first device subscribes to the promise of the second to give him information. But there are no guarantees. The subscriber must decide what to do in case of untimely provision of data to him.
The synchronous communication problem is solved by transmitting events via the bus with links to synchronous channels. The synchronous channel protocol is determined by the type of event itself. For example, you can send an event with the type “do-render-video-stream” and how to send IP WEB cameras as payload. Thus, the recipient will know that you need to play the video stream from the specified address.
But how does the bus physically work? The implementation of the bus rests with the community. The tire expands with the transport that your project requires. For example, an event is received over http and relayed over UART. For all elements of the ecosystem, outwardly nothing will change.
- Virtual IoT devices
For ThingJS, a thing is not only a physical thing, but also a special application - a virtual thing. Moreover, a physical thing can contain several virtual things (applications) that use the resources of a physical thing.
This approach allows you to unify the interaction between the conditional backend (controller / server / cloud, etc.) and frontend (browser, application, etc.), as well as b2b and even f2f. Build a matrix, not a hierarchy of interactions.

A simple example would be a WEB camera, which in itself has a virtual thing - a user interface. When the user goes to the address http://192.168.4.1 , the WEB page opens, where the virtual thing begins to “live”. The camera (physical thing) and page (virtual thing) automatically become an ecosystem where a unified data bus is available. Through it, the virtual thing communicates with the physical. In this case: the physical thing tells the virtual thing via the bus the address of the video stream, its state, etc., and the virtual one shows the user the video and gives the necessary commands to the physical thing.
The logical extension is the ability to host virtual things in the clouds and include them in a common ecosystem. And this, in turn, allows you to create virtual devices with huge resources that solve problems, for example, available for AI.
You can create such devices yourself, or use already created ones. Stockholm syndrome is defeated. You yourself determine what your project depends on and how you will develop it.
Technical information
ThingJS Application Structure
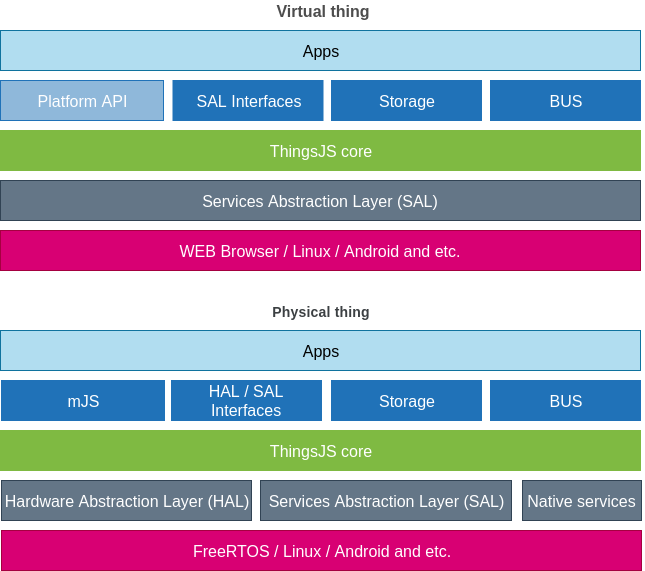
Technology stack
The hardware platform selected is the ESP32 controller. The platform was designed as hardware independent. But, unfortunately, there was no time to partition on other devices.
The firmware recommended by Espressif is used to develop the firmware. The firmware is developed in C. The cmake collector. The project uses the component concept, also promoted by Espressif.
In addition to esp-idf, Mongoose WEB Server is used , as well as the modified JavaScript interpreter Mongoose mJS .
For application development, JavaScript is used with the VUE 2 framework. Applications are built using webpack. The package manager is npm. As a basis for the development environment, the VUE CLI was used .
In order to standardize application visualization and ease the pangs of UI creativity, the vuetifyjs package is included in the platform.
Development Environment Features
For JavaScript developers (virtual things):
- Recommended IDE - WEBStorm;
- All profits that VUE CLI and IDE gives;
- Intra-system debugging of applications (mJS debugger on the controller);
- MJS implements the debugger command, which allows you to call the debugger in an arbitrary place;
- Hot upload of updated files to the controller during development (JavaScript developers already cannot live without this feature);
- Runtime development is paired with a real controller. You program and, right there, you see the result on the hardware;
- Configured ESLint to understand platform objects.
For C developers (physical things):
- Recommended IDE - CLion;
- All profits esp-idf and IDE;
- The platform is divided into components as part of the esp-idf concept;
- Easy integration with native components platform.
Supported Devices
Only ESP32 is currently supported. The chip is popular due to its availability with amazing technical characteristics. Based on it, a lot of ready-made IoT devices have been created that can be used under the control of ThingJS.
Comparison with competitors
I suggest not to run so far. I don’t dare to call commercial platforms competitors. And open-source appear and disappear without leaving a noticeable trace. Therefore, I did not make a comparison. However, if someone has a desire, I am ready to post the result of his work here.
Fast start
I just have to watch
I want to try
In order to try the platform on real hardware, you will need any device based on ESP32 with flash 4mb and the ability to flash it via USB. But ESP32 core board v2 is best suited.

You can buy such things without any problems on Aliexpress or Ebay. Moreover, there are even representative offices in Russia. I personally buy in St. Petersburg .
In order to test the operation of the test application “Blink”, you need to connect an LED. Some board versions have a pre-installed LED connected to GPIO2. If you have such a board, then you can do nothing. Blink should work without unnecessary movements. If you have only one diode (power supply), you will have to connect the indicator diode yourself. This is nothing complicated.
You will need any indicator LED and resistance from 1 to 5K.

The only thing left is to deploy the user package on the device. You can take it here . Deployment instructions are located there.
Blink app
Assembly from source
Blink is a simple ecosystem consisting of one virtual device that implements a user interface, and one physical. A virtual device starts from a physical device when accessing it through a browser.
The script is simple. When installing the application on a physical device, the LED (previously connected to it) starts flashing at a frequency of 1 Hz. The user can turn on or off the blinking of the diode from the interface. You can watch the video in the “I can only watch” section.
Sources are in the src / applications / blink repository . In order to collect blink and play with it, you only need this repository. Make sure you already have git, npm, and nodejs installed.
git clone --branch alpha https://github.com/rpiontik/ThingJS-front cd ThingJS-front npm install npm run build
If everything went smoothly, you will end up with something like the following:
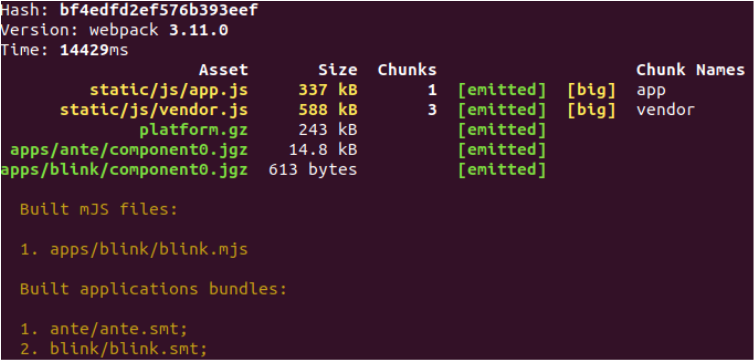
Congratulations! You have compiled your first ThingJS app. You can find it in the dist / apps / blink folder and immediately try to install it on the device, guided by the video from the "I can only watch" section.
Application Composition
| File | Description |
|---|---|
| scripts / blink.js | The script that is installed on the controller |
| blink.js | Application component mount point |
| Blink.vue | VUE component that implements the user interface |
| favicon.svg | Application icon |
| langs.js | Application Language Pack |
| manifest.json | Application manifest |
You can get acquainted with all the details of the application yourself. I will focus on several files.
manifest.json
{ "name": "Blink", "vendor" : "rpiontik", "version" : 1, "subversion" : 0, "patch" : 0, "description": { "ru": " ", "en": "Blink Example" }, "components": {...}, "scripts": {...}, "requires" : {...} }
As the name of the file indicates, this is the application manifest. It has general metadata about the purpose of which is easy to guess. In addition to them, there are three important blocks. Let's look at them closely:
Components block
"components": { "blink-app": { "source": "blink.js", "intent_filter": [ { "action": "thingjs.intent.action.MAIN", "category": "thingjs.intent.category.LAUNCH" } ] } }
The block describes the entire component base of the application. The “source” field points to the mount point of the component (see blink.js) and is the assembly entry point for webpack ( entry ). Thus, each component will be issued in a separate bundle. This bundle will be loaded as needed ( lazy load ).
An important structure is intent_filter . If you happen to program for Android, you will find something familiar to you. And do not be mistaken. The system generates interface and service events to which the component subscribes. If an event occurs that satisfies the filtering conditions, the component will be loaded and control will be transferred to the mount point.
In this case, the “blink-app” component is subscribed to the launch event of the main interface component of the application. When the launcher starts the application, it is this component that will be introduced.
If you modify the manifest by changing the line
thingjs.intent.category.LAUNCH >> thingjs.intent.category.PREFERENCE
, then after its assembly and installation it turns out that the application has stopped opening on the desktop. But a new “tile” appeared in the “Settings” section. At the same time, nothing has changed functionally.
Thus, we indicated to the launcher that this component is an interface element for customizing our application. And this component began to appear in the settings.
Scripts block
"scripts": { "entry": "blink", "subscriptions" : ["$-script-restart", "blink"], "modules": { "blink": { "hot_reload": true, "source": "scripts/blink.js", "optimize": false } } }
This block is similar in function to the “components” block, but it describes the application component base on the controller side.
It clearly indicates the entry point. In the “entry” field. Separately, I note that when installing the application, the script does not start immediately. It is launched only when one of the events to which the script is subscribed occurs.
For subscriptions, the “subscriptions” field is responsible. Now it indicates two events:
- $ -script-restart - occurs when the system starts or restarts;
- blink is a custom event that is relevant to the blink ecosystem.
In the “modules” block, the description of the scripts follows. I will note two fields:
- hot_reload - if this field is set to true, then when a file is changed in development mode, it will automatically be downloaded to the controller (hot reload);
- optimize - if true, then when building the project, the script will be optimized and aggregated.
The “requires” block
"requires" : { "interfaces" : { "blink" : { "type" : "bit_port", "required" : true, "default" : 2, "description" : { "ru" : "LED ", "en" : "LED indicator" } } } }
You probably already noticed that when installing the application you need to select the pin on which the LED will flash. However, by default it is already selected as GPIO2. This block is responsible for these settings.
In this block dependencies are indicated. In this case, in order for the application to function, it needs to provide an interface with the type “bit_port”. This interface is a required requirement (required = true) and by default, GPIO2 is specified (default = 2). It will be projected into the script with the name “blink”.
When installing the application, the profile of the equipment on which the scripts will be deployed is taken into account. This profile lists the available interfaces and the available hardware resources for them (in particular, pins and their combinations). Checks the compatibility of requirements and equipment. If the equipment can meet the requirements of the application, the user is presented with a resource allocation scheme where primary resources are allocated automatically, taking into account recommendations from the manifest. Those. from that same “default” field.
Thus, several applications can be installed on one device, which can share hardware resources among themselves.
blink.js
import App from './Blink.vue'; import Langs from './langs'; $includeLang(Langs); $exportComponent('blink-app', App);
The file is the mount point of the component announced in the manifest (see manifest.js / components). It performs registration of the VUE component 'blink-app' through the abstraction method $ exportComponent, and also records the language pack.
You may ask - why such difficulties? Why not immediately register the VUE component that you specify in source? The fact is that the manifest describes public components. These components may be requested by third-party applications (runtime dependencies). The mount point, in turn, can register related components (for internal use), as well as services. That is, prepare the component environment.
Blink.vue
export default { name: 'Blink', watch: { blink_state (state) { // Send event to script this.$bus.$emit($consts.EVENTS.UBUS_MESSAGE, 'blink', state); } }, data () { return { blink_state: true }; } };
The code speaks for itself. When the “blink_state” property is changed, a message is sent to the bus ($ bus) with the current value. This is all you need to do so that the script on the controller side receives the desired command.
scripts / blink.js
let active = true; let state = true; // Set port direction $res.blink.direction($res.blink.DIR_MODE_DEF_OUTPUT); // Run background process setInterval(function () { if (active) { // $res - is container with required resources $res.blink.set(state); // Do invert state = !state; } }, 1000); // Event listener // $bus - system bus interface $bus.on(function (event, content, data) { if (event === 'blink') { active = !!JSON.parse(content); } }, null);
In general, the code is very similar to the classic use of a timer in JavaScript. Except that it is not in this dialect of JavaScript. It is implemented in the platform. Meet this mJS . You can learn more about it on the official page of the project.
For the needs of the platform, the dialect is finalized. Timers have been introduced, as well as such a useful command as “debugger”. Well, the debugger itself. More on this separately in the section "Development Environment" .
Pay attention to the global objects of the platform. They are named with the “$” character.
- $ res - contains resources that are allocated to the script;
- $ bus - bus interface.
Because the application requested an interface with the type “bit_port” (see profile.json / requires) and the name “blink”, it was given to it as $ res.blink. The interface implements only three functions:
- set (value) - set the GPIO level
- get () - get the current GPIO level
- direction (value) - set GPIO mode
For the direction function, the available constants are described through the same interface $ res.blink .: DIR_MODE_DISABLE; DIR_MODE_DEF_INPUT; DIR_MODE_DEF_OUTPUT; DIR_MODE_INPUT_OUTPUT_OD; DIR_MODE_INPUT_OUTPUT.
Subscribing to bus events is done through the $ bus.on method. In this case, all events to which the script is subscribed will come to the handler. The handler accepts three parameters:
- event - event identifier. In this case, only two are possible: “$ -script-restart” and “blink”. Of which only one is processed - blink. Subscription to the second one is only necessary for the script to be launched immediately at system startup.
- content - data may come with the event. Their size is limited to 126 bytes, taking into account the length of the event identifier.
- data - data that is transmitted when subscribing to the event as a second parameter. And in this case, they are null.
Interfaces are extensible. Below you will find a description of how to create your own interface.
Interface implementation
ThingJS allows you to expand available hardware and service resources through special interfaces. You can independently create an interface that will implement any complex, accurate, loaded, etc. functional.
For example, you can implement an integration interface with your cloud service. Or a background, asynchronous process with which the script will be able to exchange messages. Well, or implement display support. It will be equally easy to make and use. Both you and others. True, for this you need to know C.
Consider the implementation of the bit_port interface, which is used in the Blink example. In order to start, you need to deploy the ThingJS-template alpha release project. The deployment documentation is in the project itself.
git clone --branch alpha https://github.com/rpiontik/ThingJS-template
The project includes components:
- ThingJS-boards - contains device configurations. So far, only ESP32_CORE_BOARD V2 and compatible;
- ThingJS-extern - libraries of third-party projects that ThingJS uses;
- ThingJS-core - platform core;
- ThingJS-front - application development environment;
- ThingJS-stdi - standard interfaces.
We are interested in the ThingJS-stdi project. Its structure is as follows:
| File | Description |
|---|---|
| implementation / tgsi_bit_port.c | Bit_port interface implementation |
| implementation / tgsi_bit_port.h | Bit_pro interface header file |
| CMakeLists.txt | cmake build script |
| README.md | |
| sdti_utils.h | Helpers |
| thingjs_stdi.c | Interface Mount Point |
| thingjs_stdi.h | Mount Point Header File |
In fact, we are only interested in one file - implementation / tgsi_bit_port.c. It contains everything that requires a separate explanation.
void thingjsBitPortRegister(void) { static int thingjs_bit_port_cases[] = DEF_CASES( DEF_CASE(GPIO0), DEF_CASE(GPIO2), DEF_CASE(GPIO3), DEF_CASE(GPIO4), DEF_CASE(GPIO5), DEF_CASE(GPIO12), DEF_CASE(GPIO13), DEF_CASE(GPIO14), DEF_CASE(GPIO15), DEF_CASE(GPIO16), DEF_CASE(GPIO17), DEF_CASE(GPIO18), DEF_CASE(GPIO19), DEF_CASE(GPIO21), DEF_CASE(GPIO22), DEF_CASE(GPIO23), DEF_CASE(GPIO25), DEF_CASE(GPIO26), DEF_CASE(GPIO27), DEF_CASE(GPIO32), DEF_CASE(GPIO33) ); static const struct st_thingjs_interface_manifest interface = { .type = "bit_port", .constructor = thingjsBitPortConstructor, .cases = thingjs_bit_port_cases }; thingjsRegisterInterface(&interface); }
The thingjsBitPortRegister function registers the component in the ThingJS kernel. To do this, it calls the thingjsRegisterInterface function, to which it passes a structure with a description of the interface.
- type - interface identifier. It is he who is specified as the type in the manifest.json file of the application;
- constructor - link to the interface constructor. The function is called every time you need to create a new instance of the interface;
- cases is an array describing possible hardware resources that the interface can use for its work. In this case, these are single GPIOs. But their combinations or dependencies can be separately described.
The interface constructor mounts the interface into the mJS machine.
mjs_val_t thingjsBitPortConstructor(struct mjs *mjs, cJSON *params) { //Validate preset params //The params must have pin number if (!cJSON_IsNumber(params)) return MJS_UNDEFINED; //Get pin number gpio_num_t gpio = params->valueint; //Create mjs object mjs_val_t interface = mjs_mk_object(mjs); /* Configure the IOMUX register for pad BLINK_GPIO (some pads are muxed to GPIO on reset already, but some default to other functions and need to be switched to GPIO. Consult the Technical Reference for a list of pads and their default functions.) */ gpio_pad_select_gpio(gpio); //Add protected property to interface mjs_set(mjs, interface, "gpio", ~0, mjs_mk_number(mjs, gpio)); //Set protected flag mjs_set_protected(mjs, interface, "gpio", ~0, true); //Bind functions mjs_set(mjs, interface, "set", ~0, mjs_mk_foreign_func(mjs, (mjs_func_ptr_t) thingjsBitPortSet)); mjs_set(mjs, interface, "get", ~0, mjs_mk_foreign_func(mjs, (mjs_func_ptr_t) thingjsBitPortGet)); mjs_set(mjs, interface, "direction", ~0, mjs_mk_foreign_func(mjs, (mjs_func_ptr_t) thingjsBitPortDirection)); //Consts mjs_set(mjs, interface, "DIR_MODE_DISABLE", ~0, mjs_mk_number(mjs, GPIO_MODE_DISABLE)); mjs_set(mjs, interface, "DIR_MODE_DEF_INPUT", ~0, mjs_mk_number(mjs, GPIO_MODE_DEF_INPUT)); mjs_set(mjs, interface, "DIR_MODE_DEF_OUTPUT", ~0, mjs_mk_number(mjs, GPIO_MODE_DEF_OUTPUT)); mjs_set(mjs, interface, "DIR_MODE_INPUT_OUTPUT_OD", ~0, mjs_mk_number(mjs, GPIO_MODE_INPUT_OUTPUT_OD)); mjs_set(mjs, interface, "DIR_MODE_INPUT_OUTPUT", ~0, mjs_mk_number(mjs, GPIO_MODE_INPUT_OUTPUT)); //Return mJS interface object return interface; }
How parameters are passed:
- mjs - global execution context;
- params - interface initialization parameters. In this case, this is the GPIO number.
An mJS “interface” object is created, where the methods and properties of the interface are mounted:
- gpio - readonly property in which the number of used GPIO is stored;
- set - method for setting the signal level;
- get - a method of obtaining the current signal level;
- direction - setting the GPIO mode;
Also, constants are mounted with which scripts can operate (DIR_MODE_DISABLE, DIR_MODE_DEF_INPUT, etc.).
After creating the interface, it is mounted under a specific identifier (in the Blink example it is “blink”) in the global $ res object. An example of use can be found in the Blink section ( scripts / blink.js ).
You can format interfaces into separate components or packages. This will allow you to assemble the firmware as lego.
Development environment
Application Development
The application development environment is based on the VUE CLI, which has been refined to meet the needs of the ThingJS platform. This is a hard fork, incl. new features from VUE CLI should be expected if they directly make life much easier.
To deploy your environment, you must clone the ThingJS-front alpha release project. Make sure you already have git, npm, and nodejs installed.
git clone --branch alpha https://github.com/rpiontik/ThingJS-front cd ThingJS-front npm install
When developing, I recommend using the IDE WEBStorm.
The composition and structure of the project inherits from VUE CLI. I will reflect significant differences:
- Reworked build scripts in the build folder.
- An environment variable “HW_DEVICE_URL” has been added to the dev environment config (config / dev.env.js). It must specify a link to the physical device with which you will work.
- The src / applications system folder has appeared. It contains applications that will be built automatically. In particular, it contains two applications: ante (launcher) and blink (application).
- Everything above the src / applications folder is considered platform modules and resources. Of course, you can make changes to them, but in this case, they will appear in the controller only after flashing it. T.ch. Unless you specifically set goals for yourself, it’s better not to touch them.
For trial, you can immediately start the dev-server. Although you cannot fully develop without the physical hardware, this does not interfere with the development of the interface. And so, the dev server starts:
npm run dev
The result should be something like this:

Opening the browser and entering http://0.0.0.0:8080 in the address bar, you will see the platform in development mode:

The interface development process itself is not much different from the classic front-end development on VUE. Except that there are global platform objects that you need to be aware of:
- $ const - contains platform constants, as well as language packs;
- $ bus - data bus;
- $ store - global storage (VUEX).
From the examples you can understand how to use them.
Multilingualism is implemented in the simplest way - through the “lang” filter. Specify a language constant, it is interpreted into text depending on the interface language.
v-bind:label="'BLINK_SATE' | lang"
In order to fully evaluate the capabilities of the development environment, you will need a prepared (stitched) controller. You can assemble the firmware yourself from the project or use the ready-made firmware and utility from here .
After flashing the controller and connecting to the network, you need to make sure that the controller is accessible via IP from your computer. To do this, type http: // [ controller IP ] in the browser. The WEB interface should open.
Now you need to specify the address of the controller in the config / dev.env.js file
'use strict' const merge = require('webpack-merge') const prodEnv = require('./prod.env') module.exports = merge(prodEnv, { NODE_ENV: '"development"', HW_DEVICE_URL: '"http://[IP ]"' //HW_DEVICE_URL: '"http://192.168.8.105"', //HW_DEVICE_URL: '"http://192.168.4.1"', })
If the dev server was started, stop it and restart it. In the future, after changing the build files, configuration, and application manifest, always restart the dev server.
Although when working in a dev environment, all applications that are in the src / application folder as installed are displayed, only those that are really installed on the controller will work fully. This is not a feature, but an alpha bug. In the future, synchronization of hardware and dev-environment will occur automatically. But for now, you need to manually install the application on the controller so that the environment “hooks” it and synchronizes it with what is in dev.
We assemble the application in prod mode:
npm run prod
Install the collected applications on the controller directly. Not through the dev server .
Now you can start development. Any changes you make to the files will automatically start rebuilding the applications and the picture on the screen will change (hot reload). The same rule applies to controller scripts. For example, you can add the debugger command to the blink application script and see the result.
// Event listener // $bus - system bus interface $bus.on(function (event, content, data) { if (event === 'blink') { debugger; active = !!JSON.parse(content); } }, null);
Now, when the state of the checkbox of the Blink application changes, the development environment will throw the following message:

Clicking on the “Start debugger” link will take you to the debugger. The line at which the stop occurred is displayed.

The debugging process itself is not much different from other debuggers.

The debugger is divided into four sections. In the central code itself. Left installed applications on the controller. Their structure and composition. Right, Inspector. The log is displayed below. At the bottom left is the current status of communication with the controller.
The debugging environment is in the process of intensive development. There are many more monitoring and debugging tools to be built. I apologize in advance for possible bugs.
Firmware development
Firmware development is based on the concept proposed by Espressif. I can’t beat the native documentation in this regard.
A repository has been prepared for a quick start. It contains deployment information. For an example of use, see “Implementing an Interface” .
The assembly is very simple and in literally 1-2 hours you will already be assembling the firmware without any problems.
What's next?
Further, if the platform is of interest to the community, it is planned:
- Development of a debugging environment;
- Standardization of naming of interfaces, events, components;
- Detailed platform documentation;
- Cloud hosting for virtual things;
- Runtime repositories
- Partitioning to various finished devices.
Also, I am looking for people who would like to develop the platform with me. It is already very large in scope and ambition. I assume equal cooperation, the purpose of which will be to develop the platform to a full-fledged OpenSource.
To enter the project, you need to make valuable pull-requests to the platform components that interest you.
References
ThingJS Project Resources:
ThingJS:
:
FAQ
.