
The Windows server security topic has been raised more than once, including on this blog. Nevertheless, I would like to once again refresh the memory of old defense methods and talk about little-known new ones. Of course, we will use the built-in tools to the maximum.
So, suppose we have a small company that rents a terminal server in a remote data center.
When designing any protection, you should start with a threat model - from whom or what, in fact, we will defend. In our typical configuration, I will build a defense against external evil hackers, from incompetent (and maybe a little malicious) users. Let's start with the outer perimeter of the defense - the firewall.
Behind you like a wall of fire
In the days of Windows 2003, the built-in firewall was a miserable sight, and if it was impossible to use third-party tools, you had to use IPSec. An example of such a configuration is described, for example, in the material Secure Windows Servers using IPSec Firewall .
Now, with the advent of WFP ( Windows Filtering Platform ), things have become better. In principle, probably every Windows system administrator came across this firewall anyway, so setting up remote access to the server only from certain IPs should not be difficult. I will pay attention to some "chips", which are rarely used.
By default, the firewall blocks all incoming connections, except for explicitly allowed ones, but outgoing permits all but explicitly forbidden connections. This policy can be changed by opening firewall management through wf.msc and selecting "Properties".
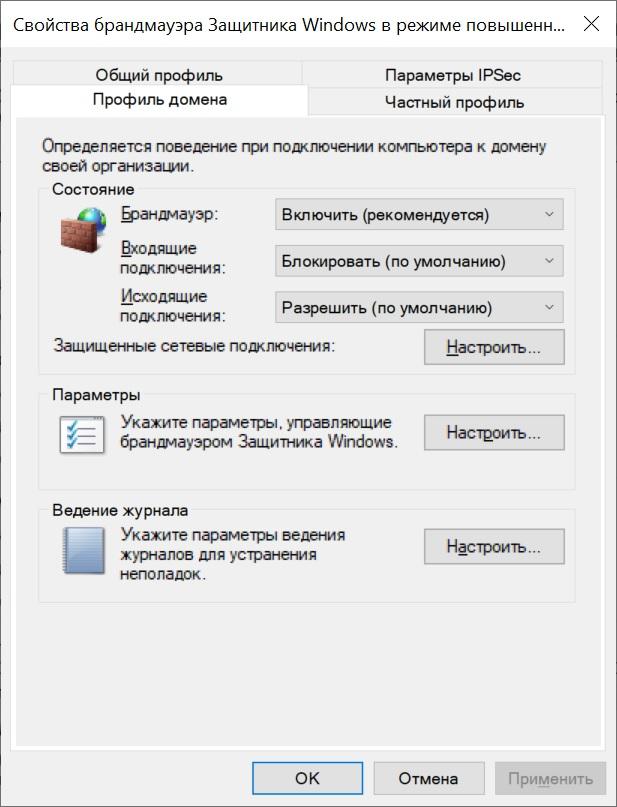
Firewall settings.
Now, if we want to prevent users of the terminal server from accessing the Internet from this server, we will succeed.
It is worth noting that when setting up server access rules (incoming connections), explicitly creating rules for outgoing traffic is not necessary. In terms of iptables, established and related are always allowed.
For connoisseurs of the command line, you can configure the firewall in the context of netsh advfirewall. You can read about the commands in the article “ Windows 7 Firewall with Advanced Security ”, but I’ll add that blocking incoming and outgoing connections is enabled by the command:
netsh advfirewall set currentprofile firewallpolicy blockinbound,blockoutbound
Another feature of the windows firewall is that any program or setting changes its rules without notification. For example, you turned off all the rules on our grandfather, a second one appeared nearby, you made a local network between them, set up shared access and ... suddenly you have smb turned on for everyone and everything with all the consequences.
There are actually two and a half exits (I remind you that we are only talking about built-in tools): regularly check to see if the rules have changed, and use the good old IPSec or, as for me, the most reasonable option is to configure the firewall with Group Policy. The settings are made in Computer Configuration - Windows Configuration - Security Settings - Windows Defender Firewall Monitor in Advanced Security.
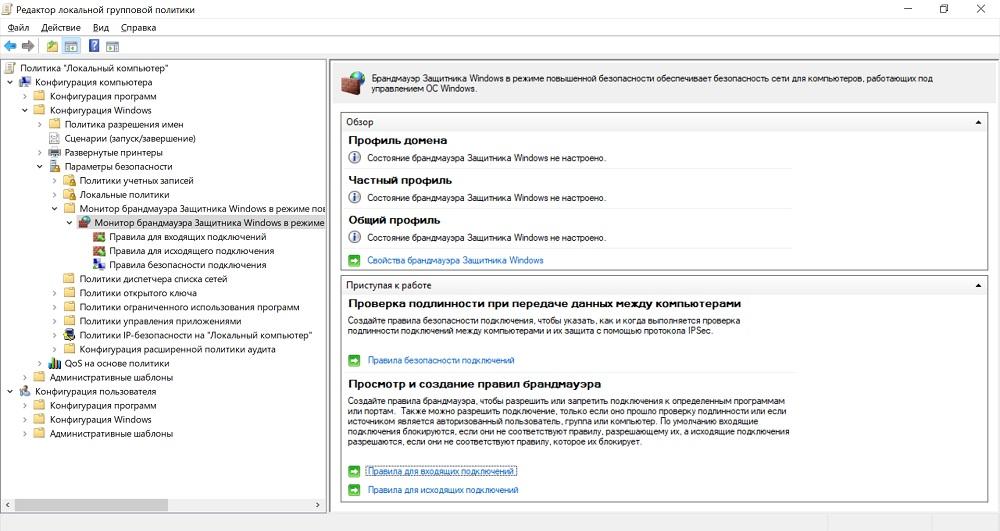
Setting up a firewall by group policy.
Also, using windows firewall, you can implement a simple fail2ban. It is enough to enable the audit of failed login attempts and, if several failures in a row, block the source IP. You can use self-written scripts, or you can use ready-made tools, which I wrote about in the article " How to give encryptors to sink a company ."
If the built-in firewall is not enough and you want to use something more serious, then you can install third-party software. It is a pity that most of the well-known solutions for Windows Server are paid. Another option would be to put a router in front of the server. It is clear that such an installation is suitable if we use colocation, and not rent a server somewhere far, far abroad. If the foreign data center is our choice, then you can use virtualization - for example, built-in Hyper-V - and install the familiar GNU \ Linux or FreeBSD into the virtual machine.
The question arises: how to make the virtual machine have direct Internet access, but the server does not? Moreover, the MAC address of the server does not shine on the hoster and thereby does not require the purchase of another IP address.
Caution! Further actions are best done through IP-KVM!
For this, the virtual machine must be equipped with two network adapters. One is for direct connection to the Internet, for it we will make a virtual switch of the “external” type and uncheck the box that allows the operating system to interact with this switch. With this checkmark, we deprive the server of direct access to the Internet (it is better to configure the firewall virtual machine in advance), and its MAC will not light up to the host.
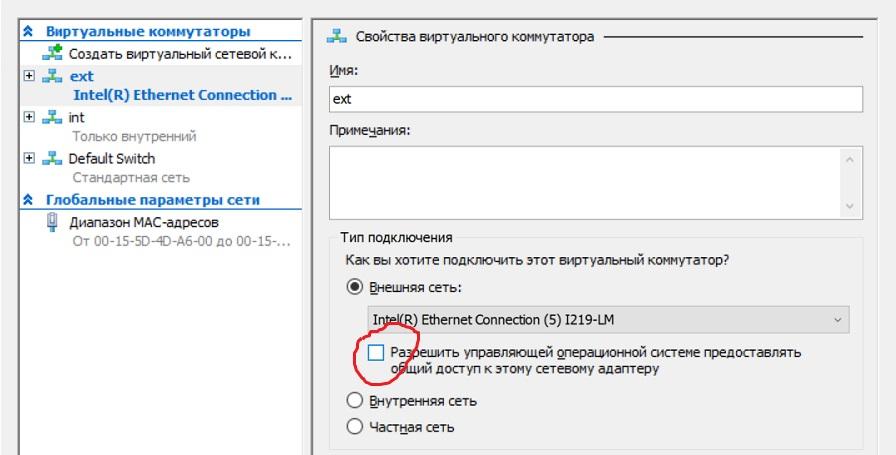
Configure an external virtual switch.
Another virtual switch should be made of the “internal” type for interaction between the virtual machine and the server. It already needs to configure local addressing. This will create a virtual router that stands in front of the server and protects it.
At the same time, you can configure your favorite VPN to the office or remote employees on this virtual machine without bothering with the role of “Routing and Remote Access” or with built-in IPSec, as I described in the article “ How I Hid the 1C Base in Germany ”. The main thing is not to forget to check the startup of this virtual machine at system startup.
You can connect to such a server using regular RDP or use HTML5 clients with two-factor authentication. It is worthwhile in case of brute force to take care of both fail2ban solutions and blocking the account for some time with several unsuccessful attempts of authorization in a row.
Outside, we more or less protected the server, let's move on to internal protection.
Internal protection: stop and do not let go
Of course, to protect the server from the inside, I really want to install some kind of antivirus - you never know what the server users are accumulating or pumping from the Internet. But in practice, the antivirus on the server can do more harm than good. Therefore, I usually use non-whitelisted software blocking mechanisms — in particular, the SRP (software restriction policies) mechanism, which I also mentioned in the article “ How to enable encryptors to flood a company ”.
I will dwell in more detail on one pitfall, which we often forget about when you turn on SRP with standard settings, when everything is blocked, except for the Windows and Program Files folders. Indeed, this filters out almost all malware. But it doesn’t really work with the maliciousness of employees, because in the system folders there are subfolders with the right to create objects by users. For example, you can look at the folder C: \ Windows \ Temp.

Permissions for the folder that is whitelisted.
And such a folder is not alone. You can, of course, audit system folders yourself, or you can trust people who have already done this. For example, a Stefan Kanthak specialist on his blog (there is an EICAR test virus by reference, an antivirus can work) walks in a rather aggressive manner on Windows antivirus and protection methods and at the same time offers an already-assembled SRP settings package that will also block such suspicious folders. Upon request, the author provides a program for converting these registry settings into local policy files.
If you prefer to use the AppLocker mechanism with more flexible settings, then the AaronLocker solution can help you .
The editors do not recommend using and installing scripts and other programs from the Internet without first studying them.
If AppLocker appeared for a long time, and the age of SRP exceeded 15 years, then a relatively fresh alternative is WDAC (Windows Defender Application Control). Indeed, since Security Essentials, the built-in “antivirus” has acquired many interesting features. For example, WDAC is the module that is responsible for access policies for applications and libraries. Previously, it was part of Device Guard (protecting a computer, including using virtualization technologies), and a little about its configuration was described in the article “ The principle of S Mode in Windows 10 and setting up Device Guard with your own hands ”. More details about all the subtleties can be found in the official documentation , but I can add a few drawbacks that distinguish it from classic solutions like SRP and AppLocker:
- There is no graphical configuration, all through PowerShell cmdlets.
- There are no settings in the user slice, only for the computer.
- Setup is done quite unusual - an xml file is prepared, which is then converted to binary, and distributed to computers.
But it is possible to configure the application in a slice: for example, if you want to give cmd.exe access to your script, and not to a third-party virus, this can be implemented. Moreover, the policy can be applied before booting the system using UEFI.

Chrome lock via WDAC.
In general, due to the painful configuration, the impression was that WDAC was no longer positioned by itself for managing computers, but as a tool that allows you to integrate with centralized MDM systems like Microsoft Intune . But at the same time, the development of the good old SRP was discontinued in Windows 10 1803.
If we talk about Windows Defender, you can not help but mention the Credential Guard and Remote Credential Guard.
The first tool again uses virtualization, launching the LSA (Local Security Authority) component in a process isolated from the operating system, which greatly complicates the process of stealing Kerberos password and ticket hashes. Read more about the technology in the official documentation . For the processor to work, it must support virtualization, and the system must have Secure Boot enabled and the TPM module for binding credentials to equipment. You can enable Credential Guard through the group policy Computer Configuration - Administrative Templates - System - Device Guard - Enable a virtualization-based security tool.
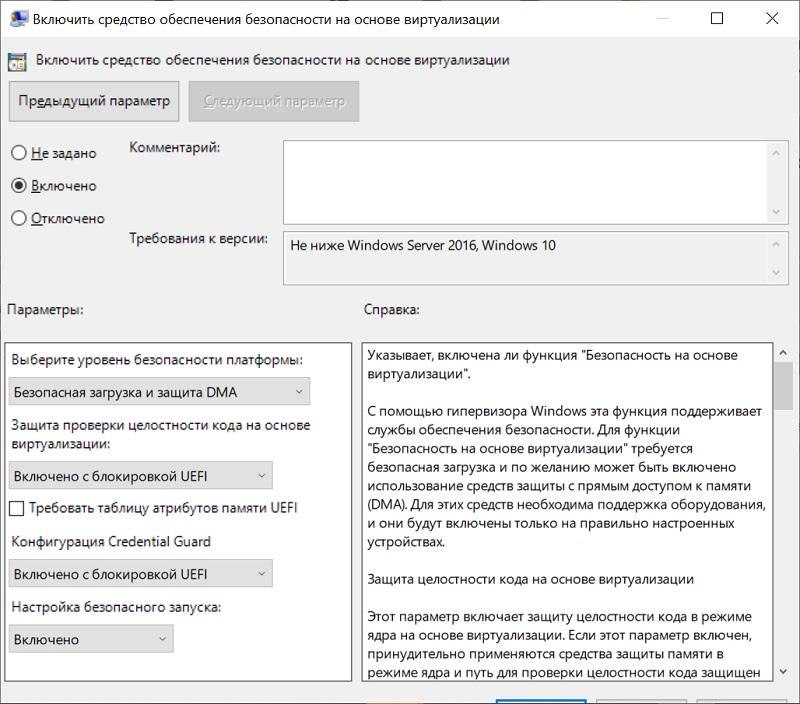
Enabling Credential Guard.
The second tool serves to protect the transmitted credentials (especially admin!) For remote connection, for example, through the same RDP. Previously, the Restricted Admin Mode mechanism was proposed for these purposes, but it limited the connection to only one server. Having connected to the server, it was impossible to just use network resources, administrator rights were applied to only one server a la Local System account.
Remote Credential Guard allows you to transfer credentials from the local machine to a remote server without entering an explicit password, which, in addition to advanced security, will also provide the convenience of connecting to servers (SSO). You can read more in the documentation , but I’ll add that for the mechanism to work, just turn on its support on the server — for example, through the registry with the command:
reg add HKLM\SYSTEM\CurrentControlSet\Control\Lsa /v DisableRestrictedAdmin /d 0
And then connect to the server with the command:
mstsc.exe /remoteGuard
Now the credentials are safe, and the server is quite secure. True, in the material I did not consciously touch upon issues of protection against a malicious hoster, but here it comes down to one thing in general - to disk encryption.