 The main work when creating the cryptoarmpkcs utility was not the development of code or a graphical interface, but the work with ASN1 structures. It is in these structures that x509v3 certificates, electronic document signatures (PKCS # 7, CMS), certificate requests (PKCS # 10, CSR), public and private keys, PKCS # 12 / PFX protected containers, lists of revoked CRL certificates and time stamps are stored for electronic signatures, OCSP requests and responses and so on and so forth. Constantly had to look at existing structures to understand how others did it, look at the AN1 structures just assembled by ourselves. The process is clear. But since I work on Linux (now it’s Mageia, and I also prepare code for Windows on Linux), the openssl and derdump utilities from the NSS package were at hand from the available tools for parsing ASN1 structures. Personally, my preferences were on the side of derdump. It was she who became the prototype of the derdump.tcl / tclderdump utility considered here for viewing ASN1 structures. And if you compare the output of the derdump utility from the NSS package and the derdump.tcl utility, then you will hardly see any differences:
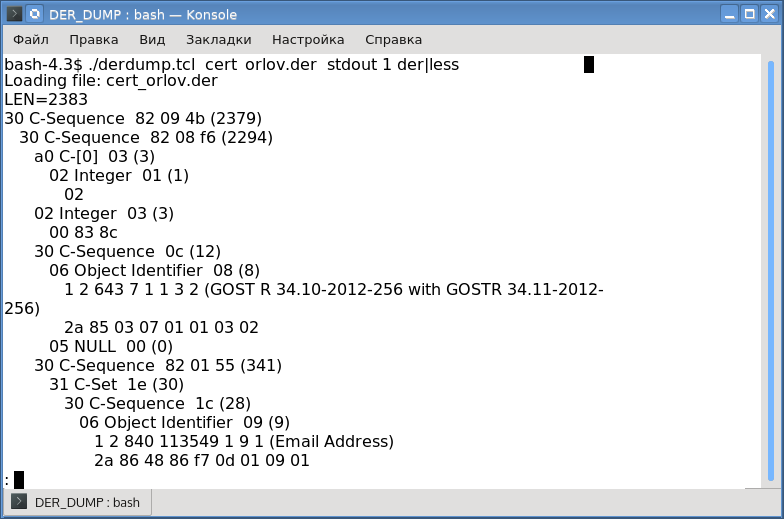
Differences relate to oid names. The utility has the following syntax:
$dertcl.tcl < > < | stdout> <1 | 0> <der | pem | hex>
Where
- <input file> - indicates the path to the file with the ASN1 structure;
- <output file> - indicates the file where the result of the analysis will be saved: if stdout is specified as the output file, the result will be sent to standard output;
- the third parameter indicates that full (1) information should be displayed;
- the fourth parameter sets the format of the input file, where der is a binary file, pem indicates that the file contains base64 encoded data with the heading “----- BEGIN ... -” and the trailer “----- END ... -” as is customary in openssl, and finally hex says the file contains hexadecimal code. At the same time, it may contain special characters (\ r, \ n, \ t), spaces and characters "." And ":". Where the dot and colon symbols came from will become clear below.
The hex format was vital for me. Indeed, in order to parse any piece from the parsed file, you had to translate it into binary form (der-encoding) and again pass it through the utility. The hex format made life a lot easier.
Of course, using pure tcl code (as well as using any other script code, for example python) is not entirely comfortable. Therefore, the utilities are framed in tclderdump distributions for Linux, Windows, and OS X platforms. These distributions are self-sufficient: you download and run.
But back to the ability to view ASN1 structures stored in hexadecimal. In addition to the above-mentioned utilities for viewing ASN1 structures, there is also a good pyderasn utility written in Python, which uses dot and colon characters in the output, and it was decided that they can also be present in hexadecimal code. The following is the result of parsing the same x509 v.3 certificate with the derdump.tcl and pederasn utilities:

But I wanted more, namely a graphical interface and the ability to parse internal blocks on the fly. It was decided to add this functionality to the cryptoarmpkcs utility, especially since it has a lot to develop, for example, encrypt documents on the recipient certificate. And here again you can not do without a viewer ASN1-structures.
For these purposes, it was decided to reorient the function button "Token Information". We reoriented the button and assigned the new function “View ASN1 structure” to it, and you can still get information about the connected token by moving the cursor over the token name to the right of the “Choose token / smartcard” label:

Everything is simple here. We select the file with the ASN1 structure, indicate in which format it is, decide whether we need additional details and click the “View ASN1 file” button:
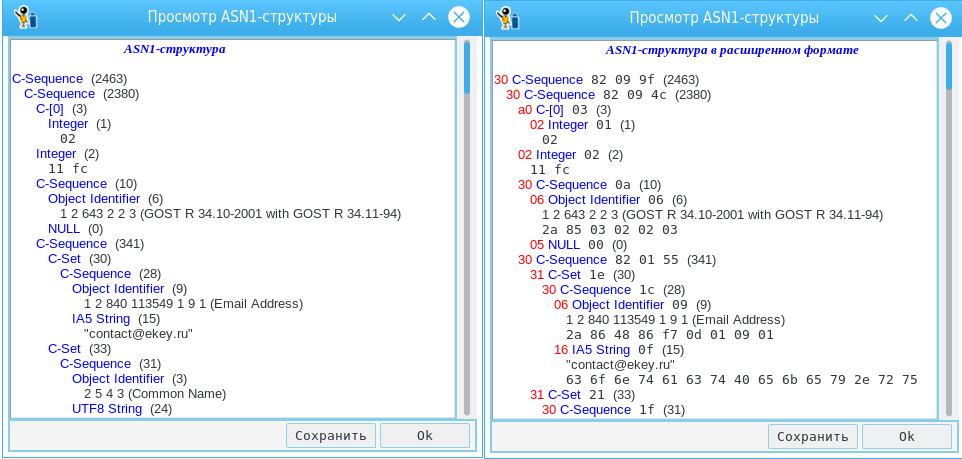
Comparing the right and left screenshots, you can personally see what additional information you can get when the "Additional Information" button is pressed. To save the structure in disassembled form, just click the "Save" button.
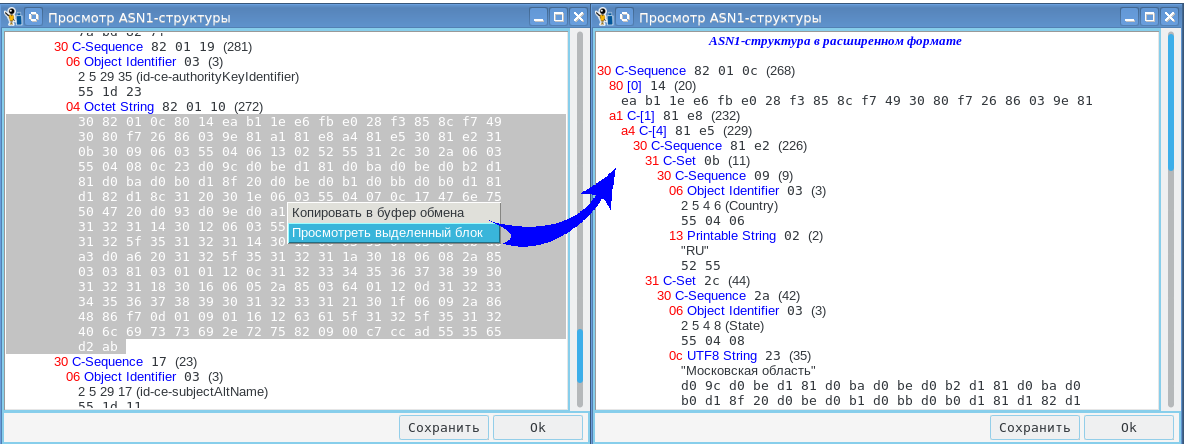
If you hold down the left mouse button, you can select the block of interest to us. And, if now on the selected block, press the right mouse button, a menu will appear with the following items:
- copy to clipboard;
- view the highlighted block.
And if you select the "View selected block" option, a window with the parsed block will appear:
If you click the “copy to clipboard” button, the selected block will be copied to the clipboard. The clipboard can be viewed by clicking the “ASN1-clipboard” button. The user can put the data into the clipboard with his own funds, and then view it here.
And since the utility is often updated, the ability to get new versions of the utility directly from it has been added. To do this, just move the mouse cursor over the field "PKCS # 11, x509v3, PKCS # 10, PKCS # 7, CMS, PKCS # 12, ASN1", press the right mouse button and select "About the program" in the menu that appears. In the window that appears, just select the platform and press the left mouse button:
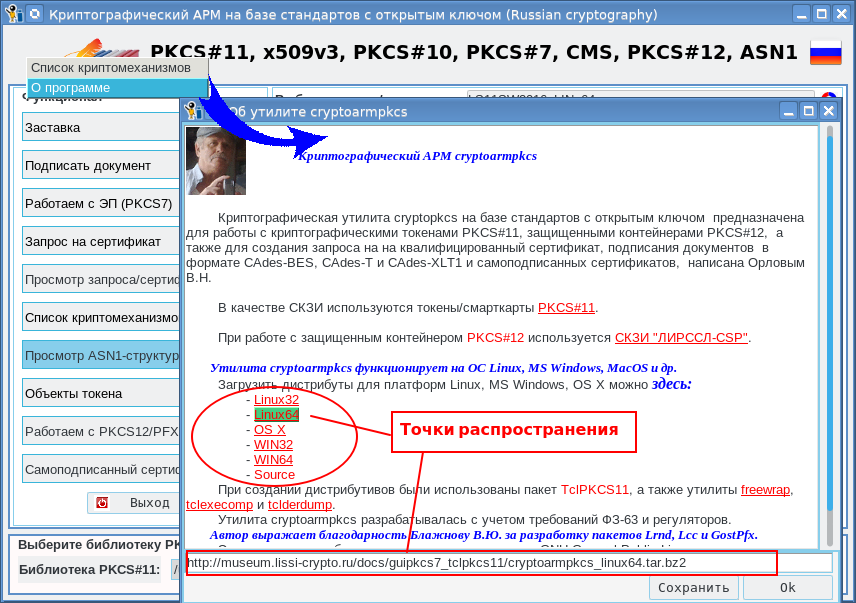
Upon successful receipt of the distribution kit, you will receive a corresponding message about where the received archive was saved:

PS For those who want to get utilities for the first time, this can still be done here: