 In this part, I will tell you the option of “simple” integration of an air conditioner (and, in general, almost any device controlled via IR) using a WiFi <=> IR gateway.
In order to make it more interesting, I chose a popular gateway (by the way, Yandex uses it for her Alice). You can buy one on Ali, the price is about 1200 rubles (Yandex is more expensive).
The device is quite compact (easily fits in the palm of your hand), from the visible organs there is one small unobtrusive blue LED and a button for pairing. Everything else is hidden behind a black infrared transparent case. You can use any available USB port (power supply, computer, etc.) as a power source. The gateway is connected to it using a microUSB cable (supplied or in any convenient way).
The peculiarity of this device is that it is built on the “well-known in narrow circles” esp8266, which means that it can be “tamed” quite easily.
Option "for the smallest"
Before changing the device, I tried to use it in normal mode: I installed the TuyaSmart application on the phone (there are versions for both Android and iPhone), and then everything is simple:
- register in the application,
- we’ll go through a small wizard to connect a new device (for this, the gateway must be connected to power and enter it into the “pairing” mode using a single button on it,
- after the gateway appears in the application, we create a new “control panel” - another small wizard where you select the type of device (in my case - Air conditioning), then the manufacturer is selected (there is no Electrolux in the application, but it worked great when choosing Midea). Immediately we come up with the “name” of the new console (I chose “Mr. White”).
That's all. After that, the following control panel appears on the phone:
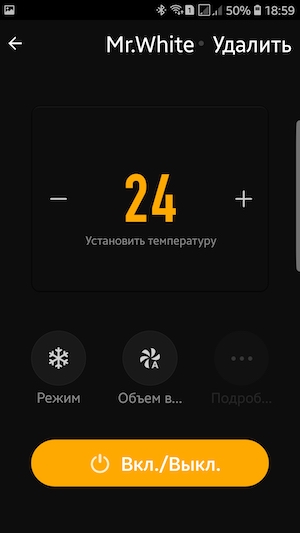 With it, you can control the basic basic functions:
- on / off
- temperature setting
- selection of the operating mode ("Auto", "Cooling", "Heating", "Fan"),
- fan speed selection (“Auto”, “Low”, “Medium”, “High”).
In general, it is already possible to use for remote control, but where is the “smart home” and integration?
Since this is a simple way, it’s bad with a smart home, but with integration it is somewhat better.
First, the fly in the ointment - there is no integration with Apple HomeKit, so Siri is not yet available, but with other competing platforms everything is much more fun:
- For Amazon Alexa - there is a Tuya Smart skill. It is enough to activate it and indicate in it your account, which you entered during registration in the application - you can voice control the air conditioner.
- Similarly, you can connect Tuya Smart to Google Assistant.
In both cases, the Russian language is not supported, but the voice is controlled easily and simply. I found the following commands:
- Alexa, turn on Mr. White
- Hey, Google, set Mr. White to 24 degrees
- Alexa, turn off Mr.White
Let me remind you that I have implemented voice control using Amazon Echo Dot and Google Home Mini - both devices work out commands identically.
By the way, which voice commands you can control the operation mode and air flow rate - I did not find. If someone tells me, I will be grateful.
And then “semi-automatic” integration with UD was made: when the temperature in the room rises above the threshold - the UD controller sends a message asking to turn on the air conditioner, and I, remotely, using the TuyaSmart application, turned on the air conditioner in the right mode.
The solution is "so-so", of course, but at least somehow you can use it.
But this is not our way - we move on:
Jedi Way
Autopsy and preparation
There is an option to flash the device without opening it, the method is described here .
This method seemed to me unnecessarily complicated (so many movements, when the firmware requires only 4 wires to solder), and it was interesting to look inside.
Unfortunately, in the process I got carried away and forgot to take a picture, so I will show other people's photos:
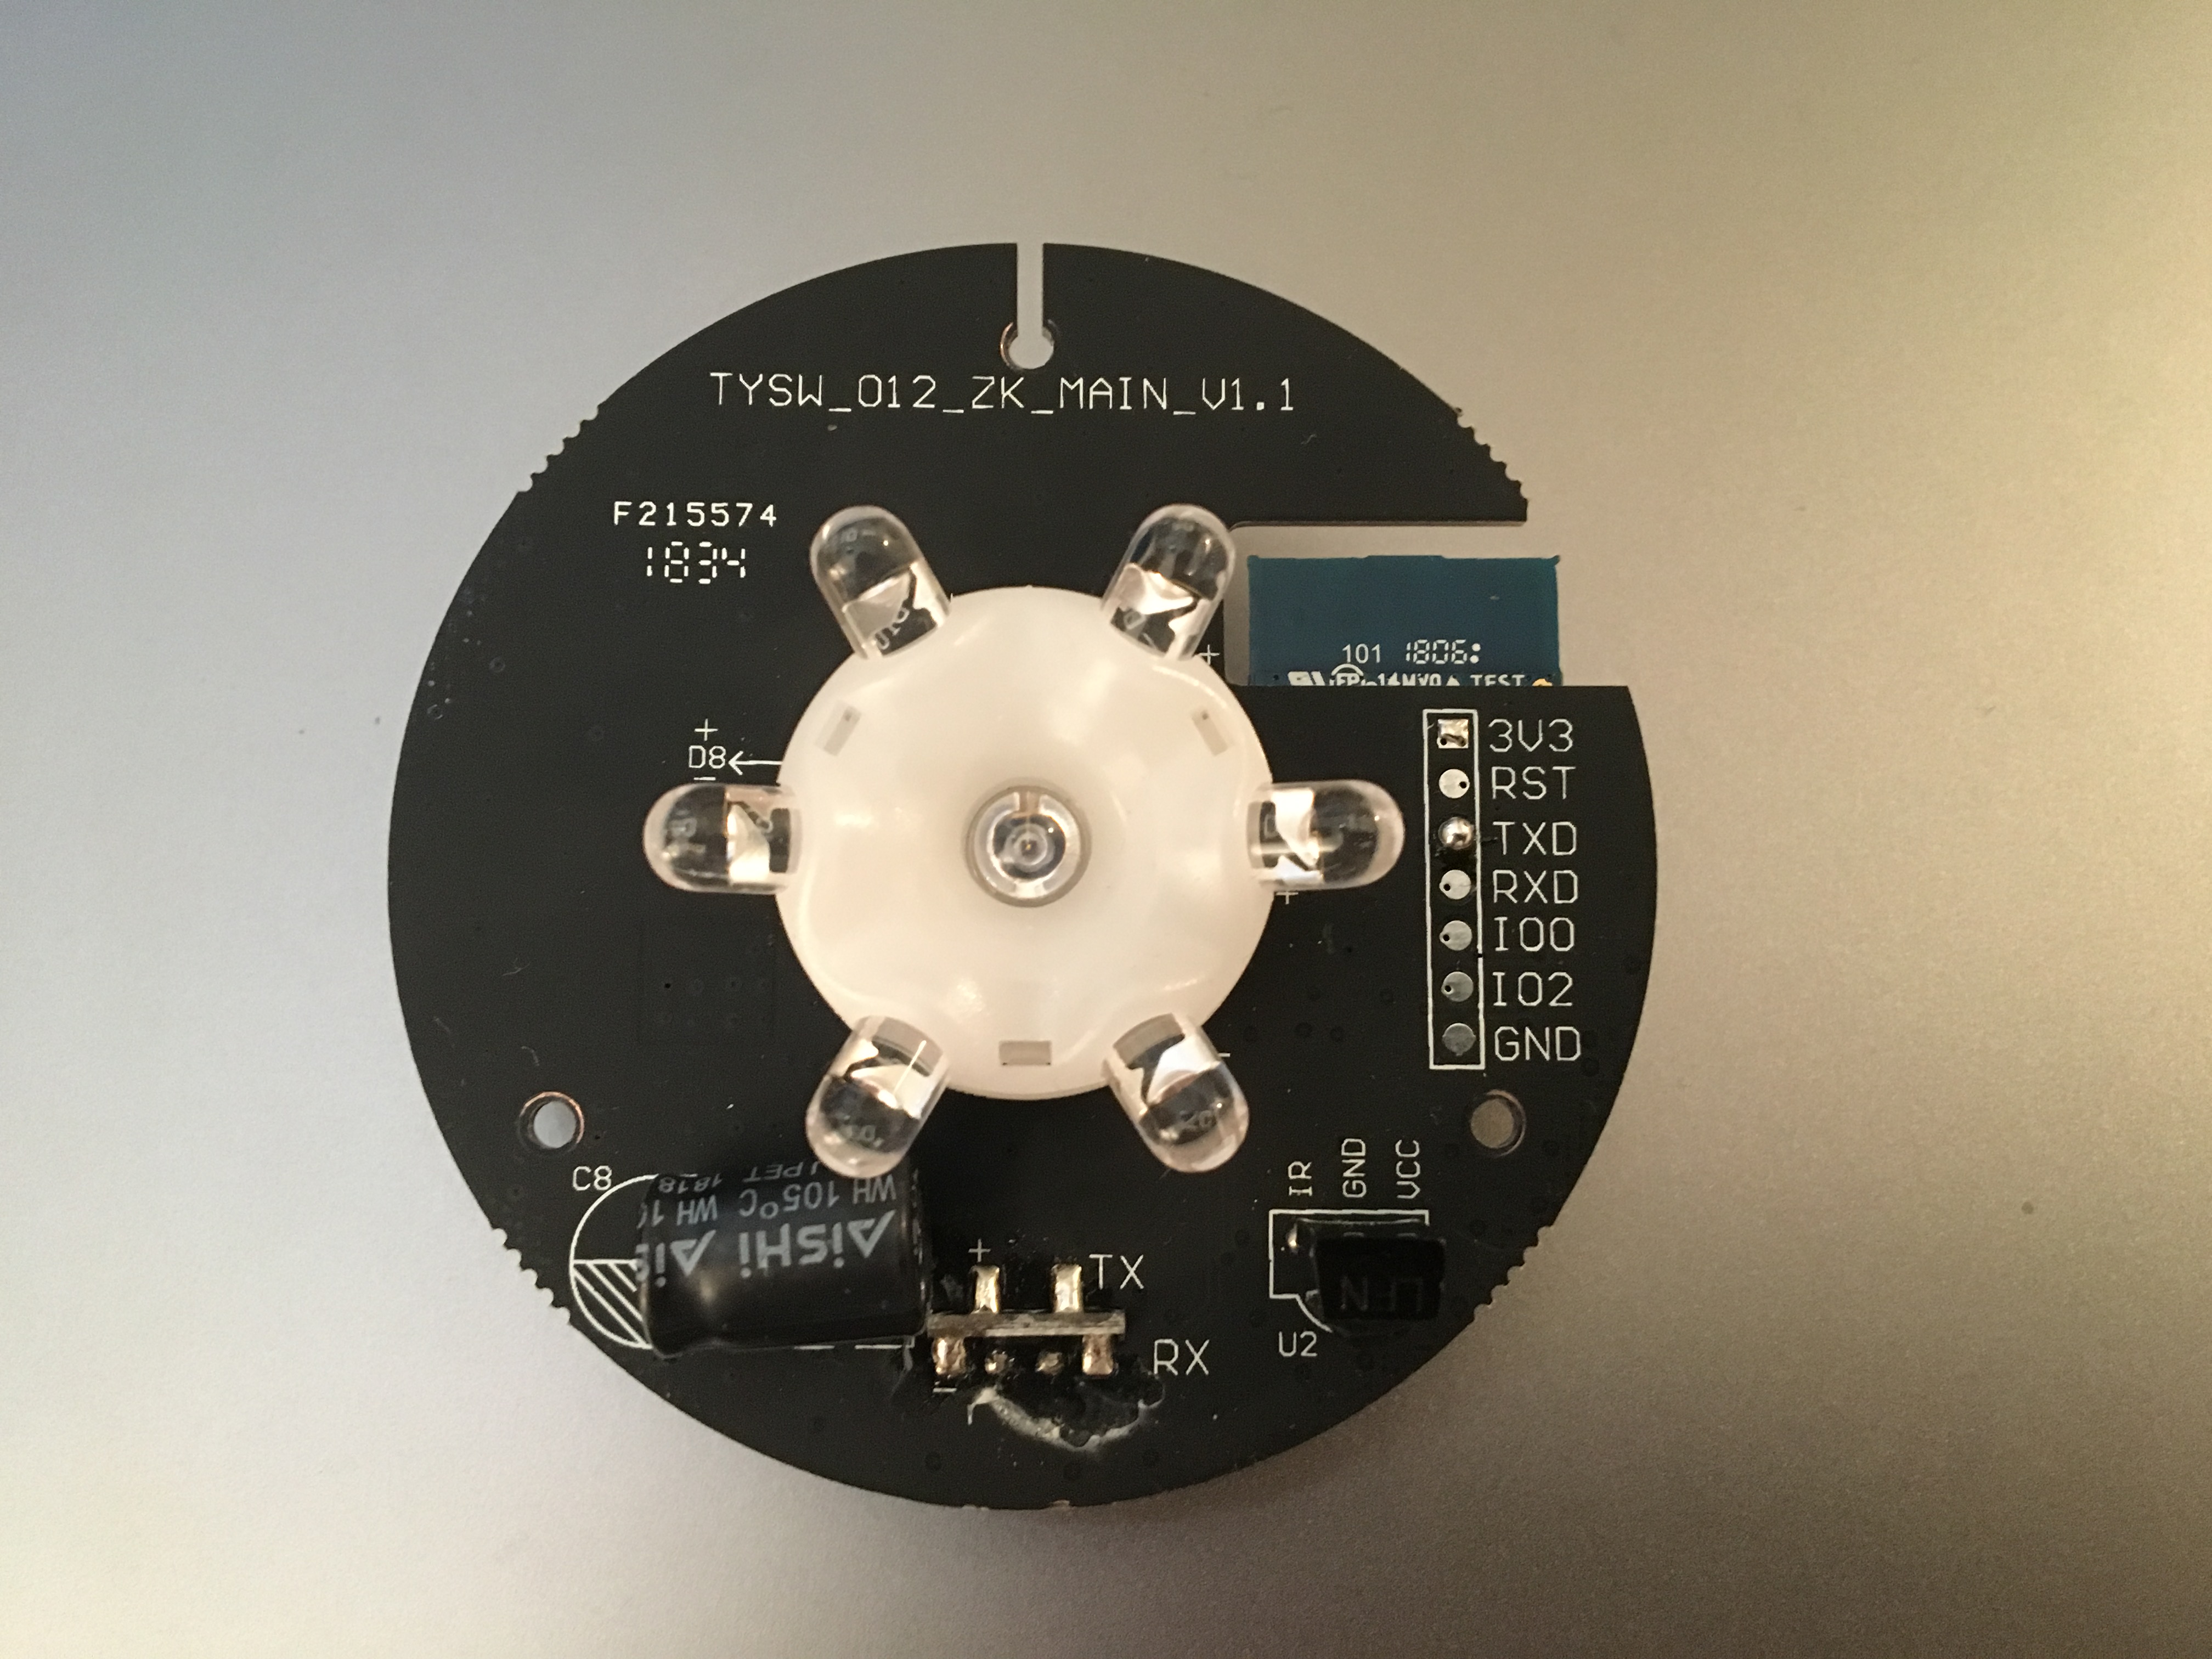
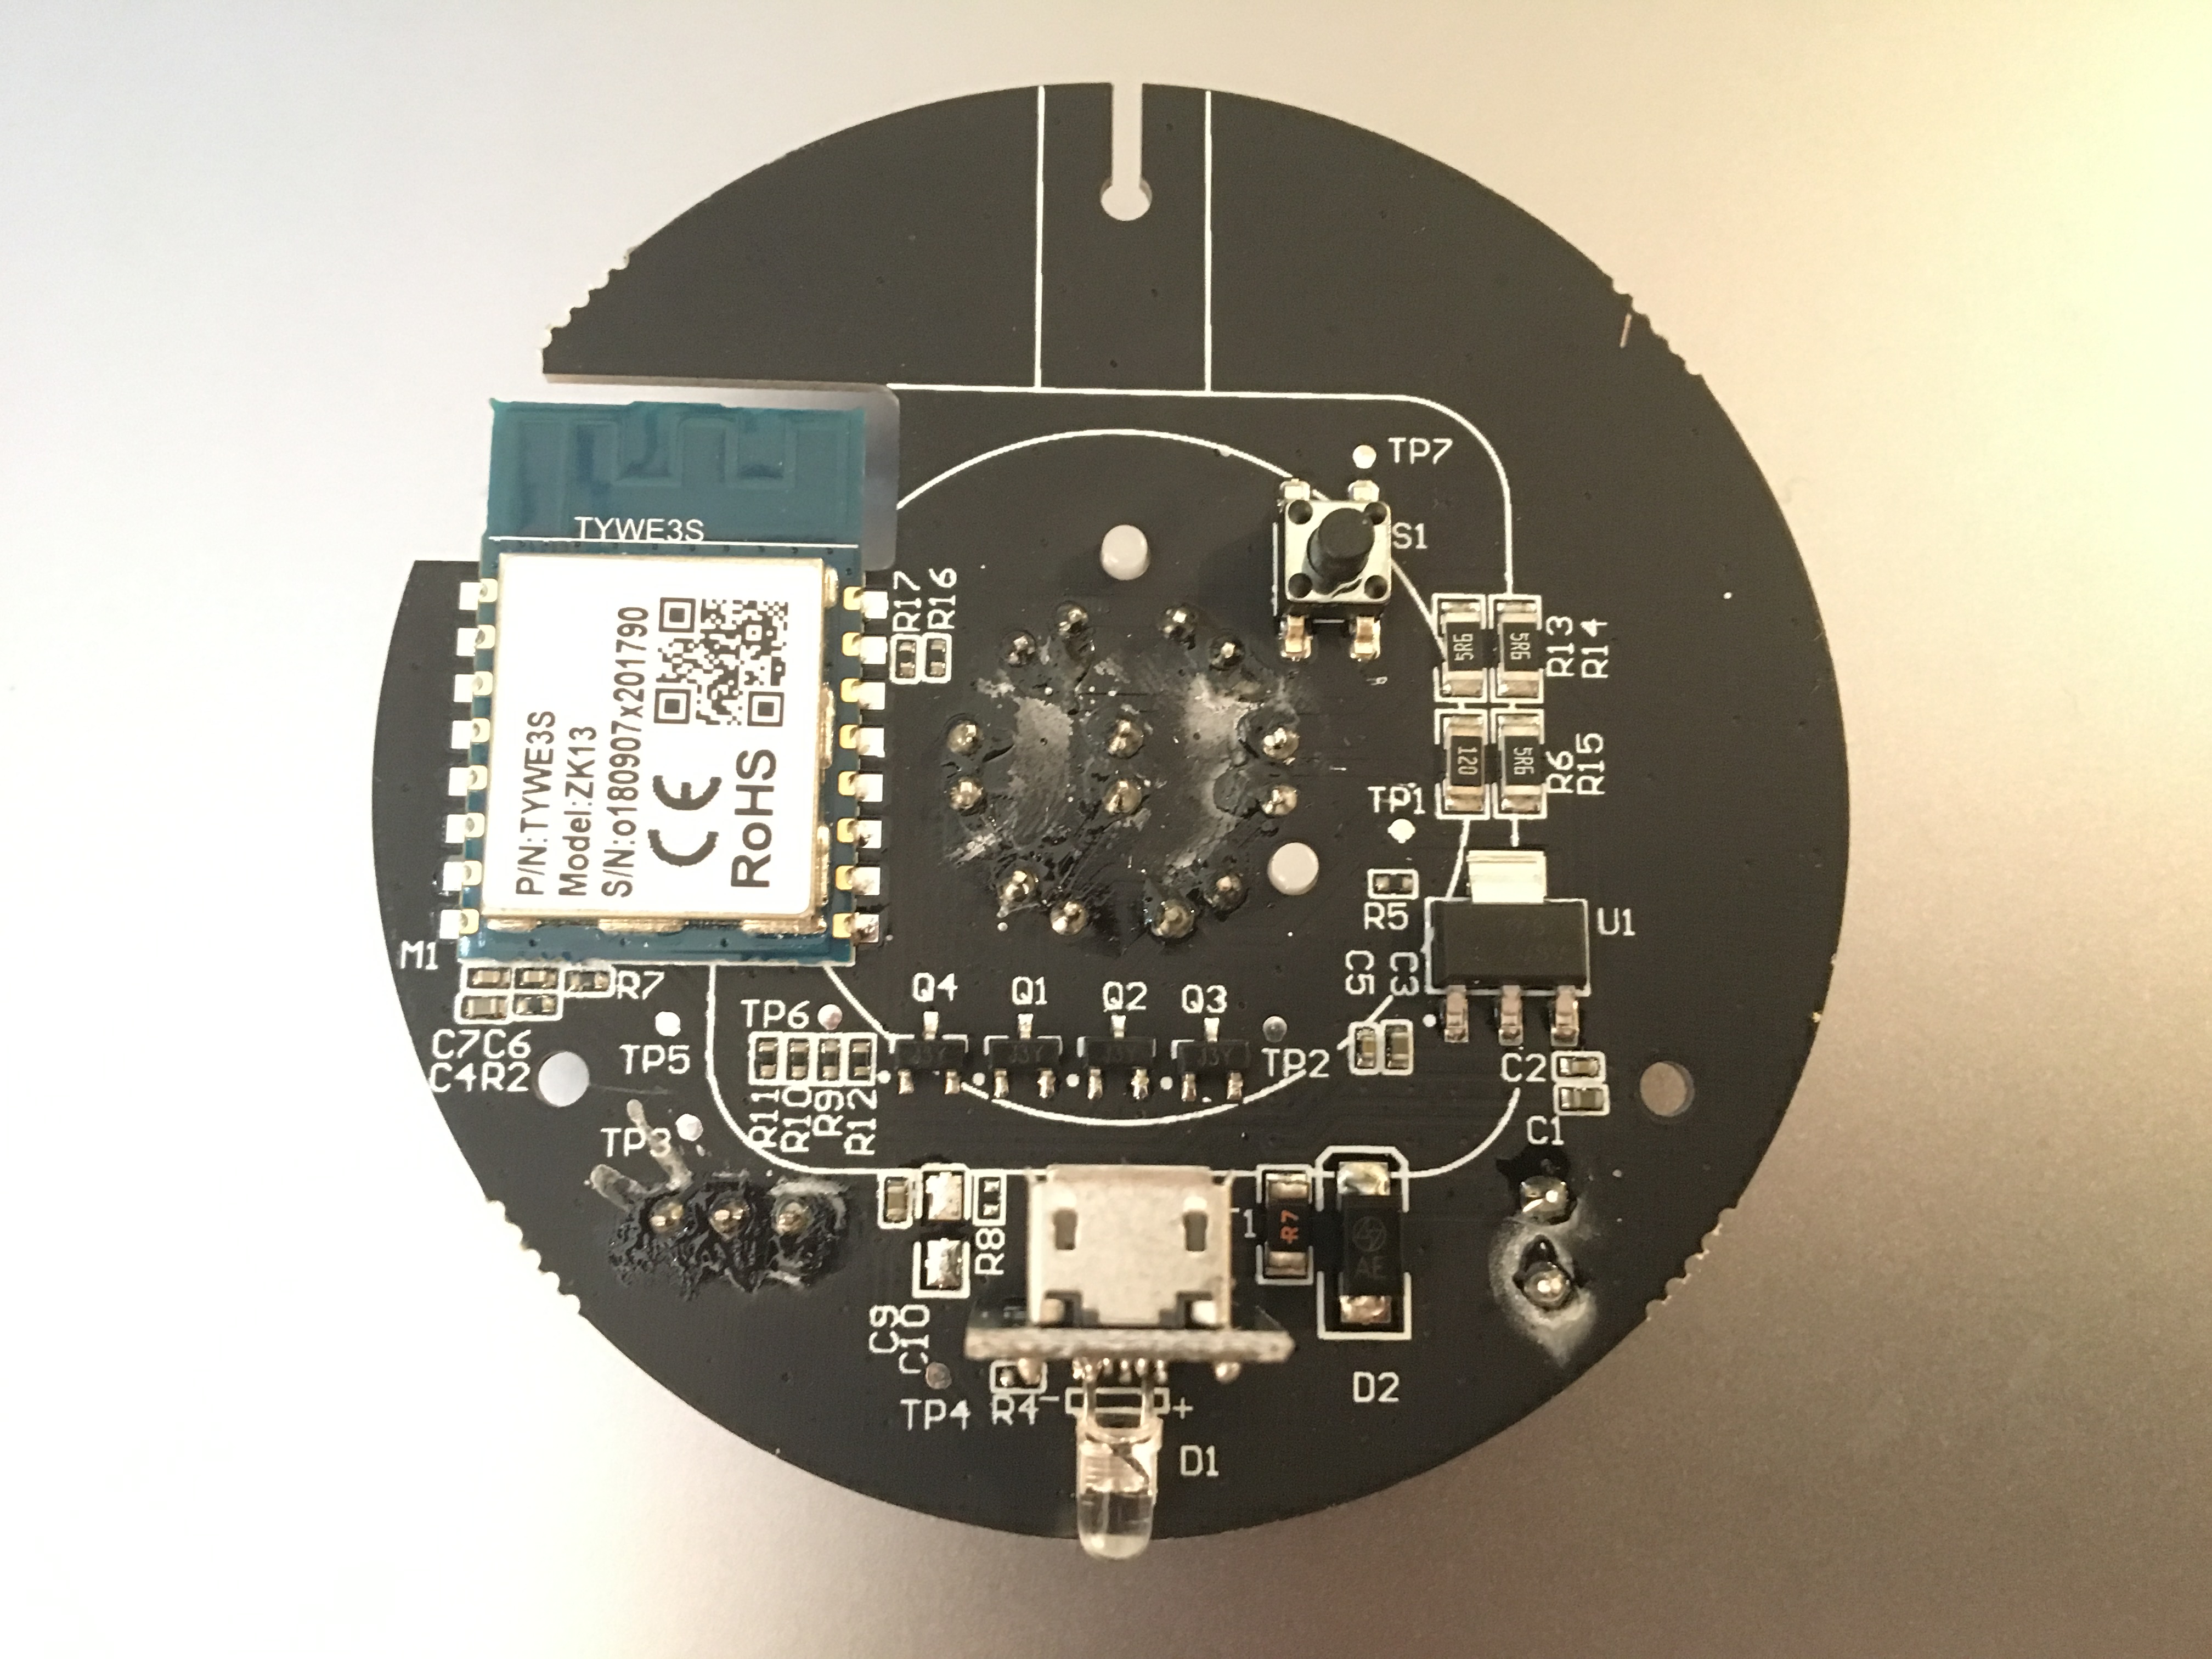
More photos can be seen here .
The photo clearly shows that the TYWE3S module is used (the datasheet on which is very simple in Google).
Now you need to flash the module. The original firmware is overwritten and cannot be restored.
The firmware is done very simply: we take the Arduino environment (or Atom, or something else - choose to your taste). Download the sketch with Tasmota firmware to the development environment . Then we connect on a TYWE3S RX, TX, GND, VCC module from any usb-serial (do not mix up - you need 3.3V power and the corresponding signal levels, if there is 5V, you will have to order a new gateway). Before applying power, do not forget to close (in any convenient way) the GPIO0 of the module to ground, thereby putting the module into firmware mode. Flashing.
It is not required to configure the firmware - everything can be left in the code “as is”, we just need to “tame” the module.
If everything is done correctly (after disconnecting the wires for the firmware, of course), turn on the gateway. We turn on the search for WiFi networks on the phone or computer - a new network should appear with the name sonoff-xxxx (where xxxx are the numbers), which our device picks up.
We connect to this network and go to the address: 192.168.4.1 - this is the web interface of our gateway.
First, in the gateway settings, specify the home WiFi network and password for it (the device will reboot and connect to the home network). Further, all the actions are easier to do in it. Naturally, you need to find out in any convenient way what address the gateway received in the home network.
We go to the Tasmota firmware release page . Download two files - sonoff-minimal.bin and sonoff-ir.bin
Now, using the web interface of the gateway, we update the firmware in two stages - first we sew the “minimum” version, and the second step is sonoff-ir.
After all these simple actions, we will already have a module with the current firmware version in our hands, it remains only to configure it as follows:

Actually, this is the minimum necessary configuration - in the described example we will interact with the module using GET requests (although it is possible through MQTT as well).
You can check the operation of the module, and at the same time find out something useful in its console (a link to it is available from the main page of the web interface). Open the console and see how the module “lives”.
Now you can begin to learn the air conditioning control interface. To do this, pick up the standard remote control from the air conditioner and press the power button. If all is well, then a line like:
19:24:09 MQT: tele/IRbridge/RESULT = {"IrReceived":{"Protocol":"COOLIX","Bits":24,"Data":"0xB29F70","DataLSB":"0x4DF90E","Repeat":0,"IRHVAC":{"Vendor":"COOLIX","Model":-1,"Power":"on","Mode":"cool","Celsius":"on","Temp":22,"FanSpeed":"min","SwingV":"off","SwingH":"off","Quiet":"off","Turbo":"off","Econo":"off","Light":"on","Filter":"off","Clean":"on","Beep":"off","Sleep":-1}}}
The module received and “parsed” the IR command from the remote control. Those. it’s immediately clear from the console which protocol (in my case it is COOLIX) is used by the standard air conditioning unit and what parameters are encoded in the package.
Great, now you can already control the air conditioning. To do this meaningfully, it is better to familiarize yourself with this description of the commands.
To check through the gateway console, we’ll send, for example, this command (I’ll give all the commands for my air conditioner, you may have a different control protocol):
IRhvac{"Protocol":"COOLIX","Power":"On","Mode":"Cool","FanSpeed":"min","Temp":22}
Miraculously, the air conditioner turns on immediately and in the required mode. Miracle!
Turn off the air conditioner with the following command:
IRhvac{"Protocol":"COOLIX","Power":"Off"}
In general, the module is prepared and tested.
Go to integration!
Air conditioning + Domoticz = friendship forever!
I use Domoticz as the main automation system, so we will be “friends” with this particular system.
The work plan is as follows:
- Create several virtual devices: a switch, two selectors (for selecting modes and air flow rate) and a thermostat.
- Add a few scripts that, by actions with virtual devices, will send commands to the gateway.
- Verify that everything is being managed as it should.
Virtual devices
When creating devices, you must specify their names. I bring mine, you can choose any others, just remember to fix the scripts for them later.
Create a regular switch (type “Switch”) with the name “HVAC”. This switch will be used to turn on / off by one button.
To select the operating modes of the air conditioner, add a virtual switch “HVAC-Mode” (type “Selector Switch”) with the following characteristics:

Please note that here I created only two modes - “heating” and “cooling”. Although the air conditioner still has the “Auto” and “Fan” modes, they are useless for me - the first one works somehow strange and uncomfortable for households, and the second one was never needed at all. If you use these modes, you can simply add them to the selector.
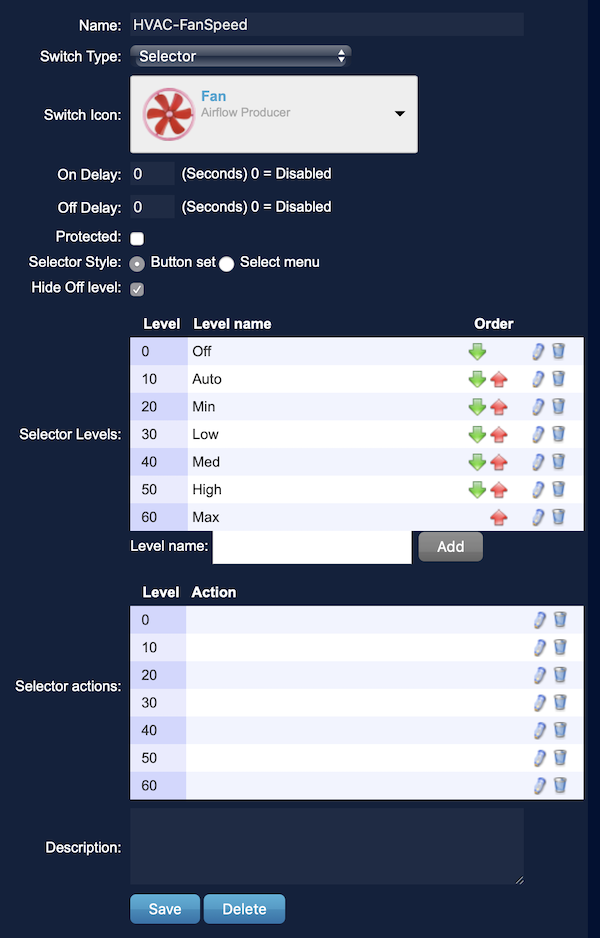
Similarly, create the “HVAC-FanSpeed” selector:
Now it remains to create only the HVAC-Temp thermostat (the device type is Thermostat Setpoint).
Scripts
I’m somehow closer to Domoticz scripts on Lua (Devices), so I do what is more convenient for me.
For definiteness - the IP address of the IR gateway in my home network is 10.40.20.254 and this address appears in one of the scripts, you will need to fix it on the address of your gateway.
Create the following three scripts.
HVACauto:
commandArray = {} for deviceName,deviceValue in pairs(devicechanged) do if (deviceName=='HVAC-Temp') then if (tonumber(deviceValue) < tonumber(otherdevices_temperature[''])) then commandArray['HVAC-Mode'] = 'Set Level: 10' --"Cool" else commandArray['HVAC-Mode'] = 'Set Level: 20' --"Heat" end commandArray['HVAC'] = "On" end end return commandArray
This script compares the set temperature of the air conditioner and the temperature from the “Room” sensor in order to select the correct mode - “cooling” or “heating”.
HVACpower:
commandArray = {} for deviceName,deviceValue in pairs(devicechanged) do if (deviceName == 'HVAC') then if deviceValue == "Off" then print(' ') commandArray['HVAC-Mode'] = 'Set Level: 0' --"Off" else if (tonumber(otherdevices['HVAC-Temp']) < tonumber(otherdevices_temperature[''])) then commandArray['HVAC-Mode'] = 'Set Level: 10' --"Cool" else commandArray['HVAC-Mode'] = 'Set Level: 20' --"Heat" end end end end return commandArray
This script monitors the status of the “general” switch of the air conditioner and selects the desired operation mode when turning on or off the air conditioner.
And the last HVACmain script:
commandArray = {} local cmnd for deviceName,deviceValue in pairs(devicechanged) do if (deviceName=='HVAC-Mode' or deviceName=='HVAC-FanSpeed' or deviceName=='HVAC-Temp') then if (otherdevices['HVAC-Mode']=='Off') then cmnd = 'http://10.40.20.254/cm?cmnd=IRhvac{"Protocol":"COOLIX","Power":"Off"}' else cmnd = 'http://10.40.20.254/cm?cmnd=IRhvac{"Protocol":"COOLIX","Power":"On","Mode":"'..otherdevices['HVAC-Mode']..'","FanSpeed":"'..otherdevices['HVAC-FanSpeed']..'","Temp":'..otherdevices['HVAC-Temp']..'}' end print(cmnd) os.execute("wget '"..cmnd.."'") end end return commandArray
But this script is the most important. It generates the correct commands with the necessary parameters and implements a GET request to the gateway. Do not forget to fix the IP address of your gateway in it.
Actually, that’s all. You can switch the Domoticz interface to the corresponding tabs and “press buttons” to control the air conditioning. If everything is done correctly, the air conditioning system will be controlled as you need.

Features
This control option through an IR gateway has one drawback - the lack of feedback. Those. if someone uses a standard remote control, then the statuses in Domoticz will not change and will display information that is no longer relevant.
In general, this does not really interfere (especially if you do not use an IR remote control, but use only the capabilities of the UD).
You can, of course, monitor with the IR gateway what commands are sent via IR (the gateway transmits this information via MQTT) and program a little more so that even when using the standard remote control, the current statuses and parameters are set in the UD system.
But while I don’t have time for this, and I don’t have a special need either (it’s easier to “look” into the video surveillance system and see if the air conditioner is turned on).
So?
Naturally, we do not stop there.
At a minimum, the current management implementation is already much more functional than the “for the smallest” option.
After “forwarding” the air conditioner in Domoticz, I also made control with Siri:
 After the opportunity appeared to control the UD system (and especially, voice via Siri), the need to use a standard IR remote disappeared.
In the near future, we’ll write a “winter” script that, in the absence of the owners and at a temperature “outside” of at least -10, use the resources of the air conditioner to heat the house (it is more energy efficient in this mode than electric heated floors, but less comfortable), and when the owners return, they again switch to underfloor heating.
Of course, there will be a “summer” script that will automatically turn on the cooling mode and maintain the set temperature of the house.
Naturally, all possible use cases are limited only by imagination. Do not hold back;)
Part III?
At the moment, the announced WiFi-module for air conditioning control has not appeared on sale.
If there is time (long winter evenings), I’ll take another approach to the air conditioner interface module and still try to “catch” the internal air conditioner commands.
So ... stay tuned!