
That's right, after the release of Hashicorp Consul 1.5.0 in early May 2019 in Consul, you can authorize applications and services running in Kubernetes natively.
In this tutorial, we will step by step create a POC (Proof of concept, PoC - proof of concept] - demonstrating this new feature. Basic knowledge of Kubernetes and Hashicorp's Consul is expected from you. And although you you can use any cloud platform or on-premises environment, in this guide we will use Google's Cloud Platform.
Overview
If we turn to the Consul documentation on its authorization method , we will get a brief overview of its purpose and use case, as well as some technical details and a general overview of the logic. I highly recommend reading it at least once before continuing, as I will explain and chew it all now.
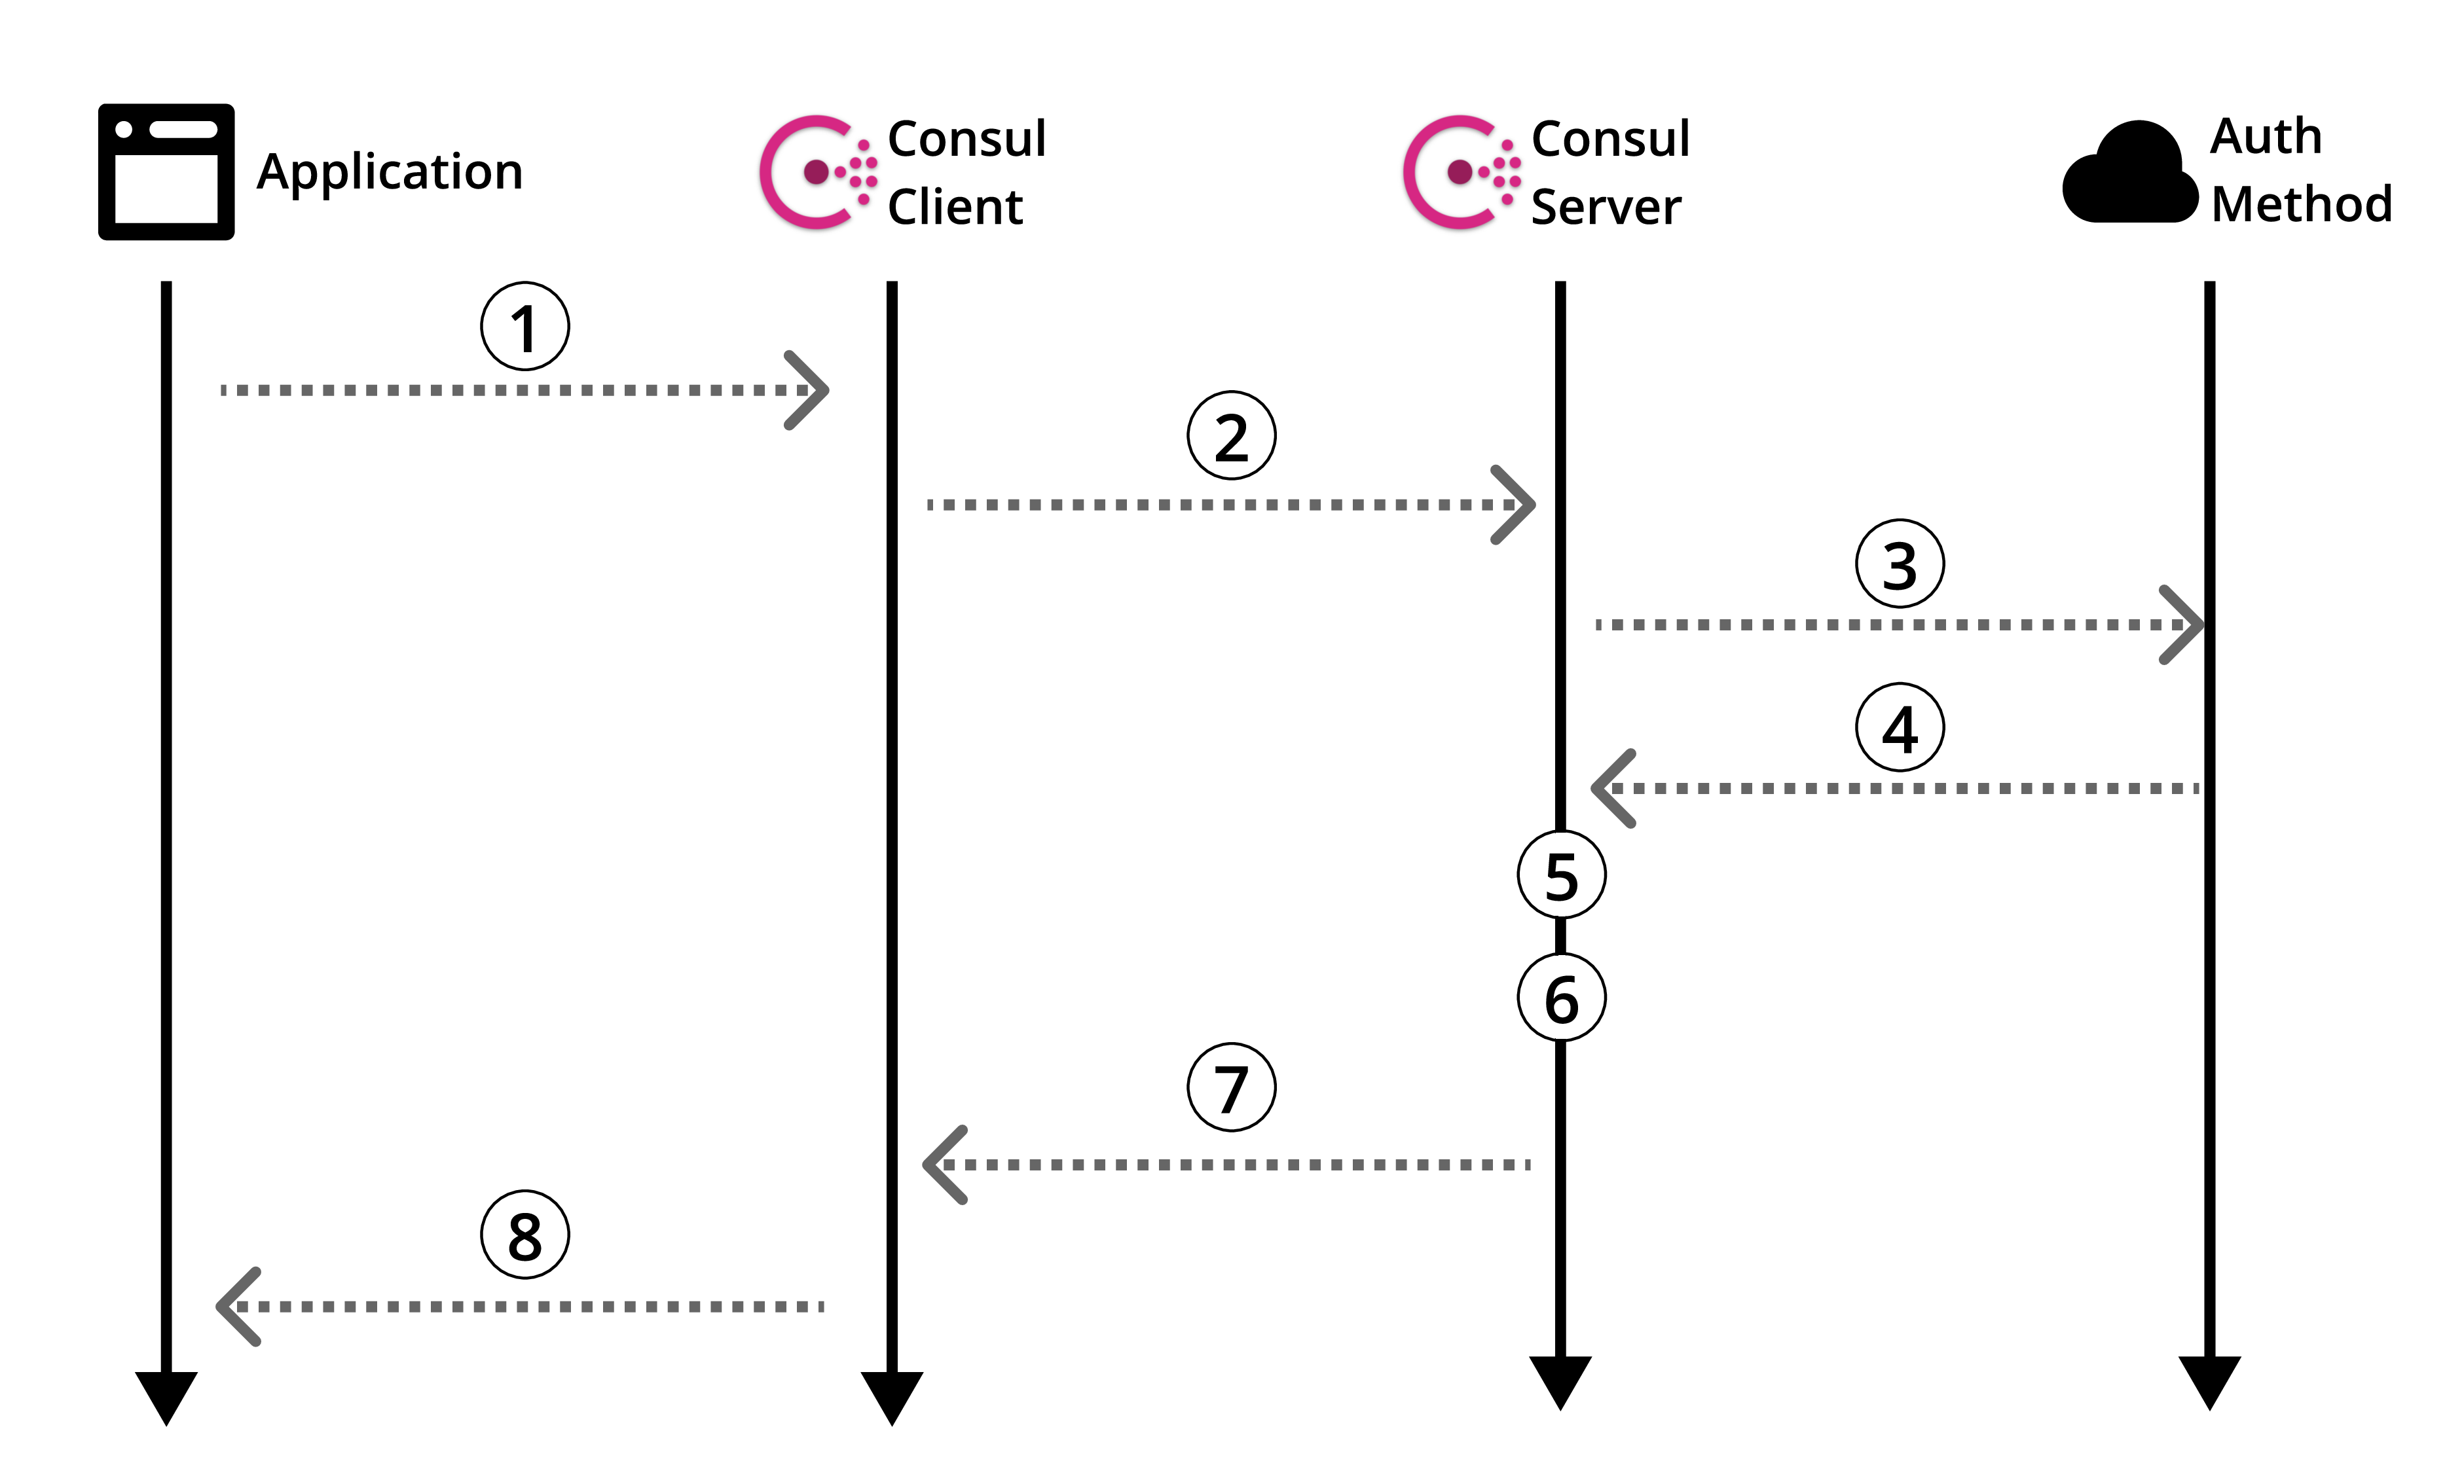
Figure 1: Official Consul Authorization Method Overview
Let's take a look at the documentation for the specific Kubernetes authorization method .
Of course, there is useful information, but there is no guide on how to actually use all this. Therefore, like any sane person, you scour the Internet for guidance. And then ... Be defeated. It happens. Let's fix it.
Before we move on to creating our POC, let's go back to the Consul authorization methods overview (Figure 1) and refine it in the context of Kubernetes.
Architecture
In this guide, we will create a Consul server on a separate machine that will interact with the Kubernetes cluster with the Consul client installed. Then we will create our dummy application in the hearth and use our customized authorization method to read from our Consul key / value store.
The diagram below shows in detail the architecture that we create in this guide, as well as the logic of the authorization method, which will be explained later.
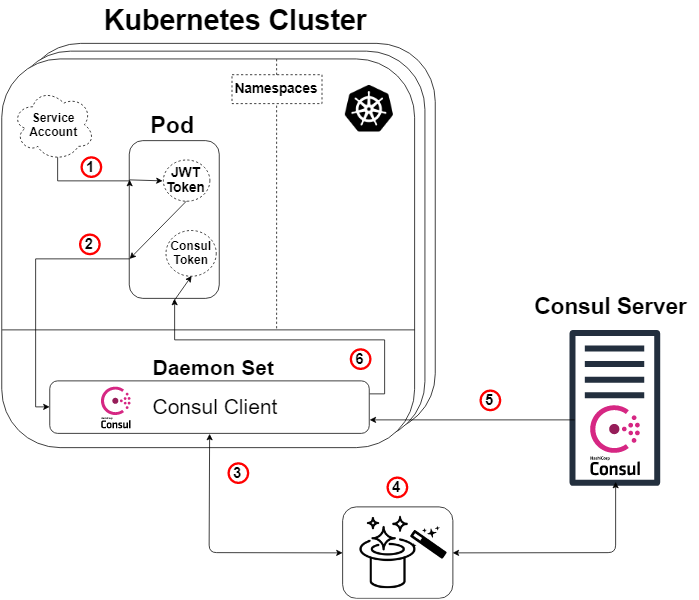
Figure 2: Overview of the authorization method in Kubernetes
A quick note: The consul server does not need to live outside of the Kubernetes cluster for this to work. But yes, he can do this and that.
So, taking the Consul overview diagram (Scheme 1) and applying Kubernetes to it, we get the diagram above (Scheme 2), and here the logic will be as follows:
- Each pod will have a service account attached containing a JWT token generated and known by Kubernetes. This token is also inserted into the sub by default.
- Our application or service inside the hearth initiates a command to enter our Consul client. The request for login will also indicate our token and the name of a specially created authorization method (such as Kubernetes). This step No. 2 corresponds to step 1 of the Consul scheme (Scheme 1).
- Our Consul client will then forward this request to our Consul server.
- MAGIC! It is here that the Consul server verifies the authenticity of the request, collects information about the identity of the request and compares it with any associated predefined rules. Below is another diagram to illustrate this. This step corresponds to steps 3, 4 and 5 of the Consul overview diagram (Scheme 1).
- Our Consul server generates a Consul token with permissions in accordance with the rules of the authorization method we specified (which we determined) regarding the identity of the requestor. Then he will send this token back. This corresponds to step 6 of the Consul scheme (Scheme 1).
- Our Consul client redirects the token to the requesting application or service.
Our application or service can now use this Consul token to communicate with our Consul data, as determined by the token privileges.
The magic is revealed!
For those of you who are not happy with just the rabbit in the hat and want to know how it works ... let me "show you how deep the rabbit hole is ."
As mentioned earlier, our “magic” step (Scheme 2: Step 4) is that the Consul server verifies the authenticity of the request, collects information about the request and compares it with any associated predefined rules. This step corresponds to steps 3, 4 and 5 of the Consul overview diagram (Scheme 1). Below is a diagram (Scheme 3), the purpose of which is to clearly show what is actually happening under the hood of a specific Kubernetes authorization method.
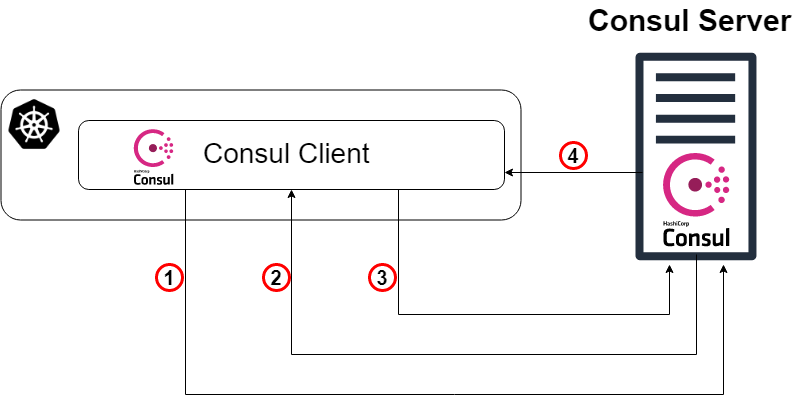
Scheme 3: The magic is revealed!
- As a starting point, our Consul client redirects the login request to our Consul server with the Kubernetes account token and the specific name of the authorization method instance that was created earlier. This step corresponds to step 3 in the previous explanation of the circuit.
- Now the Consul server (or leader) needs to verify the authenticity of the received token. Therefore, he will consult with the Kubernetes cluster (through the Consul client) and, with the appropriate permissions, we will find out whether the token is genuine and to whom it belongs.
- Then the verified request returns to the Consul leader, and the Consul server searches for an instance of the authorization method with the specified name from the login request (and type Kubernetes).
- The consul leader determines the specified instance of the authorization method (if one is found) and reads the set of binding rules that are attached to it. He then reads these rules and compares them with verified identity attributes.
- TA-dah! Go to step 5 in the previous explanation of the circuit.
Run Consul-server on a regular virtual machine
From now on, I will mainly give instructions for creating this POC, often in points, without explanatory whole sentences. Also, as noted earlier, I will use GCP to create the entire infrastructure, but you can create the same infrastructure anywhere else.
- Start the virtual machine (instance / server).
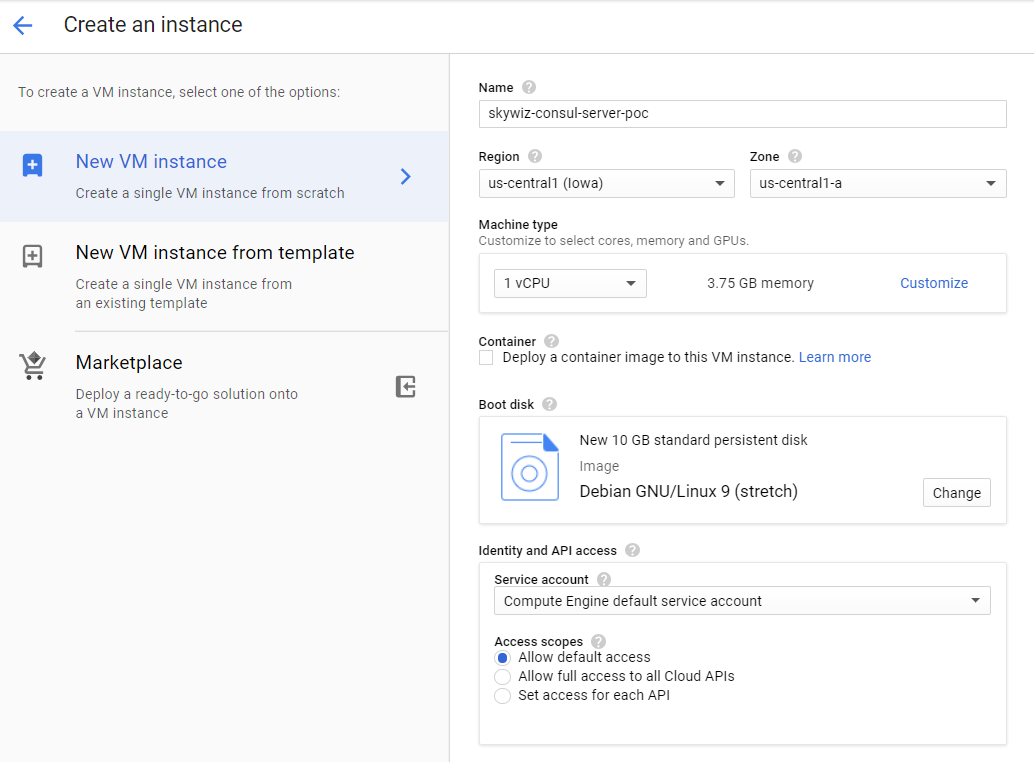
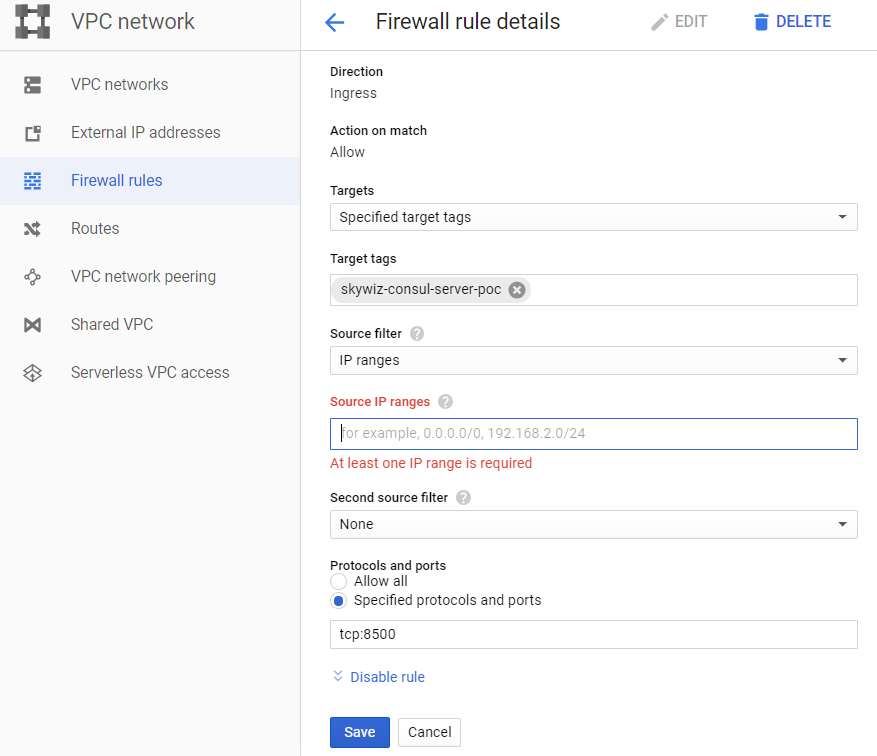
- Create a rule for firewall (security group in AWS):
- I like to assign the same machine name to the rule and the network tag, in this case it is “skywiz-consul-server-poc”.
- Find the IP address of your local computer and add it to the list of source IP addresses so that we can access the user interface (UI).
- Open port 8500 for the UI. Click Create. We will change this firewall [ link ] again soon.
- Add the rule for firewall to the instance. Return to the VM dashboard on the Consul server and add “skywiz-consul-server-poc” in the network tag field. Click Save.
- Install Consul on a virtual machine, check here. Remember that you need Consul version ≥ 1.5 [link]
- Create a single node Consul - the configuration is as follows.
groupadd --system consul useradd -s /sbin/nologin --system -g consul consul mkdir -p /var/lib/consul chown -R consul:consul /var/lib/consul chmod -R 775 /var/lib/consul mkdir /etc/consul.d chown -R consul:consul /etc/consul.d
- For a more detailed guide on installing Consul and setting up a cluster of 3 nodes, see here .
- Create the file /etc/consul.d/agent.json as follows [ link ]:
### /etc/consul.d/agent.json { "acl" : { "enabled": true, "default_policy": "deny", "enable_token_persistence": true } }
- Launch our Consul server:
consul agent \ -server \ -ui \ -client 0.0.0.0 \ -data-dir=/var/lib/consul \ -bootstrap-expect=1 \ -config-dir=/etc/consul.d
- You should see a bunch of output and end up with “... update blocked by ACLs”.
- Locate the external IP address of the Consul server and open a browser with this IP address on port 8500. Make sure that the UI opens.
- Try adding a key / value pair. There must be a mistake. This is because we loaded the Consul server using the ACL and denied all the rules.
- Go back to your shell on the Consul server and start the process in the background or in some other way for it to work, and enter the following:
consul acl bootstrap
- Find the value "SecretID" and go back to the UI. On the ACL tab, enter the secret identifier of the token you just copied. Copy SecretID somewhere else, we will need it later.
- Now add a key / value pair. For this POC, add the following: key: "custom-ns / test_key", value: "I'm in the custom-ns folder!"
Launch Kubernetes Cluster for our application with Consul Client as Daemonset
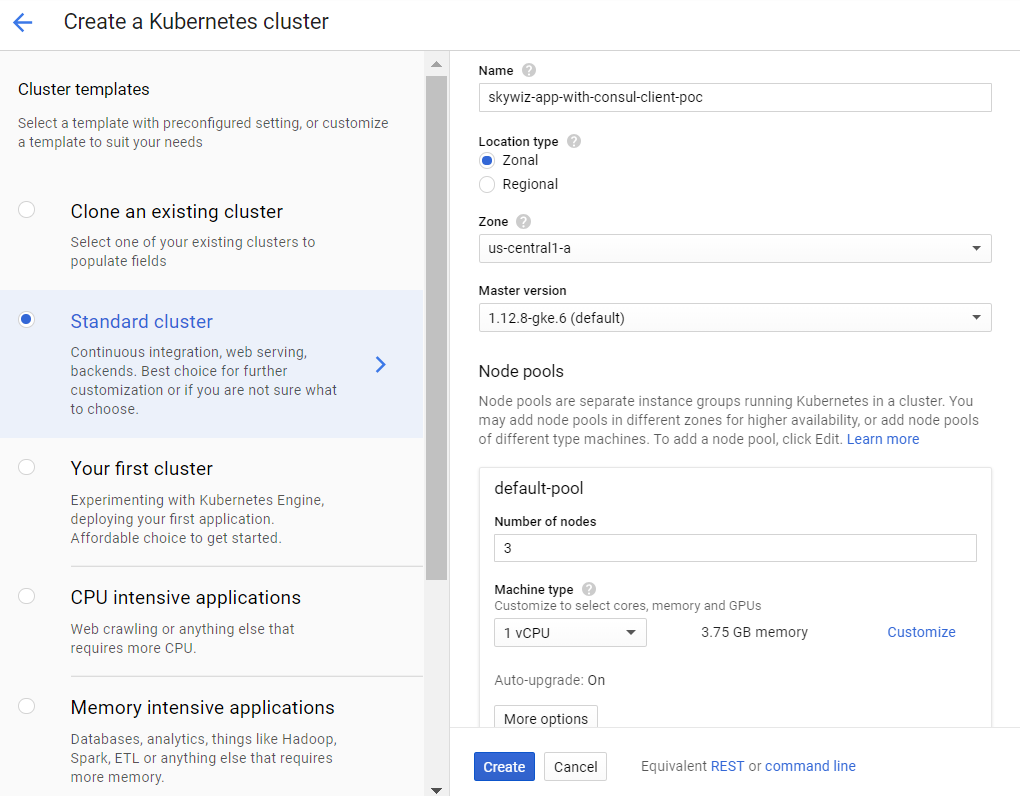
- Create a K8s cluster (Kubernetes). We will create it in the same zone as the server for faster access, and therefore we can use the same subnet for easy connection with internal IP addresses. We will call it “skywiz-app-with-consul-client-poc”.
- As a note, here is a good guide that I came across when setting up a POC Consul cluster with Consul Connect.
- We will also use the Hashicorp helm chart with an extended values file.
- Install and configure Helm. Configuration steps:
kubectl create serviceaccount tiller --namespace kube-system kubectl create clusterrolebinding tiller-admin-binding \ --clusterrole=cluster-admin --serviceaccount=kube-system:tiller ./helm init --service-account=tiller ./helm update
- helm chart: https://www.consul.io/docs/platform/k8s/helm.html
- Use the following values file (note most I have disabled):
### poc-helm-consul-values.yaml global: enabled: false image: "consul:latest" # Expose the Consul UI through this LoadBalancer ui: enabled: false # Allow Consul to inject the Connect proxy into Kubernetes containers connectInject: enabled: false # Configure a Consul client on Kubernetes nodes. GRPC listener is required for Connect. client: enabled: true join: ["<PRIVATE_IP_CONSUL_SERVER>"] extraConfig: | { "acl" : { "enabled": true, "default_policy": "deny", "enable_token_persistence": true } } # Minimal Consul configuration. Not suitable for production. server: enabled: false # Sync Kubernetes and Consul services syncCatalog: enabled: false
- Apply helm chart:
./helm install -f poc-helm-consul-values.yaml ./consul-helm - name skywiz-app-with-consul-client-poc
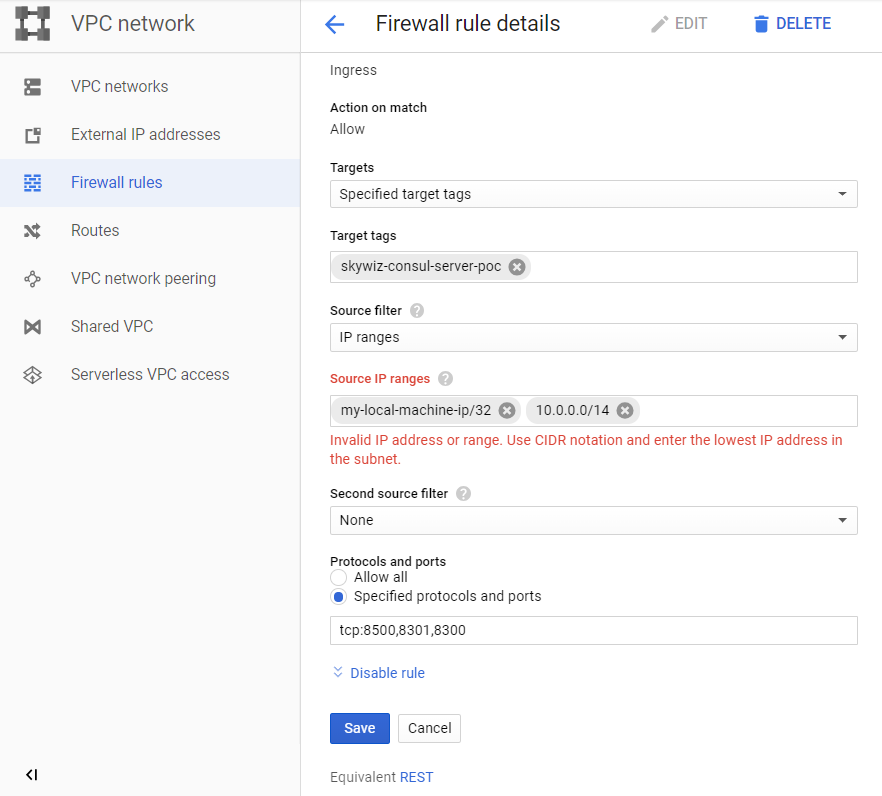
- When trying to start, it will need permissions for the Consul server, so let's add them.
- Pay attention to the "Pod address range" located on the cluster dashboard and return to our rule for the "skywiz-consul-server-poc" firewall.
- Add the address range for the IPA to the IP address list and open ports 8301 and 8300.
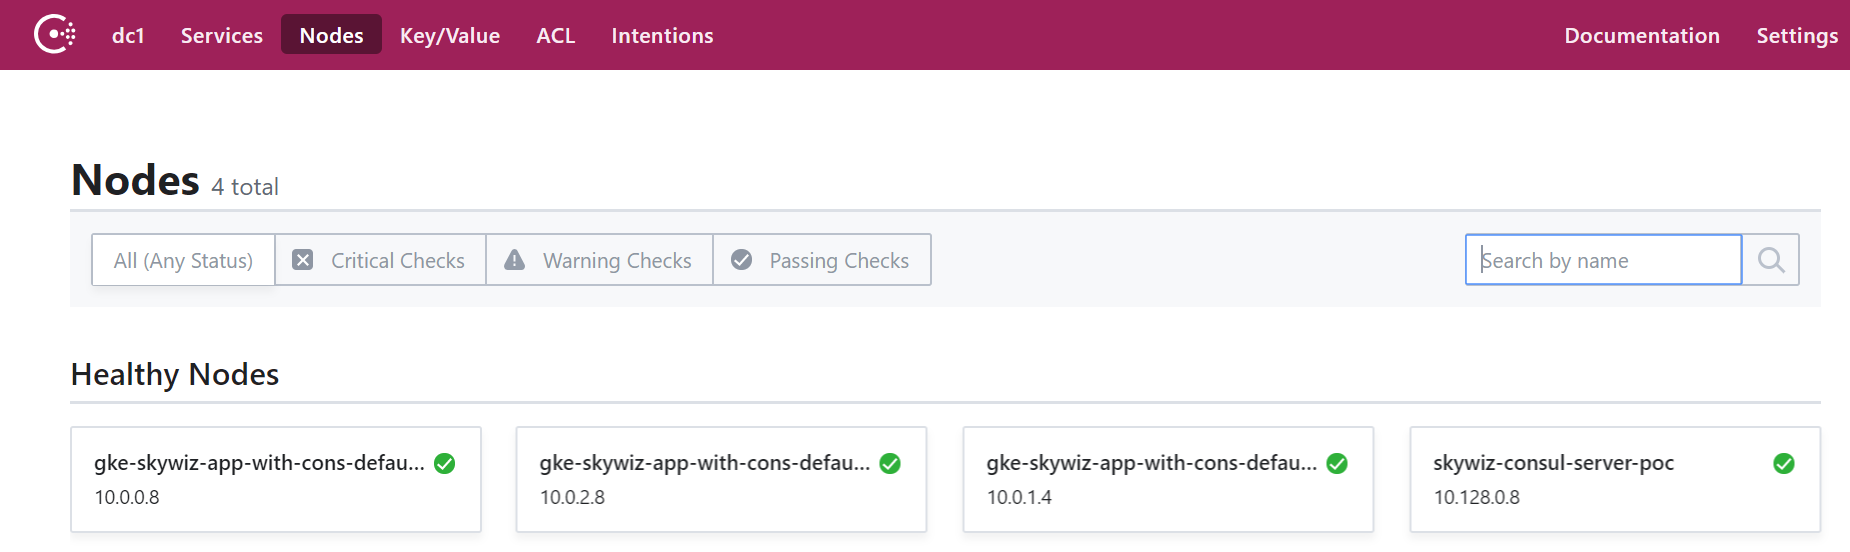
- Go to the Consul UI, and in a few minutes you will see that our cluster will appear on the node tab.
Configure authorization method by integrating Consul with Kubernetes
- Return to the Consul server shell and export the token that you saved earlier:
export CONSUL_HTTP_TOKEN=<SecretID>
- We need information from our Kubernetes cluster to create an instance of the auth method:
- kubernetes-host
kubectl get endpoints | grep kubernetes
- kubernetes-service-account-jwt
kubectl get sa <helm_deployment_name>-consul-client -o yaml | grep "\- name:" kubectl get secret <secret_name_from_prev_command> -o yaml | grep token:
- The token is encoded in base64, so decrypt it using your favorite tool [ link ]
- kubernetes-ca-cert
kubectl get secret <secret_name_from_prev_command> -o yaml | grep ca.crt:
- Take the certificate “ca.crt” (after decoding with base64) and write it into the file “ca.crt”.
- Now create an instance of the auth method, replacing the placeholders with the values you just received.
consul acl auth-method create \ -type "kubernetes" \ -name "auth-method-skywiz-consul-poc" \ -description "This is an auth method using kubernetes for the cluster skywiz-app-with-consul-client-poc" \ -kubernetes-host "<k8s_endpoint_retrieved earlier>" \ -kubernetes-ca-cert=@ca.crt \ -kubernetes-service-account- jwt="<decoded_token_retrieved_earlier>"
- Next, we need to create a rule and attach it to the new role. You can use the Consul UI for this part, but we will use the command line.
- Write a rule
### kv-custom-ns-policy.hcl key_prefix "custom-ns/" { policy = "write" }
- Apply the rule
consul acl policy create \ -name kv-custom-ns-policy \ -description "This is an example policy for kv at custom-ns/" \ -rules @kv-custom-ns-policy.hcl
- Find the identifier of the rule you just created from the output.
- Create a role with a new rule.
consul acl role create \ -name "custom-ns-role" \ -description "This is an example role for custom-ns namespace" \ -policy-id <policy_id>
- Now we will associate our new role with the auth method instance. Please note that the selector flag determines whether our login request will receive this role. Check out the other selector options here: https://www.consul.io/docs/acl/auth-methods/kubernetes.html#trusted-identity-attributes
consul acl binding-rule create \ -method=auth-method-skywiz-consul-poc \ -bind-type=role \ -bind-name='custom-ns-role' \ -selector='serviceaccount.namespace=="custom-ns"'
Last configurations
Access rights
- Create permissions. We need to give Consul permission to verify and identify the K8s service account token identity.
- Write the following [link] to the file:
###skywiz-poc-consul-server_rbac.yaml --- kind: ClusterRoleBinding apiVersion: rbac.authorization.k8s.io/v1 metadata: name: review-tokens namespace: default subjects: - kind: ServiceAccount name: skywiz-app-with-consul-client-poc-consul-client namespace: default roleRef: kind: ClusterRole name: system:auth-delegator apiGroup: rbac.authorization.k8s.io --- kind: ClusterRole apiVersion: rbac.authorization.k8s.io/v1 metadata: name: service-account-getter namespace: default rules: - apiGroups: [""] resources: ["serviceaccounts"] verbs: ["get"] --- kind: ClusterRoleBinding apiVersion: rbac.authorization.k8s.io/v1 metadata: name: get-service-accounts namespace: default subjects: - kind: ServiceAccount name: skywiz-app-with-consul-client-poc-consul-client namespace: default roleRef: kind: ClusterRole name: service-account-getter apiGroup: rbac.authorization.k8s.io
- Create access rights
kubectl create -f skywiz-poc-consul-server_rbac.yaml
Connect to Consul Client
- As noted here , there are several options for connecting to daemonset, but we will move on to the following simple solution:
- Apply the following file [ link ].
### poc-consul-client-ds-svc.yaml apiVersion: v1 kind: Service metadata: name: consul-ds-client spec: selector: app: consul chart: consul-helm component: client hasDNS: "true" release: skywiz-app-with-consul-client-poc ports: - protocol: TCP port: 80 targetPort: 8500
- Then use the following built-in command to create the configmap [ link ]. Please note that we refer to the name of our service, replace it if necessary.
cat <<EOF | kubectl apply -f - apiVersion: v1 kind: ConfigMap metadata: labels: addonmanager.kubernetes.io/mode: EnsureExists name: kube-dns namespace: kube-system data: stubDomains: | {"consul": ["$(kubectl get svc consul-ds-client -o jsonpath='{.spec.clusterIP}')"]} EOF
Testing the auth method
Now let's look at the magic in action!
- Create a few more key folders with the same top-level key (i.e. <new_folder> / sample_key) and the value of your choice. Create appropriate policies and roles for new key paths. We will do the bindings later.

Custom namespace test:
- Create our own namespace:
kubectl create namespace custom-ns
- Create under in our new namespace. Write the configuration for the hearth.
###poc-ubuntu-custom-ns.yaml apiVersion: v1 kind: Pod metadata: name: poc-ubuntu-custom-ns namespace: custom-ns spec: containers: - name: poc-ubuntu-custom-ns image: ubuntu command: ["/bin/bash", "-ec", "sleep infinity"] restartPolicy: Never
- Create under:
kubectl create -f poc-ubuntu-custom-ns.yaml
- Once the container starts, go there and install curl.
kubectl exec poc-ubuntu-custom-ns -n custom-ns -it /bin/bash apt-get update && apt-get install curl -y
- Now we will send a request to enter Consul using the authorization method that we created earlier [ link ].
- To view the entered token from your service account:
cat /run/secrets/kubernetes.io/serviceaccount/token
- Write the following to a file inside the container:
### payload.json { "AuthMethod": "auth-method-test", "BearerToken": "<jwt_token>" }
- Login!
curl \ --request POST \ --data @payload.json \ consul-ds-client.default.svc.cluster.local/v1/acl/login
- To complete the above steps on a single line (as we will run several tests), you can do the following:
echo "{ \ \"AuthMethod\": \"auth-method-skywiz-consul-poc\", \ \"BearerToken\": \"$(cat /run/secrets/kubernetes.io/serviceaccount/token)\" \ }" \ | curl \ --request POST \ --data @- \ consul-ds-client.default.svc.cluster.local/v1/acl/login
- Working! Must at least. Now take the SecretID and try to access the key / value that we must have access to.
curl \ consul-ds-client.default.svc.cluster.local/v1/kv/custom-ns/test_key --header “X-Consul-Token: <SecretID_from_prev_response>”
- You can decode Base64's “Value” and see that it matches the value in custom-ns / test_key in the UI. If you used the same value above in this manual, your encoded value would be IkknbSBpbiB0aGUgY3VzdG9tLW5zIGZvbGRlciEi.
User Service Account Test:
- Create a custom ServiceAccount with the following command [ link ].
kubectl apply -f - <<EOF apiVersion: v1 kind: ServiceAccount metadata: name: custom-sa EOF
- Create a new configuration file for the hearth. Please note that I turned on curl installation to save labor :)
###poc-ubuntu-custom-sa.yaml apiVersion: v1 kind: Pod metadata: name: poc-ubuntu-custom-sa namespace: default spec: serviceAccountName: custom-sa containers: - name: poc-ubuntu-custom-sa image: ubuntu command: ["/bin/bash","-ec"] args: ["apt-get update && apt-get install curl -y; sleep infinity"] restartPolicy: Never
- After that, run the shell inside the container.
kubectl exec -it poc-ubuntu-custom-sa /bin/bash
- Login!
echo "{ \ \"AuthMethod\": \"auth-method-skywiz-consul-poc\", \ \"BearerToken\": \"$(cat /run/secrets/kubernetes.io/serviceaccount/token)\" \ }" \ | curl \ --request POST \ --data @- \ consul-ds-client.default.svc.cluster.local/v1/acl/login
- Permission denied. Oh, we forgot to add a new rule binding with the appropriate permissions, let's do it now.
Repeat the previous steps above:
a) Create an identical Policy for the prefix "custom-sa /".
b) Create a Role, name it "custom-sa-role"
c) Attach the Policy to Role.
- Create a Rule-Binding (only possible from cli / api). Note the different value of the selector flag.
consul acl binding-rule create \ -method=auth-method-skywiz-consul-poc \ -bind-type=role \ -bind-name='custom-sa-role' \ -selector='serviceaccount.name=="custom-sa"'
- Log in again from the poc-ubuntu-custom-sa container. Success!
- Check our access to the custom-sa / key path.
curl \ consul-ds-client.default.svc.cluster.local/v1/kv/custom-sa/test_key --header “X-Consul-Token: <SecretID>”
- You can also make sure that this token does not provide access to kv in “custom-ns /”. Just repeat the above command after replacing “custom-sa” with the prefix “custom-ns”.
Permission denied.
Overlay example:
- It is worth noting that all rule-binding mappings will be added to the token with these rights.
- Our poc-ubuntu-custom-sa container is in the default namespace - so let's use it for another rule-binding.
- Repeat the previous steps:
a) Create an identical Policy for the key prefix “default /”.
b) Create a Role, name it “default-ns-role”
c) Attach the Policy to Role. - Create Rule-Binding (only possible from cli / api)
consul acl binding-rule create \ -method=auth-method-skywiz-consul-poc \ -bind-type=role \ -bind-name='default-ns-role' \ -selector='serviceaccount.namespace=="default"'
- Go back to our poc-ubuntu-custom-sa container and try to access the default / kv path.
- Permission denied.
You can view the specified credentials for each token in the UI under ACL> Tokens. As you can see, only one “custom-sa-role” is attached to our current token. The token we are currently using was generated when we logged in, and then there was only one rule-binding, which then corresponded. We need to log in again and use the new token. - Make sure you can read both from the “custom-sa /” and “default /” kv paths.
Success!
This is because our "poc-ubuntu-custom-sa" matches the bindings of the "custom-sa" and "default-ns" rules.
Conclusion
TTL token mgmt?
At the time of this writing, there is no integrated way to determine TTL for tokens generated by this authorization method. It would be a fantastic opportunity to provide secure automation of Consul authorization.
It is possible to manually create a token with TTL:
- https://www.consul.io/docs/acl/acl-system.html#acl-tokens
Expiration Time - The time when this token will be revoked. (Optional; added in Consul 1.5.0) - There is only for manual creation / updating https://www.consul.io/api/acl/tokens.html#expirationtime
I hope that in the near future we will be able to control how tokens are generated (for each rule or authorization method) and add TTL.
Until then, it is proposed to use in your logic the endpoint of the exit from the system.
- https://www.consul.io/api/acl/acl.html#logout-from-auth-method
- https://www.consul.io/docs/acl/acl-auth-methods.html#overall-login-process
Also read other articles on our blog:
- What was the result of migration from ClickHouse without authorization to ClickHouse with authorization
- How to run multiple pipelines using GitLab CI / CD
- Three simple tricks to reduce docker images
- Traefik as an Ingress Controller for K8S
- Backing up a large number of heterogeneous web projects
- Telegram bot for Redmine. How to simplify life for yourself and people