Table of contents
Foreword
1. Configuring git
.... 1.1 Configuration Files
.... 1.2 Default settings
.... 1.3 Aliases
2. The basics of git
.... 2.1 Creating a repository
.... 2.2 File Status
.... 2.3 Working with the index
.... 2.4 Working with commits
.... 2.5 View History
.... 2.6 Working with a remote repository
3. Branching in git
.... 3.1 Basic operations
.... 3.2 Merging branches
.... 3.3 Rerere
4. Pointers in git
.... 4.1 Moving pointers
5. Recommended reading
Foreword
Git is the most popular distributed version control system. [1] [2]
The main purpose of Git is to save snapshots of the successively improving conditions of your project (Pro git, 2019).
This article is for those who have at least basic knowledge and skill in working with git and who wish to expand their knowledge.
Only technical aspects of git are considered here, for a more detailed immersion in git's philosophy and its internal implementation, I advise you to read several useful books (see Recommended reading ).
1. Configuring git
Before you start working with git, you need to configure it for yourself!
1.1 Configuration Files
- / etc / gitconfig - General settings for all users and repositories
- ~ / .gitconfig or ~ / .config / git / config - Specific user settings
- .git / config - Settings for a specific repository
There is a special team
git config [<>]
which will allow you to change the standard behavior of git, if necessary, but you can edit the configuration files manually (I think so faster).
Depending on which parameter you pass to the git config (--system, --global, --local) command, the settings will be written to one of these files. Each of these “levels” (system, global, local) redefines the values of the previous level!
To see in which file what settings are installed, use git config --list --show-origin.
Ignoring files
In git, you decide which files will go into which commit, but perhaps you would like certain files to never be in the index and in the commit, and not even appear in the untracked list. To do this, you can create a special file (.gitignore) in your repository and write the template of ignored files there. If you do not want to create such a file in each repository, you can define it globally using core.excludesfile (see Useful Settings ). You can also download the finished .gitignore file for the programming language you are working on.
To customize .gitignore, use bash regular expressions .
1.2 Default Settings
There are a bunch of git settings for both the server and the client, only basic client settings will be considered here.
Use
git config name value
where name is the name of the parameter, and value is its value in order to set the settings.
Example:
git config --global core.editor nano
will install the default editor nano.
You can look at the value of an existing parameter with git config --get [name] where name is the parameter whose value you want to get.
Useful settings:
- user.name - The name that will be used when creating the commit
- user.email - Email to use when creating the commit
- core.excludesfile - A file whose template will be used to ignore specific files globally
- core.editor - The default editor
- commit.template - The file whose contents will be used for the default commit message (See Working with commits ).
- help.autocorrect - When set to 1, git will execute incorrectly written commands.
- credential.helper [mode] - Sets credential storage mode. [cache] - credentials are saved for a certain period, passwords are not saved (--timeout [seconds] the number of seconds after which the data is deleted, by default 15 minutes). [store] - the credentials are stored for unlimited time in the clear (--file [file] indicates the path to store data, by default ~ / .git-credentials).
1.3 Aliases
If you don't want to print every command for Git in its entirety, you can easily configure aliases. To create an alias use:
git config alias.SHORT_NAME COMMAND
where SHORT_NAME is the name to abbreviate, and COMMAND the command (s) to be abbreviated. Example:
git config --global alias.last 'log -1 HEAD'
after executing this command, you can view information about the last commit on the current branch by running git last.
I advise you to use the following abbreviations (you can also define any of your own):
- st = status
- ch = checkout
- br = branch
- mg = merge
- cm = commit
- reb = rebase
- lg = "git log --pretty = format: '% h -% ar:% s'”
To view configuration settings, use: git config --list.
2. The basics of git
Only mandatory and useful (in my opinion) parameters are listed here, for listing all is inappropriate. To do this, use git command -help or --help, where command is the name of the command the help you want to get about.
2.1 Creating a repository
- git init [<options>] - Creates a git repository and a .git directory in the current directory (or in the directory specified after --separate-git-dir <git_root>, in which case the .git directory will be in another place);
- git clone [<options>] [-] <repository> [<folder>] [-o, --origin <name>] [-b, --branch <branch>] [--single-branch] [- -no-tags] [--separate-git-dir <git_root>] [-c, --config <key = value>] - Clones repositories with the name origin (or the one you specify -o <name> ), being on the branch that HEAD points to (or the one you specify -b <branch>). You can also clone only the necessary HEAD branch (or the one specified in -b <branch>) by specifying --single-branch. By default, all tags are cloned, but by specifying --no-tags you can not clone them. After the command is executed, the .git directory is created in the current directory (or in the directory specified after --separate-git-dir <git_root>, in which case the .git directory will be located elsewhere);
2.2 File Status
To view the status of files in your repository, use:
git status [<>]
This command can show you: which branch you are currently on and the status of all files. There are no required options, only -s can be distinguished from useful ones, which will show a brief idea of the states of files.
File life cycle
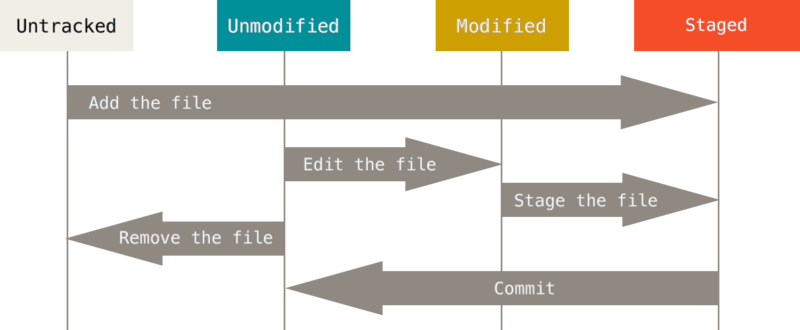
As you can see in the picture, the files can be untracked and tracked. The monitored files can be in 3 states: Not modified (Unmodified), modified (Modified), prepared (Staged).
If you add (using git add) an “Unmonitored” file, then it goes into the “Prepared” state.
If you change the file to the “Not changed” state, then it goes into the “Changed” state. If you save the modified file (that is, in the “Modified” state), it goes into the “Prepared” state. If you commit a file (that is, in the "Prepared" state), it goes into the "Not changed" state.
If the versions of the file in HEAD and the working directory are different, then the file will be in the “Modified” states, otherwise (if the version in the HEAD and the working directory is the same “), the file will be in the“ Not changed ”states.
If the version of the file in HEAD differs from the working directory, but does not differ from the version in the index, the file will be in the “Prepared” state.
This cycle can be represented as follows:
Unmodified -> Modified -> Staged -> Unmodified
That is, you modify the file, save it in the index and make a commit, and then all over again.
2.3 Working with the index
I hope you understand what the life cycle of the git repository looks like. Now let's see how you can manage the index and files in your git repository.
An index is an intermediate place between your last commit and the next. You can add or remove files from the index. When you commit, it gets data from the index, and not from the workspace.
To view the index, use git status.
To add files to the index use
git add [<>]
Useful git add command options:
- -f, --force - add ignored files as well
- -u, --update - update tracked files
To remove files from the index, you can use 2 git reset and git restore commands.
git-restore - restores working tree files.
git-reset - resets the current HEAD to the specified state.
In fact, you can achieve the same thing with both commands.
To remove some files from the index, use:
git restore --staged <file>
this way you will restore your index (or rather, delete specific files from the index), as if git add had not been executed for them since the last commit. Using this command, you can restore the working directory so that it looks as if no changes were made after the commit. But this command has a bit strange behavior - if you added a new version of your file to the index, you cannot change your working directory until the index is different from HEAD. Therefore, you first need to restore your index and only then the working directory. Unfortunately, it is not possible to do this with a single command, since when passing both arguments (git restore -SW) nothing happens. And just like that, transferring -W will also not happen if the file in the index and HEAD are different. Probably, they did it for protection so that you would not accidentally change your working directory. But in this case, why is the -W argument passed by default? In general, I don’t understand why this was done and why this command was added at all. For me, reset copes with this task much better, and it also has richer functionality since it can move the index and working directory not only to the last commit, but also to any other.
But the developers themselves recommend using git restore -S to reset the index. Instead of git reset HEAD.
Using git status you can see which files have changed, but if you also want to know what exactly has changed in the files, use the command:
git diff [<options>]
thus, by running the command without arguments, you can compare your index with the working directory. If you have already added files to the index, then use git diff --cached to see the differences between the last commit (or the one you specify) and the working directory. You can also see the differences between two commits or branches by passing them as an argument. Example: git diff 00656c 3d5119 will show the differences between commit 00656c and 3d5119.
2.4 Working with commits
Now that your index is in the right state, it's time to commit your changes. Remember that all files for which you did not run git add after editing are not included in this commit. In fact, there will be files in it, but only their old version (if any).
To commit your changes, use:
git commit [<>]
Useful options for the git commit command:
- -F, --file [file] - Write a commit message from the specified file
- --author [author] - Replace commit author
- --date [date] - Change commit date
- -m, --mesage [message] - Message commit
- -a, --all - Commit all changes to files
- -i, --include [files ...] - Add the specified files to the index for the next commit
- -o, --only [files ...] - Commit only the specified files
- --amend - Overwrite previous commit
You can define a default commit message using commit.template. This directive in the configuration file is responsible for the file whose contents will be used for the default commit. Example: git config --global commit.template ~ / .gitmessage.txt.
You can also change, delete, merge any commit.
As you may have noticed, you can quickly overwrite the last commit with git commit --amend.
To change the commit in your story, use
git rebase -i <commit>
where commit is the top commit in your chain from which you would like to change anything.
After executing git rebase -i in the interactive menu, select what you want to do.
- pick <commit> = use commit
- reword <commit> = use commit, but change the commit message
- edit <commit> = use commit, but stop to fix
- squash <commit> = use commit, but merge with previous commit
- fixup <commit> = as "squash", but skip the commit message
- exec <command> = execute the command (remainder of the line) using the shell
- break = stop here (continue with "git rebase --continue")
- drop <commit> = delete commit
- label <label> = give name to current HEAD
- reset <label> = reset HEAD to the specified label
To change the message of a specific commit.
You must change pick to edit above the commit you want to change.
Example: you want to change the message of the 750f5ae commit.
pick 2748cb4 first commit
edit 750f5ae second commit
pick 716eb99 third commit
After saving the script, you will return to the command line and git will tell you what to do next:
Stopped at 750f5ae ... second commit
You can amend the commit now, with
git commit --amend
Once you are satisfied with your changes, run
git rebase --continue
As indicated above, you must run git commit --amend in order to change the commit message. Then execute git rebase --continue. If you have selected several commits for changing the name, then these operations will need to be done on each commit.
To delete a commit
You must delete the line with the commit.
Example: you want to delete the commit 750f5ae
You need to change the script from this:
pick 2748cb4 third commit
pick 750f5ae second commit
pick 716eb99 first commit
on this:
pick 2748cb4 first commit
pick 716eb99 third commit
To merge commits
You must change pick to squash over the commits you want to merge.
Example: you want to combine the commits 750f5ae and 716eb99.
You need to change the script from this:
pick 2748cb4 third commit
pick 750f5ae second commit
pick 716eb99 first commit
On such
pick 2748cb4 third commit
squash 750f5ae second commit
squash 716eb99 first commit
Notice that in the interactive script, commits are shown in reverse order than in git log. Using squash, you combine the commit 750f5ae with 716eb99 and 750f5ae with 2748cb4. As a result, getting one commit containing the changes of all three.
2.5 View History
Using command
git log [<>] [<->]
You can view the commit history of your repository. There are also a bunch of options for sorting and searching for a specific commit.
Useful git log command options:
- -p - Shows the difference for each commit.
- --stat - Shows statistics of modified files for each commit.
- --graph - Displays an ASCII graph with branches and merge history.
You can also sort commits by time, quantity, etc.
- - (n) Shows only the last n commits.
- --since, --after - Shows commits made after the specified date.
- --until, --before - Shows commits made before the specified date.
- --author - Shows only those commits in which the author entry matches the specified string.
- --committer - Shows only those commits in which the committer entry matches the specified string.
- --grep - Displays only commits whose message contains the specified string.
- -S - Shows only commits in which a change in the code resulted in the addition or deletion of the specified line.
Here are some examples:
git log --since = 3.weeks - Show commits in the last 2 weeks
git log --since = "2019-01-14" - Show the commits made on 2019-01-14
git log --since = "2 years 1 day ago" - Show the commits made 2 years and one day ago.
You can also customize your commits output format with
git log --format:["format"]
Formatting options for git log --format.
- % H - Commit Hash
- % h - Shortened commit hash
- % T - Tree Hash
- % t - Shortened tree hash
- % P - Parent Hash
- % p - Abbreviated Parent Hash
- % an - Author Name -% ae - Author Email
- % ad - Author date (date format can be set with option --date = option)
- % ar - Relative date of the author
- % cn - Committer Name
- % ce - Committer Email
- % cd - Commit Date
- % cr - Relative commit date
- % s - Content
Example:
git log --pretty=format:"%h - %ar : %s"
will show a list of commits consisting of a time hash and a commit message.
2.6 Working with a remote repository
Since git is a distributed hard currency, you can work not only with local but also with external repositories.
Remote repositories are versions of your project stored on an external server.
To work with external repositories, use:
git remote [<options>]
If you cloned the repositories via the http URL, then you already have a link to the external one. Otherwise, you can add it with
git remote add [<options>] <name> <adres>
You can immediately extract external branches using -f, --fetch (you get the names and state of the branches of the external repository). You can only configure repositories to send or receive data using --mirror [= (push | fetch)]. To get tags, specify --tags.
To view connected external repositories, use git remote with no arguments or git remote -v to view the addresses to send and receive data from the repository.
To track branches, use git branch -u <rep / br> where rep is the name of the repository, br is the name of the external branch, and branch is the name of the local branch. Or git branch --set-upstream local_br origin / br in order to indicate which local branch will monitor the external branch.
When your branch is tracking the outside, you can find out which branch (local or external) is behind or ahead and by how many commits. For example, if after a commit you did not perform git push, then your branch will be ahead of the outer one by 1 commit. You can find out about this by running git branch -vv, but first do git fetch [remote-name] (--all to get updates from all repositories) to get the latest data from an external repository. To cancel branch tracking, use git branch --unset-upstream [<local_branch>].
Use git pull [rep] [branch] to download data from an external repository. If your branches track external, then you can not specify them when performing git pull. By default, you will receive data from all monitored branches.
To upload branches to a new branch, use git checkout -b <new_branch_name> <rep / branch>.
To send data to the server, use
git push [<rep>] [<br>]
where rep is the name of the external repository, and br is the local branch that you want to send. You can also use this entry git push origin master: dev. Thus, you upload your local master branch to origin (but there it will be called dev). You will not be able to send data to an external repository if you do not have rights to do so. Also, you will not be able to send data to an external branch if it is ahead of yours (in general, you can send using -f, --forse in this case, you will rewrite the history on the external repository). You can omit the name of the branch if your branch is tracking the outside.
To delete external branches use
git push origin --delete branch_name
For detailed information about the external repository (addresses for sending and receiving, as indicated by HEAD, external branches, local branches configured for git pull and local links configured for git push)
git remote show <remote_name>
To rename the name of the external repository, use
git remote rename <last_name> <new_name>
To remove links to an external repository, use
git remote rm <name>
3. Branching in git
Branching is a powerful tool and one of the main features of git since it allows you to quickly create and switch between different branches of your repository. The main concept of branching is that you can take off from the main line of development and continue working independently of it, without interfering with the main line. A branch always points to the last commit in it, and HEAD points to the current branch (see Pointers in git ).
3.1 Basic operations
To create a branch, use
git branch <branch_name> [<start_commit>]
Here branch_name is the name for the new branch, and start_commit is the commit to which the branch will point (that is, the last commit in it). By default, the branch will be on the last commit of the parent branch.
Git branch options:
- -r | -a [--merged | --no-merged] - List of monitored external branches -r. -a. --merged. --no-merged.
- -l, -f <-> [<->] — -l. , -f. < >.
- -r (-d | -D) — -r. -d. ( ) -D.
- -m | -M [< >] < > — / (-m). / , -M.
- (- | -) [<->] <-> — -c. , -C.
- -v, -vv - List of branches with the last commit on the -v branch. List and status of monitored branches with the last commit to them.
See git branch -h for more information | --help.
To switch to a branch, use git checkout. You can also create a branch by running git checkout -b <branch>.
3.2 Merging branches
To merge 2 branches of a git repository, use git merge.
Useful options for git merge:
- --squash - Create one commit instead of merging. If you have a conflict on branches, then after resolving it, you will have 2 commits added on the branch (commit from the merged branch + merge commit), but by specifying this argument you will only add one commit (merged commit).
- --ff-only - Do not merge if there is a conflict. Let anyone else resolve conflicts: D
- -X [strategy] - Use the selected merge strategy.
- --abort - Cancel the merge.
The merger process.
If you did not execute new commits on the parent branch, then the merge boils down to fast-forward fast, as if you were not creating a new branch, and all changes occurred right here (on the parent branch).
If you made commits on both branches, but did not create a conflict, then the merge will take place in the “recursive strategy”, that is, you just need to create a merge commit to apply the changes (use the --squash option to avoid creating an extra commit) .
If you made commits on both branches that made different changes to the same part of the same file, then you will have to resolve the conflict and commit the merge commit.
When resolving the conflict, you need to choose which part of the changes from the two branches you want to leave. When you open a conflicting file, it will contain the following:
<<<<<<< HEAD
There will be a version of the last commit of the current branch
======
There will be a version of the last commit of the merged branch
>>>>>>> Here the name branches with which we merge
Having resolved the conflict, you must complete the merge by committing.
During a conflict, you can see what differences are in which files.
git diff --ours - Difference before merging and after
git diff --theirs - Difference of merged branch before merging and after
git diff --base - Difference with both branches before merging and after
If you do not want to allow merging, then use different merge strategies, either choosing “our” version (that is, the one located on the current branch) or choosing “their” version located on the merged branch without fixing the conflict. Run git merge --Xours or git merge --Xtheirs respectively.
3.3 Rerere
Rerere - “reuse recorded resolution” - “reuse of saved conflict resolutions”. The rerere mechanism is able to remember how you resolved a certain part of the conflict in the past and automatically correct the conflict the next time it occurs.
To enable rerere do
git config --global rerere.enabled true
You can also enable rerere by creating the .git / rr-cache directory in the desired repository.
Use git rerere status to see which files rerere has saved snapshots for before merging.
Use git rerere diff to view the current state of conflict.
If during the merge it says: Resolved 'nameFile' using previous resolution. So rerere has already resolved the conflict using the cache.
To cancel automatic conflict resolution, use git checkout --conflict = merge so you cancel automatic conflict resolution and return the file (s) to the conflict state for manual resolution.
4. Pointers in git
git has pointers like HEAD branch. In fact, everything is very simple HEAD points to the current branch, and the branch points to the last commit in it. But for understanding it is better to imagine that HEAD indicates the last commit.
4.1 Moving Pointers
The Pro git book provides a very good example of how you can manage your repository, so I will stick with it too. Imagine that Git manages the contents of three different trees. Here, “tree” refers to a “set of files”.
In its usual operations, Git manages three trees:
- HEAD - Snapshot of the last commit, parent of the next
- Index - Snapshot of the next upcoming commit
- Working Directory - Sandbox
Actually git provides tools for manipulating all three trees. Next, the git reset command will be discussed, which allows you to work with three trees of your repository.
Using the various options of this command you can:
- --soft - Reset HEAD only
- --mixed - Reset HEAD and index
- --hard - Reset HEAD, index and working directory
By reset means moving to the specified commit. The default is --mixed.
Example 1. You made 3 extra commits each of which brings small changes and you want to make one of them, so you can use git reset --soft to move the HEAD pointer while leaving the index and working directory untouched and commit. As a result, your story will look like all the changes happened in one commit.
Example 2. You added extra files to the index and want to remove them from there. You can use git reset HEAD <files ...> for this. Or do you want the commit files to look like a couple of commits back. As I said earlier, you can reset the index to any commit, unlike git restore, which resets only until the last commit. Only with the mixed option can you apply an action to the specified file!
Example 3. You started working on a new feature on your project, but suddenly the employer says that it is no longer needed and in a fit of anger you perform git reset --hard returning your index, files and HEAD by the time you have not started working on features. And the next day you are told that the feature should still be washed down. But what to do? How to move forward, because you rolled back all 3 trees and now you can’t find them in the history using git log. And there is a way out - this is the git reflog link log. With this command, you can see where HEAD was pointing and it will move not only down the commit history, but also up. This log is local to each user.
In general, I think you can come up with a lot more examples than me. In conclusion, I’ll say that with git reset you can do magic ...
5.
- Pro git — Scott Chacon
- Git — . , ,
- Git Essentials — F. Santacroce
- Git: Version Control for Everyone (2013) — R. Somasundaram
- Version Control with Git: Powerful tools and techniques for collaborative software development (2009) — J. Loeliger, M. McCullough
- Practical Git and GitHub (2016) — D. Cruz
- Git in Practice (2016) — M. McQuaid
- Git Best Practices Guide (2014) — E. Pidoux
- Learn Enough Git to Be Dangerous (2016) — M. Hartl
- Learn Version Control with Git: A step-by-step course for the complete beginner (2014) — T. Günther
- Git: Learn Version Control with Git: A step-by-step Ultimate beginners Guide (2017) — D. Hutten
- Pragmatic Guide to Git (2010) — S. Travis
- Git (2016) — .
- A Hacker's Guide to Git (2014) — J. Wynn
- Practical Git and GitHub (2016) — D. Cruz
- Deploying to OpenShift(2018) — G. Dumpleton
- Git for Teams (2015) — Emma Jane Hogbin Westby