
The essence of the problem
Old BIOSes do not see new NVMe SSDs, unlike EFI (UEFI). Modern OSs, as a rule, see these disks, and after loading the OS it is possible to work with the disk, but there is no old BIOS, therefore, it will not work to boot from the new fast disk. Well, because you cannot give a command to download something that is not visible.
Prelude
An NVMe SSD drive, as a rule, has an M.2 connector, and works as if directly with the processor, via the PCI-E bus.
Therefore, if your motherboard does not have an M.2 connector, then for starters it is recommended to get a PCI-E >> M.2 adapter, or a PCI-E RAID controller for M.2 SSD format.
There are few advanced NVMe SSDs that have their own Legacy emulator on board. For example, the Samsung 950 Pro has an additional rom to boot as a Legacy device on older BIOSes. But the entire EVO series does not have such an opportunity.
Decision
A bit of history
Many years ago, when Intel began supplying Apple its processors and components for use in Macs, there was a need for preliminary testing of hardware for compatibility with MacOS. Then Intel engineers wrote a tricky DUET bootloader, which is a UEFI emulator loaded on top of the Legacy BIOS and allowing you to run operating systems that require UEFI (MacOS, for example).
However, using DUET “directly” is not a very trivial task ( an example , or, brrr ...), requiring a lot of manual operations, depending on the specific hardware and OS, and understanding what you are doing.
In the future, DUET was taken as the basis for several projects to create multi-bootloaders. One of them is Hackintosh - a project to install the latest MacOS on any Intel, and later AMD machines. As a result of the development of Hackintosh, a multi-functional bootloader Clover (Clover) appeared , which is, of course, sharpened for loading MacOS and Intel, but now it can be successfully used to boot anything on, practically, anything. Here they are, Clover , we will use to solve our problem.
Clover Configurator
Clover by itself is also configured not anyhow , and in order to somehow facilitate the further tuning process, the Clover Configurator configuration utility was released, and many manuals for use.
But the trouble is that Clover Configurator only works on MacOS, and on Windows you, at best, only run it on VmWare.
Web Configurator for Clover
Some users recommend using the web configurator for Clover instead of Clover Configurator. The truth is not the fact that the press for your MB will be on the list. And the documentation on Clover is voluminous and detailed. But, try, and suddenly.
There are also rumors (in the comments) that the author of Clover (SergeySlice) does not recommend using Clover Configurator but recommends editing the configuration file by hand.
We will not go this way ... we have paws and Mastday.
Boot Disk Utility (BDUtility.exe)
Especially for those with paws, one Russian enthusiast wrote the utility BDUtility.exe , which itself downloads the latest Clover release, makes the necessary minimum settings and writes the resulting image to a USB flash drive.
Do not be alarmed by a vyrviglazny site, the utility works fine :-)
To download the utility, click on the picture with the letters "Bu" and a blue arrow in the middle of the site :-)
Note
To solve our problem, we will use an additional bootable USB flash drive, from which Clover will boot over the BIOS, identify your new fast NVMe SSD and send it a command to boot your new 64-bit Windows 10 (or any other).
From now on, the USB flash drive will be permanently installed in the free USB port of your computer, until you upgrade the old hardware!
Yes, anyone with a laptop should take care that there are few free USB ports, and a long flash drive sticking out of the laptop all the time may not be aesthetically pleasing enough.
On the other hand, now your flash drive is the coolest security key to your computer, because without it the computer just won’t turn on, and guessing that the flash drive should be, and even with Clover, is a task for true intelligence agencies.
If there is an extra SATA drive ...
Theoretically, you can try putting Clover on an extra SATA drive or even a memory card, if there are any in the system and it supports loading (I have no disks left, demolished everything, buzz, but there weren’t any options to boot from the memory cards). In any case, the Clover documentation allows this. However, in this case you will have to manually conjure with the boot area.
Creating an installation flash drive
If you were able to download the BDUtility utility, run it. It runs under Windows and with administrator privileges, be careful.
The lucky owner of other operating systems is to skip this step and return to Clover Configurator above.
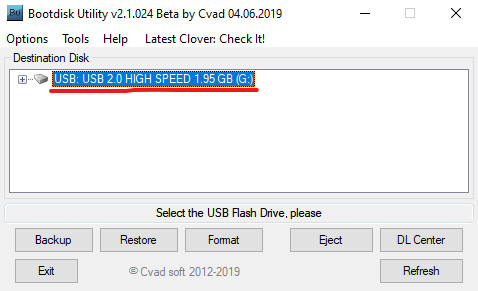
Run BDUtility.exe
Next, you need to make a number of settings so that the utility downloads the latest Clover distribution, configures it, and writes it to your USB flash drive. The flash drive must be inserted into the USB port, and preferably formatted cleanly.
Note
Currently, the BDUtility utility is taking Clover releases from sourceforge.net, where releases are posted up to version Clover_v2.5k_r5070.zip . After that, the development of Clover was transferred to GitHub , where the release of Clover_v2.5k_r5097.zip is now posted. Consider this in your work. BDUtility can optionally use pre-downloaded Clover releases (but compatible with BDUtility) if you need to use the latest release.
We sent requests to the developers of Clover and BDUtility with a request to communicate with each other and switch BDUtility to GitHub.
BDUtility setup:
- Make sure that your flash drive is identified by the utility
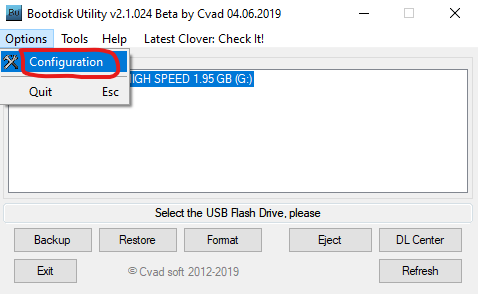
- Go to the utility settings Options => Configuration
- Check the Check at Startup checkbox so that the new version of Clover is checked at every boot.
- Click the Check Now Button to Download the Latest Clover Release Now
- (optional, recommendation) Uncheck the Boot Partition Size checkbox so that the entire volume of your flash drive is allotted to the Colver bootloader, otherwise you will see additional disks (unoccupied and unallocated sections of the flash drive) in "My Computer" , which after some time will start to annoy you
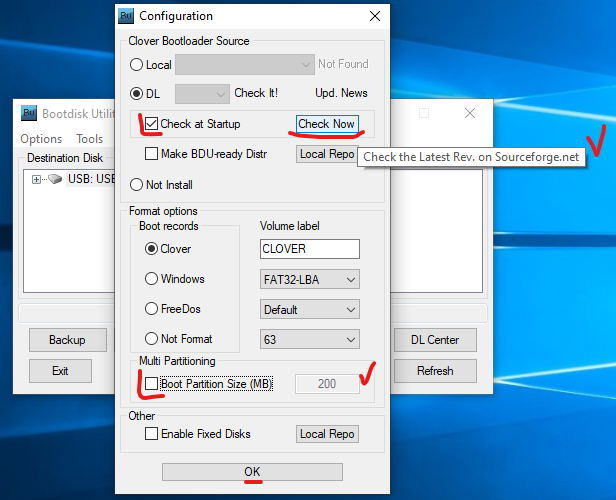
- Click OK

- Click the Format button, examine the configuration of the bootloader being created and click OK
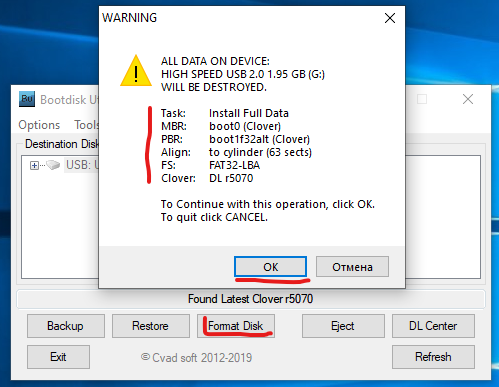
- Expect a positive result (sit on the stove, perk up ...)
Now that the flash drive is ready, try to boot from it. Do not forget to configure the BIOS boot disk => your flash drive.
If the download occurs, approximately the following picture should appear on the screen, with a list of current download options. You can try to find your boot record and load the current OS.

NVMe Drivers
If your NVMe SSD is already inserted into the computer, do not try to find it in the Clover settings - it is not there. The fact is that, by default, Clover does not load drivers for NVMe devices. Drivers must be included in the download manually.
To do this, open the USB flash drive in the conductor.
We go to the folder G: \ EFI \ CLOVER \ drivers \ off (where the “G” drive is your flash drive, and the “off” folder is the folder with the clover drivers not connected).
We find the file NvmExpressDxe.efi
Press Ctrl + C to copy the file to the clipboard, and copy the file to the folders G: \ EFI \ CLOVER \ drivers \ BIOS and G: \ EFI \ CLOVER \ drivers \ UEFI . Just in case, we copy to both folders so as not to understand which BIOS you have now, the old BIOS or the old UEFI.
We reboot the computer, boot from the Clover flash drive and observe the number of icons on the screen that indicate the boot options - there should be more of them, because now Clover sees your NVMe SSD.
Half the story is over!
Installing a new OS on a new NVMe SSD
Further, in order to take advantage of booting from a fast NVMe SSD, we need to actually install a system on it. And there is a nuance. So that in the future there would be no problems with trying to boot from your NVMe disk from Clover, it is highly recommended not to transfer your current system to a new disk, but to install a new system on the NVMe disk from scratch. The problem goes back to the type of bootloader of your operating system that was selected and used when it was installed on the computer. If you now have a system with a BIOS that does not support NVMe, then the current boot loader is focused on the BIOS, not on EFI.
It is to this bootloader that Clover transfers control, and in EFI emulation mode. For reference, my Win64 clover loader lies on a clover flash drive here G: \ EFI \ BOOT \ BOOTX64.efiTransferring such an OS to an NVMe disk and using it to boot in EFI mode just doesn’t work, you will need to manually change the OS loader, and this is time-consuming, not entirely justified and fraught, IMHO.
Therefore, we boldly stock up on the license key for the new OS (well, or find where the old one is) and go to the Media Creation Tool download page to make the boot disk of your Windows operating system. The fact is that for some time now Microsoft began to include both the BIOS and EFI loaders in the image created by the Media Creation Tool. And now this bootable flash drive can boot on absolutely any system with Legacy BIOS, UEFI and EFI. And before, I had to process the resulting boot image and integrate Rufus into it to boot in EFI mode (for example , scroll to the middle).
Note
Yes, you will need a second bootable USB flash drive to install the OS on the NVMe SSD.
No, the Windows distribution cannot be written to a flash drive with Clover.
OS installation
Installing the operating system on the new NVMe SSD is quite regular and quick.
You need to boot with two inserted flash drives, and boot from a clover flash drive, and not from a Windows distribution, do not confuse.
In the Clover interface, find the boot from the flash drive with the distribution of your OS. Next, the installation of the OS should begin. At some point, the system will reboot (you install Windows), and you will have to choose to continue downloading from your NVMe SSD, again, do not confuse! Do not choose to re-boot from the OS distribution, otherwise the installation will just start again, and we need it to continue with the SSD and, preferably, be completed.
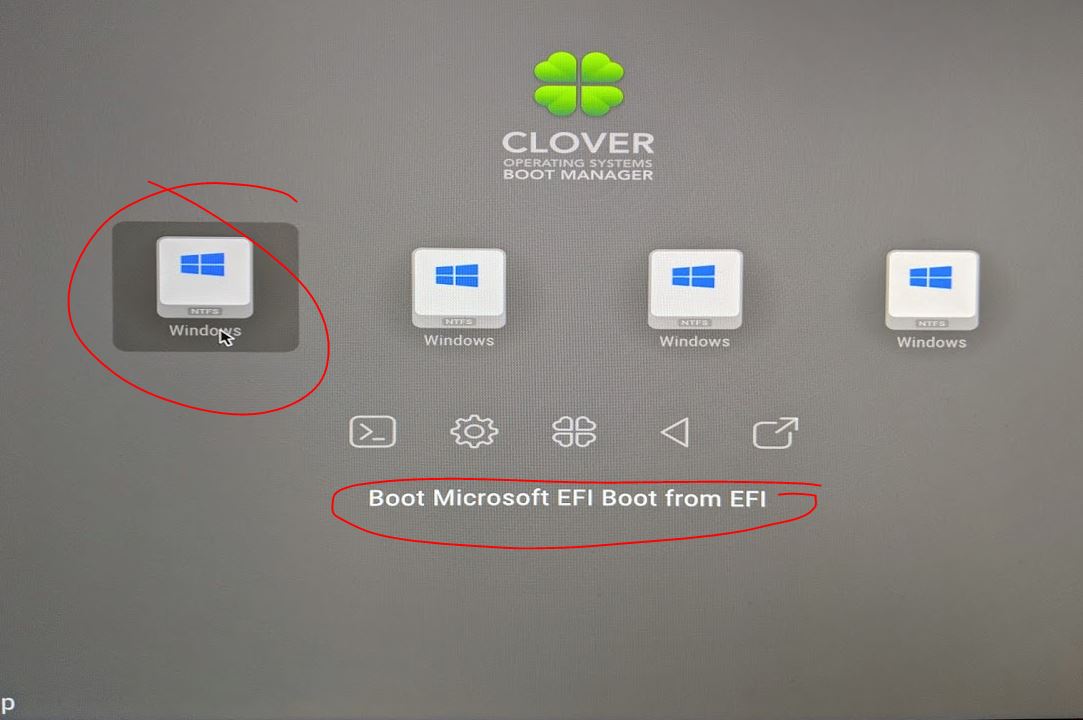
After installing the new system on your new NVMe SSD, a record will appear in Clover that a new OS was installed from under it. Also, the boot icon for the new OS should appear first in the list of downloads, and if I don’t confuse anything, it will be called “Boot Microsoft EFI Boot from EFI” .
And after the final installation of the OS, remove the USB flash drive with its distribution so that it no longer appears in Clover and in "My Computer".
And in your BIOS, the boot order of disks should always start with a clover flash drive, until you upgrade the hardware to support EFI.
Then, and only then, you will be able to proudly put your first, by that time already old, NVMe SSD! .
That's all, actually
Now, with each reboot, you will be taken to the Clover interface, and press the Enter key (if your OS is on the list first). But then enjoy the new system and fast SSD :-)
Unfortunately, in the absence of Clover Configuator, I was not able to configure Clover so that it automatically loads my OS, for example, after 5 seconds. inaction. In order not to press Enter every time. But of course there is such an option in Clover.
I would be grateful if someone knows how to manually configure this boot mode without a configurator. The clover settings file usually lies here G: \ EFI \ CLOVER \ config.plist
They say that the tags are responsible for this option:
<key>Timeout</key> <integer>5</integer> <key>DefaultVolume</key> <string>LastBootedVolume</string>
The first indicates the time delay before startup, and the second indicates the id of the drive from which we want to boot by default, or the value LastBootedVolume, which remembers the id of the last drive from which the boot was performed.
But for some reason it doesn’t work for me :-(
There is a suspicion that with these values there is some kind of lag in Clover on AMD. Either the timer does not count, or LastBootedVolume is not remembered, but not sure.
THE END
PS
But if you initially paid a little more, and would not buy a PCI-E >> M.2 adapter, but a Raid controller for M.2 disks, then you would not have to read all of the above, and all the more to do all this ... Because The Raid controller has its own microsystem and emulates (or imitates) itself as a Legacy device, making available all the disks inserted into it in all BIOSes, old and new.
UPD
Users alpha_ds and walkman7 kindly supplemented the post with the DefaultVolume tag and a link to the Clover web configurator.
Thanks to igrblkv for the tip on CloverGitHub .