
Nowadays, you can deploy your website with a second-level domain name in the cloud for free. Are you curious about how? Read on.
I suggest you take a look at how you can create a guest book on ASP.NET Core (with reCAPTCHA) and host it for free on a fairly well-known cloud hosting (yes, with limitations, but it’s quite suitable for a personal website with not much traffic)
As a database, I liked Atlas 's MongoDB . It can also be "zayuzat" for free.
Alternatively, there are still good options in the form of DynamoDB with some kind of free limits and Firebase Firestore.
The application will be dockerized. But since "there is a lack of desire" to install docker locally, we will configure the pipeline to automatically build and publish the Docker image (of course, also free)
You can find the source code of the guest book on github
I will not consider the code in detail. In brief, I’ll just look at adding reCAPTCHA v3. The guest book recaptcha is Must. Moreover, Recaptcha 3rd version does not bother the user with character input.
Using reCAPTCHA
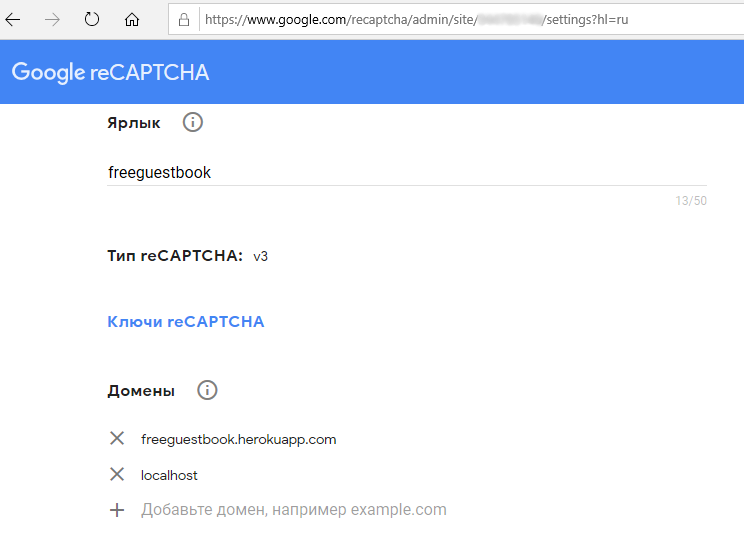
You can create an account and get SiteKey and SecretKey in the Google admin console reCAPTCHA .
Do not forget to add localhost (temporarily at the time of development) and the url of your website to the list of domains (it is in the settings)
We hook the script with the key taken from the settings of the application as a parameter:
<script src="https://www.google.com/recaptcha/api.js?render=@Configuration["ReCaptcha:SiteKey"]" async defer></script>
And in the event of sending the contents of the form, we add the reCAPTCHA token (we send “XMLHttpRequest” without using jQuery)
grecaptcha.ready(function() { grecaptcha.execute('@Configuration["ReCaptcha:SiteKey"]', {action: 'homepage'}).then(function(token) { xhttp.open('POST', '@Url.Action("AddMessage", "Home")', true); xhttp.setRequestHeader("RequestVerificationToken", document.getElementById('RequestVerificationToken').value); var formData = new FormData(document.forms.message); formData.append("Token", token) xhttp.send(formData); }); });
The AntiForgeryToken is set as the header. This is another token, without which it is also impossible.
In order to make sure that the request was not sent by the robot or the spammer, you need to send the token received from reCAPTCHA and the secret key to the address www.google.com/recaptcha/api/siteverify
For this we need HttpClient. Creating HttpClient using the using construct is not at all in the ASP.NET Core concept. In Core, it is customary to create an HttpClientFactory factory. It is created simply. A line is added to Startup.cs
services.AddHttpClient();
And then already in the designers of the controllers we can extract / create client instances from the DI. For example, like this:
private readonly HttpClient _httpClient; public HomeController(IHttpClientFactory httpClientFactory) { _httpClient = httpClientFactory.CreateClient("defaultClient"); }
Check reCAPTCHA like this:
var parameters = new Dictionary<string, string> { { "secret", _configuration["ReCaptcha:SecretKey"] }, { "response", model.Token } }; var encodedContent = new FormUrlEncodedContent(parameters); var response = await _httpClient.PostAsync("https://www.google.com/recaptcha/api/siteverify", encodedContent); var result = JsonConvert.DeserializeObject<ReCaptchaResponse>(await response.Content.ReadAsStringAsync());
In this case, the ReCaptchaResponse class itself:
public class ReCaptchaResponse { public bool success { get; set; } public double score { get; set; } public string action { get; set; } public string hostname { get; set; } public string challenge_ts { get; set; } }
Create a free cloud database
When registering an account with MongoDB Atlas .
You must enter a phone number and some other personal data. The free Starter cluster is designed to learn MongoDB and for small applications. It is interesting that you can choose not only the region, but the cloud hosting provider of your base to your taste from the three largest

After creating the cluster, you will need to create a user

and you’ll have to add all the IPs with the allowed list (unfortunately, Heroku’s free hosting plan does not provide a static IP).

Now all we have to do is create a database and a collection

Click on COLLECTIONS and then on Add my own data

We come up with the name of the database and collection and fill in the fields. It is better not to select Capped collections, since in this case it will not be possible to delete records. Capped collections are just perfect for logging information. Recording of new records is quick, when a certain amount is reached, the old records are rewritten.

Clicking on Connect and choosing Connect Your Application
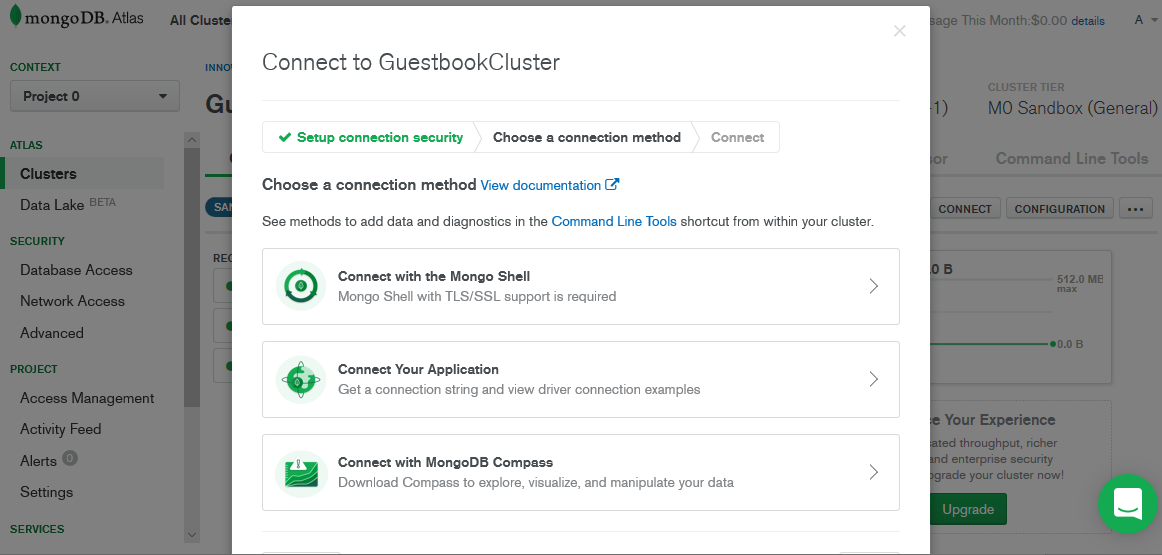
You will be able to copy the connection string

Creating a Heroku Application

Everything is really simple there. Even a credit card can not be tied when registering an account.
Creating a pipeline to publish an image to the Docker Hub
In the project, create a Dockerfile with fairly normal content (an example file is provided for the version of .NET Core 2.2)
FROM mcr.microsoft.com/dotnet/core/aspnet:2.2-stretch-slim AS base WORKDIR /app EXPOSE 64498 EXPOSE 44396 FROM mcr.microsoft.com/dotnet/core/sdk:2.2-stretch AS build WORKDIR /src COPY Guestbook.csproj Guestbook.csproj RUN dotnet restore COPY . . WORKDIR /src RUN dotnet build -c Release -o /app FROM build AS publish RUN dotnet publish -c Release -o /app FROM base AS final WORKDIR /app COPY --from=publish /app . ENTRYPOINT ["dotnet", "Guestbook.dll"]
In order for Heroku to be able to launch the image, the last line will need to be changed to
CMD ASPNETCORE_URLS=http://*:$PORT dotnet Guestbook.dll
The source code must be run in some version control system. I put it on github.
Once the code is placed on GitHub to build the docker image, it becomes possible to use Azure Devops . You can skip this part of the article, install Docker locally, and rebuild everything manually each time.
I will describe the creation of the project with screenshots

After creating the project itself, you need to create a new pipeline

and select the version control system you are using

Now you can select a repository

Next, you will need to authorize DevOps to access the repository.
And it will be possible to select the type of configuration (yaml file of a certain type will be created automatically)

Our version is Docker.
In the window that opens, you need to specify the path to the Docker file:

In the next step, the contents of the yaml file will be displayed to you.
You can think and conjure it yourself, but it is easier to copy the following code and replace some values in it (Attention! Spaces in yaml are very important):
variables: dockerId: your-docker-login # Replace with your Docker ID for Docker Hub or the admin user name for the Azure Container Registry imageName: mongodb-guestbook # Replace with the name of the image you want to publish steps: - script: | docker build -t $(dockerId)/$(imageName) . docker login -u $(dockerId) -p $(dockerPassword) docker push $(dockerId)/$(imageName) docker login --username=_ --password=$(token) registry.heroku.com docker build -t registry.heroku.com/myfreeguestbook/web . docker push registry.heroku.com/myfreeguestbook/web
your-docker-login you need to replace with the ID of your docker account
mongodb-guestbook change the name of your image
instead of myfreeguestbook insert the name of your application on Heroku
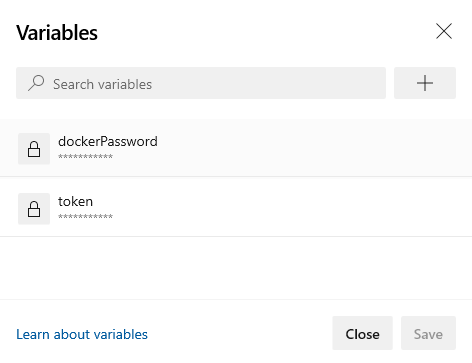
All that remains is to enter the values of the dockerPassword and token variables. To do this, click Variables

Well, enter the password for the docker account. And the token ..
If it’s clear where to get the password from the docker account, then in order to get the token we need Heroku CLI
You can download it at the following link: Download and install
You can install standalone / portable version.
Login using one of the following commands: heroku login
(this command will open a browser window for login) or heroku login -I
(this command will request a password in the console)
The token is obtained using the command
heroku auth:token
It is also advisable to change the type of Heroku application to container. This is done by the command:
heroku stack:set container -a myfreeguestbook
Remember to change myfreeguestbook to the name of your application.
After the pipeline completes and creates the docker image, you need to run the command publishing your application:
heroku container:release -a myfreeguestbook
If you are the right developer and store all the settings in the appsettings.Development.json file, then the project will not work for you. In order for everything to work, you need to add settings to Heroku

Json child elements are separated by double underscores __
Domain and SSL setup
With Heroku CLI, you can add your domain to the application. To do this, you will first have to attach a credit card to your account.
Team:
heroku domains:add www.example.ru
It will give you something like:
Adding www.example.ru to ⬢ example-app ... done
▸ Configure your app's DNS provider to point to the DNS Target
▸ whispering-willow-5678.herokudns.com.
▸ For help, see https://devcenter.heroku.com/articles/custom-domains
It must be repeated for your root domain (for example, for example.ru)
CNAME aliases must be saved and added as CNAMEs on your domain name registrar portal
www whispering-willow-erkie5ugksj4fo.herokudns.com
@ mighty-horse-dvkerbibi34biufbwiieuf.herokudns.com
You can add them immediately to the arbitrary DNS record editor:
www.example.ru. IN CNAME whispering-willow-erkie5ugksj4fo.herokudns.com.
@.example.ru IN CNAME mighty-horse-dvkerbibi34biufbwiieuf.herokudns.com.
You can do so.
But I prefer the option of having a free cloudflare account. After all, Cloudflare provides a free SSL certificate. For Content, you must specify the CNAME values received from Heroku. As you can see, I also added free Yandex mail for the domain.

Well, what will be indicated in the values of Cloudflare nameservers you will need to specify in the form of DNS servers on the site of your domain registrar.
The result is that CloudFlare is an intermediary between your DNS provider and Heroku.