We are making an autonomous water drone, or as I dreamed of helping Baikal, but I am not a Gazprom. Part 1
Hello, Habr!
I live near Baikal, and have been on it many times. It is a beautiful lake with clean air. A few years ago, the lake began to become polluted. And so I thought, why not make a drone with solar panels, put an engine on it, a neural computer with YolloV3 (a neural network that provides computer vision) with a stereo camera, add GPS and teach it how to clean Baikal offline.
Googling, I found out that there are two main reasons: dirty, poorly cleaned sewage from the city of Ulan-Ude and vacationers who use detergents, which in turn create a high concentration of nitrates and phosphates on the shore of Lake Baikal. After another search in Google, it turned out that in order to save Lake Baikal, it just needs to be cleaned. I thought that I could handle such a tricky thing. So I began my journey as a drone builder)
The cleaning process consists in pumping water through a conventional water filter, which is installed in a flowing water supply system. This will filter out all harmful substances, especially nitrates and phosphates, which make it possible to grow spirogyra (the alga that swamps water bodies).
The first one I told about my idea was my boss. It was in the spring of 2018. He liked the idea and so in a few days he drew a 3D drawing of the drone. This is the only photo that has been preserved. In the photo, a drone with a solar battery and a lower buoy removed.

Next, we found a sponsor, but he received the drawings immediately fell off. Further, the boss also cooled down to the project when I proposed to collect it for my money.
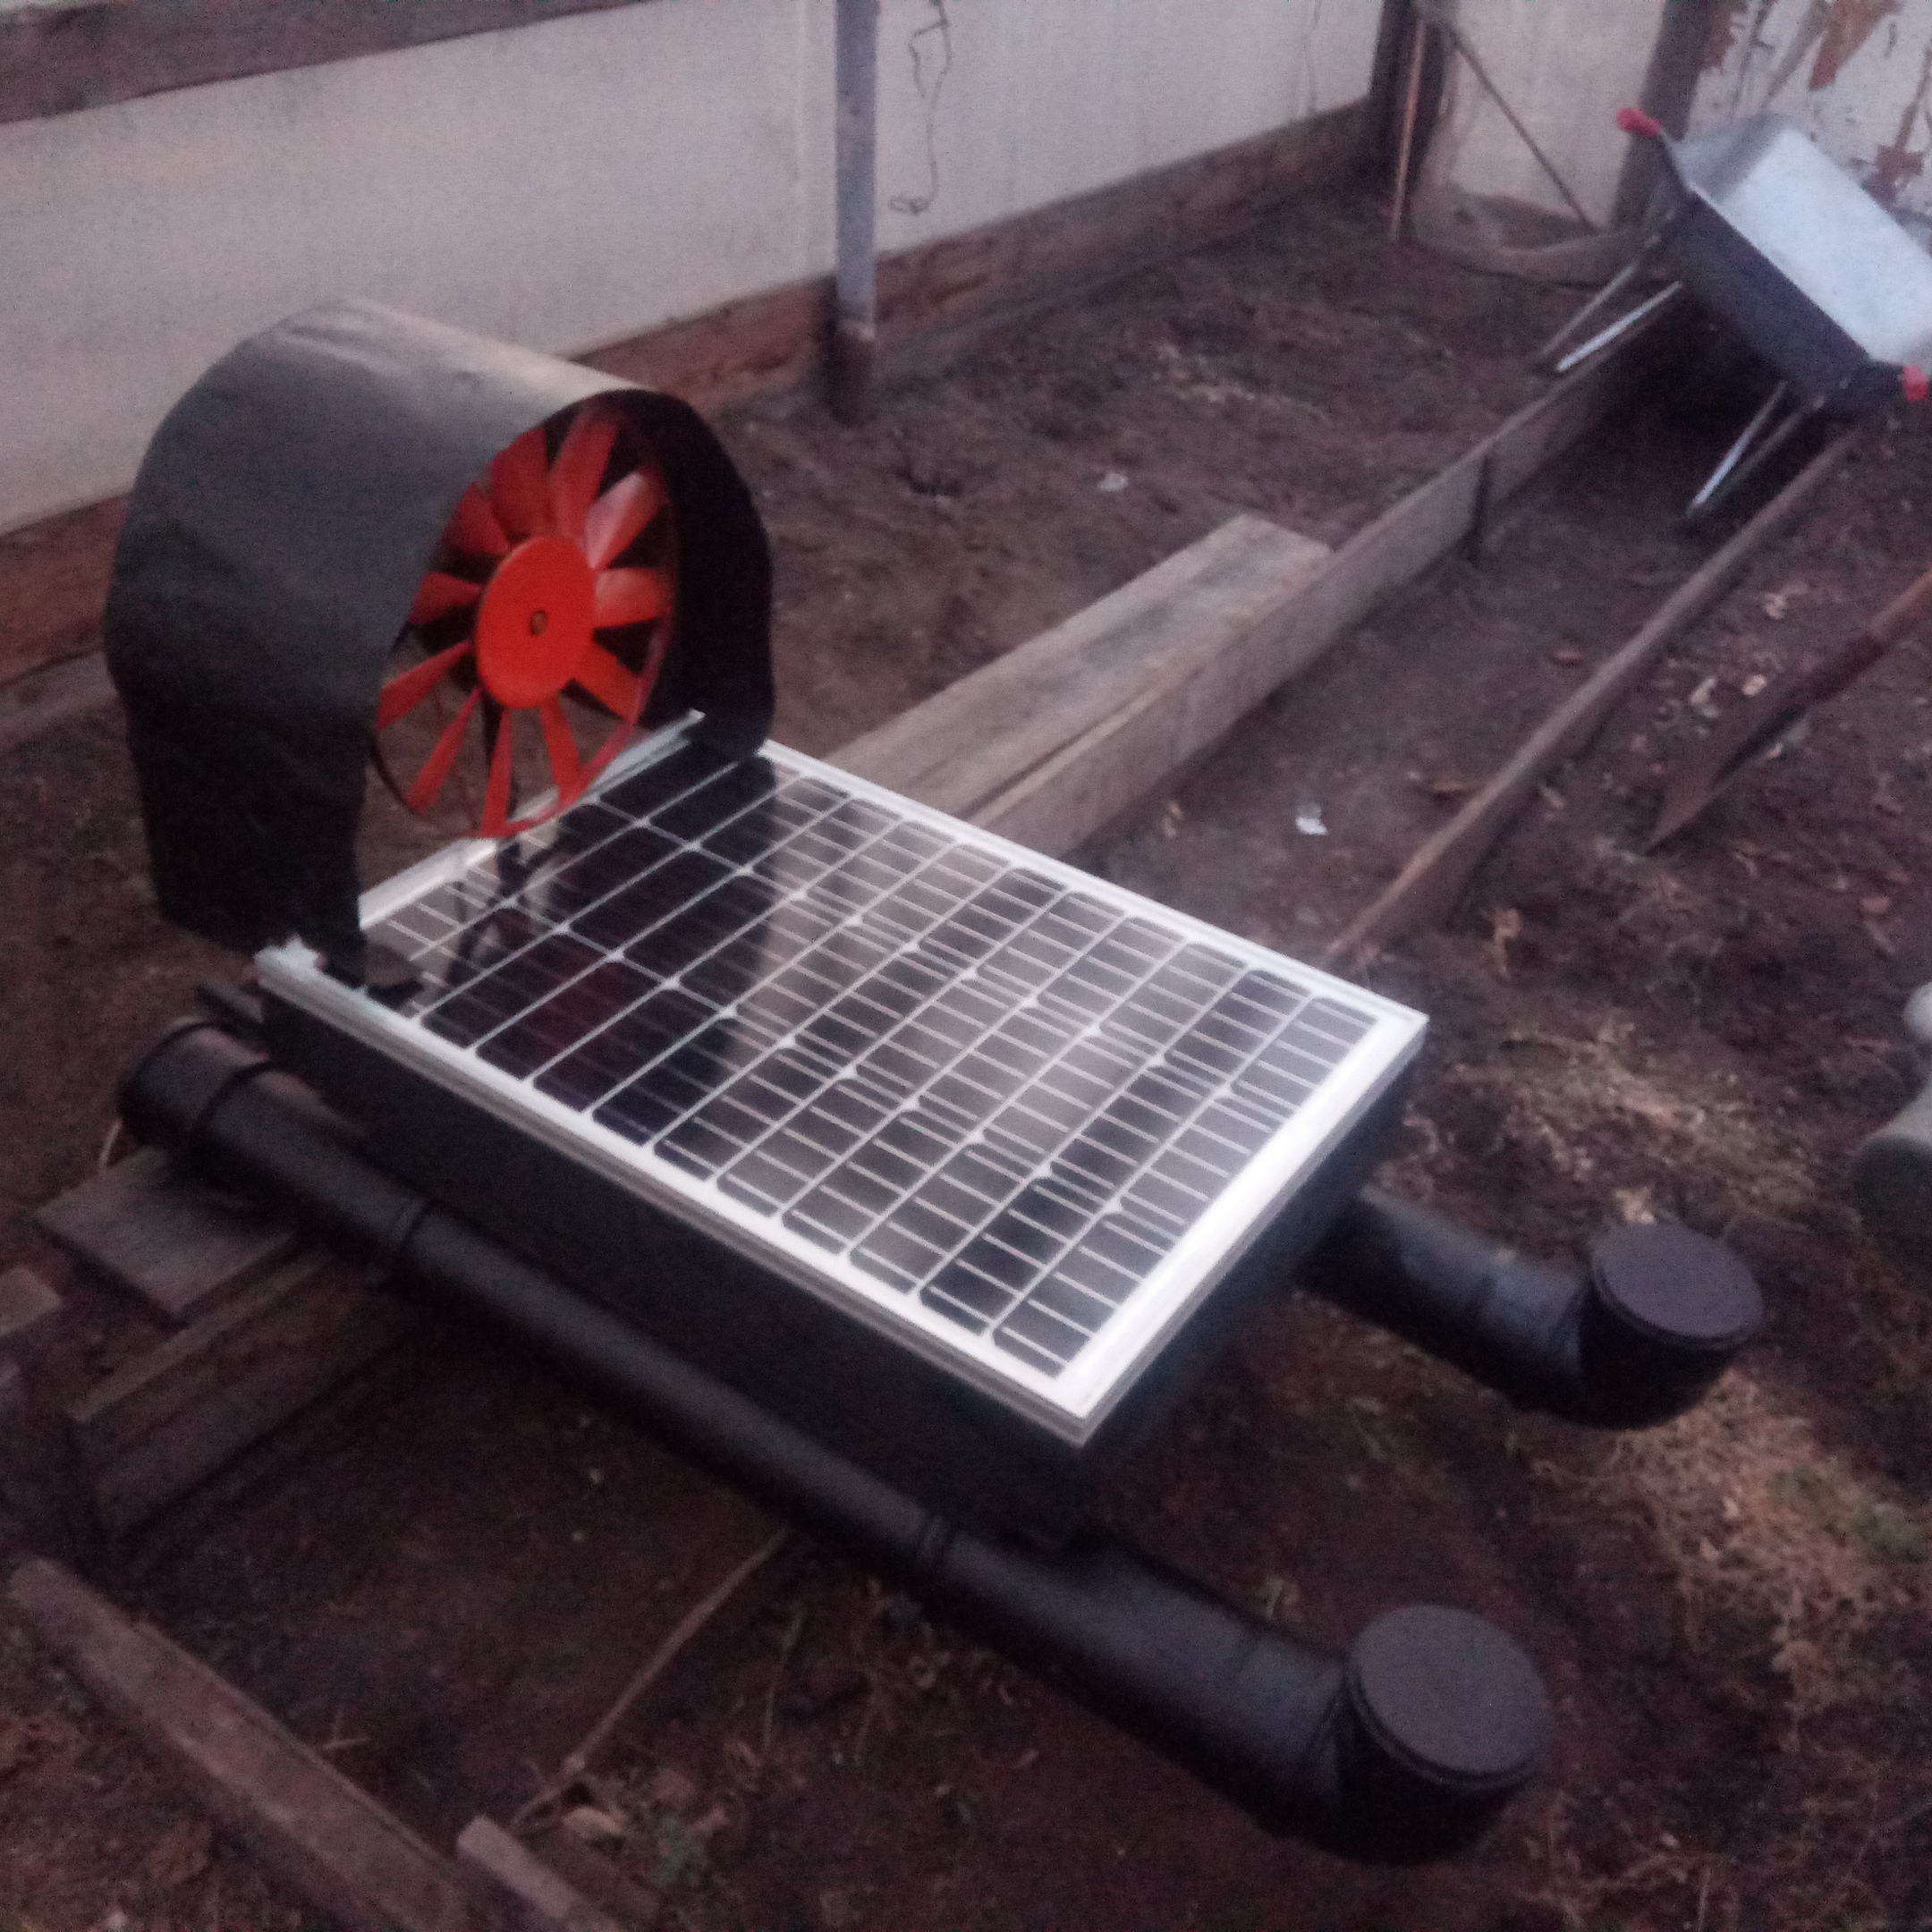
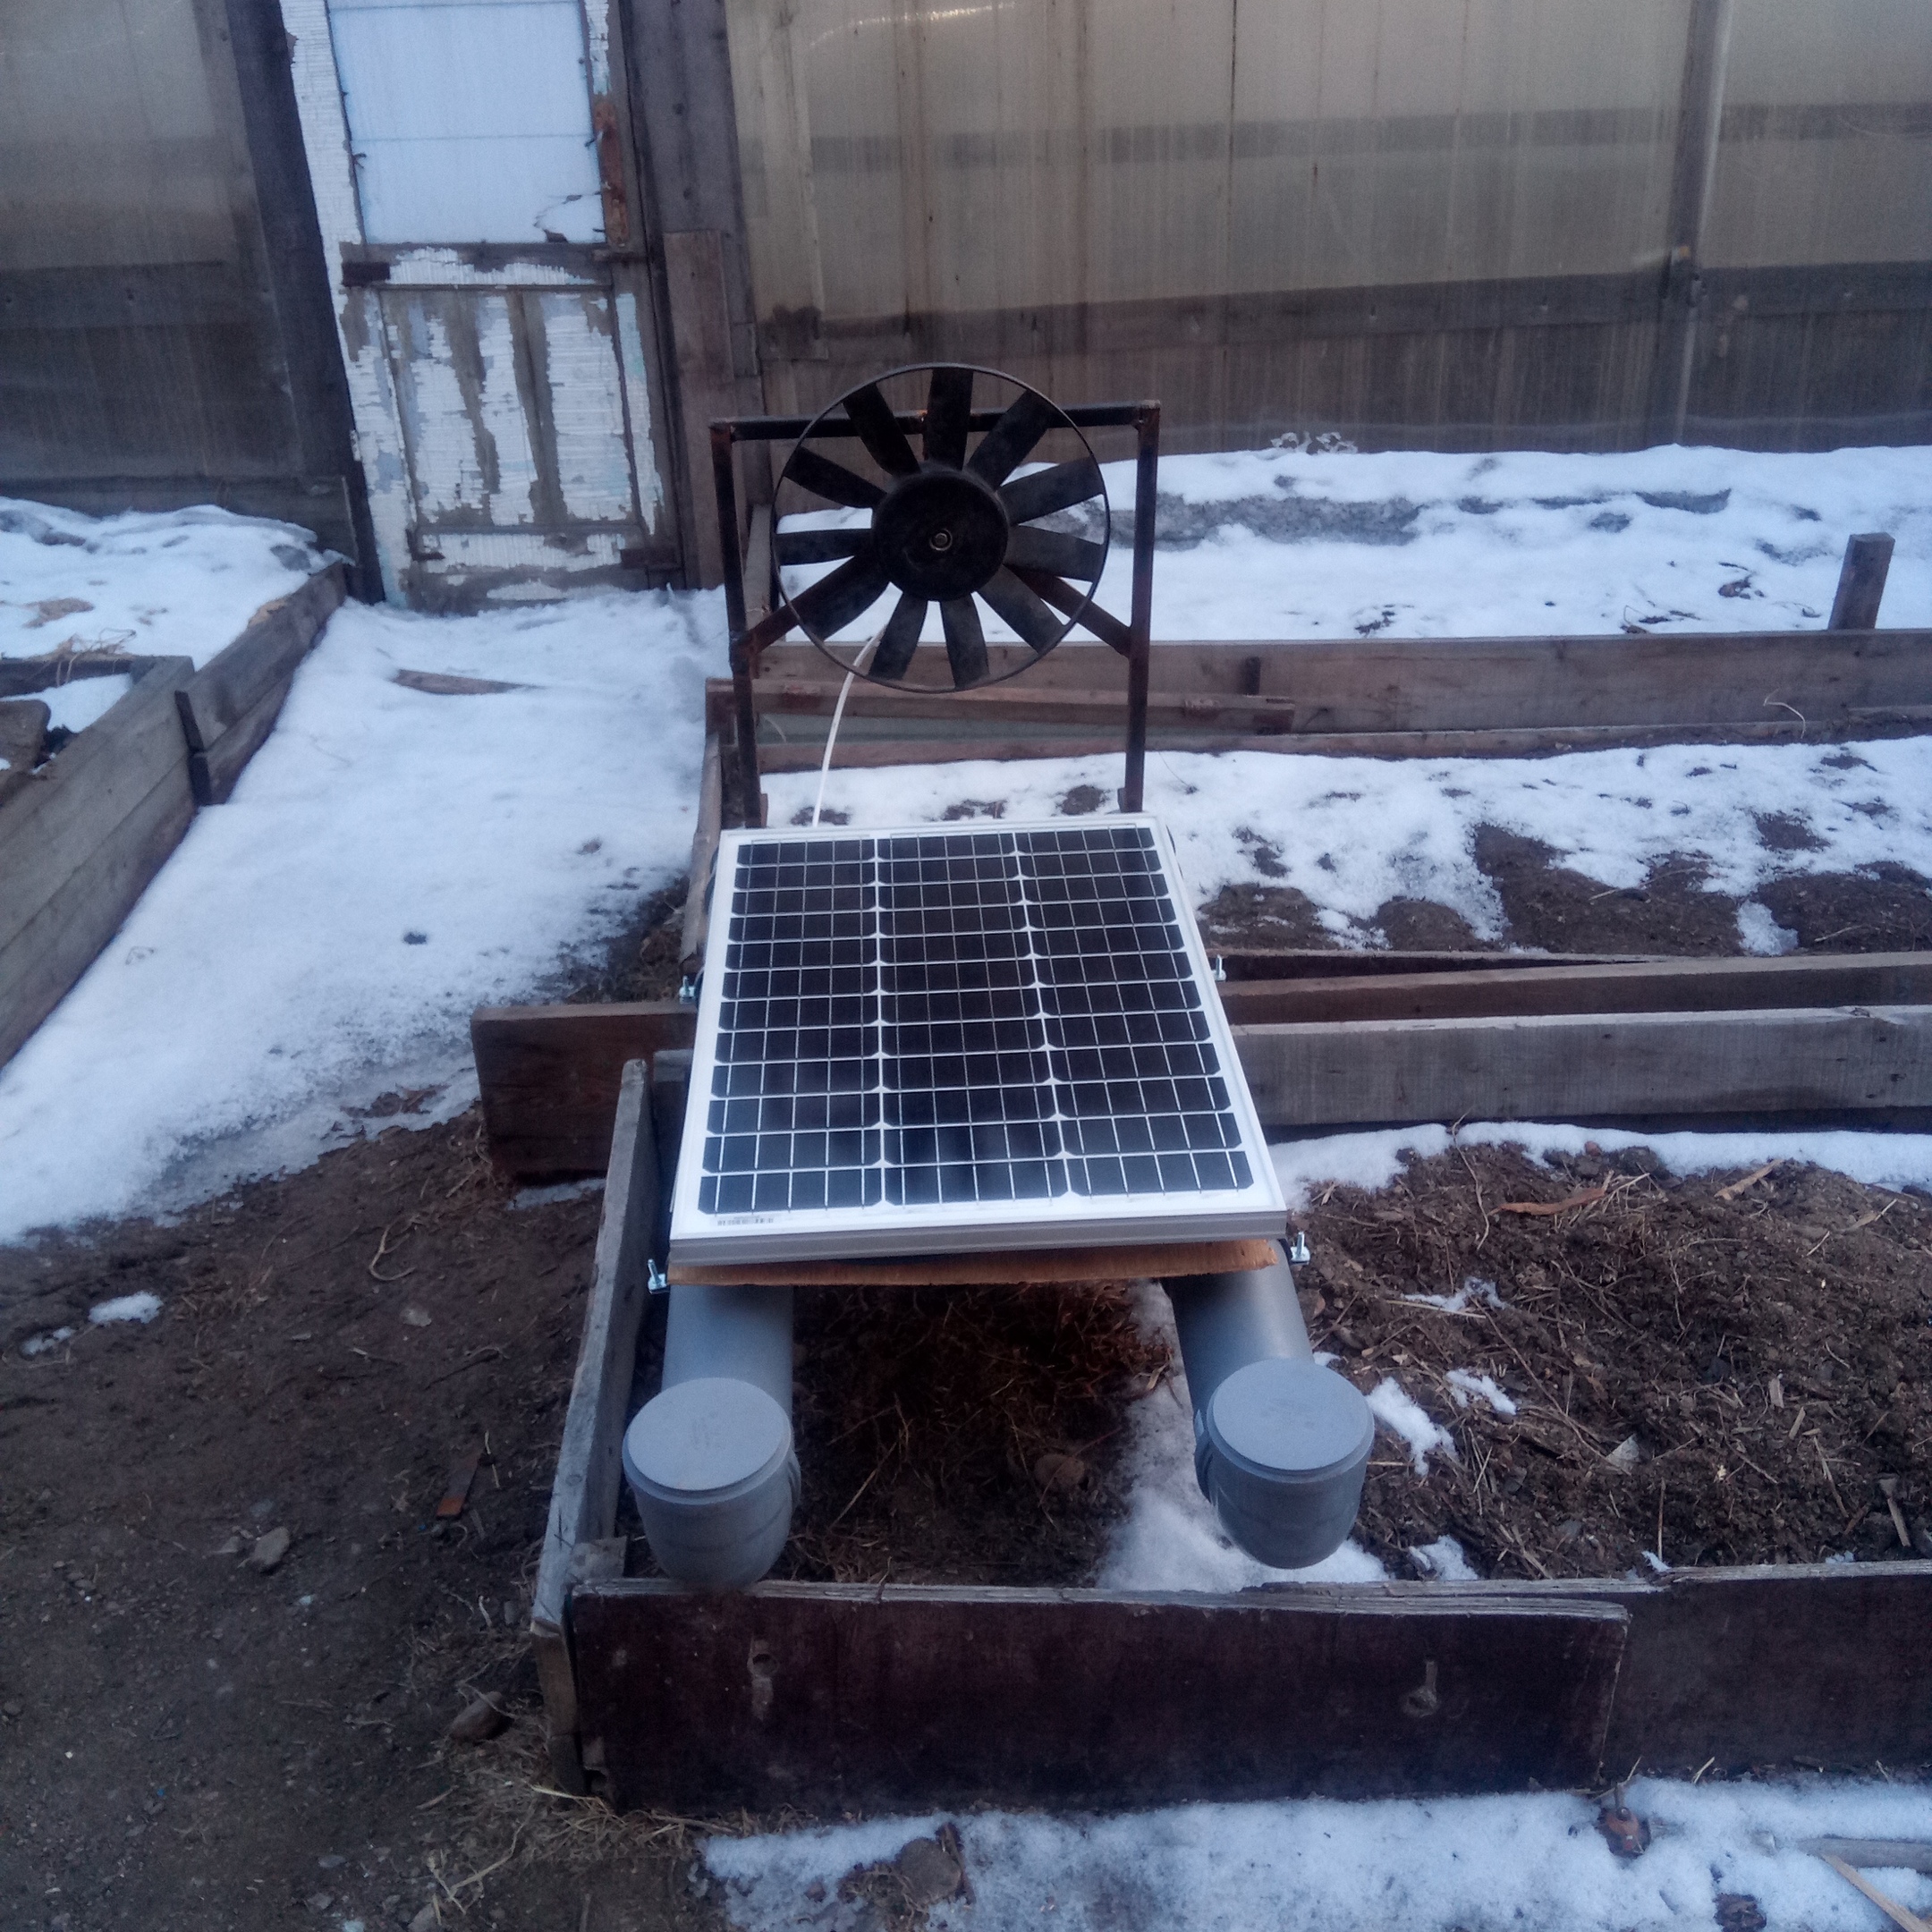
January 2019 arrived and still decided to make it. Uncle agreed to help me. The first thing I bought was ordinary plastic pipes (why are they so expensive !!!) along with couplings, lapels, clamps and covers. Next, we took an old baguette, drilled holes for each sleeve in it, and screwed a sheet of plywood to it. Pipes took a meter with a diameter of 110mm. We did not know which ones would be suitable for our ship, so we took these, and in the future, we already had to adjust the necessary carrying capacity.

Next, we welded a metal frame for the engine from ordinary old pieces of iron that were lying in the garden. A broken engine from the cooling of the Volga-3110 engine was given to me by an uncle. After the autopsy it turned out that a spark-extinguishing conder was broken there. After replacing it, the engine worked. And our raft turned into a boat.
Spring has already come and I found out about the IT-Start contest. I wondered why I shouldn’t go with my project. But there, at first the Muscovites told me that the drone that cleans Lake Baikal is not needed, some kind of commercial purpose is needed, and then the locals did not appreciate my initiative. By the last day of the IT launch, we had already managed to make a body for electronics and a steering wheel. The night before the competition, I managed to finish a simple ship control on esp8266 without feedback. I showed this video at the competition:
So he looked inside:
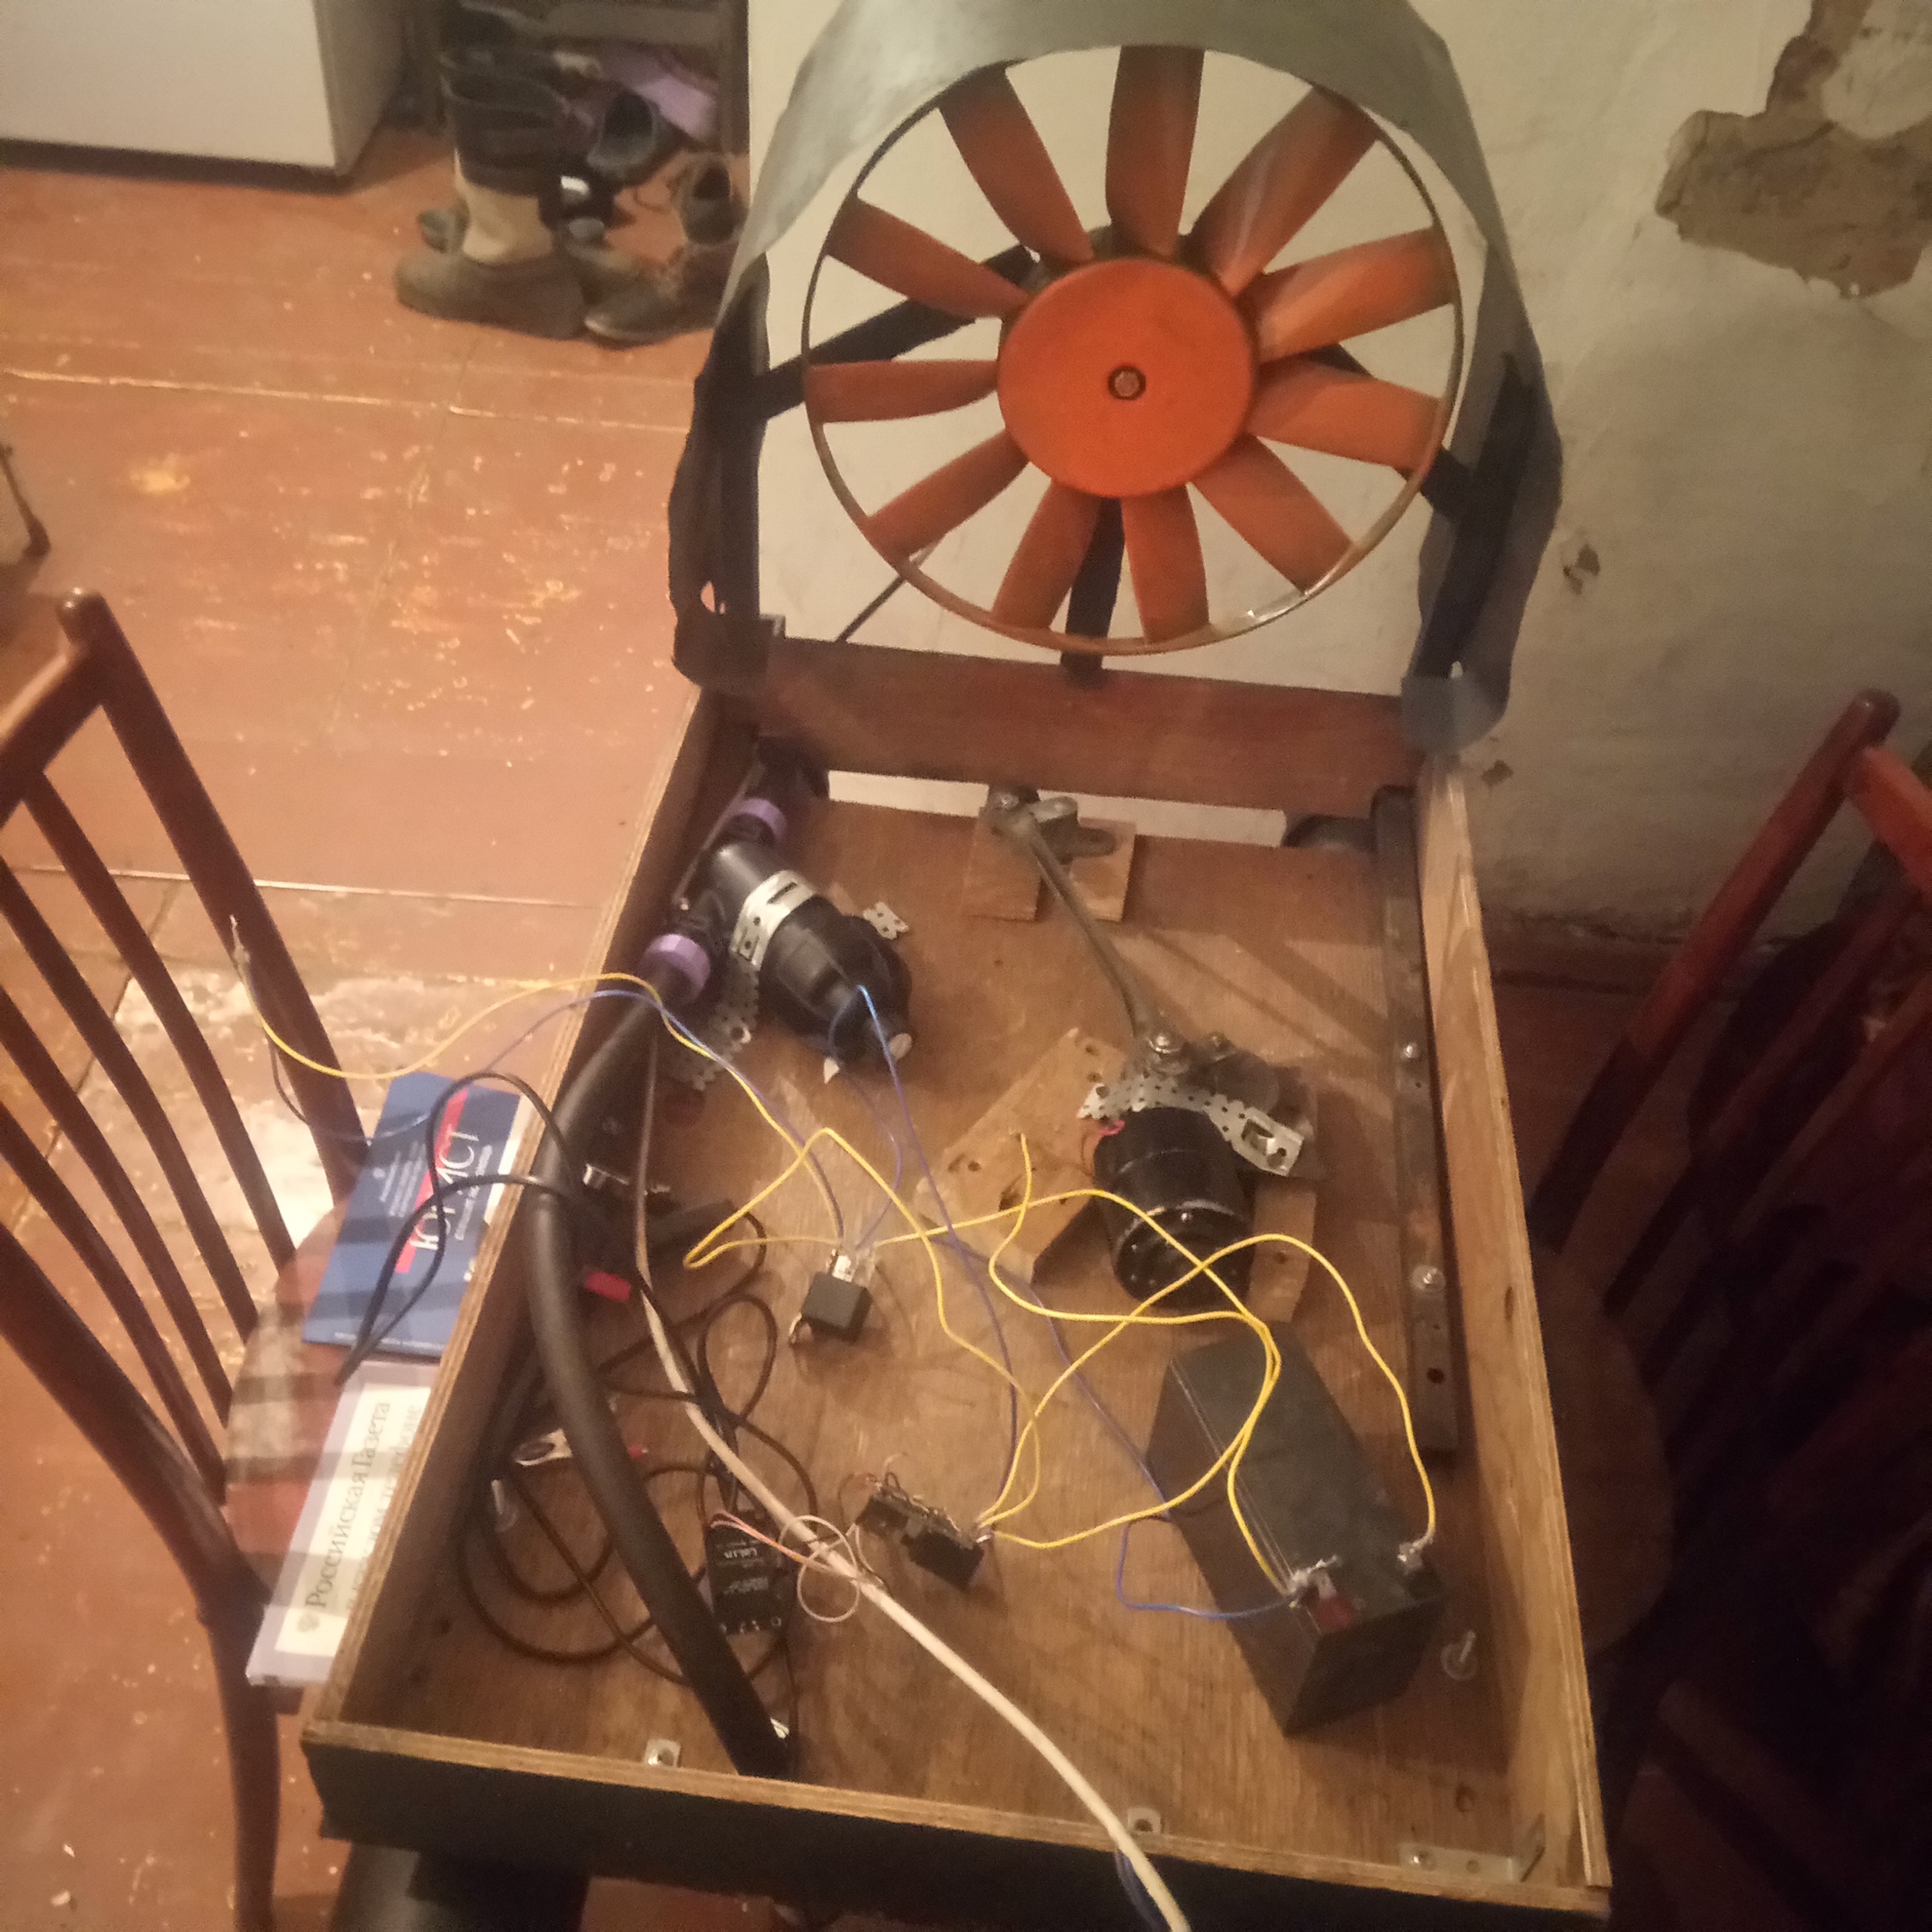
The battery from the uninterruptible system was presented by a familiar weigher. The steering engine was found somewhere by an uncle. I had to buy a filter and a pump (a submersible pump, therefore, located under the ship in the “nose”) for my money. Car Relay at 40 Amps.
After the competition, enthusiasm diminished. And in the summer I studied no more than 2 hours a week. Management collected on esp8266 had one drawback: everything worked through a get request in a function similar to an interrupt, and if at that moment another command was sent, the percent failed and rebooted, which was visible from the data sent over the com port. And the percent itself constantly fell off. Having rummaged through the Arduino sources and not finding registers there (it turns out, as I later learned that the Chinese immediately wrote control functions for all esp8266 models), I decided to go the simplest way, namely, buy a radio keychain and write all the controls on atmega-88pa. Feedback of the rudder position was made on two springs, drawn by a 560 ohm resistor to 5 V. When the aluminum bar attached to the engine guide was in the right position, touched the nearest spring, then the ground came to pin1 micron, when to the far one to pin2.

I also decided to assemble the driver of the steering engine engine on 4 transistors (in the photo this is a bright piece of phoners), but after assembling and testing it turned out that the engine doesn’t care what polarity comes to it, and I abandoned this idea.
And now the end of September. After the vacation, we went to run it. On the first attempt, he began to sink. The back of the ship was heavy, and the sealant was leaky and water got into it. The radio module has died. The next day they bought a new one and increased the pipes. The ship stopped sinking, but in combat conditions the radio module took only half a meter. I had to make a third attempt. I googled sources for esp8266 and a program for a smartphone ( thanks to a kind person ) and on the third attempt it earned
The battery lasted only for a few minutes, so it was not possible to pull it to the shore.
OK it's all over Now. The final source code for ESP8266 and redone for atmega lies here .
I live near Baikal, and have been on it many times. It is a beautiful lake with clean air. A few years ago, the lake began to become polluted. And so I thought, why not make a drone with solar panels, put an engine on it, a neural computer with YolloV3 (a neural network that provides computer vision) with a stereo camera, add GPS and teach it how to clean Baikal offline.
Googling, I found out that there are two main reasons: dirty, poorly cleaned sewage from the city of Ulan-Ude and vacationers who use detergents, which in turn create a high concentration of nitrates and phosphates on the shore of Lake Baikal. After another search in Google, it turned out that in order to save Lake Baikal, it just needs to be cleaned. I thought that I could handle such a tricky thing. So I began my journey as a drone builder)
The cleaning process consists in pumping water through a conventional water filter, which is installed in a flowing water supply system. This will filter out all harmful substances, especially nitrates and phosphates, which make it possible to grow spirogyra (the alga that swamps water bodies).
The first one I told about my idea was my boss. It was in the spring of 2018. He liked the idea and so in a few days he drew a 3D drawing of the drone. This is the only photo that has been preserved. In the photo, a drone with a solar battery and a lower buoy removed.
Next, we found a sponsor, but he received the drawings immediately fell off. Further, the boss also cooled down to the project when I proposed to collect it for my money.
January 2019 arrived and still decided to make it. Uncle agreed to help me. The first thing I bought was ordinary plastic pipes (why are they so expensive !!!) along with couplings, lapels, clamps and covers. Next, we took an old baguette, drilled holes for each sleeve in it, and screwed a sheet of plywood to it. Pipes took a meter with a diameter of 110mm. We did not know which ones would be suitable for our ship, so we took these, and in the future, we already had to adjust the necessary carrying capacity.
Next, we welded a metal frame for the engine from ordinary old pieces of iron that were lying in the garden. A broken engine from the cooling of the Volga-3110 engine was given to me by an uncle. After the autopsy it turned out that a spark-extinguishing conder was broken there. After replacing it, the engine worked. And our raft turned into a boat.
Spring has already come and I found out about the IT-Start contest. I wondered why I shouldn’t go with my project. But there, at first the Muscovites told me that the drone that cleans Lake Baikal is not needed, some kind of commercial purpose is needed, and then the locals did not appreciate my initiative. By the last day of the IT launch, we had already managed to make a body for electronics and a steering wheel. The night before the competition, I managed to finish a simple ship control on esp8266 without feedback. I showed this video at the competition:
So he looked inside:
The battery from the uninterruptible system was presented by a familiar weigher. The steering engine was found somewhere by an uncle. I had to buy a filter and a pump (a submersible pump, therefore, located under the ship in the “nose”) for my money. Car Relay at 40 Amps.
After the competition, enthusiasm diminished. And in the summer I studied no more than 2 hours a week. Management collected on esp8266 had one drawback: everything worked through a get request in a function similar to an interrupt, and if at that moment another command was sent, the percent failed and rebooted, which was visible from the data sent over the com port. And the percent itself constantly fell off. Having rummaged through the Arduino sources and not finding registers there (it turns out, as I later learned that the Chinese immediately wrote control functions for all esp8266 models), I decided to go the simplest way, namely, buy a radio keychain and write all the controls on atmega-88pa. Feedback of the rudder position was made on two springs, drawn by a 560 ohm resistor to 5 V. When the aluminum bar attached to the engine guide was in the right position, touched the nearest spring, then the ground came to pin1 micron, when to the far one to pin2.
Atmega firmware source code
/* * korabl.cpp * * Created: 24.07.2019 21:59:04 * Author : */ #include <avr/io.h> #include "util/delay.h" # define F_CPU 8000000UL int p=0; int polozhenue = 0; void init_port(void) { DDRD|=(1<<2)|(1<<3); ///DDRB|=1<<1; } void po_4asovoi_on(void) { PORTD|=(1<<2)|(1<<3); } void po_4asovoi_off(void) { PORTD&=0b11110011; } void init_polozhenie(void) { po_4asovoi_on(); while(PIND&0x10); po_4asovoi_off(); p = 0; polozhenue = 0; } int main(void) { init_port(); p=0; /* Replace with your application code */ while (1) { if(PIND&0x10) { if ((p==1)||(p==2))///if(GPIOB->IDR&(1<<9)) { po_4asovoi_on(); _delay_ms(200); // HAL_TIM_Base_Stop_IT(&htim3); po_4asovoi_off(); p=0; } while(PIND&0x10) { PORTD|=(1<<1); _delay_ms(100); } } PORTB&=0xfc; if(PIND&0x20) { if ((p==2)||(p==0))///if(GPIOB->IDR&(1<<8)) { po_4asovoi_on(); while(PIND&0x80) { } //HAL_TIM_Base_Stop_IT(&htim3); po_4asovoi_off(); p=1; } } if(PIND&0x40) { if ((p==1)||(p==0))///if(GPIOB->IDR&(1<<7)) { po_4asovoi_on(); while(PINB&0x02) { } /// HAL_TIM_Base_Stop_IT(&htim3); po_4asovoi_off(); p=2; } } } }
I also decided to assemble the driver of the steering engine engine on 4 transistors (in the photo this is a bright piece of phoners), but after assembling and testing it turned out that the engine doesn’t care what polarity comes to it, and I abandoned this idea.
And now the end of September. After the vacation, we went to run it. On the first attempt, he began to sink. The back of the ship was heavy, and the sealant was leaky and water got into it. The radio module has died. The next day they bought a new one and increased the pipes. The ship stopped sinking, but in combat conditions the radio module took only half a meter. I had to make a third attempt. I googled sources for esp8266 and a program for a smartphone ( thanks to a kind person ) and on the third attempt it earned
The battery lasted only for a few minutes, so it was not possible to pull it to the shore.
OK it's all over Now. The final source code for ESP8266 and redone for atmega lies here .
All Articles