I looked back to see if she looked back - 2 or to my own data center via AWS

We publish any services located in the home hypervisor through the EC2 Amazon Web Services service through a free instance for Amazon Linux AMI 2018 using libreswan , xl2tpd and with a little bit of perversion ...
System administrators of a traditional (non-IT) business with experience, usually after a while, have their own server virtualization farm at home to test the heap of solutions on the ground. This can be a banal imitation of a distributed office-branch network, testing of an integrated infrastructure of high availability, deployment of new versions of some solutions, etc.
Outwardly, it can look from a simple memory-pumped home PC with a built-in hypervisor and a consumer-grade NAS as iSCSI storage (or even as a simple virtual machine on the same PC) to full-fledged small-sized rack-mount servers purchased for cheaply written-off control units with a pedigree from western data centers, with the same BU tsiska for network connectivity and stuck in the Fiber Channel the same, bought in the secondary market NAS, but already a business class.
Of course, in our age of craze for clouds, the entire infrastructure can easily be deployed in cloud data centers, but this is still not always possible, primarily because of the cost. It doesn’t matter if the tests require several lightweight virtual machines from the available plans, but what if on duty you have to twist several dozen or even hundreds of separate “virtual machines” with a wide variety of services, but you also want to have an archive so that at any time at hand there was a sample that twisted in configs / settings a year ago. Or there is a need to transfer all the pitfalls with the same synchronization between ADDS and ADFS before transferring some of the existing business services to the same MS Azure.
The main problem in this case is the publication (forwarding) of all this infrastructure to the outside, so that you can work out connecting users from outside to your home “server platform” or to your own “cloud” services, or integration with third-party services etc.
It’s good if the home connection is designed for a business tariff, in this case there are no problems with incoming requests, and the IP address is almost always “white”, static.
But what to do when the usual “home” provider is present in the place of residence, which in addition can only provide an address from the Private network. Or will it give a white address, but traditionally cut off all incoming from the privileged (<1024) port range? Or you are a corny poor student and you simply cannot afford a monthly rate designed for legal entities. Or do you often have to change your place of residence, dragging your virtual server "belongings" to the hump? A special case is also relevant for those living outside the CIS, when the provider forcibly provides its own equipment for connecting to the Internet and there you simply physically cannot configure the forwarding of the ports you need to the home virtual farm outside.
One solution is to use any of the third-party VPN services. Unfortunately, few of them allow the permission of incoming connections with respect to the tunnel, most often it is a separate paid service. Also in this case, the choice of external IP addresses will be very limited if you want to test the situation with the presence of an external IP address in a particular country, moreover, as a rule, there is no guarantee that at the same time a bunch of other VPN service clients do not hang on this address , or it will be static for a long time, which is important for setting up service subdomain records in DNS.
Also worthy (IMHO), although a few perverted methods, is to deploy your own “virtual” router on some external cloud platform with the ability to configure a VPN tunnel from the home hypervisor farm to this virtual machine in the cloud, with the necessary incoming connections forwarded from the external network interface clouds to home hypervisor services. And ideally, to pay almost nothing for the whole thing.
Having recently lost my job, and with it access to a warm and comfortable corporate test farm, but in return received a lot of free time to update my skills, I decided to give services from my home hypervisor the opportunity to see incoming client connections.
The author of these lines “loves all kinds of infrastructural perversions” , so as a virtual router we will use the free Amazon Web Services (AWS) EC2 t2.micro instance for Linux, which instead of AWS: VPC (in theory) will give a little more flexibility in debugging and features , and the topology of this VPN perversion is shown below:
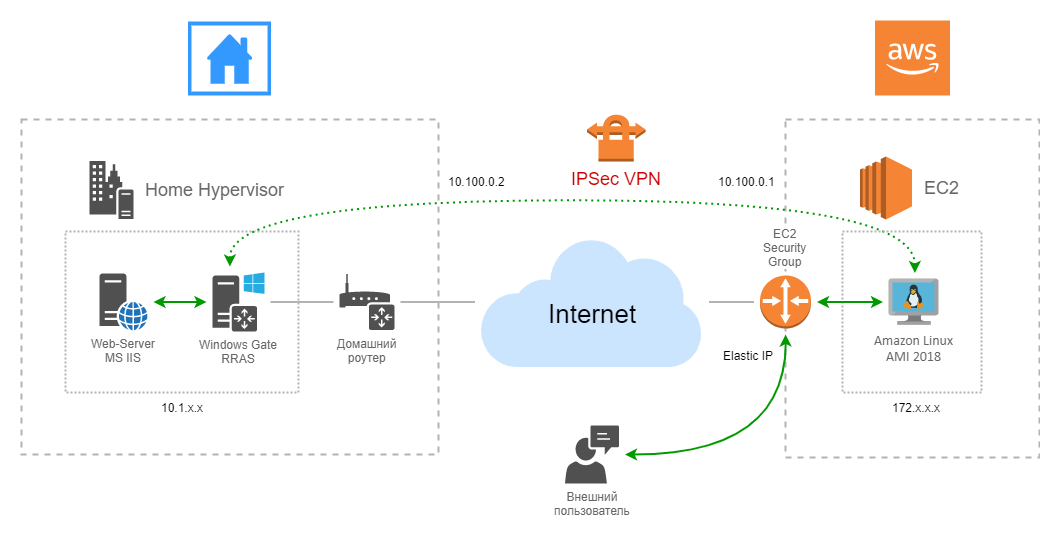
What do we see here?
There is a free (750 hours of work per month during the year) virtual machine (instance), on Linux, deployed in AWS: EC2. Incoming calls from some users of your home services fall to the external white IPv4 address of Elastic IP, then through the Inbound rules in the “Security Groups” the ports we need map inward to the network interface of the instance, then packets of these requests through iptables go through the IPSec tunnel to a virtual machine under Windows 2016, where, using routing, RRAS gets to the desired service inside the home virtual farm. We pay special attention to the presence of three NATs at once: one in AWS Linux, one on the “office network” router and one more, implicit, on the home router.
In this (my) case, a virtual machine under Windows Server 2016 plays the role of a router to simulate an office network and its server platform, MS WAP is deployed on it in conjunction with a separate machine with MS ADFS and others, so there is no problem replacing it with any other OS or even a homemade piece to taste. With Windows RRAS, by the way, things get complicated on the contrary, along the way I had to deal with various unpleasant moments (about which below), so if you choose to dislike MS Windows Server as a router, then with another operating system it may be easier.
First we’ll create an AWS account if you still don’t have one. There are no problems with creating the account itself, you only need to indicate the details of your plastic card, from which 1 USD will be debited (and then returned) as a check.
Only two points need to be mentioned here:
- Be sure to go to AWS: IAM (Identity and Access Management) and enable MFA (Multi-Factor Authentication) for your new account, or even better, as AWS recommends - create a separate account with MFA as well and continue to work through the restriction of the corresponding rights. her. Otherwise, you may end up in an unpleasant situation when a Trojan steals AWS credentials from your PC and, for example, someone miners from your heart at your expense on expensive high-performance instance plans ...
- For practical reasons, it’s recommended that you set a budget alert. This is done in the account settings, the corresponding menu item is called "Billing & Cost Management Dashboard". In the panel that opens, select the “Budgets” item on the left and configure the planned monthly budget to taste using the built-in wizard. Do not forget to set up an alert there: when you exceed the specified amount, you will immediately receive a message. This is useful if you have not worked with AWS before and are afraid to accidentally “get” a round sum in the course of your experiments.
Next, we need AWS: EC2 service .
One of the most important steps is to select the AWS region (essentially a data center) in which we want to deploy our virtual machine. The placement will directly affect the geographical location of your “virtual router”, and therefore the network delay when working with it. This is important because AWS does not provide live migration between regions (the built-in AWS Server Migration Service can only migrate something to the AWS cloud itself) and in case of a placement error it is easier to recreate a new instance again in the desired location. Alternatively, you will have to remove the image from the instance (Image, built-in EC2) in AWS: S3 (storage service) and from there pull this image into the EC2 instance in the new region. In my case, the Frankfurt region was originally selected:
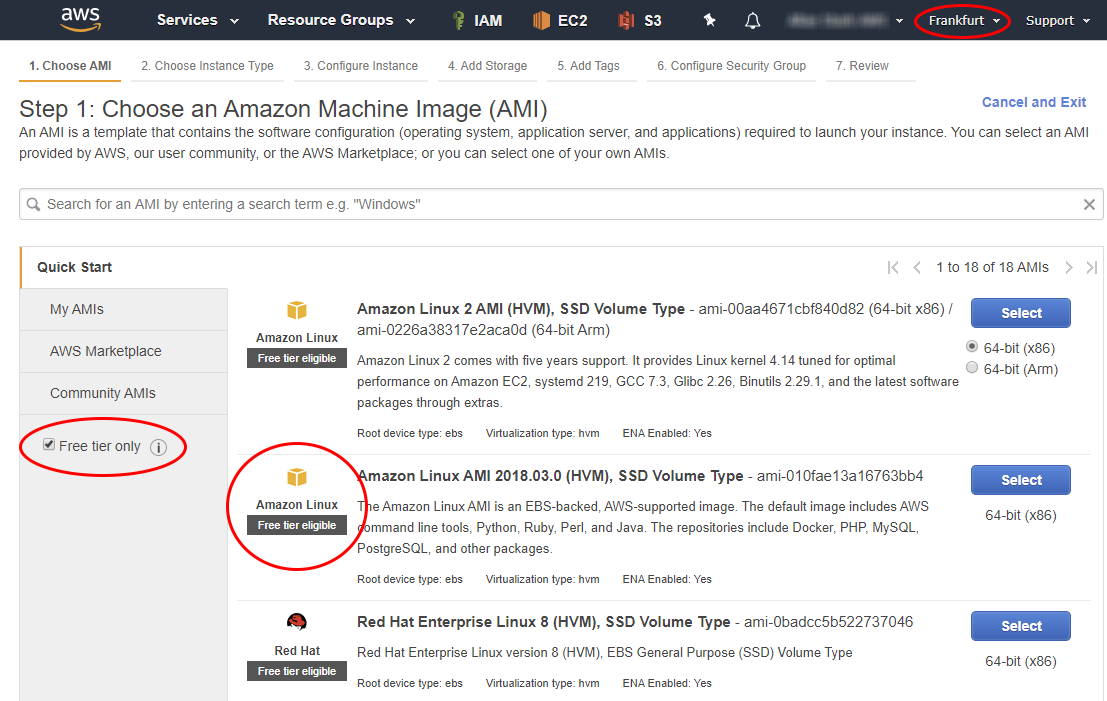
We create a new instance, select the option “Free tier only” on the left, which will limit the proposed list of images to only free ones. I chose "Amazon Linux AMI 2018" ( more about Linux distributions in AWS), because on "Amazon Linux 2 AMI" xl2tpd does not work properly due to the nature of the kernel assembled by Amazon.
You can choose any other Linux image that is familiar to you from the list provided. You can also go deeper into the AWS Marketplace and look for alternative images there, just carefully read the comments about the cost: the image itself and computing resources can be free, but you will have to pay extra for disk space, etc.
We select the proposed type "t2.micro" , it provides 1 vCPU, 1 GB of memory, 8-30 GB (SSD / Magnetic) of disk space and 750 hours of work for free every month for a year. Enough for our “virtual router”. It is worth noting that free disk space and working time is spent on all instances, so in case of financial difficulties you do not need to create / run them more than you can afford except free.
Click in the “Next ...” wizard, at the 3rd step we leave all the default values, at the 4th we agree with the proposed 8 gigabytes of SSD default disk and the instance starts with the Review and Launch button:
After that we will get a window with a message about creating a new key pair for connecting to ours via SSH and a proposal to name this pair and download the private key in * .pem format. We will really need it in the future, so it is advisable to immediately save it in a safe place. If this file is lost, you will lose the ability to remotely connect to instances using it. In EC2, there is no way to regenerate it again for an existing instance, the only way is to connect the instance disk to another instance that has access and subsequent key editing.
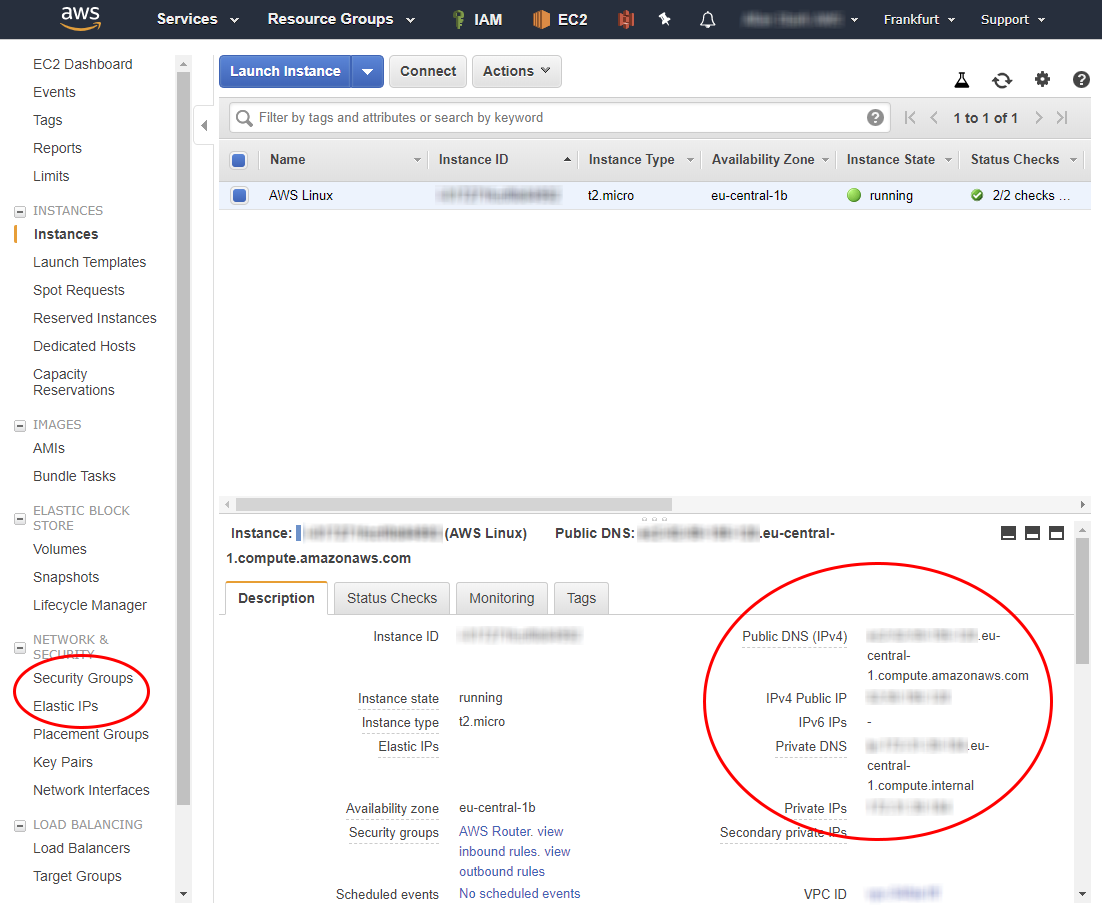
After a while, the instance will be launched, it will have an internal (private) and external (public) IPv4 address, as well as two corresponding DNS names.
Immediately configure Security Groups to ensure traffic flow for the services you need:
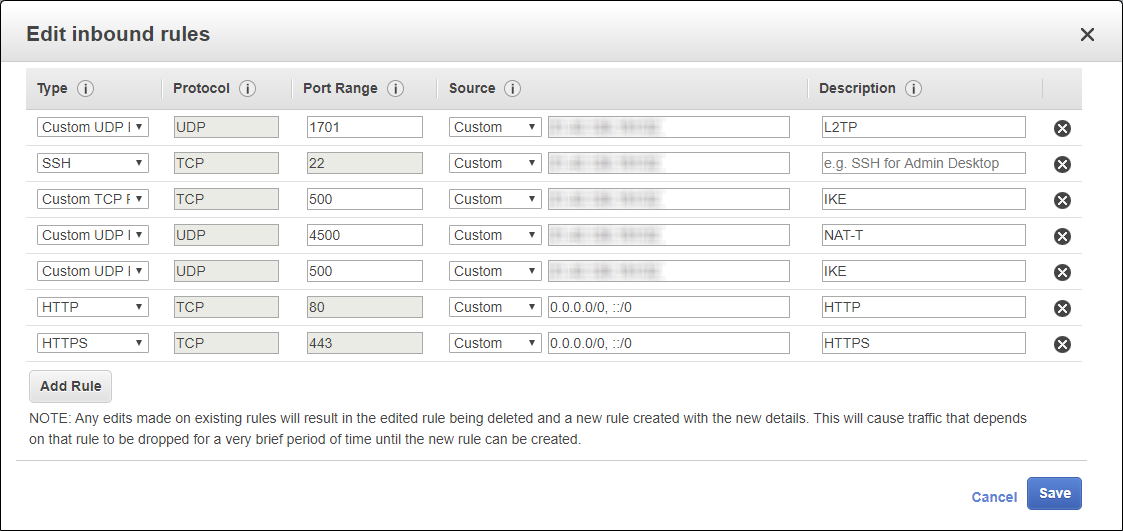
We will need the open incoming ports 500, 1701, 4500 UDP and 4500 TCP for organizing the IPSec L2TP VPN tunnel, HTTP & HTTPS for publishing home farm services, external access to the instance via SSH was created automatically when creating the instance, because EC2 essentially does not contain any built-in access to the virtual machine console through its web interface. There is only the ability to view the screen:
It is advisable to configure access via VPN and SSH only from your home IP address. The order of the rules in Security Groups does not matter.
Since we will use multiple NAT documentation, AWS recommends disabling “Network source / destination checking” in this case:
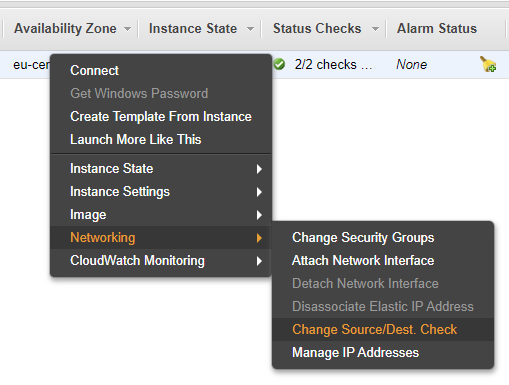
Since we will use IPSec tunneling, and not transport, this setting does not make much sense to us, but just in case, it is better to turn it off.
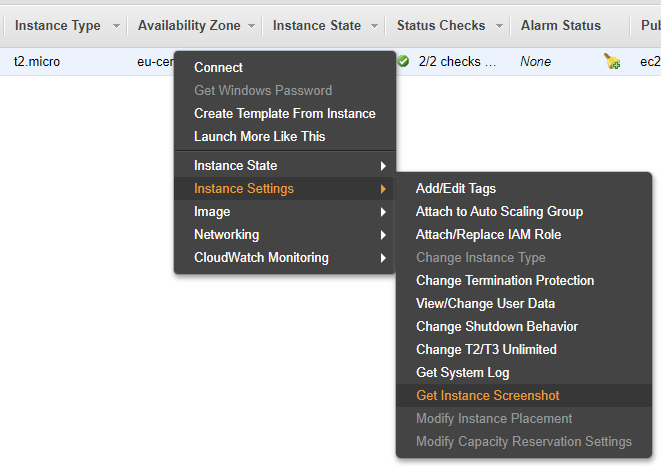
Connect through SSH to our instance. If you use an SSH graphical client, for example, PuTTY, to connect, the built-in help on connection, called by RMB on the instance -> Connect, will help you:

Amazon Linux runs a pedigree from RHEL and CentOS, so the yum package manager is used.
All operations described below must be performed with privilege escalation, therefore we precede them with sudo or just work as root.
First update:
# yum update
As software for organizing a VPN server, we will use a combination of libreswan and xl2tpd.
LibreSwan (fork of Openswan and an analogue of strongSwan) is a popular implementation of VPN IPSec and IKE (Internet Key Exchange). It can properly bypass various types of NAT and their combinations, which is especially important when organizing IPSec tunneling.
xl2tpd is also widely used, its main advantage is the built-in ability to authenticate and transmit client connection parameters via ppp when connecting (for example, IP addresses, default route settings, dns servers, etc.), which eliminates the need for additional DHCP and Radius deployment for our simple tasks.
Since xl2tpd is not in the standard Amazon Linux repositories, we need to enable EPEL (Extra Packages for Enterprise Linux):
# yum-config-manager --enable epel
Install the necessary packages:
# yum install libreswan xl2tpd -y
Enable kernel level routing:
in the file /etc/sysctl.conf we write:
net.ipv4.ip_forward = 1 net.ipv4.conf.all.accept_redirects = 0 net.ipv4.conf.all.secure_redirects = 1 net.ipv4.conf.all.send_redirects = 0 net.ipv4.conf.default.accept_redirects = 0 net.ipv4.conf.default.secure_redirects = 0 net.ipv4.conf.default.send_redirects = 0 net.ipv4.conf.lo.accept_redirects = 0 net.ipv4.conf.lo.secure_redirects = 0 net.ipv4.conf.lo.send_redirects = 0 net.ipv4.conf.eth0.accept_redirects = 0 net.ipv4.conf.eth0.secure_redirects = 0 net.ipv4.conf.eth0.send_redirects = 0 net.ipv4.conf.all.rp_filter = 0 net.ipv4.conf.default.rp_filter = 0 net.ipv4.conf.eth0.rp_filter = 0
Disable rp_filter in the current session so as not to reboot:
# for f in /proc/sys/net/ipv4/conf/*/rp_filter ; do # echo 0 > $f # done
We apply the settings and check the availability of routing:
# sysctl -p /etc/sysctl.conf # cat /proc/sys/net/ipv4/ip_forward
We need to ensure the forwarding of incoming (with respect to the public interface of the instance) packets from the ports of the required services to our future IPSec tunnel. For this, it is necessary not only to de-NAT these packets, but also to do masquerading on the ppp0 interface.
We will use the built-in iptables features for this, which in the case of Amazon Linux is initially configured to completely pass any traffic in any direction:
make DNAT of the required ports:
# iptables -t nat -A PREROUTING -p tcp -i eth0 --dport 80 -j DNAT --to-destination 10.100.0.2:80 # iptables -t nat -A PREROUTING -p tcp -i eth0 --dport 443 -j DNAT --to-destination 10.100.0.2:443
forward all the packets that came to these ports to the Windows gate address:
# iptables -A FORWARD -p tcp -d 10.100.0.2 --dport 80 -m state --state NEW,ESTABLISHED,RELATED -j ACCEPT # iptables -A FORWARD -p tcp -d 10.100.0.2 --dport 443 -m state --state NEW,ESTABLISHED,RELATED -j ACCEPT
do masquerading for these packages:
# iptables -t nat -A POSTROUTING -o ppp0 -j MASQUERADE
It is advisable to keep the iptables rules so that they automatically tighten when the instance is restarted:
# service iptables save
In this case, we use the DNAT (Destination NAT) of the required TCP port from the network interface eth0 of the instance in the direction of IPv4 address 10.100.0.2, which is the address on the ppp interface of the RRAS service of our Windows gate in the home hypervisor.
Next comes a very important point: since the services inside the hypervisor need to be able to respond to requests received from the AWS instance, it is necessary to provide masquerading (replacing the sender address) on the ppp0 interface of the instance before sending the packet, otherwise the answer will go in a completely different direction: from the Windows gate in the hypervisor past the IPSec tunnel directly to the default router (home router), as a result of which, of course, it will be discarded on the client side of the service, as if it came from an unsolicited resource. If masquerading is used in the packet header at the entrance to the vpn tunnel, the sender address will change from the address somewhere on the Internet to the address ppp0 of the interface of the AWS instance: EC2, i.e. in my case at 10.100.0.1
As an alternative to using iptables for other Linux distributions or * NIX systems, you can recommend the good old rinetd, where all this is done generally in one line in its rinetd.conf config:
<ip source> <port source> <ip destination> <port destination>
The only thing that will need to be enabled in this case in the kernel is the possibility of routing / NAT traffic.
It's time to cook libreswan.
The /etc/ipsec.conf file contains instructions for downloading all .conf files from /etc/ipsec.d/, so we create a new configuration file in this directory /etc/ipsec.d/aws_vpn.conf and add it to it:
config setup # # plutostderrlog=/var/log/pluto.log # logfile=/var/log/pluto.log # plutodebug = all # NAT-T - NAT- nat_traversal=yes oe=off protostack=netkey nhelpers=0 interfaces=%defaultroute conn aws_vpn type=tunnel auto=start forceencaps=yes pfs=no fragmentation=yes authby=secret left=%defaultroute # <…> Elastic IP leftid=<…> # <…> (172...) leftsubnet=<…>/32 leftnexthop=%defaultroute leftprotoport=17/1701 rightprotoport=17/%any right=%any rightsubnetwithin=0.0.0.0/0 rightsubnet=vhost:%priv
For simplicity, we will use IPSec authentication based on a shared key (PSK), not certificates, so we must explicitly specify it. The file /etc/ipsec.secrets contains instructions for downloading all .secrets files from /etc/ipsec.d/ , there we create a new file /etc/ipsec.d/aws_vpn.secrets and specify the PSK in it in the format:
< 172...> %any : PSK "< PSK>"
As an example:
172.31.20.120 %any : PSK "Pa$$w0rd"
Since the ppp connection will be used inside the IPSec tunnel, and there is its own authentication, we configure it too:
Enter the username and password in the file / etc / ppp / chap-secrets in the format:
<user> * <password> *
As an example:
aws_user * Pa$$w0rd *
When connecting to the ppp client, it is possible to pass a number of options to configure the network interface and the routing table on its part.
In the file /etc/ppp/options.xl2tpd we set these options:
# xl2tpd ip ipcp-accept-local ipcp-accept-remote # defaultroute Windows- nodefaultroute noccp auth # RRAS Windows- mschap-v2 require-mschap-v2 # MTU MRU mtu 1410 mru 1410 lock
Because we do not need to pass dns, wins, etc. addresses to the client. things - all other options need to be commented out.
Here you need an explanation of the config.
The standard behavior for VPN connections is to install a new Default Route in the client table, which forces all traffic from it to the Internet to "go" through the vpn server. In our case, this is wrong, because the goal of the Windows gate is to provide simulated access to the Internet of the virtual office network behind it in the hypervisor and to publish the resources of internal services outward through AWS: EC2, so it is irrational to drive all traffic through the instance to AWS: EC2. That's why you need to prevent a VPN connection in RRAS from changing the default route (to a home router).
It is also important to choose the correct MTU and MRU values: we use IPSec tunneling and a too large payload size may not fit into the encapsulation limit, which will lead to fragmentation and most likely an error. If it appears, try first of all to reduce these values, for example, to 1280. The values indicated in the given config are compatible with the Windows VPN client.
It remains to configure xl2tpd
We configure everything necessary in the configuration file xl2tpd /etc/xl2tpd/xl2tpd.conf :
[global] port=1701 ipsec saref = yes ; , ;debug tunnel = yes ;debug avp = yes ;debug network = yes ;debug state = yes ;debug tunnel = yes [lns default] name = AWSvpnServer ; ppp ip range = 10.100.0.2-10.100.0.2 ; ppp0 AWS:EC2 local ip = 10.100.0.1 require authentication = yes require chap = yes refuse pap = yes pppoptfile = /etc/ppp/options.xl2tpd length bit = yes
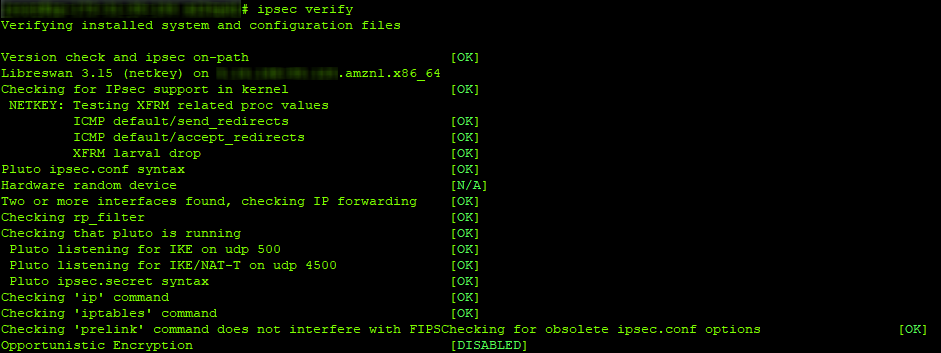
We check everything that we have done
We try to run both services and check the configs:
service ipsec start service xl2tpd start ipsec verify
Services may already be running, in which case they are simply restarted.
If all is well, then the output from ipsec verify should be similar to the screenshot:
You can debug xl2tpd interactively by running it with the -D switch and hanging it in a separate "window" of the SSH terminal using the screen utility:
# xl2tpd -D
In this case, the xl2tpd process will not go into the background, but will display all its activities on the terminal screen.
In case of any problems, you need to uncomment the debugging options in the configs (see comments) and look at the contents of the system logs and the /var/log/pluto.log file. It is also worth paying attention to the contents of the virtual_private / virtual-private option in the /etc/ipsec.conf file, it lists all the private networks available for exchanging data through IPSec. If for some reason you have your own addressing, for example, you use your own pool of white IPv4 addresses, you should make changes to this parameter.
Let's move on to the last step - setting up the RRAS service in the Windows gate and checking the publication of services from the Internet
It is assumed that in your home hypervisor there is a virtual machine running Windows 2012R2 or newer, deployed in graphical (Desktop) mode and in this virtual machine there are two network adapters: one “looks” into the home network and has a default home router as the route and the other into a virtual local “office” network, in which there are services published outside. The presence of a Windows domain is optional, unless of course the services themselves require it.
Install with the Server Manager or with the PowerShell Install-WindowsFeature cmdlet all the necessary roles:
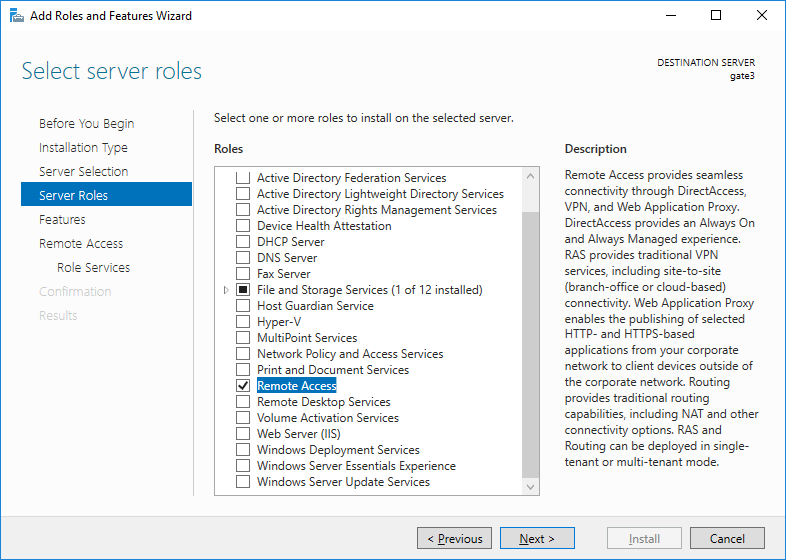
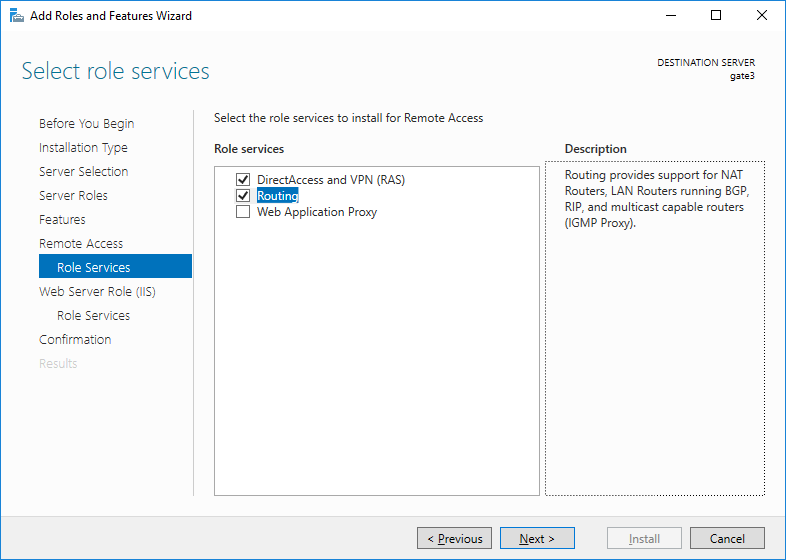
Here I demonstrate the installation of roles through graphics, because then it will still be much more convenient by calling the setup wizard from Server Manager, and in the schedule you can configure the RRAS service itself, which will please us with the good old interface from the time of Windows Server 2003:

Click RMB on your server, select "Configure and Enable Routing and Remote Access" and then configure manually:
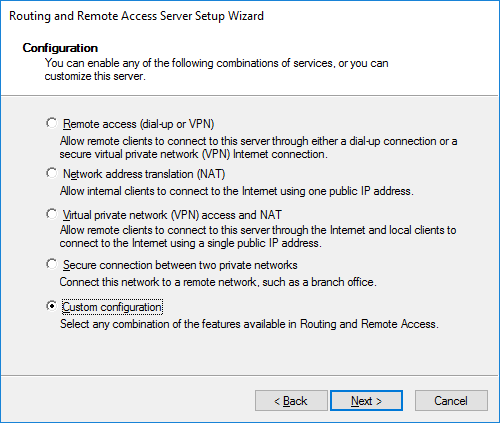
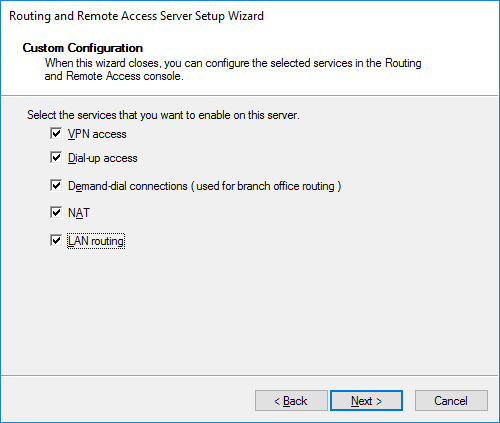
Feel free to select all the jackdaws, complete the wizard and start the service:
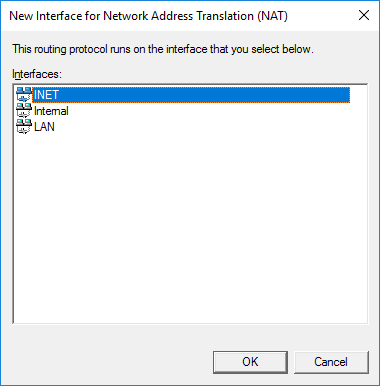
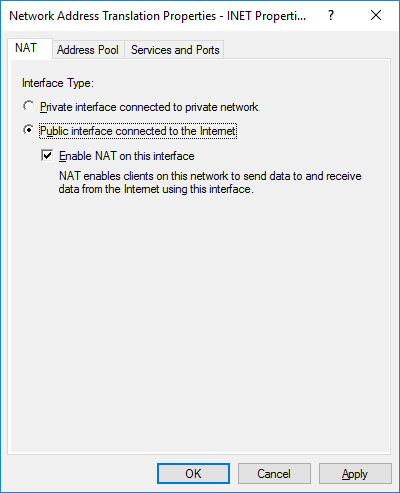
First, let’s release our virtual local area network outside. We go into IPv4-> NAT and create a new interface, as the existing interface on which NAT will be implemented, select the external interface (which looks in the Internet, or rather in your home network), mark it as public and enable NAT on it:
We check how the traffic from the virtual LAN goes out through our gate. We do not need to configure Windows Firewall yet.
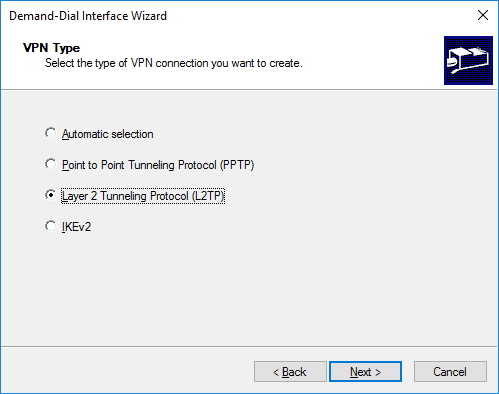
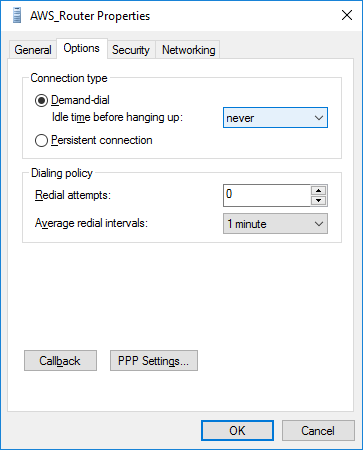
If everything is OK, we will finally create what we were fighting for, a VPN connection to our AWS instance and check the publication of our services. We go in the RRAS snap-in in "Network Interfaces" and create a new Demand-dial interface with an arbitrary name:

Immediately select the L2TP connection, so our new interface will not automatically try to determine the type of VPN and as a result it will connect faster:
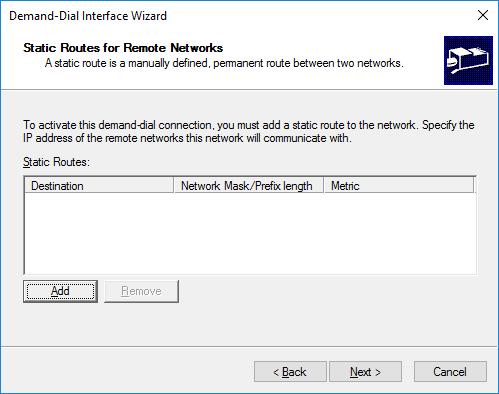
Further in the wizard we indicate the public address of our cloud (in my case, Elastic IP). In the next steps, leave everything as it is, because we do not need a site-to-site connection:

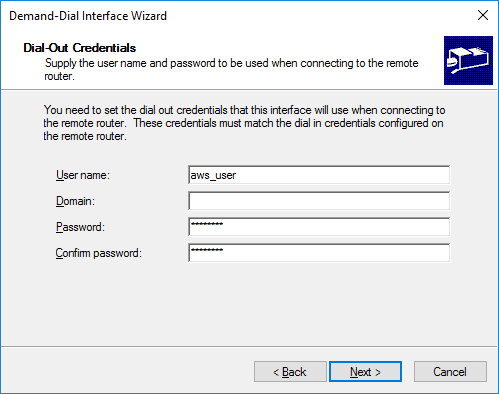
Specify the user account under which we configured the ppp connection (in the file / etc / ppp / chap-secrets ). No domain name is required:
The wizard creates a new connection. Now it remains to configure it. We adjust the idle timeout (Idle-time), remove the outdated CHAP in favor of only MS-CHAPv2, specify the PSK key in the “Advanced Properties” (the one that was set for xl2tpd in the file /etc/ipsec.d/aws_vpn. secrets) and remove IPv6:


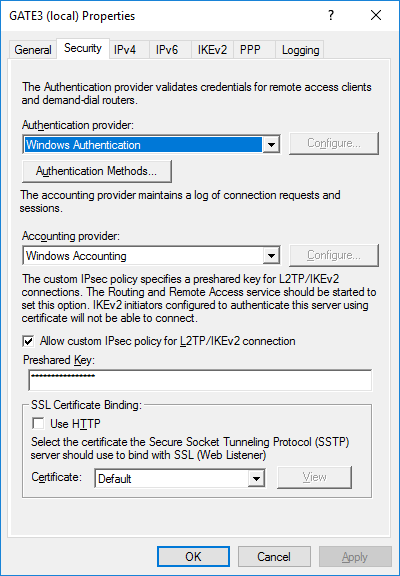
After creating a new interface, you must also go into the properties of the RRAS service itself, enable your IPSec policy for L2TP and specify your PSK. They are asked to restart the RRAS service.
It would seem that everything can be safely raised a new interface and enjoy the work. But no. Due to the fact that we used NAT on the side of the AWS: EC2 instance, the Windows VPN client will not be able to connect to such a Nat-Traversal node. This is true both for client versions (up to the latest at the time of writing this article of the Windows 10 build) and for server ones.
Fortunately, there is an official solution to this problem in the form of edits in the registry of IPSec Policy service settings followed by a reboot:
By the address
HKEY_LOCAL_MACHINE \ SYSTEM \ CurrentControlSet \ Services \ PolicyAgent
create a DWORD (32-bit) key
AssumeUDPEncapsulationContextOnSendRule = 2
and reboot our Windows Gate.
RRAS service is unfortunately famous for its capriciousness in configuration and operation, and even after a reboot, it performs a delayed start. So you can rush it after a reboot.
If everything is done correctly, the connection will work within 5-10 seconds.
It remains to make the publication of the necessary resources on the Windows gate itself.
For the test we will work out the publication of the web server. First, check out our IPSec tunnel and the iptables rules.
With trembling hands, we check from an arbitrary PC connected to the Internet:

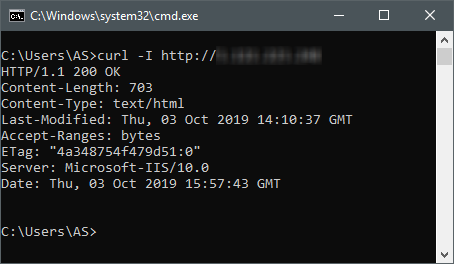
Wow, it works ...
During the installation of the necessary roles, the “native” MS IIS was forcibly installed, but we want it even easier. For this, on a Windows platform, HFS (HTTP File Server) is well suited - it is free, does not require installation, gives a specific page and HTTP header, can work on an arbitrary port (by default it is 8080, so in our case it will be necessary to reconfigure to 80), and also immediately writes in his console where the connection came from, which is very convenient for debugging the publication of many web resources on the Windows platform. To use it, you must first stop the MS IIS site in order to untie the embedded server from the required port. Since we do not want to install the MS IIS management console (in fact, the MS IIS 6 console will be present for compatibility, but IIS 7+ cannot be controlled through it), we will do this through PowerShell:
Stop-WebSite -Name "Default Web Site"
or simply through the iisreset management utility:
iisreset /stop
After that, you need to allow inbound traffic to port 80 in the built-in Windows Firewall.
We start HFS and check:

Everything is great. We have achieved that from anywhere on the Internet you can see the web server that lives in our home as a virtual machine in an arbitrary hypervisor.
The final touch: we teach RRAS to forward all such requests from the outside into the virtual office network, where according to legend, we have another web server.
To do this, we again go to the RRAS management snap-in in IPv4-> NAT and RMB on our VPN interface, where we select the “Services and Ports” tab, mark the Web Server in the list and specify the web server in the internal virtual network whose resources we want to publish to internet:
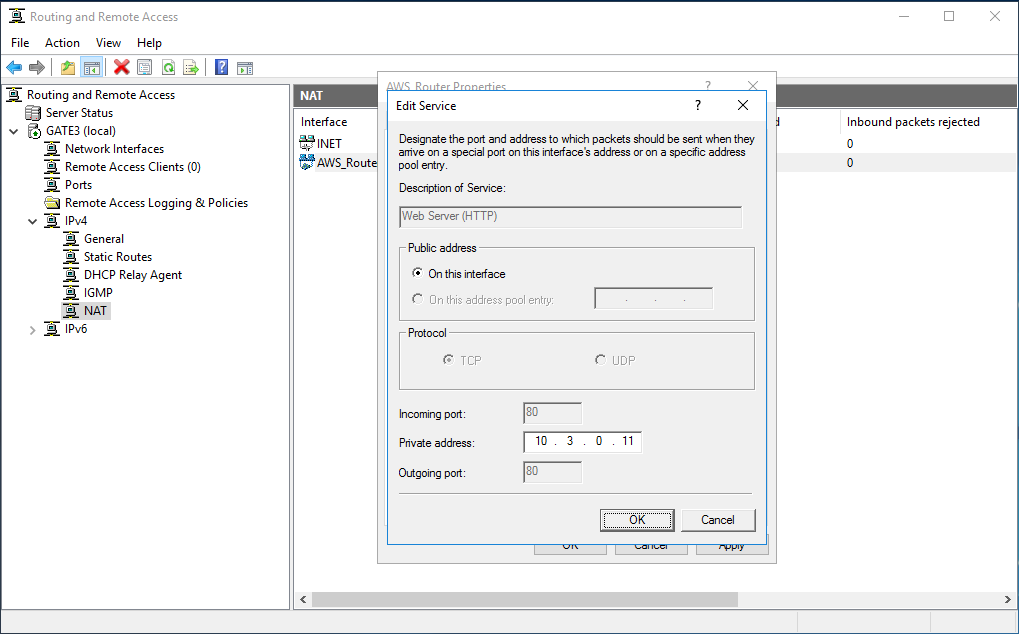
Click OK and ... everything is ready. We check - everything should work fine.
In such a simple way, you can quickly publish almost any services and resources, from sites, mail servers to some complex integrations. Naturally, for most of them, you will need to have your own DNS domain with the ability to create subdomains in it and edit the necessary records. It is also advisable to use SSL certificates for publishing web resources, thanks to LetsEncrypt and similar ACME-compatible services, all this can be done completely free of charge and with automatic updating.
When you restart the instance, the public IPv4 address does not change - only when it is stopped, but it is still recommended to use a static IPv4 address in AWS: EC2. Static in the sense that when you turn off your instance, it will remain assigned to it, and will not fall into the general free pool. Of course, this is necessary so as not to bother every time with the reconfiguration of DNS records in domains, and nobody canceled TTL with caching. It costs a lot of money and is called, as already mentioned above, Elastic IP .
Primitive process automation
Finally, I want to mention another great feature of AWS: EC2 - quick configuration of the deployed instance. There are many quick deployment options in AWS: EC2, up to special (and rather complex, but very powerful) services, but there is the simplest one: at step 3 in the wizard for creating a new instance at the bottom is the "User data" field. You can put a script in bash or even PowerShell in it (in the case of an instance for Windows), and this script will be executed automatically immediately after creating the instance.
Those. you can slightly modify all the above commands and configs to create your own bash script and use it to quickly raise such a virtual AWS: EC2 router. Learn more about this feature .
Thanks for taking the time to read this article.
All Articles