Regular Avalonia
Sometimes we don’t understand how the regular expression that we have composed works and want to check. There are many exciting applications built into various environments or online. I wanted to add one more to this list.
In this article we will see how you can wrap Regex in cross-platform graphics and get a simple application for testing regular expressions.
In order to create a project using avalonia ui, you need to install templates from GitHub .
And create a project from the mvvm template.
To create the main window, place all the components inside the grid.
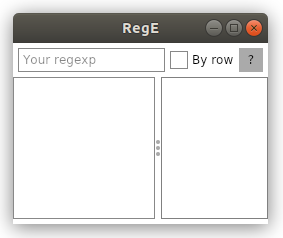
Our application consists of 2 parts: the upper analogue of the toolbar and the workspace.

Here we have a field for entering a regular expression, a checkbox showing how to analyze the text (line by line or as a whole fragment) and a help button.
The container is the Dock panel. This control allows you to easily fill the container with elements, pressing them to different sides and ensuring no free space inside.
And fill it with a text input field:
Here it is worth noting a pleasant trifle for Avalonia ui - the presence of watermark in the text fields.
Add a checkbox with 2 states to the panel, as IsThreeState = "False" says:
And the button responsible for calling the help:
Main part
The working part will be placed in the grid:
The input field is represented by the text box:
The splitter allows you to choose a convenient visualization for your needs:
And the field responsible for displaying the result of applying regular expressions will be placed in the border because the text block does not have its own frame:
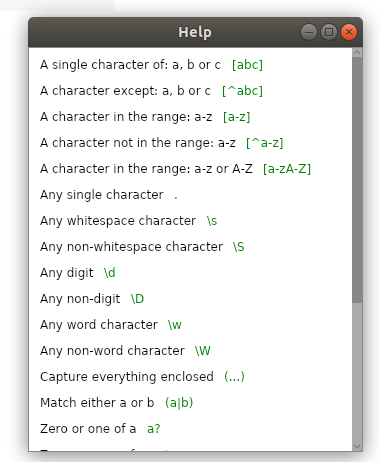
Help window
to create a new window, let's turn to the terminal
This window will contain only reference information and nothing else, so, ignoring the containers, make the box sheet a child of this window:
And fill it with the same elements as needed:
The layout is quite simple: a stack panel with 2 fields, the only thing worth mentioning here is the Classes attribute, which allows us to style our windows like css (another nice feature of Avalonia.
And actually paint the rules themselves in green:
First of all, let's take care of the fields for all the markup elements:
Let's create methods that will return the results of the match with the original text:
And with the source text along the lines, for which we use Split
And add a method that displays the help window
Properties and Bindings
An interesting feature of Avalonia is the ability to attach a method directly to a button:
Which we will use.
For the rest of the fields, we simply bind to the properties. An interesting feature here is that in avalonia, the binding update occurs when the content of the control changes, which was done in the vpf: UpdateSourceTrigger = PropertyChanged in avalonia works by default.
And since the Avalonia mvvm template is associated with the Reactive UI, the properties are created using this library:
Finally
I hope that this article will be of interest not only to those who want to use my material and / or somehow improve it, but also to all those who are familiar with Avalonia or are looking for ways to create cross-platform applications in c #.
Source code ( tyk ).
I would like to say thanks to ForNeVer kekekeks worldbeater
And note that support for c # can be found here , and for Avalonia here .
In this article we will see how you can wrap Regex in cross-platform graphics and get a simple application for testing regular expressions.
Start
In order to create a project using avalonia ui, you need to install templates from GitHub .
And create a project from the mvvm template.
dotnet new avalonia.mvvm -o MyApp
Design and layout
To create the main window, place all the components inside the grid.
<Grid> <Grid.RowDefinitions> <RowDefinition Height="5" /> <RowDefinition Height="Auto" /> <RowDefinition Height="5" /> <RowDefinition Height="*" /> <RowDefinition Height="5" /> </Grid.RowDefinitions> </Grid>
Our application consists of 2 parts: the upper analogue of the toolbar and the workspace.
Consider the top
Here we have a field for entering a regular expression, a checkbox showing how to analyze the text (line by line or as a whole fragment) and a help button.
The container is the Dock panel. This control allows you to easily fill the container with elements, pressing them to different sides and ensuring no free space inside.
<DockPanel Grid.Row="1">
And fill it with a text input field:
<TextBox Margin="5, 0, 5, 0" Watermark="Your regexp" AcceptsReturn="False" Text="{Binding RegText}"/>
Here it is worth noting a pleasant trifle for Avalonia ui - the presence of watermark in the text fields.
Add a checkbox with 2 states to the panel, as IsThreeState = "False" says:
<CheckBox DockPanel.Dock="Right" Content="By row" IsThreeState="False" IsChecked="{Binding IsChecked}" ToolTip.Tip="Check for each row" />
And the button responsible for calling the help:
<Button DockPanel.Dock="Right" Content=" ? " Margin="5, 0, 5, 0" ToolTip.Tip="Show hints" Command="{Binding ShowHelp}" />
Main part
The working part will be placed in the grid:
<Grid Grid.Row="3"> <Grid.ColumnDefinitions> <ColumnDefinition Width="*" /> <ColumnDefinition Width="Auto" /> <ColumnDefinition Width="0.75*" /> </Grid.ColumnDefinitions> </Grid>
The input field is represented by the text box:
<TextBox Grid.Column="0" AcceptsReturn="True" ScrollViewer.VerticalScrollBarVisibility="Auto" Text="{Binding InputText}"/>
The splitter allows you to choose a convenient visualization for your needs:
<GridSplitter Grid.Column="1" />
And the field responsible for displaying the result of applying regular expressions will be placed in the border because the text block does not have its own frame:
<Border BorderBrush="Gray" BorderThickness="1" Grid.Column="2"> <TextBlock ScrollViewer.VerticalScrollBarVisibility="Auto" Text="{Binding OutputText}" /> </Border>
Help window
to create a new window, let's turn to the terminal
dotnet new avalonia.window -na MyApp -n MyNewWindow
This window will contain only reference information and nothing else, so, ignoring the containers, make the box sheet a child of this window:
<ListBox ScrollViewer.VerticalScrollBarVisibility="Visible" VirtualizationMode="None"> </ListBox>
And fill it with the same elements as needed:
<ListBoxItem> <StackPanel Orientation="Horizontal"> <TextBlock Margin="5" Text="A single character of: a, b or c" /> <TextBlock Margin="5" Classes="green" Text="[abc]" /> </StackPanel> </ListBoxItem>
The layout is quite simple: a stack panel with 2 fields, the only thing worth mentioning here is the Classes attribute, which allows us to style our windows like css (another nice feature of Avalonia.
And actually paint the rules themselves in green:
<Window.Styles> <Style Selector="TextBlock.green"> <Setter Property="Foreground" Value="Green" /> </Style> </Window.Styles>
Mvvm functionality
First of all, let's take care of the fields for all the markup elements:
private bool _isChecked; private string _inputText; private string _regText; private string _outputText;
Let's create methods that will return the results of the match with the original text:
private void SetNoRowResult() { OutputText = string.Join(Environment.NewLine,new Regex(_regText).Matches(_inputText)); }
And with the source text along the lines, for which we use Split
private void SetRowResult() { var r = new Regex(_regText); var s = string.Empty; foreach (var line in _inputText.Split( Environment.NewLine,StringSplitOptions.RemoveEmptyEntries)) { s += $"--{Environment.NewLine}"; s+=string.Join(Environment.NewLine,r.Matches(line)); s += $"{Environment.NewLine}--{Environment.NewLine}"; } OutputText = s; }
And add a method that displays the help window
public void ShowHelp() { new HelpWindow().Show(); }
Properties and Bindings
An interesting feature of Avalonia is the ability to attach a method directly to a button:
<Button Command="{Binding ShowHelp}" />
Which we will use.
For the rest of the fields, we simply bind to the properties. An interesting feature here is that in avalonia, the binding update occurs when the content of the control changes, which was done in the vpf: UpdateSourceTrigger = PropertyChanged in avalonia works by default.
And since the Avalonia mvvm template is associated with the Reactive UI, the properties are created using this library:
public string RegText { get => _regText; set { this.RaiseAndSetIfChanged(ref _regText, value); if(_isChecked) SetRowResult(); else SetNoRowResult(); } }
Finally
I hope that this article will be of interest not only to those who want to use my material and / or somehow improve it, but also to all those who are familiar with Avalonia or are looking for ways to create cross-platform applications in c #.
Source code ( tyk ).
I would like to say thanks to ForNeVer kekekeks worldbeater
And note that support for c # can be found here , and for Avalonia here .
All Articles