Deep Learning is now in Java
Do not like Java? Yes, you do not know how to cook it! Mani Sarkar invites us to get acquainted with the Valohai tool, which allows you to conduct model research in Java.
Some time ago, I came across a cloud service called Valohai, and I was pleased with its user interface and the simplicity of design and layout. I asked for the service of one of Valohai's members and received a demo version. Before that, I wrote a simple pipeline using GNU Parallel, JavaScript, Python and Bash - and another one that uses only GNU Parallel and Bash.
I also thought about using ready-to-use task / workflow management tools like Jenkins X, Jenkins Pipeline, Concourse or Airflow, but for various reasons I decided not to.
I noticed that many Valohai examples and documentation are based on Python and R and their respective frameworks and libraries. I decided not to miss the opportunity and want to correct the lack of examples and documentation.
Valohai pushed me to implement something using the famous Java library called DL4J - Deep Learning for Java .
My first experience with Valohai already made a good impression on me after feeling through its design, layout and workflow. The creators have already taken into account various aspects of both developer workflows and infrastructure. In our world, the infrastructure development process is mainly controlled by the DevOps or SysOps teams, and we know the nuances and pain points associated with it.
In any machine learning project, there are two important components (from a high-level point of view) - a code that will work with the model, and code that will work with the infrastructure in which the entire project life cycle will be executed.
Of course, there will be steps and components necessary before, during and after, but for simplicity, let's say, we need code and infrastructure.
For the code, I chose a complex example using DL4J, this is the MNist project with a training set of 60,000 images and a test set of 10,000 images of handwritten digits. This dataset is available through the DL4J library (just like Keras).
Before you begin, it is recommended that you take a look at the source code that we will use. The main Java class is called org.deeplearning4j.feedforward.mnist.MLPMnistSingleLayerRunner .
We decided to try the Java example using Valohai as our infrastructure for conducting experiments (training and model evaluation). Valohai recognizes git repositories and connects directly to them, allowing us to execute our code regardless of platform or language - so we will see how it works. It also means that if you use GitOps or Infrastructure-As-Code, everything will work for you too.
For this, we just need an account at Valohai. After creating a free account, we get access to several instances of various configurations. For what we would like to do, Free-Tier is more than enough.
We will provide all the dependencies to the Docker image and use it to compile our Java application, train the model and evaluate it on the Valohai platform using a simple valohai.yaml file located in the root folder of the project repository.
The simplest part. We don’t have to do much, just collect the jar and load the dataset into the Docker container. We have a pre-created Docker image that contains all the dependencies needed to create a Java application. We placed this image in the Docker Hub, and you can find it by searching for dl4j-mnist-single-layer (we will use a special tag as defined in the YAML file). We decided to use GraalVM 19.1.1 as our build and runtime Java environment for this project, and it is built into the Docker image.
When the uber jar is called from the command line, we create the MLPMnistSingleLayerRunner class, which tells us the intended action, depending on the parameters passed to:
Parameters passed to uber jar are accepted by this class and processed by the execute () method.
We can create a model using the --action train parameter and evaluate the created model using the --action evaluate parameter passed to the Java application.
The main parts of the Java application that does this work can be found in the two Java classes mentioned in the sections below.
Call
This command creates a model named mlpmnist-single-layer.pb in the folder specified by the --output-dir parameter passed at the start of execution. From Valohai’s point of view, it should be placed in $ {VH_OUTPUTS_DIR}, which we do (see the file valohai.yaml ).
For source code, see the MLPMNistSingleLayerTrain.java class.
Call
It is assumed that a model (created during the training phase) with the name mlpmnist-single-layer.pb will be present in the folder specified in the --input-dir parameter passed when the application was called.
For the source code, see the class MLPMNistSingleLayerEvaluate.java .
I hope this short illustration clarifies how a Java application that teaches and evaluates a model works.
This is all that is required of us, but do not hesitate to play with the rest of the sources (along with README.md and bash scripts) and satisfy your curiosity and understanding of how this is done!
Valohai allows us to freely link our runtime, code, and dataset, as you can see from the YAML file structure below. Thus, various components can develop independently of each other. Therefore, only assembly and runtime components are packaged in our Docker container.
At run time, we collect the Uber JAR in a Docker container, load it into some internal or external storage, and then use the other execution step to load the Uber JAR and dataset from the storage (or other place) to start training. Thus, the two execution steps are disconnected; for example, we can compile a jar once and complete hundreds of training steps on a single jar. Because assembly and runtime environments do not have to change so often, we can cache them, and code, datasets, and models can be dynamically accessible at runtime.
valohai.yaml
The main part of integrating our Java project with the Valohai infrastructure is determining the order of the Execution steps in the valohai.yaml file located in the root of your project folder. Our valohai.yaml looks like this:
From the YAML file, we see that we define this step, first using the Docker image, and then running the script to build the Uber JAR. Our docker image has customization of build environment dependencies (e.g. GraalVM JDK, Maven, etc.) to create a Java application. We do not provide any input or parameters, as this is the assembly phase. Once the build is successful, we copy the uber jar named MLPMnist-1.0.0-bin.jar (original name) to the / valohai / outputs folder (represented as $ {VH_OUTPUTS_DIR}). Everything in this folder is automatically saved in the storage of your project, for example, in the AWS S3 recycle bin. Finally, we define our work for AWS.
The semantics of the definition are similar to the previous step, except that we specify two inputs: one for uber jar (MLPMnist-1.0.0.jar), and the other for the data set (unpacked into the folder $ {HOME} /. Deeplearning4j). We will pass two parameters - --action train and --output-dir / valohai / outputs. The model created in this step is built in / valohai / outputs / model (represented as $ {VH_OUTPUTS_DIR} / model).
Again, this step is similar to the previous step, except that we will pass two parameters --action evaluate and --input-dir / valohai / inputs / model. In addition, we again indicated in the input: the sections defined in the YAML file with the name dl4j-java-app and model without the default for both of them. This will allow us to select the uber jar and the model we want to evaluate - which was created using the Run-dl4j-mnist-single-layer-train-model step using the web interface.
I hope this explains the steps in the definition file above, but if you need further help, please feel free to view the documentation and tutorials .
After receiving the account, we can log in and continue creating the project with the name mlpmnist-single-layer and associate git repo github.com/valohai/mlpmnist-dl4j-example with the project and save the project.
Now you can complete the step and see how it turns out!
Go to the “Execution” tab in the web interface and either copy the existing execution or create a new one using the [Create execution] button. All necessary default parameters will be filled. Select Step Build-dl4j-mnist-single-layer-java-app.
For the Environment, I selected AWS eu-west-1 g2.2xlarge and clicked the [Create execution] button at the bottom of the page to see the start of execution.
Go to the “Execution” tab in the web interface and do the same as in the previous step, and select Run-dl4j-mnist-single-layer-train-model. You will need to select the Java application (just enter jar in the field) created in the previous step. The data set has already been pre-populated using the valohai.yaml file:
Click [Create Execution] to start.
You will see the result in the console:
Created models can be found on the “Outputs” tab of the “Execution” main tab during and after execution:
You may notice several artifacts in the Outputs sub tab. This is because we maintain control points at the end of each era. Let's look at this in the logs:
The checkpoint contains the state of the model in three files:
You may have noticed these entries in the execution logs:
This data allows Valohai to get these values (in JSON format) that will be used to build the metrics that can be seen during and after execution on the additional Metadata tab on the Executions main tab:
We were able to do this by connecting the ValohaiMetadataCreator class to the model, so that Valohai refers to this class during training. In the case of this class, we derive several eras, the number of iterations and Score (value of the loss function). Here is the code snippet from the class:
Once the model has been successfully created in the previous step, it should be evaluated. We create a new Execution in the same way as before, but this time select the Run-dl4j-mnist-single-layer -valu-model step. We will need to select the Java application (MLPMnist-1.0.0.jar) and the created model (mlpmnist-single-layer.pb) again before starting the execution (as shown below):
After selecting the desired model as input, click the [Create execution] button. It will execute faster than the previous one, and we will see the following result:
We see that our "hello world" led to a model whose accuracy is about 97% based on a test data set. Confusion matrix helps to find cases when a digit was incorrectly predicted as another digit.
The question remains (and beyond the scope of this post) - how good is the model when faced with real data?
To clone a git repository, here's what you need to do:
Then we need to link our Valohai project, created through the web interface in the above section, with the project stored on our local machine (the one we just cloned). Run the following commands to do this:
You will be shown something like this:
Select 1 (or the one that suits you) and you should see this message:
One more thing, before moving on, make sure your Valohai project is in sync with the latest git project by doing this:
Now we can complete the steps from the CLI with:
After Execution is done, we can check it with:
As we have seen, it is very convenient to work with DL4J and Valohai together. In addition, we can develop the various components that make up our experiments (research), that is, the build / runtime environment, code and data set, and integrate them into our project.
The sample templates used in this post are a good way to start creating more complex projects. And you can use the web or command line interface to do your job with Valohai. With the CLI, you can also integrate it with your installations and scripts (or even with CRON or CI / CD jobs).
In addition, it is clear that if I am working on a project related to AI / ML / DL, I do not need to worry about creating and maintaining an end-to-end pipeline (which many others had to do in the past).
Thanks for your attention!
Disclaimer from the translator
I hope this is not an advertising publication. I am not affiliated with Valohai. I just translated the article to which I refer the link. If clumsily translated - kick in PM. If necessary, I can delete links and mention other external resources. Thank you for understanding.
Introduction
Some time ago, I came across a cloud service called Valohai, and I was pleased with its user interface and the simplicity of design and layout. I asked for the service of one of Valohai's members and received a demo version. Before that, I wrote a simple pipeline using GNU Parallel, JavaScript, Python and Bash - and another one that uses only GNU Parallel and Bash.
I also thought about using ready-to-use task / workflow management tools like Jenkins X, Jenkins Pipeline, Concourse or Airflow, but for various reasons I decided not to.
I noticed that many Valohai examples and documentation are based on Python and R and their respective frameworks and libraries. I decided not to miss the opportunity and want to correct the lack of examples and documentation.
Valohai pushed me to implement something using the famous Java library called DL4J - Deep Learning for Java .
My first experience with Valohai already made a good impression on me after feeling through its design, layout and workflow. The creators have already taken into account various aspects of both developer workflows and infrastructure. In our world, the infrastructure development process is mainly controlled by the DevOps or SysOps teams, and we know the nuances and pain points associated with it.
What do we need and how?
In any machine learning project, there are two important components (from a high-level point of view) - a code that will work with the model, and code that will work with the infrastructure in which the entire project life cycle will be executed.
Of course, there will be steps and components necessary before, during and after, but for simplicity, let's say, we need code and infrastructure.
The code
For the code, I chose a complex example using DL4J, this is the MNist project with a training set of 60,000 images and a test set of 10,000 images of handwritten digits. This dataset is available through the DL4J library (just like Keras).
Before you begin, it is recommended that you take a look at the source code that we will use. The main Java class is called org.deeplearning4j.feedforward.mnist.MLPMnistSingleLayerRunner .
Infrastructure
We decided to try the Java example using Valohai as our infrastructure for conducting experiments (training and model evaluation). Valohai recognizes git repositories and connects directly to them, allowing us to execute our code regardless of platform or language - so we will see how it works. It also means that if you use GitOps or Infrastructure-As-Code, everything will work for you too.
For this, we just need an account at Valohai. After creating a free account, we get access to several instances of various configurations. For what we would like to do, Free-Tier is more than enough.
Deep Learning for Java and Valohai
We will provide all the dependencies to the Docker image and use it to compile our Java application, train the model and evaluate it on the Valohai platform using a simple valohai.yaml file located in the root folder of the project repository.
Deep Learning for Java: DL4J
The simplest part. We don’t have to do much, just collect the jar and load the dataset into the Docker container. We have a pre-created Docker image that contains all the dependencies needed to create a Java application. We placed this image in the Docker Hub, and you can find it by searching for dl4j-mnist-single-layer (we will use a special tag as defined in the YAML file). We decided to use GraalVM 19.1.1 as our build and runtime Java environment for this project, and it is built into the Docker image.
When the uber jar is called from the command line, we create the MLPMnistSingleLayerRunner class, which tells us the intended action, depending on the parameters passed to:
public static void main(String[] args) throws Exception { MLPMnistSingleLayerRunner mlpMnistRunner = new MLPMnistSingleLayerRunner(); JCommander.newBuilder() .addObject(mlpMnistRunner) .build() .parse(args); mlpMnistRunner.execute(); }
Parameters passed to uber jar are accepted by this class and processed by the execute () method.
We can create a model using the --action train parameter and evaluate the created model using the --action evaluate parameter passed to the Java application.
The main parts of the Java application that does this work can be found in the two Java classes mentioned in the sections below.
Model training
Call
./runMLPMnist.sh --action train --output-dir ${VH_OUTPUTS_DIR} or java -Djava.library.path="" \ -jar target/MLPMnist-1.0.0-bin.jar \ --action train --output-dir ${VH_OUTPUTS_DIR}
This command creates a model named mlpmnist-single-layer.pb in the folder specified by the --output-dir parameter passed at the start of execution. From Valohai’s point of view, it should be placed in $ {VH_OUTPUTS_DIR}, which we do (see the file valohai.yaml ).
For source code, see the MLPMNistSingleLayerTrain.java class.
Model Evaluation
Call
./runMLPMnist.sh --action evaluate --input-dir ${VH_INPUTS_DIR}/model or java -Djava.library.path="" \ -jar target/MLPMnist-1.0.0-bin.jar \ --action evaluate --input-dir ${VH_INPUTS_DIR}/model
It is assumed that a model (created during the training phase) with the name mlpmnist-single-layer.pb will be present in the folder specified in the --input-dir parameter passed when the application was called.
For the source code, see the class MLPMNistSingleLayerEvaluate.java .
I hope this short illustration clarifies how a Java application that teaches and evaluates a model works.
This is all that is required of us, but do not hesitate to play with the rest of the sources (along with README.md and bash scripts) and satisfy your curiosity and understanding of how this is done!
Valohai
Valohai allows us to freely link our runtime, code, and dataset, as you can see from the YAML file structure below. Thus, various components can develop independently of each other. Therefore, only assembly and runtime components are packaged in our Docker container.
At run time, we collect the Uber JAR in a Docker container, load it into some internal or external storage, and then use the other execution step to load the Uber JAR and dataset from the storage (or other place) to start training. Thus, the two execution steps are disconnected; for example, we can compile a jar once and complete hundreds of training steps on a single jar. Because assembly and runtime environments do not have to change so often, we can cache them, and code, datasets, and models can be dynamically accessible at runtime.
valohai.yaml
The main part of integrating our Java project with the Valohai infrastructure is determining the order of the Execution steps in the valohai.yaml file located in the root of your project folder. Our valohai.yaml looks like this:
--- - step: name: Build-dl4j-mnist-single-layer-java-app image: neomatrix369/dl4j-mnist-single-layer:v0.5 command: - cd ${VH_REPOSITORY_DIR} - ./buildUberJar.sh - echo "~~~ Copying the build jar file into ${VH_OUTPUTS_DIR}" - cp target/MLPMnist-1.0.0-bin.jar ${VH_OUTPUTS_DIR}/MLPMnist-1.0.0.jar - ls -lash ${VH_OUTPUTS_DIR} environment: aws-eu-west-1-g2-2xlarge - step: name: Run-dl4j-mnist-single-layer-train-model image: neomatrix369/dl4j-mnist-single-layer:v0.5 command: - echo "~~~ Unpack the MNist dataset into ${HOME} folder" - tar xvzf ${VH_INPUTS_DIR}/dataset/mlp-mnist-dataset.tgz -C ${HOME} - cd ${VH_REPOSITORY_DIR} - echo "~~~ Copying the build jar file from ${VH_INPUTS_DIR} to current location" - cp ${VH_INPUTS_DIR}/dl4j-java-app/MLPMnist-1.0.0.jar . - echo "~~~ Run the DL4J app to train model based on the the MNist dataset" - ./runMLPMnist.sh {parameters} inputs: - name: dl4j-java-app description: DL4J Java app file (jar) generated in the previous step 'Build-dl4j-mnist-single-layer-java-app' - name: dataset default: https://github.com/neomatrix369/awesome-ai-ml-dl/releases/download/mnist-dataset-v0.1/mlp-mnist-dataset.tgz description: MNist dataset needed to train the model parameters: - name: --action pass-as: '--action {v}' type: string default: train description: Action to perform ie train or evaluate - name: --output-dir pass-as: '--output-dir {v}' type: string default: /valohai/outputs/ description: Output directory where the model will be created, best to pick the Valohai output directory environment: aws-eu-west-1-g2-2xlarge - step: name: Run-dl4j-mnist-single-layer-evaluate-model image: neomatrix369/dl4j-mnist-single-layer:v0.5 command: - cd ${VH_REPOSITORY_DIR} - echo "~~~ Copying the build jar file from ${VH_INPUTS_DIR} to current location" - cp ${VH_INPUTS_DIR}/dl4j-java-app/MLPMnist-1.0.0.jar . - echo "~~~ Run the DL4J app to evaluate the trained MNist model" - ./runMLPMnist.sh {parameters} inputs: - name: dl4j-java-app description: DL4J Java app file (jar) generated in the previous step 'Build-dl4j-mnist-single-layer-java-app' - name: model description: Model file generated in the previous step 'Run-dl4j-mnist-single-layer-train-model' parameters: - name: --action pass-as: '--action {v}' type: string default: evaluate description: Action to perform ie train or evaluate - name: --input-dir pass-as: '--input-dir {v}' type: string default: /valohai/inputs/model description: Input directory where the model created by the previous step can be found created environment: aws-eu-west-1-g2-2xlarge
How Build-dl4j-mnist-single-layer-java-app works
From the YAML file, we see that we define this step, first using the Docker image, and then running the script to build the Uber JAR. Our docker image has customization of build environment dependencies (e.g. GraalVM JDK, Maven, etc.) to create a Java application. We do not provide any input or parameters, as this is the assembly phase. Once the build is successful, we copy the uber jar named MLPMnist-1.0.0-bin.jar (original name) to the / valohai / outputs folder (represented as $ {VH_OUTPUTS_DIR}). Everything in this folder is automatically saved in the storage of your project, for example, in the AWS S3 recycle bin. Finally, we define our work for AWS.
Note
The free Valohai account does not have network access from the Docker container (it is disabled by default), please contact support to enable this option (I had to do the same), otherwise we will not be able to download our Maven and other dependencies during assembly.
How Run-dl4j-mnist-single-layer-train-model works
The semantics of the definition are similar to the previous step, except that we specify two inputs: one for uber jar (MLPMnist-1.0.0.jar), and the other for the data set (unpacked into the folder $ {HOME} /. Deeplearning4j). We will pass two parameters - --action train and --output-dir / valohai / outputs. The model created in this step is built in / valohai / outputs / model (represented as $ {VH_OUTPUTS_DIR} / model).
Note
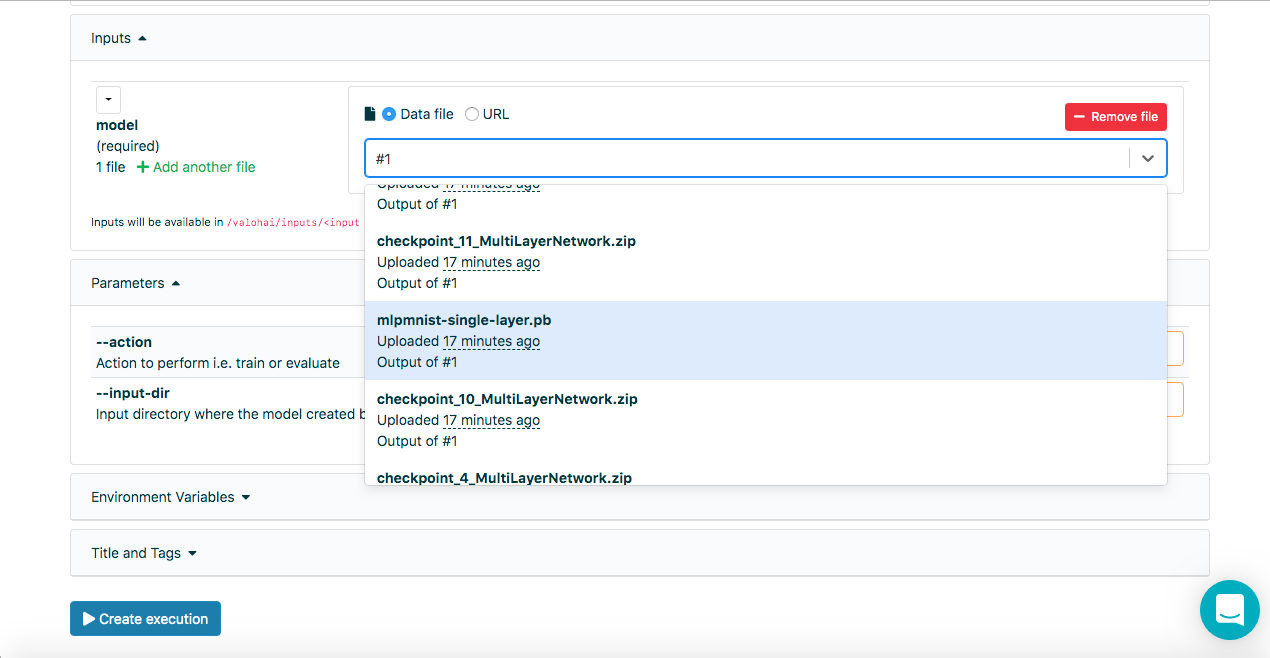
In the input fields on the Run tab of the Valohai web interface, we can select the output from previous executions using the run number, i.e. # 1 or # 2, in addition to using the datum: // or http: / URLs /, entering a few letters of the file name also helps to search the entire list.
How Run-dl4j-mnist-single-layer -valu-model works
Again, this step is similar to the previous step, except that we will pass two parameters --action evaluate and --input-dir / valohai / inputs / model. In addition, we again indicated in the input: the sections defined in the YAML file with the name dl4j-java-app and model without the default for both of them. This will allow us to select the uber jar and the model we want to evaluate - which was created using the Run-dl4j-mnist-single-layer-train-model step using the web interface.
I hope this explains the steps in the definition file above, but if you need further help, please feel free to view the documentation and tutorials .
Valohai Web Interface
After receiving the account, we can log in and continue creating the project with the name mlpmnist-single-layer and associate git repo github.com/valohai/mlpmnist-dl4j-example with the project and save the project.
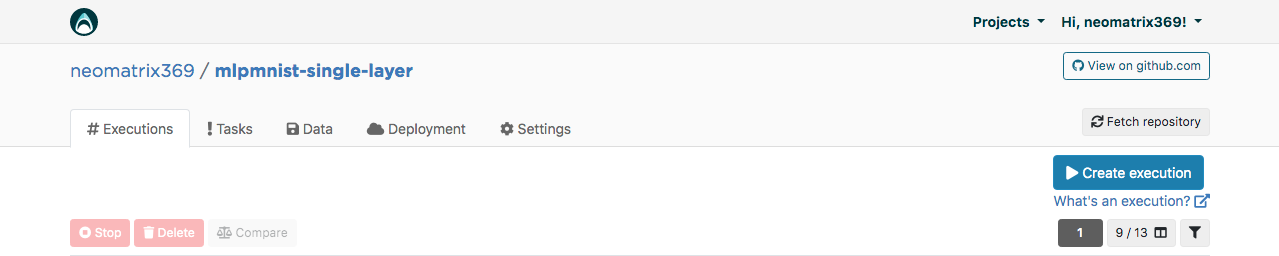
Now you can complete the step and see how it turns out!
Build a DL4J Java Application
Go to the “Execution” tab in the web interface and either copy the existing execution or create a new one using the [Create execution] button. All necessary default parameters will be filled. Select Step Build-dl4j-mnist-single-layer-java-app.
For the Environment, I selected AWS eu-west-1 g2.2xlarge and clicked the [Create execution] button at the bottom of the page to see the start of execution.
Model training
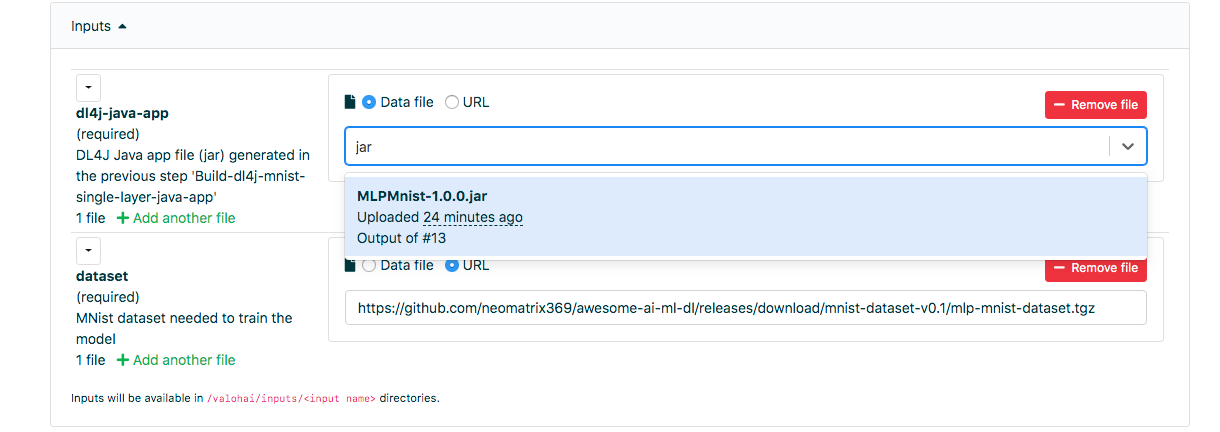
Go to the “Execution” tab in the web interface and do the same as in the previous step, and select Run-dl4j-mnist-single-layer-train-model. You will need to select the Java application (just enter jar in the field) created in the previous step. The data set has already been pre-populated using the valohai.yaml file:
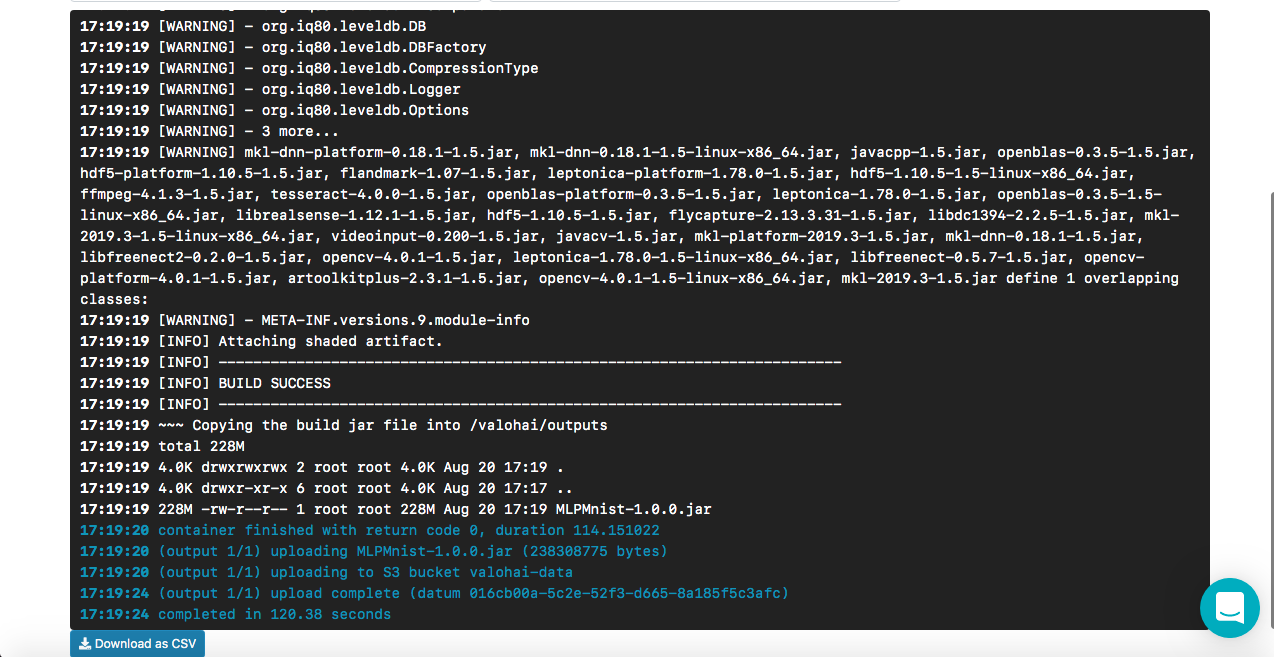
Click [Create Execution] to start.
You will see the result in the console:
[<--- snipped --->] 11:17:05 ======================================================================= 11:17:05 LayerName (LayerType) nIn,nOut TotalParams ParamsShape 11:17:05 ======================================================================= 11:17:05 layer0 (DenseLayer) 784,1000 785000 W:{784,1000}, b:{1,1000} 11:17:05 layer1 (OutputLayer) 1000,10 10010 W:{1000,10}, b:{1,10} 11:17:05 ----------------------------------------------------------------------- 11:17:05 Total Parameters: 795010 11:17:05 Trainable Parameters: 795010 11:17:05 Frozen Parameters: 0 11:17:05 ======================================================================= [<--- snipped --->]
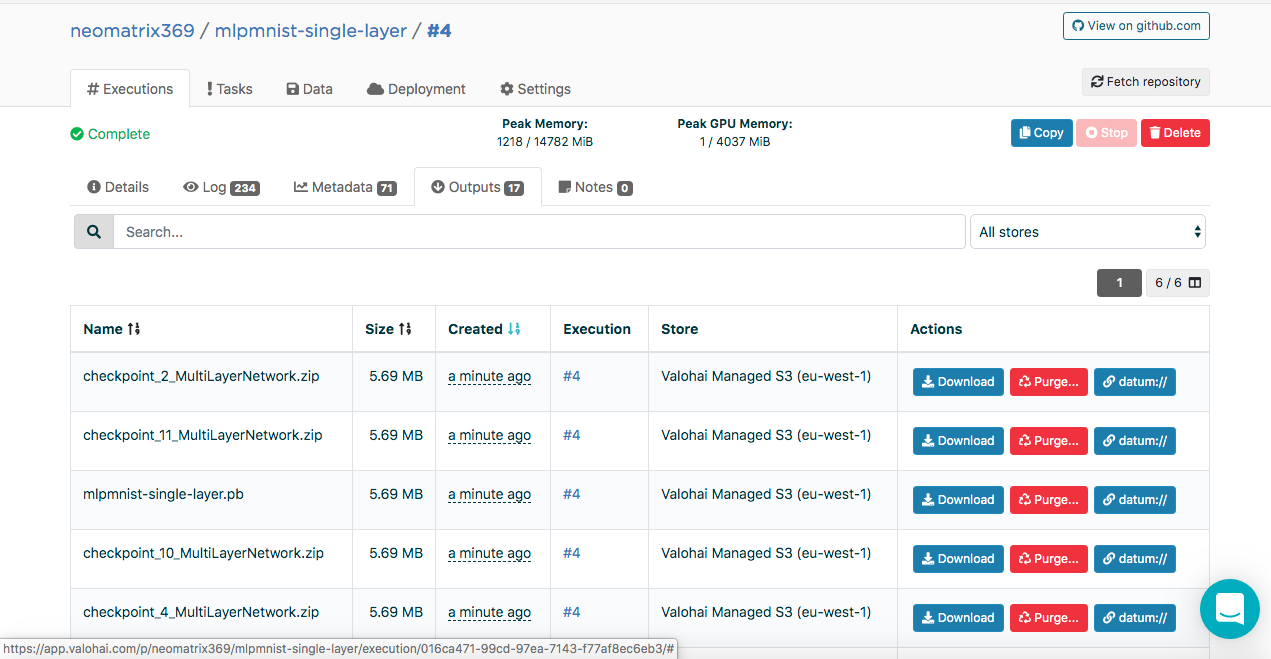
Created models can be found on the “Outputs” tab of the “Execution” main tab during and after execution:
You may notice several artifacts in the Outputs sub tab. This is because we maintain control points at the end of each era. Let's look at this in the logs:
[<--- snipped --->] 11:17:14 odolCheckpointListener - Model checkpoint saved: epoch 0, iteration 469, path: /valohai/outputs/checkpoint_0_MultiLayerNetwork.zip [<--- snipped --->]
The checkpoint contains the state of the model in three files:
configuration.json coefficients.bin updaterState.bin
Model training. Metadata
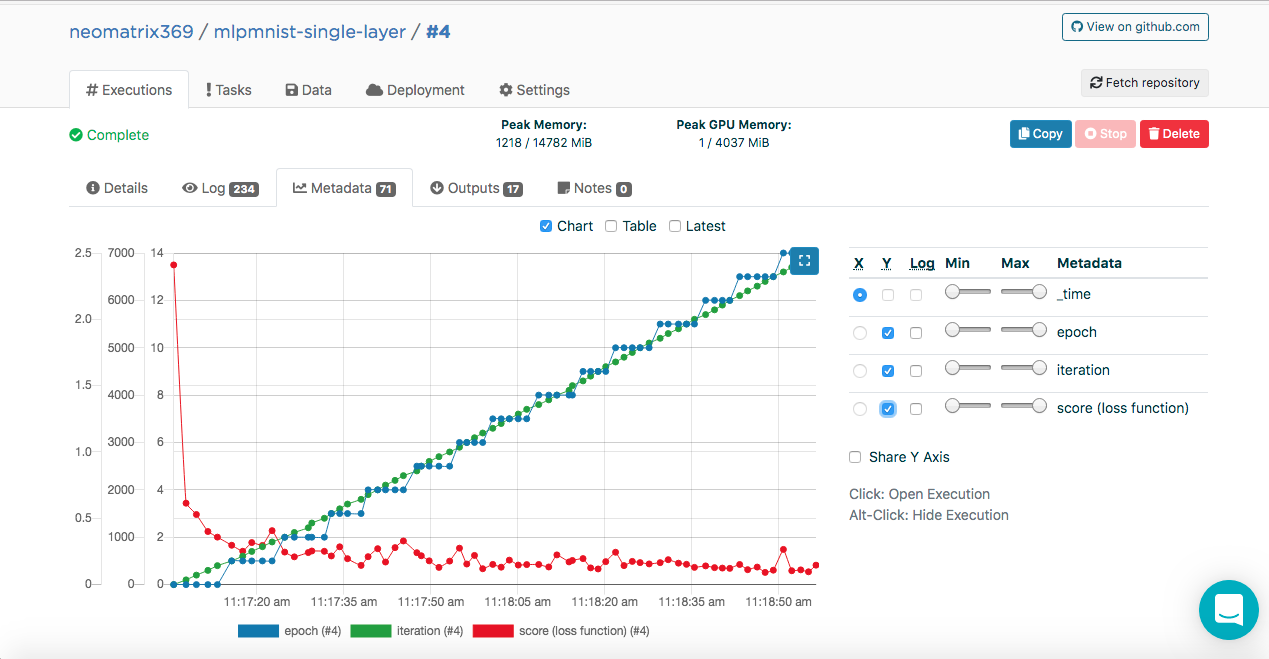
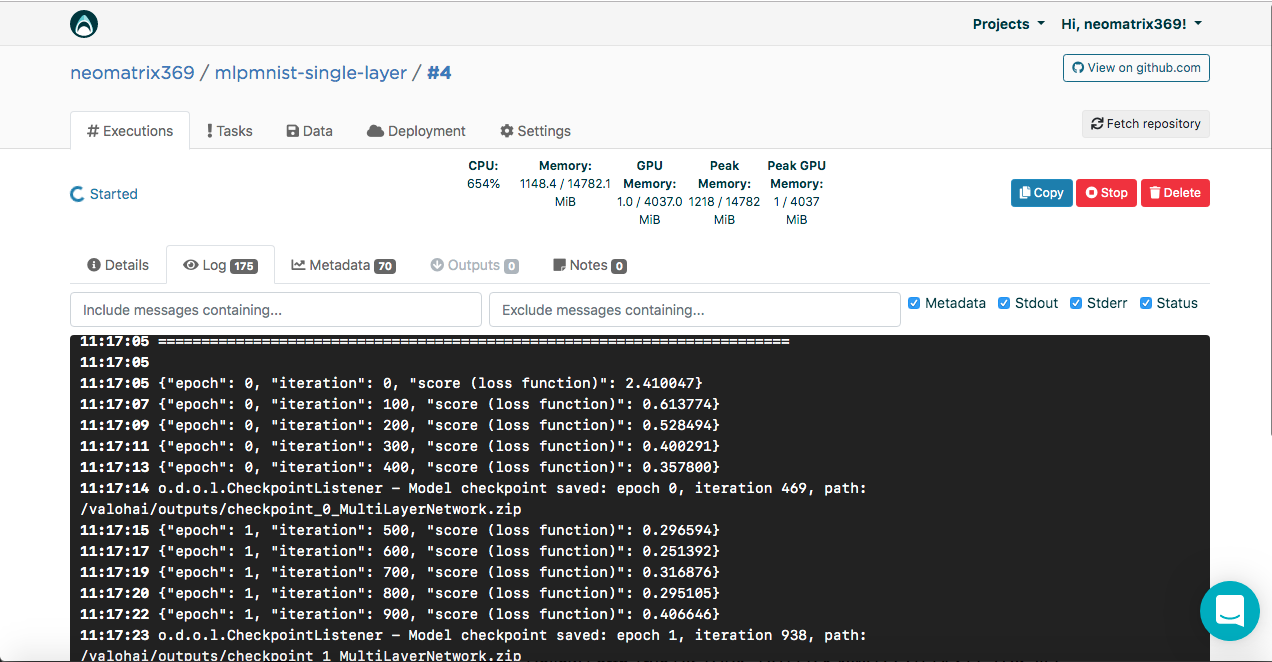
You may have noticed these entries in the execution logs:
[<--- snipped --->] 11:17:05 {"epoch": 0, "iteration": 0, "score (loss function)": 2.410047} 11:17:07 {"epoch": 0, "iteration": 100, "score (loss function)": 0.613774} 11:17:09 {"epoch": 0, "iteration": 200, "score (loss function)": 0.528494} 11:17:11 {"epoch": 0, "iteration": 300, "score (loss function)": 0.400291} 11:17:13 {"epoch": 0, "iteration": 400, "score (loss function)": 0.357800} 11:17:14 odolCheckpointListener - Model checkpoint saved: epoch 0, iteration 469, path: /valohai/outputs/checkpoint_0_MultiLayerNetwork.zip [<--- snipped --->]
This data allows Valohai to get these values (in JSON format) that will be used to build the metrics that can be seen during and after execution on the additional Metadata tab on the Executions main tab:
We were able to do this by connecting the ValohaiMetadataCreator class to the model, so that Valohai refers to this class during training. In the case of this class, we derive several eras, the number of iterations and Score (value of the loss function). Here is the code snippet from the class:
public void iterationDone(Model model, int iteration, int epoch) { if (printIterations <= 0) printIterations = 1; if (iteration % printIterations == 0) { double score = model.score(); System.out.println(String.format( "{\"epoch\": %d, \"iteration\": %d, \"score (loss function)\": %f}", epoch, iteration, score) ); } }
Model Evaluation
Once the model has been successfully created in the previous step, it should be evaluated. We create a new Execution in the same way as before, but this time select the Run-dl4j-mnist-single-layer -valu-model step. We will need to select the Java application (MLPMnist-1.0.0.jar) and the created model (mlpmnist-single-layer.pb) again before starting the execution (as shown below):
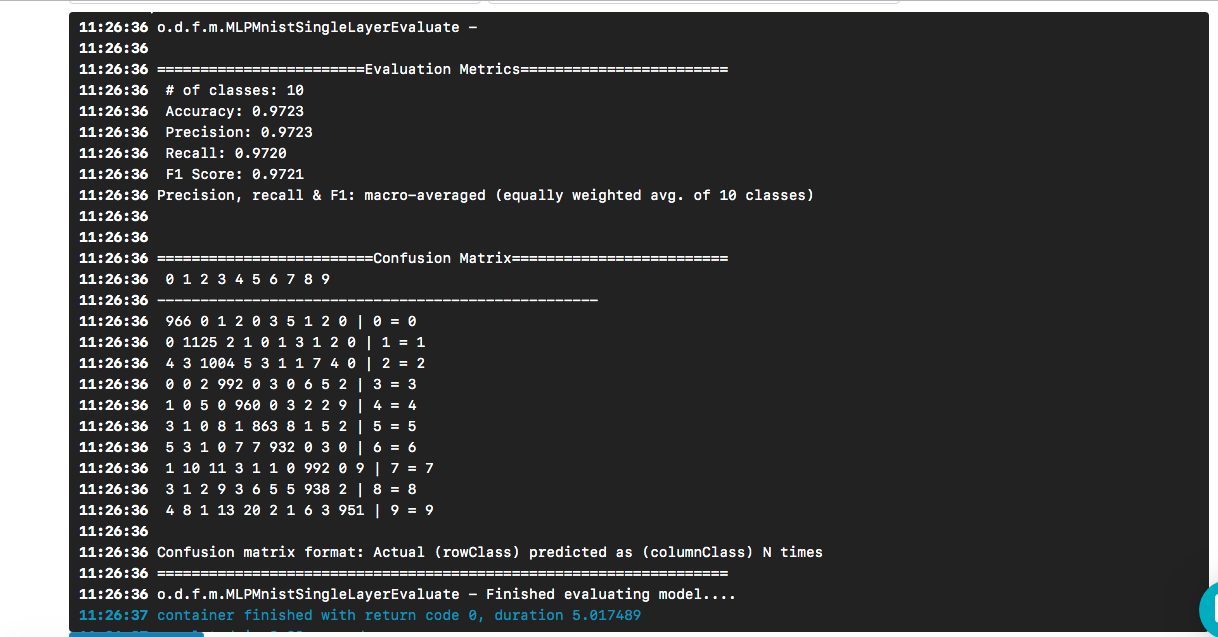
After selecting the desired model as input, click the [Create execution] button. It will execute faster than the previous one, and we will see the following result:
We see that our "hello world" led to a model whose accuracy is about 97% based on a test data set. Confusion matrix helps to find cases when a digit was incorrectly predicted as another digit.
The question remains (and beyond the scope of this post) - how good is the model when faced with real data?
To clone a git repository, here's what you need to do:
$ git clone https://github.com/valohai/mlpmnist-dl4j-example
Then we need to link our Valohai project, created through the web interface in the above section, with the project stored on our local machine (the one we just cloned). Run the following commands to do this:
$ cd mlpmnist-dl4j-example $ vh project --help ### to see all the project-specific options we have for Valohai $ vh project link
You will be shown something like this:
[ 1] mlpmnist-single-layer ... Which project would you like to link with /path/to/mlpmnist-dl4j-example? Enter [n] to create a new project.:
Select 1 (or the one that suits you) and you should see this message:
Success! Linked /path/to/mlpmnist-dl4j-example to mlpmnist-single-layer.
One more thing, before moving on, make sure your Valohai project is in sync with the latest git project by doing this:
$ vh project fetch
Now we can complete the steps from the CLI with:
$ vh exec run Build-dl4j-mnist-single-layer-java-app
After Execution is done, we can check it with:
$ vh exec info $ vh exec logs $ vh exec watch
Conclusion
As we have seen, it is very convenient to work with DL4J and Valohai together. In addition, we can develop the various components that make up our experiments (research), that is, the build / runtime environment, code and data set, and integrate them into our project.
The sample templates used in this post are a good way to start creating more complex projects. And you can use the web or command line interface to do your job with Valohai. With the CLI, you can also integrate it with your installations and scripts (or even with CRON or CI / CD jobs).
In addition, it is clear that if I am working on a project related to AI / ML / DL, I do not need to worry about creating and maintaining an end-to-end pipeline (which many others had to do in the past).
References
- The mlpmnist-dl4j-examples project on GitHub
- Awesome AI / ML / DL Resources
- Java AI / ML / DL Resources
- Deep Learning and DL4J Resources
Thanks for your attention!
All Articles