Agones, create a multi-player game server. Architecture and Installation
Agones (from other Greek agōn - “competition”) allows you to deploy a game server cluster using Kubernetes with Auto-Scaling. This open-source project was created in 2018, has already scored 2500 stars, was on Google I / O 2019, and, to the great surprise, has not yet been mentioned on Habré. The topic describes a brief excursion into architecture and instructions for starting a test server on a local machine. If interested, welcome to the cut, go!

Project Description
Agones is a Custom Resource ( Kubernetes API Extension ).
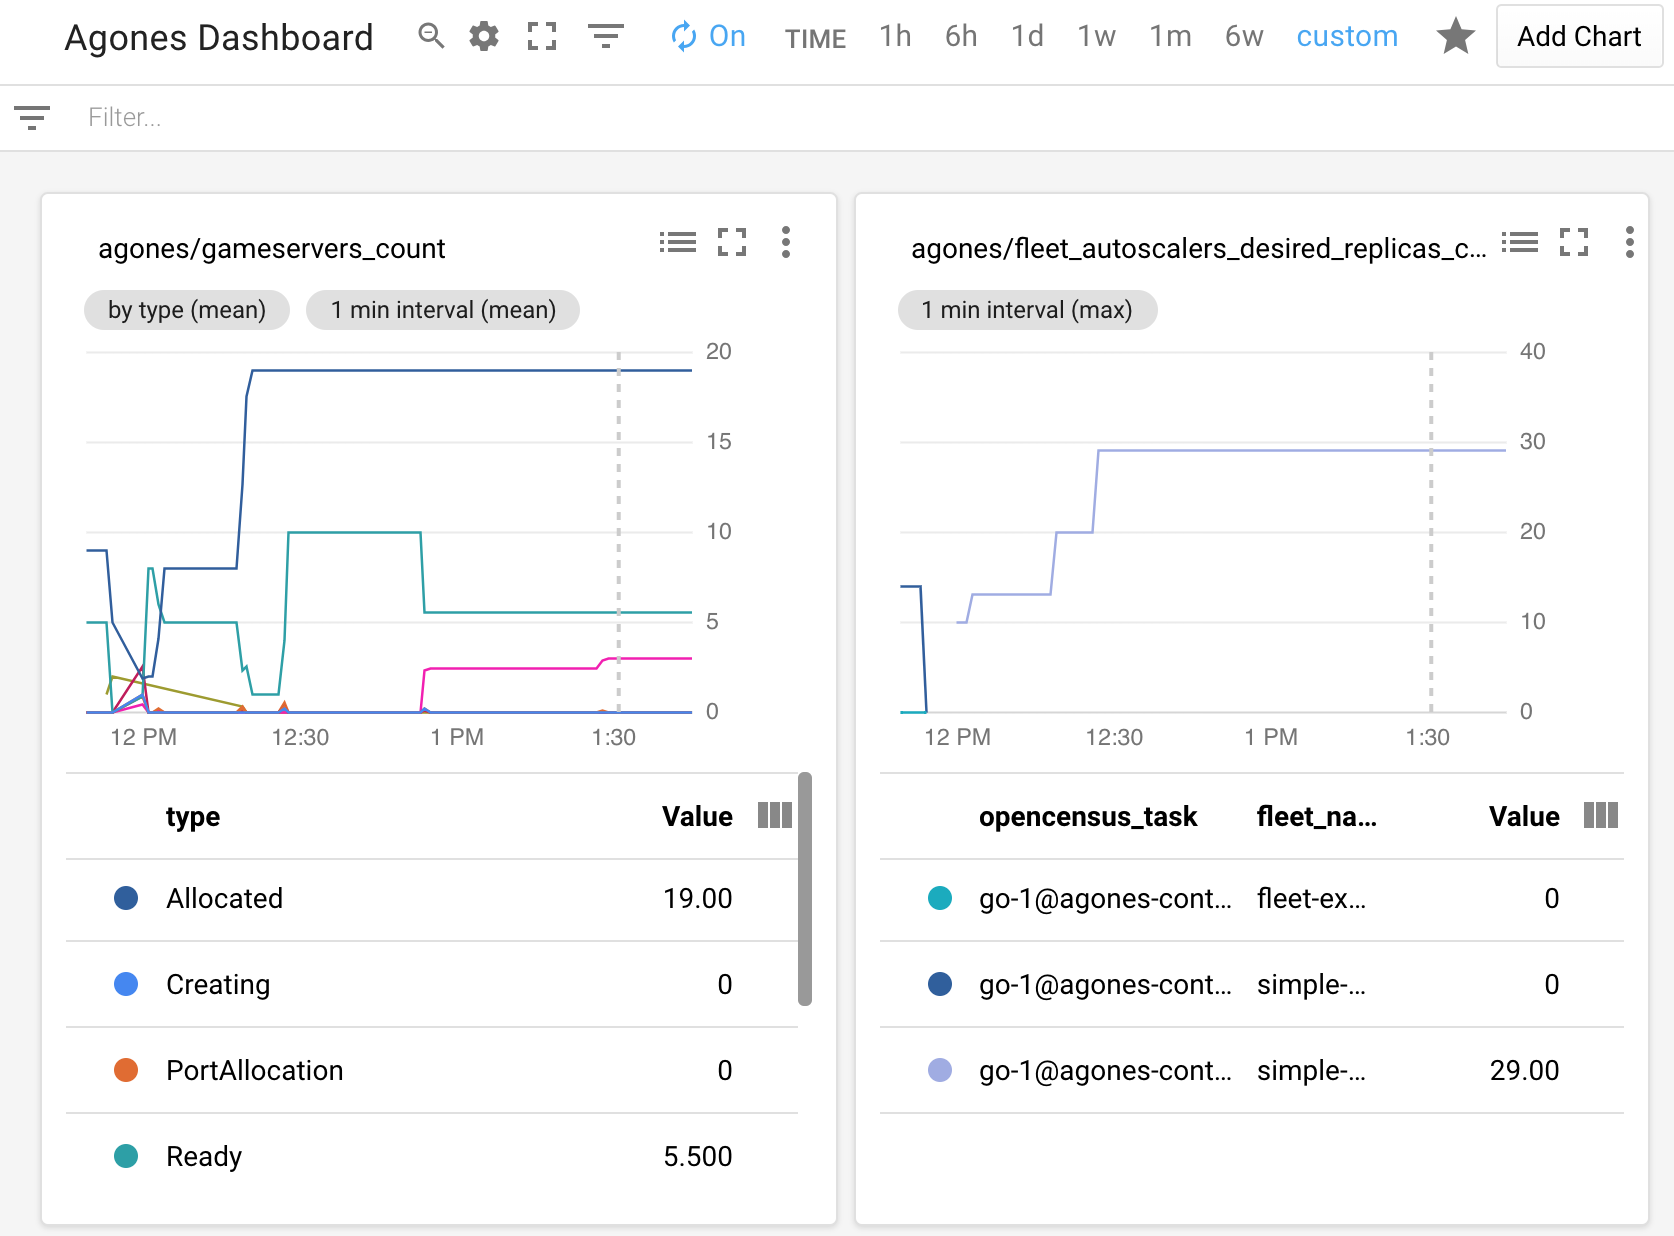
The project actually requires more attention, since it allows you to run a single game server (GameServer) or a whole "fleet" of servers (Fleets) through configuration yaml files, through the Agones API . In turn, each server gives alerts about its life cycle (GameServer lifecycles), describing the current status (health checking, connection information). Servers in the cluster have the ability to automatically scale (Fleet Autoscaling), which are integrated with the basic capabilities of Kubernetes. In addition, there is a statistics output on the dashboard using Prometheus, Grafana or Stackdriver, metrics are exported via OpenCensus , which allows you to add your own exporter. Dashboard example in Stackdriver:
Architecture, basic elements
Agones itself takes on the task of launching, automatically expanding and hosting game servers using Kubernetes as the basis. This allows you to focus on the development of the multiplayer game server itself, instead of developing its infrastructure and further support. You can use any game server that can be run on linux, and it can be written in any programming language.
The Agones Kubernetes API is divided into three main packages, each of which contains resources: agones.dev (GameServer, GameServerSet, Fleet), allocation.agones.dev (GameServerAllocation), autoscaling.agones.dev (FleetAutoscaler). Like other Kubernetes resources, yaml files are used to run them.
A brief description of each resource:
- GameServer - creates a certain template that allows you to use the usual Pod parameters, with some additions, such as hostPort and containerPort for the game server. The Agones SDK provides an optional sidecar container with which the GameServer will constantly communicate
- GameServerSet - data structure for several GameServer, very similar to the relationship between Depoyment and ReplicaSet
- Fleet - creates several ready-made GameServer, uses GameServerAllocation to distribute resources
- GameServerAllocation - asks the GameServer from Fleet for use and marks that it is ready for use by players, so GameServer will not be automatically deleted
- FleetAutoscaler - automatically expands or, conversely, reduces the number of servers in Fleet
The diagram ( from here ) shows the life cycle of the GameServer resource:
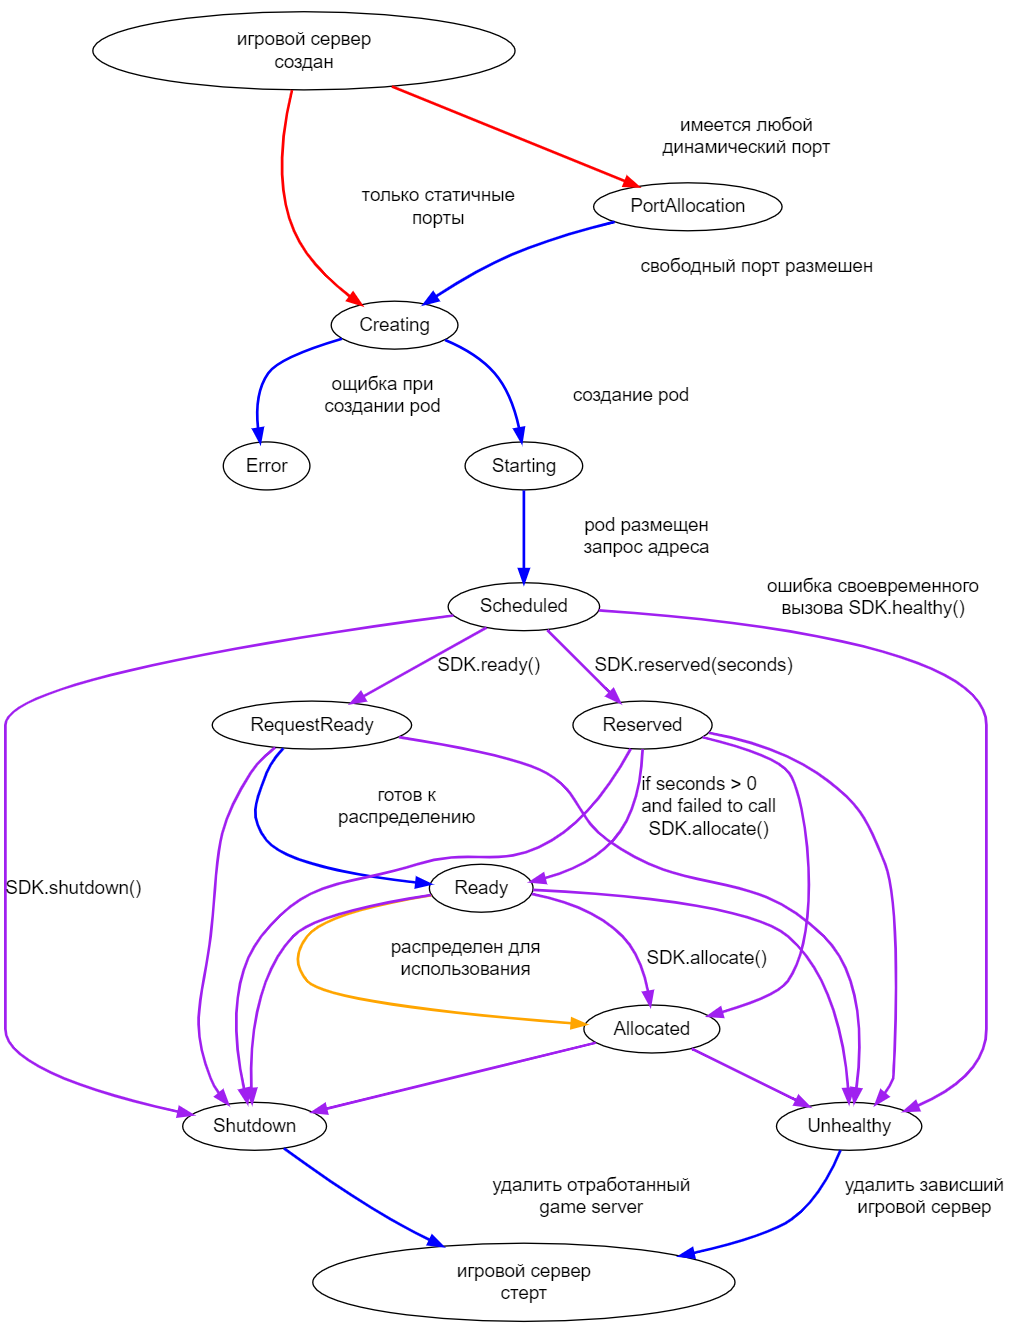
The purple arrows indicate the Agones SDK, red - the user API, blue - the game server controller, yellow - the application controller.
Installation
In this and subsequent sections, teams with instructions on the official website are used, with some additions. It is recommended that you use Kubernetes version 1.12 (tested by developers). For the test on the local computer, you can use minikube , which will require kubectl and a hypervisor ( Hyper-V or VirtualBox ) supported by the operating system.
To install the cluster and Agones, run the following commands:
minikube profile agones # agones minikube start --kubernetes-version v1.12.10 --vm-driver hyperv #virtualbox minikube status # kubectl create namespace agones-system # agones kubectl apply -f https://raw.githubusercontent.com/googleforgames/agones/release-1.0.0/install/yaml/install.yaml
The last command downloads the Agones configuration file that creates Custom Resource Definitions (CRD) via the Kubernetes API.
Launching GameServer
Now you can start the UDP server in the cluster using the ready-made test server from the examples, which will simply respond to the request sent to it:
# GameServer kubectl create -f https://raw.githubusercontent.com/googleforgames/agones/release-1.0.0/examples/simple-udp/gameserver.yaml kubectl get gameservers # GameServer minikube ip # kubectl describe gameserver # GameServer kubectl get gs # , GameServer
To confirm that the server is working, you can use NetCat, for linux the program usually comes with the system, for windows you need to download it, for example here . NetCat must be started with the -u
parameter (UDP request), specifying the minikube address (it is better to copy the address from the minikube ip
command) and the active GameServer port:
echo "hello" | nc -u $(minikube ip) 7331
If after running the command in the console the response "ACK: hello" appears, then the server is working, you can turn it off by the following command, which initializes:
echo "EXIT" | nc -u $(minikube ip) 7331
Server status is checked by the kubectl describe gameserver
, it should change to Shutdown.
Making changes to GameServer
Using the previous example, we will change the server response. First, copy the project repository:
git clone git@github.com:googleforgames/agones.git
In the file agones / examples / simple-udp / main.go, change line 159 to
respond(conn, sender, "ACKNOWLEDGED: "+txt+"\n")
From the project root folder, run the following to create a docker image and save it in minikube. For windows, you first need to run minikube docker-env | Invoke-Expression
minikube docker-env | Invoke-Expression
, for linux eval $(minikube docker-env)
. This will allow you to create docker images directly in minikube.
Create a docker image:
docker build -t agones-go:modified -f .\examples\simple-udp\Dockerfile .
This command may take some time, as the entire project repository will be copied to image. This can be avoided by leaving only the sdks folder, main.go and Dockerfile in the directory.
Next, in examples \ simple-udp \ gameserver.yaml, change line 28 to image: agones-go:modified
and create a new GameServer:
kubectl create -f .\examples\simple-udp\gameserver.yaml
Check the changes and turn off the server:
echo "hello" | nc -u 172.17.113.72 7331 echo "EXIT" | nc -u 172.17.113.72 7331
If after running commands in the console the response "ACKNOWLEDGED: hello" appears, then the changes were successful.
We start the server locally
It is possible to iterate changes for convenient development without Kubernetes, using only the Agones SDK. During operation of the game server, the SDK communicates via TCP with a small gRPC server, which Agones runs in a container under the same namespace. Such a container in Kubernetes is called sidecar. Therefore, for local development, you must start the SDK process. To do this, you need to run its source file with the -local
parameter, which turns on the 'local mode' mode. This mode tells the process to be in passive mode and not connect anywhere, just display the logs in the console so that you can see what the SDK does while the game server is running.
You can download the latest agonessdk-server in the releases of the official project repository. By default, after starting the SDK server, a GameServer configuration blank is created, which is used for GameServer () and WatchGameServer () SDK requests. At startup, you can specify your own configuration file in yaml or json format, for this you need the -file
parameter or its shortened version -f
along with the -local
parameter.
.\sdk-server --local -f .\examples\simple-udp\gameserver.yaml sdk-server : {"ctlConf":{"Address":"localhost","IsLocal":true,"LocalFile":".\\examples\\simple-udp\\gameserver.yaml","Timeout":0,"Test":""},"grpcPor t":59357,"httpPort":59358,"message":"Starting sdk sidecar","severity":"info","source":"main","time":"2019-09-29T12:45:59.8379817+02:00","version":"1.0.0"} {"filePath":"C:\\agones-release-1.0.0\\examples\\simple-udp\\gameserver.yaml","message":"Reading GameServer configuration","severity":"info","time":"2019-09-29T12:45:59.8479789+02:00"} {"message":"Starting SDKServer grpc service...","severity":"info","source":"main","time":"2019-09-29T12:45:59.8529791+02:00"} {"message":"Starting SDKServer grpc-gateway...","severity":"info","source":"main","time":"2019-09-29T12:46:00.1555756+02:00"}
To be continued...
All Articles