The mini-manual how to set up a hackintosh is as simple and painless as possible
Foreword
Although Habré already has a good article about the hackintosh, it is already quite young and some information there is outdated. However, the essence of the whole action is described correctly, so for a start I highly recommend reading it .
Hello, Habr.
This guide serves as a complement to an existing article (see the preface), during the existence of which there have been some changes that I would like to talk about.
Since with a probability of 99% you will encounter a bunch of errors at various stages of installation, the best thing I can advise is to leave a comment with your problem at the bottom of the article, or write about it in some forum. It is also possible that your problem is already known to the community, so I highly recommend applying googling skills.
So, I will try not to duplicate the information that is already on the hub, follow the link in the preface and understand. Now we can proceed.
In this article, the loader = Clover, since we will use it. About other loaders, please do not ask, unfortunately I can’t answer.
About laptops
I want to make a reservation that this guide deals mainly with PC computers, which are a much easier target for OSx86 than laptops. Installing a hackintosh on laptops is akin to the equation of the highest degree for a ninth grader: it is difficult, long and not a fact that is being solved. Although there are also successful laptop models that start everything up to the touchpad and network card, there are not many. A list of them can be found by direct request in any search engine.
What could the author make work
Motherboard: Asus ROG STRIX B360H-GAMING
CPU: Intel Core i5-8400, 2.8 GHz up to 4.0 with turbo boost
GPU: MSI RX 560 4GB AERO 16CU
RAM: Crucial 8 GB 2666 Hz
CPU: Intel Core i5-8400, 2.8 GHz up to 4.0 with turbo boost
GPU: MSI RX 560 4GB AERO 16CU
RAM: Crucial 8 GB 2666 Hz
Accessories
1. Processors
Intel only, a series is desirable i3 / i5 / i7 (better since the second generation Sandy Bridge), but Pentium / Celeron are relatively easy to start up, of course, they do not shine with performance, but for simple use it’s enough.
2. Video card
Integrations from Intel almost always start with varying degrees of success, but artifacts and a buggy interface are not uncommon even when using the latest and seemingly native instances, such as the UHD630. Often, it is necessary to replace the video card ID with a fake one in the bootloader (there is no need to be afraid, everything will be explained in detail below).
I do not recommend using graphics from nVidia for hacking. Apple has not put it for many years, no talk about any kind of nativeness. There are no drivers for them under Mojave 10.14 and Catalina 10.15. There are well-known easily-made cards, for example, GT210 and 630, but they are no longer found on sale.
If you buy a video card for hackintosh, then only from AMD. The RX4xx and RX5xx series work great, with the exception of the RX550, which can be a problem. From the professional segment - Vega 56 and 64, which are used in the original iMac Pro.
3. Internet connection
In order not to play the lottery with the computer according to the principle “it will start - it will not start”, I advise you to immediately buy an external WiFi adapter and check it in advance for the presence of drivers for makos.
Creating a bootable flash drive
A utility that allows us to format a USB flash drive (from 8 GB) and write a bootloader on it (something that will allow our system to boot) is called BootDiskUtility.
It is also good because it allows you to download the so-called “Recovery HD”, mini-images that allow you to restore the system if something bad happened. They weigh approximately 500MB, so when booting from them, the system itself downloads from Apple servers. A similar method will work for us only if we have a native network card, which immediately starts up by itself. I have not encountered such cases, but you can search on the Internet which network cards do not require a separate factory. In any case, all Recovery HD can be downloaded by clicking on “DL Center” in the BDU main menu.
Download it from the official site: tyk (carefully, a lot of advertising), connect our flash drive to the computer, select it in the list and click "Format Disk". Now our flash drive should be formatted and divided into 2 sections. In the settings of this utility, you can select the size of the partition under Clover, its version and some other parameters. 200 MB and the latest version of the bootloader will be best.
In the section with Clover, we also put drivers under the wifi adapter.
Keksts (from the Latin kernel extensions = kernel extensions) are peculiar drivers for the makoshi that make it work that, in theory, should not work, for example, a sound card or network card.
Next, download and drop the following set of kests into the clover / kexts / other folder (we do not consider FakeSMC, it is there initially):
- Lilu - a patch of system processes for other kexts.
- WhateverGreen is a graphics factory.
- USBInjectAll is a USB factory.
- AppleALC is a sound factory.
The remaining keksts are at your discretion.
A brief list of other keksts and why they are needed:
- FakePCIID is a family of kexts that replace driver identifiers for the correct operation of hardware devices. On those machines that I used for hackintosh, these keksts were not required, but if you put it, it will not be worse.
- HDMIAudio - for audio transmission via HDMI.
- ACPIBatteryManager - Fixes battery display in MacOS.
The last step in preparing the flash drive is actually the firmware on it of the MacOS image in the .hfs file format.
This is done as follows:
- Download the system image from here or from here . MacOS 10.14 Mojave is installed on my machine, and I recommend using it if your Sandy Bridge generation processor is newer. If not, 10.13 High Sierra is right for you. It doesn’t matter where you get the image from; the main thing is that it should be in .hfs format.
- Again, open the BDU, select the second (largest) section of our flash drive, click "Restore partition, in the opened window, click on our image and flash it.
- Everything, the flash drive is ready.
Download and Install
So we moved on to the final part of our action.
1. We take our flash drive, insert it into the computer into the USB2.0 port (this is very important, only USB2.0) and boot from it.
2. The Clover`a menu should open. It will look something like this:
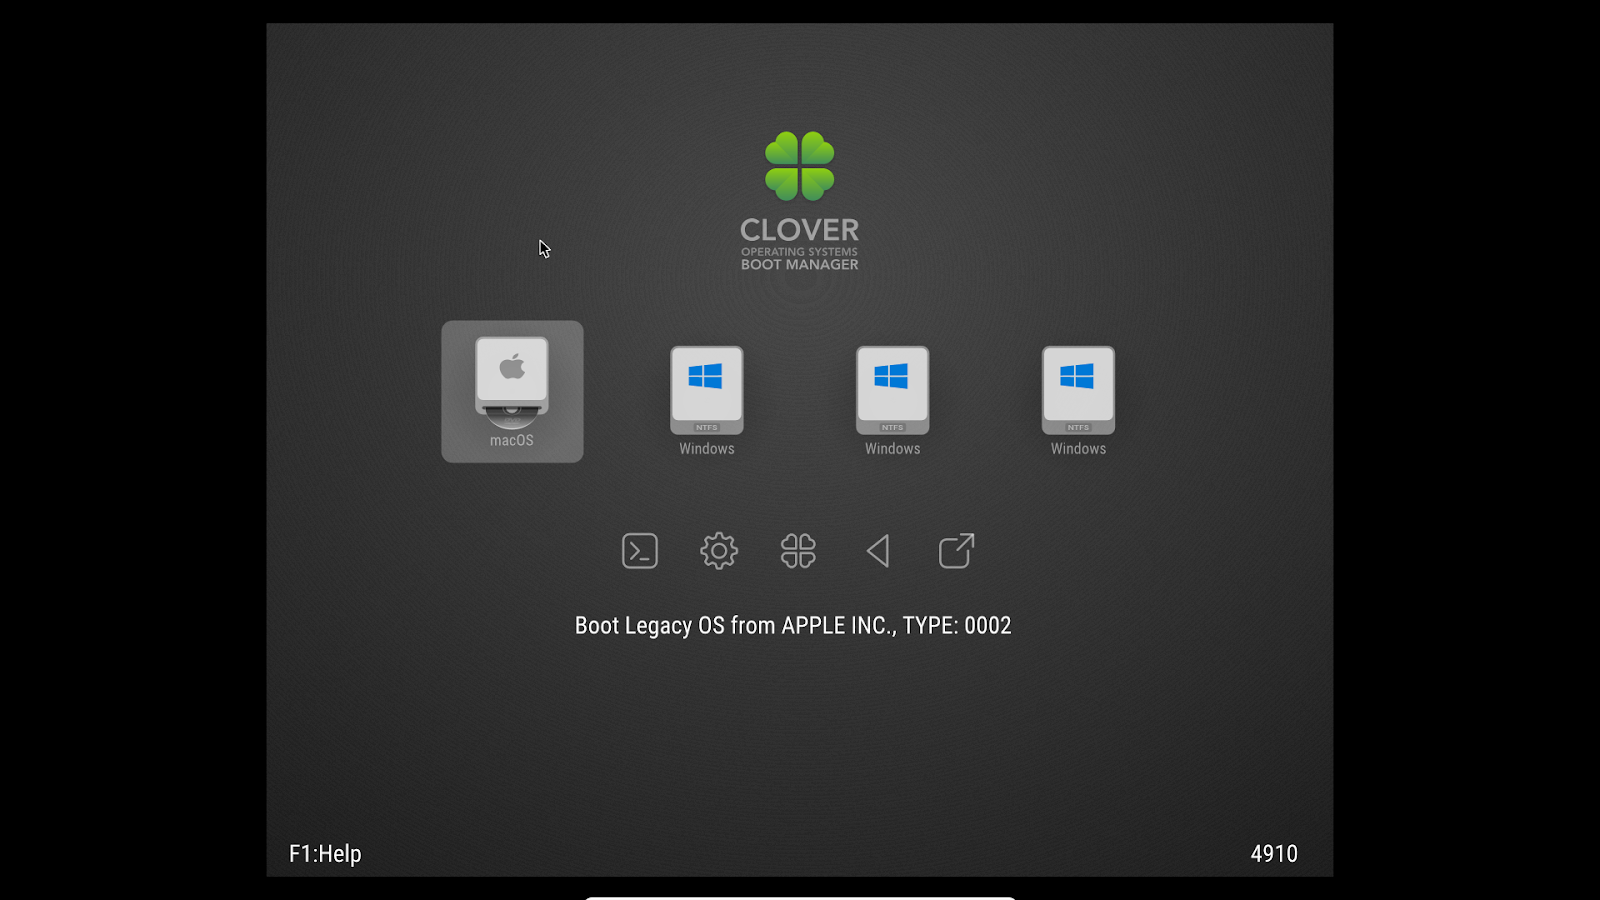
3. Open the settings by selecting the second icon in the second row (the mouse cannot be used, all the actions are performed with the keyboard).
4. We write the following boot arguments (boot args) - magic words that give the loader some directions:
kext-dev-mode = 1 -v
The first part of the line allows you to install kexts in the system, the second - starts the download in text mode. In principle, this should be enough. Also, the following boot arguments exist:
- rootless = 0 - disables System Integrity Protection, whatever it is - in no case do we use this argument since MacOS 10.11 El Capitan
- nv_disable = 1 - relevant for the first launch of video cards from nVidia. Disables the graphical shell
- nvda_drv = 1 - on the contrary, it includes a graphical shell. Used for the second and subsequent starts of nVidia graphics, when the drivers are already installed.
- –Disablegfxfirmware - activates only the integrated graphics card.
- debug = 0x100 - if a collapse occurs during bootup, it stops the system, preventing it from rebooting. Helps to make out the last lines before an error.
- keepsyms = 1 - a little more detailed output of information at boot
- cpus = x (instead of x number) - activates the specified number of processor cores
5. In the “Graphics Injector” section of the bootloader, you can change the ID of the video card. The first time this does not make sense, it can work like that. If you fail, you can try to change the ID. On which specifically - before you could find on the site applelife.ru. Recently, for some reason, it does not work, so I can’t give a link. There are cases when a fake ID of a video card can be anything, except for the default one.
6. Click "boot MacOS install from ***". The system starts to boot.
If everything is fine, follow the instructions on the screen, format the disk under the name “Macintosh HD” in the “Disk Utility” and start the installation.
If everything is not so rosy, remember the last line that appeared when loading on the screen and drive it into the search engine. Both me and all my hacking friends have passed through this path.
7. After installation, the system will reboot itself, repeat steps 1-5, but now click on “Boot MacOS from Macintosh HD”. Installation will continue, as a result you will be in the system. But this system will be inferior, so the bootloader with which you got into it is located on a USB flash drive.
System Setup
1. Run the drivers for the WiFi adapter to make the Internet work
2. Copy config.plist, kexts and drivers from the USB flash drive to the computer, and disable the USB flash drive itself.
3. From here, download and install Clover. During installation, configure Clover for UEFI BIOSes.
4. Now in Finder you can see the EFI section with Clover. We drop the kexts, drivers, and config.plist there just as they were on the flash drive.
5. Download the Clover Configurator program to edit the config.plist file. What exactly needs to be edited - I will not say, follow the link in the foreword and read there. I just don’t really want to repeat the same information several times.
6. Reboot to verify performance.
A collection of nuances / solutions to errors
- When installing systems 10.13, 10.14, 10.15, the apfs.efi driver in the Drivers64UEFI folder is required. If it is absent, then after the first stage of installation is complete, you will not be able to continue it - Clover will not see the disk with the system.
- Be sure to use the boot in text mode (the -v argument) until you are sure that the system is working properly.
- It’s better not to tick the unknown parameters in Clover`e.
- The error that I encountered is the following: when the hack is installed on the hard drive itself, the system freezes when it remains a few minutes before completion. I suffered for a long time with this, until I tried to use an older version of Clover.
- It is not necessary to hack the SSD, the system works very quickly and on 7200 rpm of ordinary hard drives.
On this your humble servant bows. If any inaccuracies were made in the article, please write about this in the comment. Thank!
All information is presented for informational purposes only and does not encourage anyone to act.
All Articles