Antiquities: consider the motherboard of the 386th computer
That moment at the very beginning of the assembly, when some pieces of iron were already mined, but nothing worked yet, and the only thing to do was to consider them. And well, that’s useful. Personal computers are developing so fast that even devices fifteen years old are perceived as something ancient from the category of museum values. The motherboard of my new-old computer based on the 386th processor is 27 years old. These are no longer medieval tomes, rather artifacts of the Stone Age. Information about the hardware of the era "before the web" is quite small, often requires restoration of varying degrees of complexity. In general, before you hear a welcome call, you need some preparatory work.
The beginning of the nineties in IT is a time of great diversity, continuous progress and regular work on bugs. Modern computers are much more limited by various industry standards, and then development in the style of “whoever is what” was the norm. Three decades later, this is confronted with the problem of limited choice and high prices. Today I will talk about the main hardware of the old computer on the 386th processor (without which it won’t work), the everyday life of the collector of antiquities, I will show the first launch and drive the vintage benchmark.
Links to all articles about the assembly of this computer:
0. 1992 in the computer press
1. Consider the motherboard of the 386th computer <- you are here
2. Benchmark of the 386th processor and the dashing nineties
I keep a diary of a collector of old pieces of iron in a Telegram .
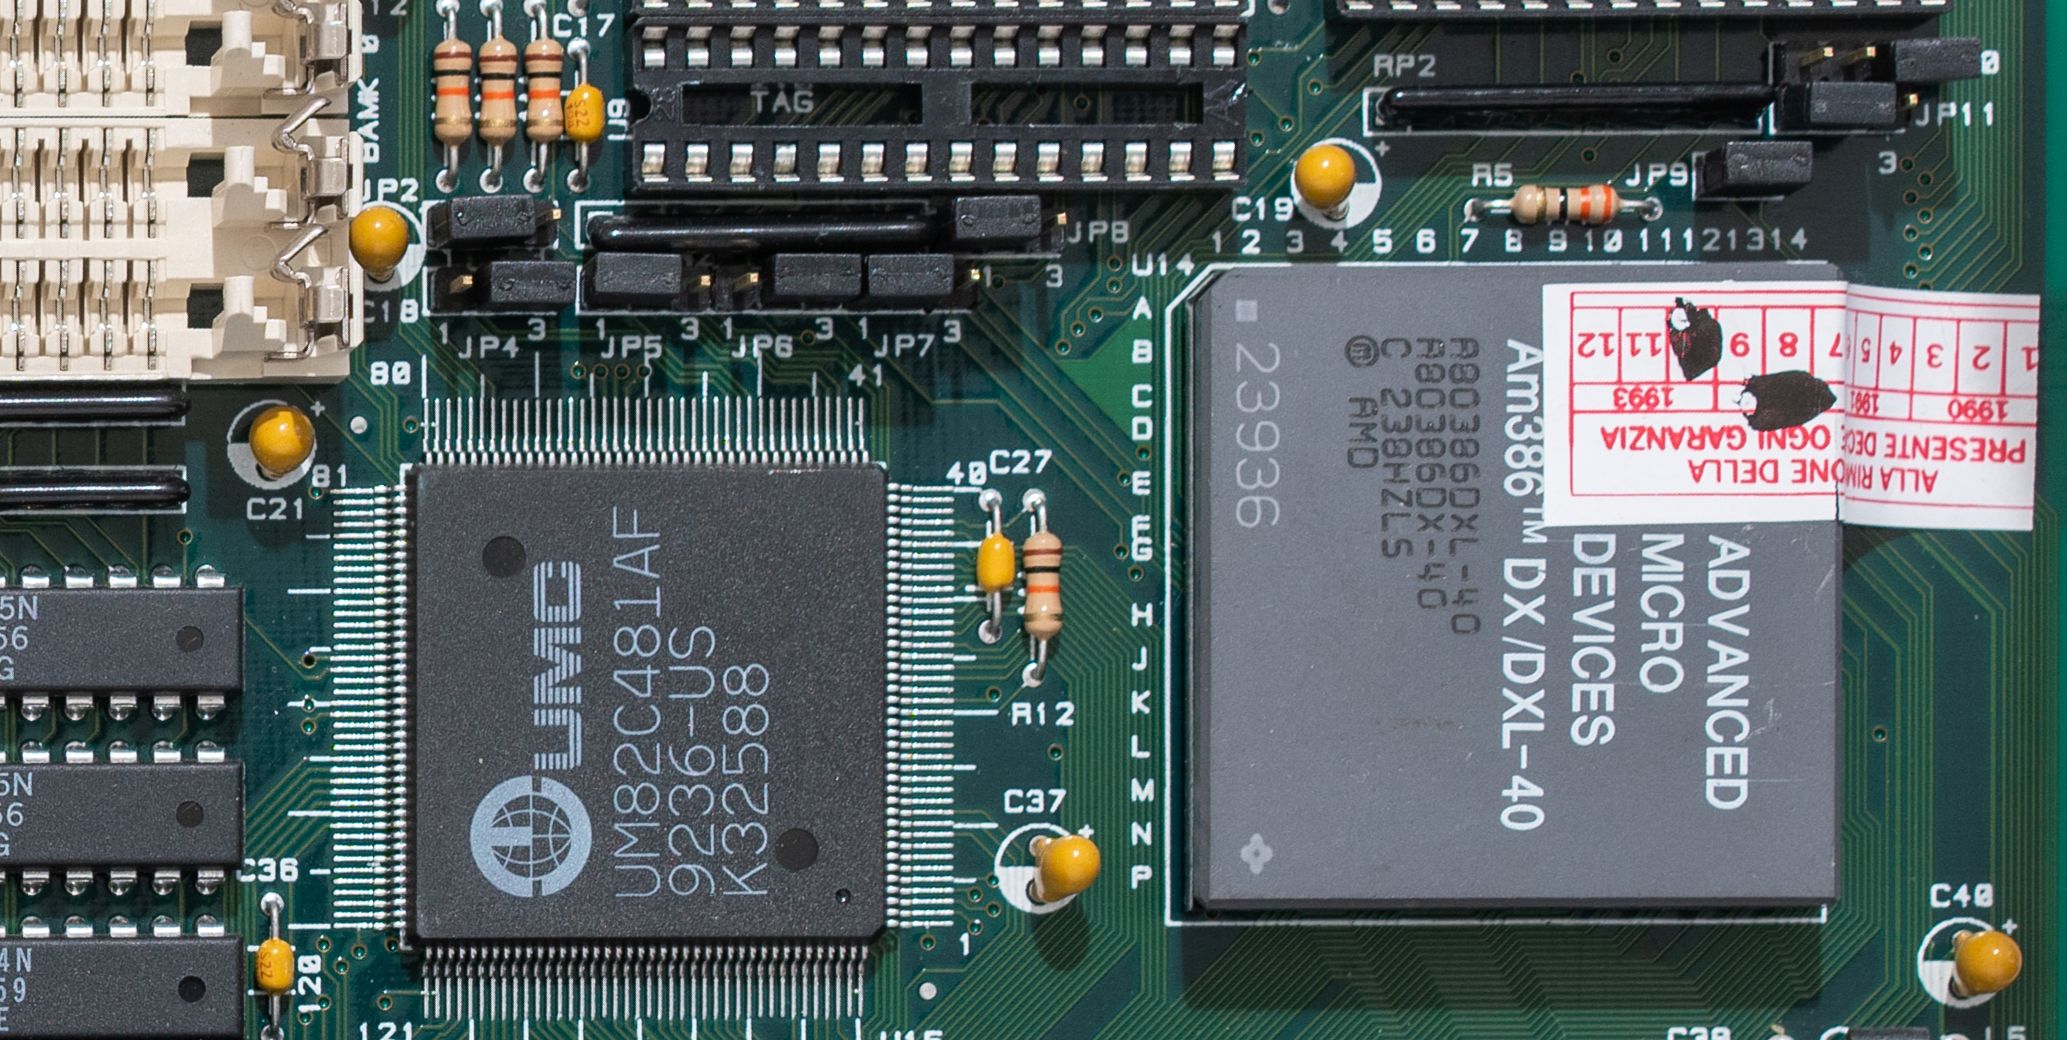
With the assembly of the 386th computer, I was of course a little late, about fifteen years. Already in the late nineties, old iron "before the Pentium" could be purchased inexpensively. In the early 2000s, I would most likely have assembled the base system for free. To date, computers 30 years ago have acquired a sufficient degree of vintage, prices have crawled up. No, you can still find the computer hardware of that era for ridiculous money, but it requires perseverance, time and free space to assemble one worker from a dozen mossy desktops. I went the "expensive way", picking up something interesting on the announcement sites and on eBay, in accordance with my ideas about the beautiful, uncompromising 386th computer. Representations, however, were vague at first, so at some point I relied on a non-working (therefore inexpensive) motherboard, because the most powerful 386th AMD AM386 DX40 processor was already bundled with it.
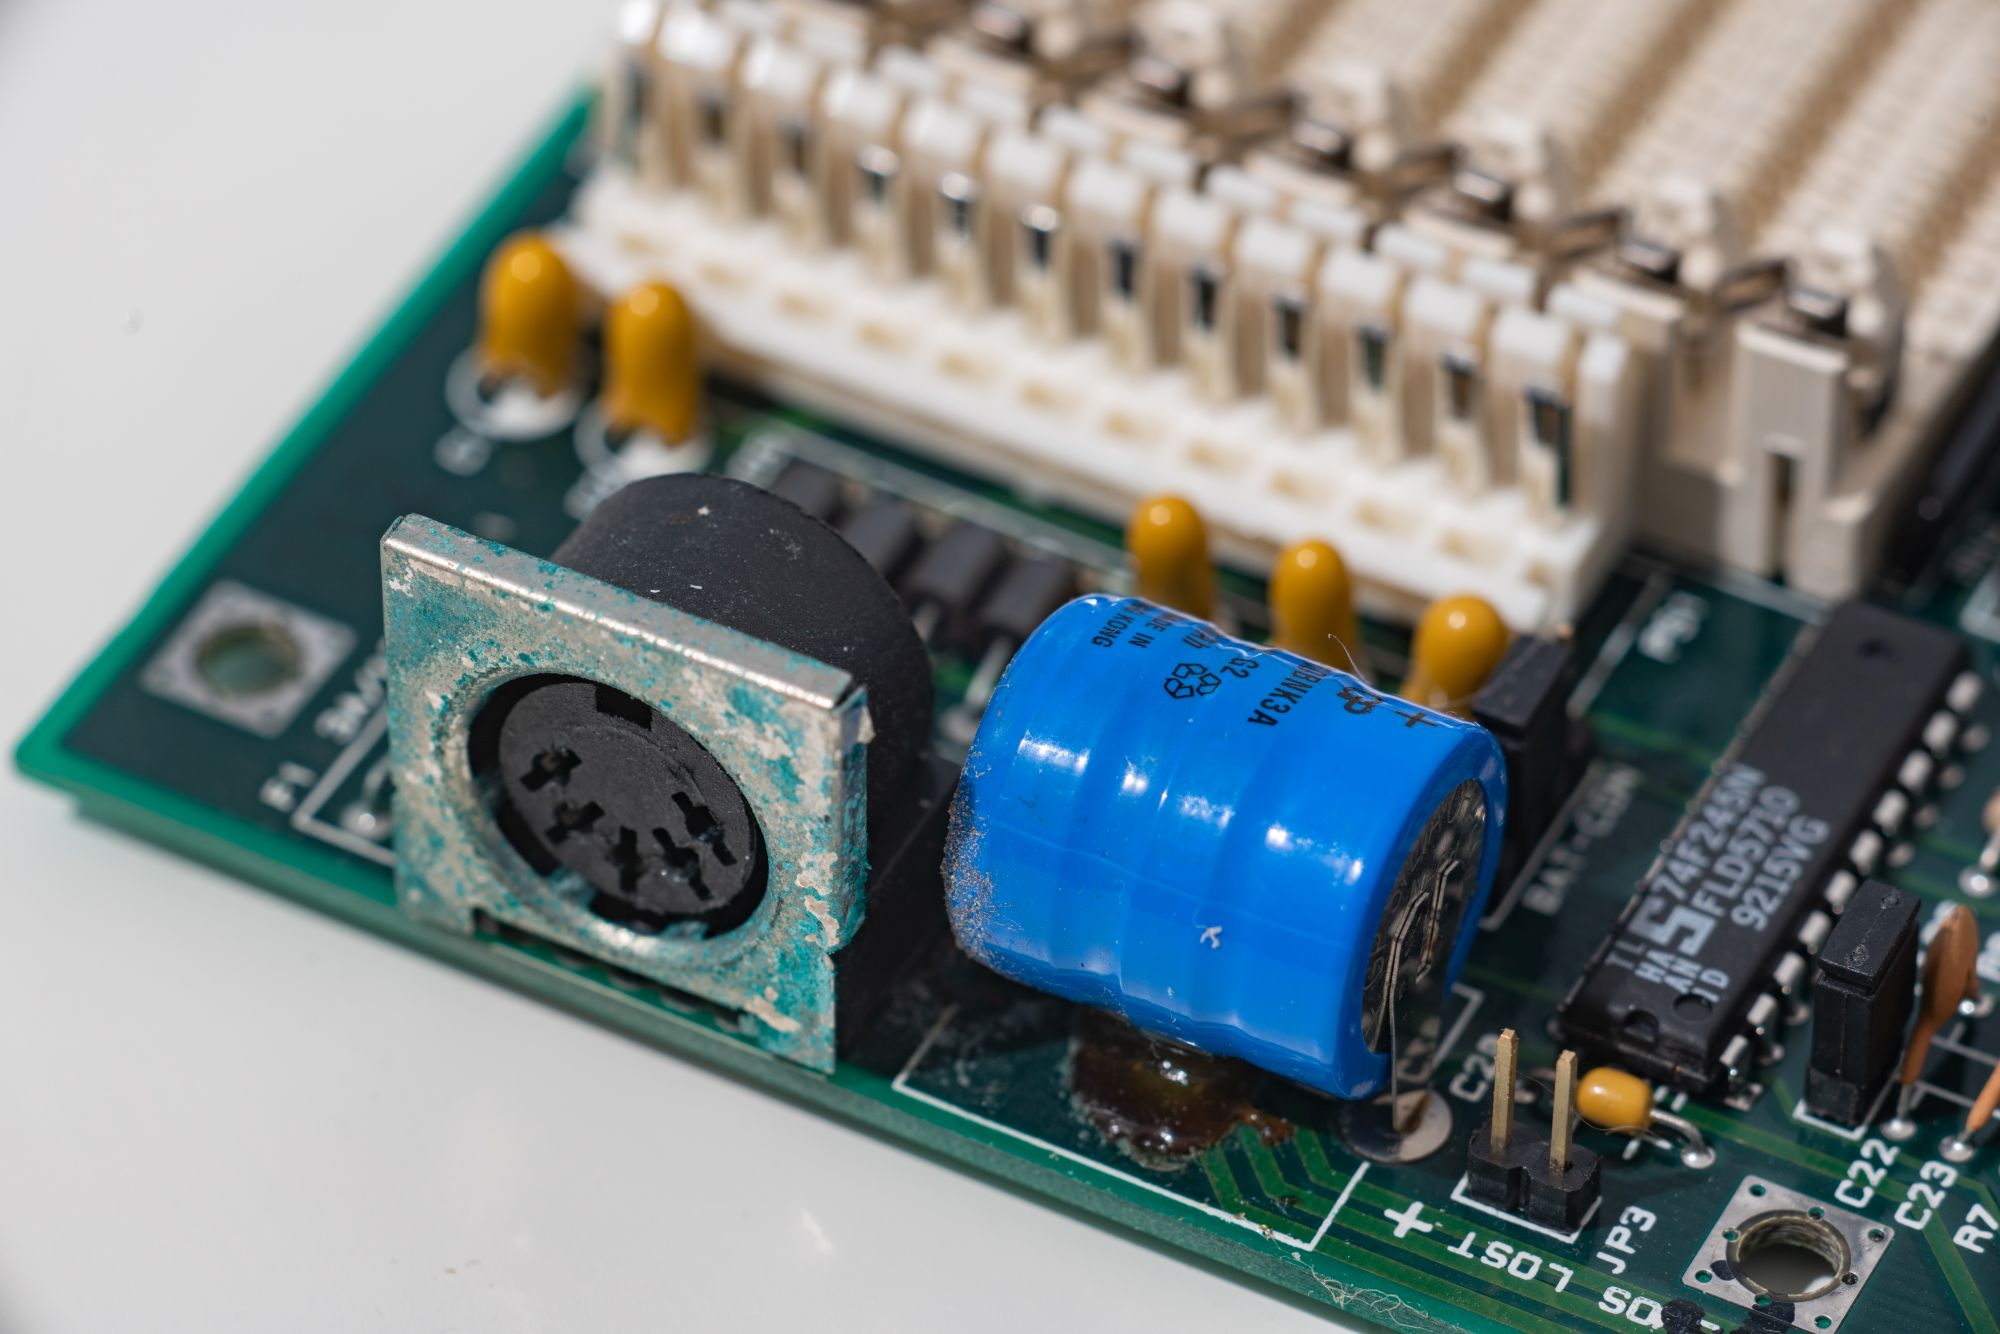
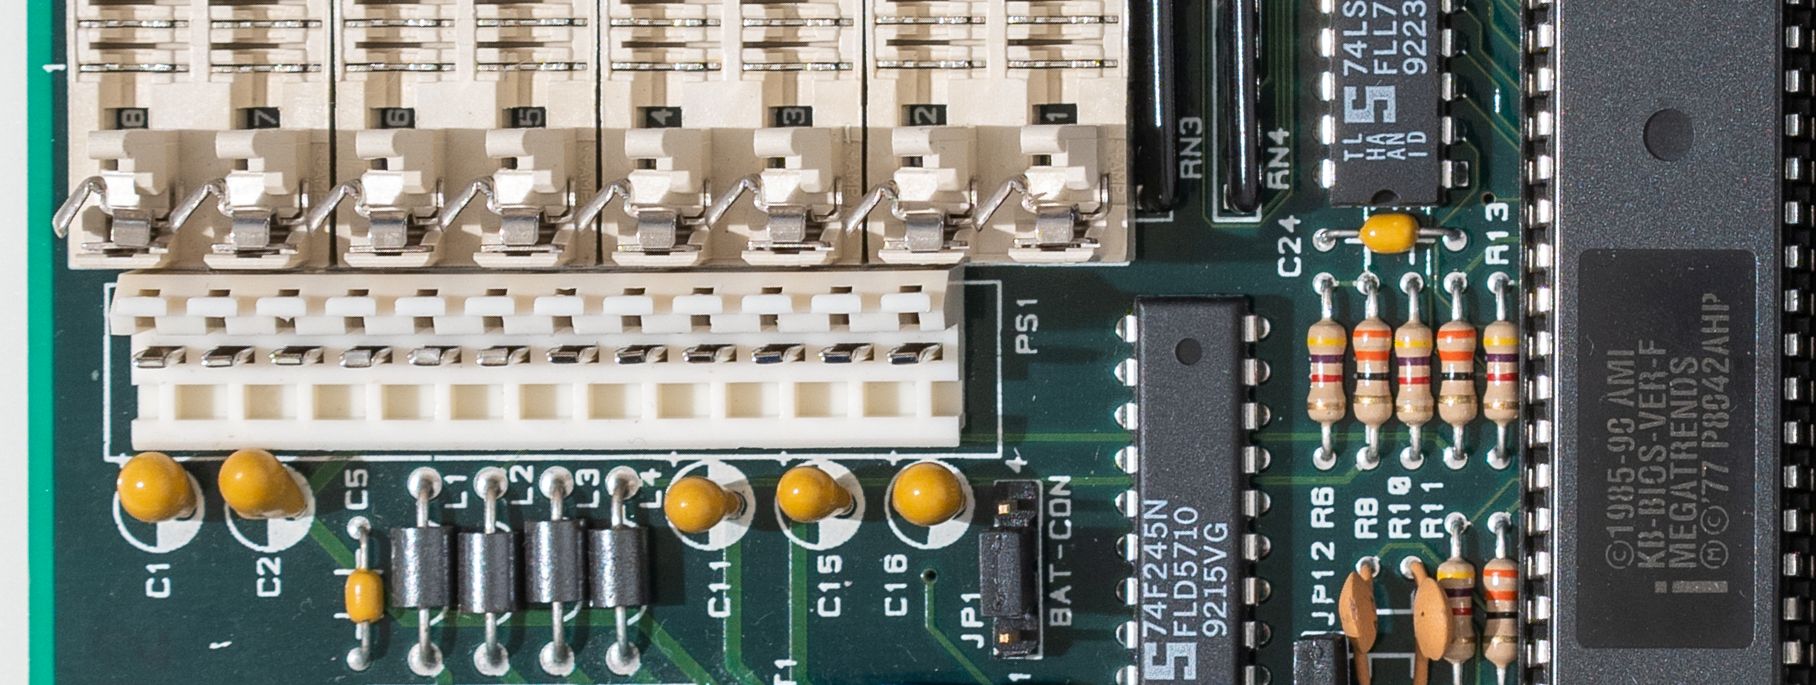
Inspection of any motherboard for the 386s and 486s (excluding the latest) systems must begin with a battery. And even before the purchase. Here is such a non-standard barrel - a 3.6-volt nickel-cadmium battery - sooner or later reduces the chances of any motherboard to survive, sometimes to zero. Let's imagine the history of this motherboard: it honestly worked in the home or work computer of the year until 1998, then it was put on the shelf, where it spent another twenty years. About five years after the resignation, the battery began to leak, but no one knew about it until the very moment of sale to the new owner. If I ever build a time machine, I’ll definitely go to the nineties and recommend that all owners of computers still alive at that time remove the battery before long-term storage. Otherwise, it will flow, in a hundred percent of cases.
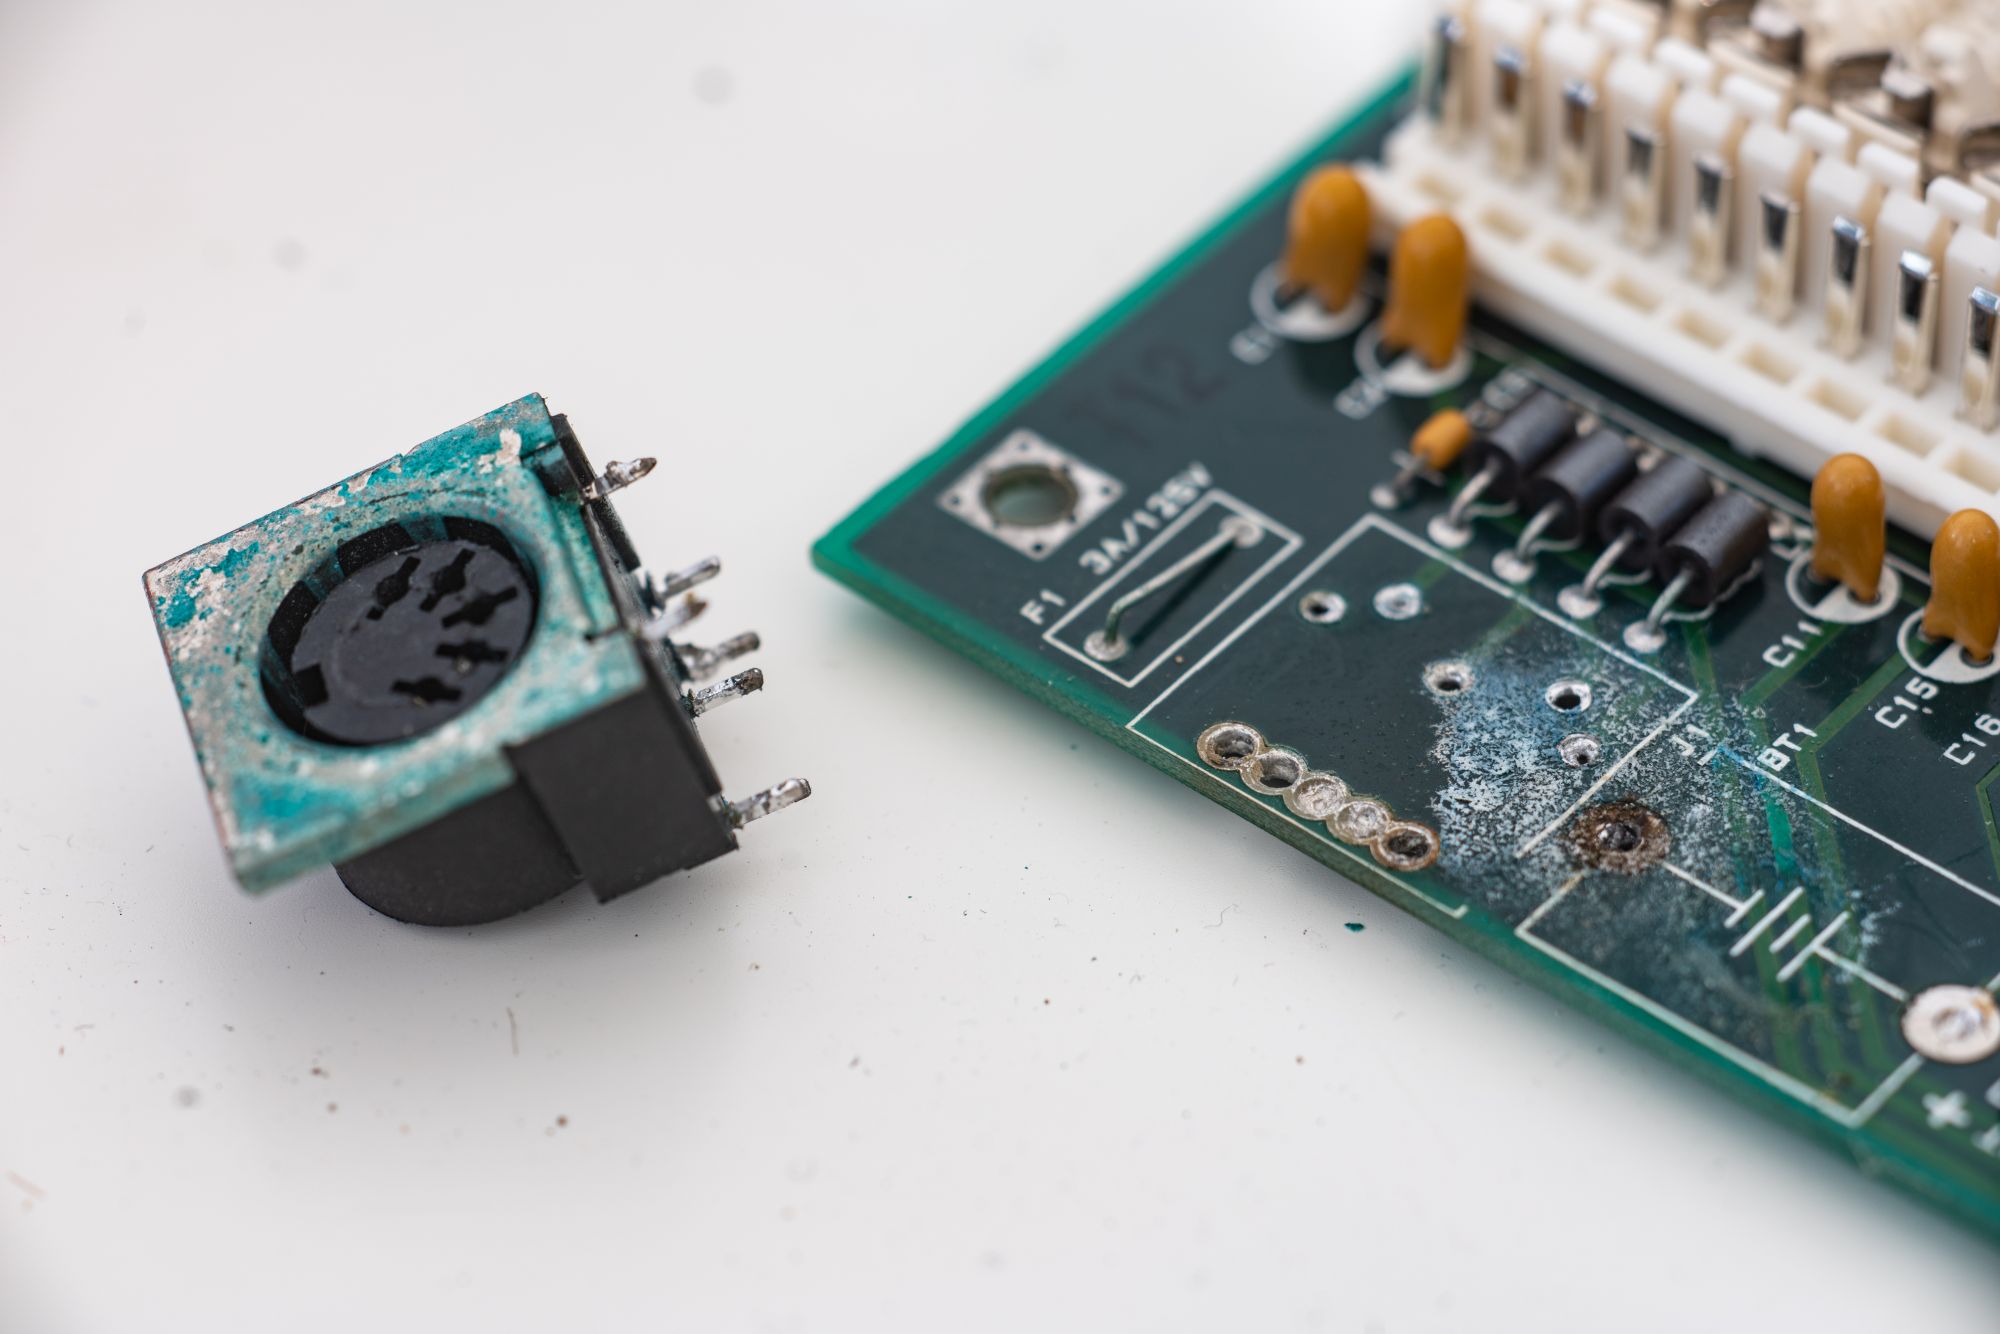
We can say that I was lucky, and the board was stored either vertically or upside down, in general - the keyboard connector suffered the most. Damage to the motherboard itself was limited to a patch just below the battery and next. All this was fairly easy to clean (experienced retailers recommendvinegar or soda to neutralize the acid). Three tracks under the battery fell under the distribution, but the contact remained. In more sad cases, the electrolyte spreads on both sides of the board, expansion card slots, destroys individual elements, and requires serious repairs with the restoration of tracks.

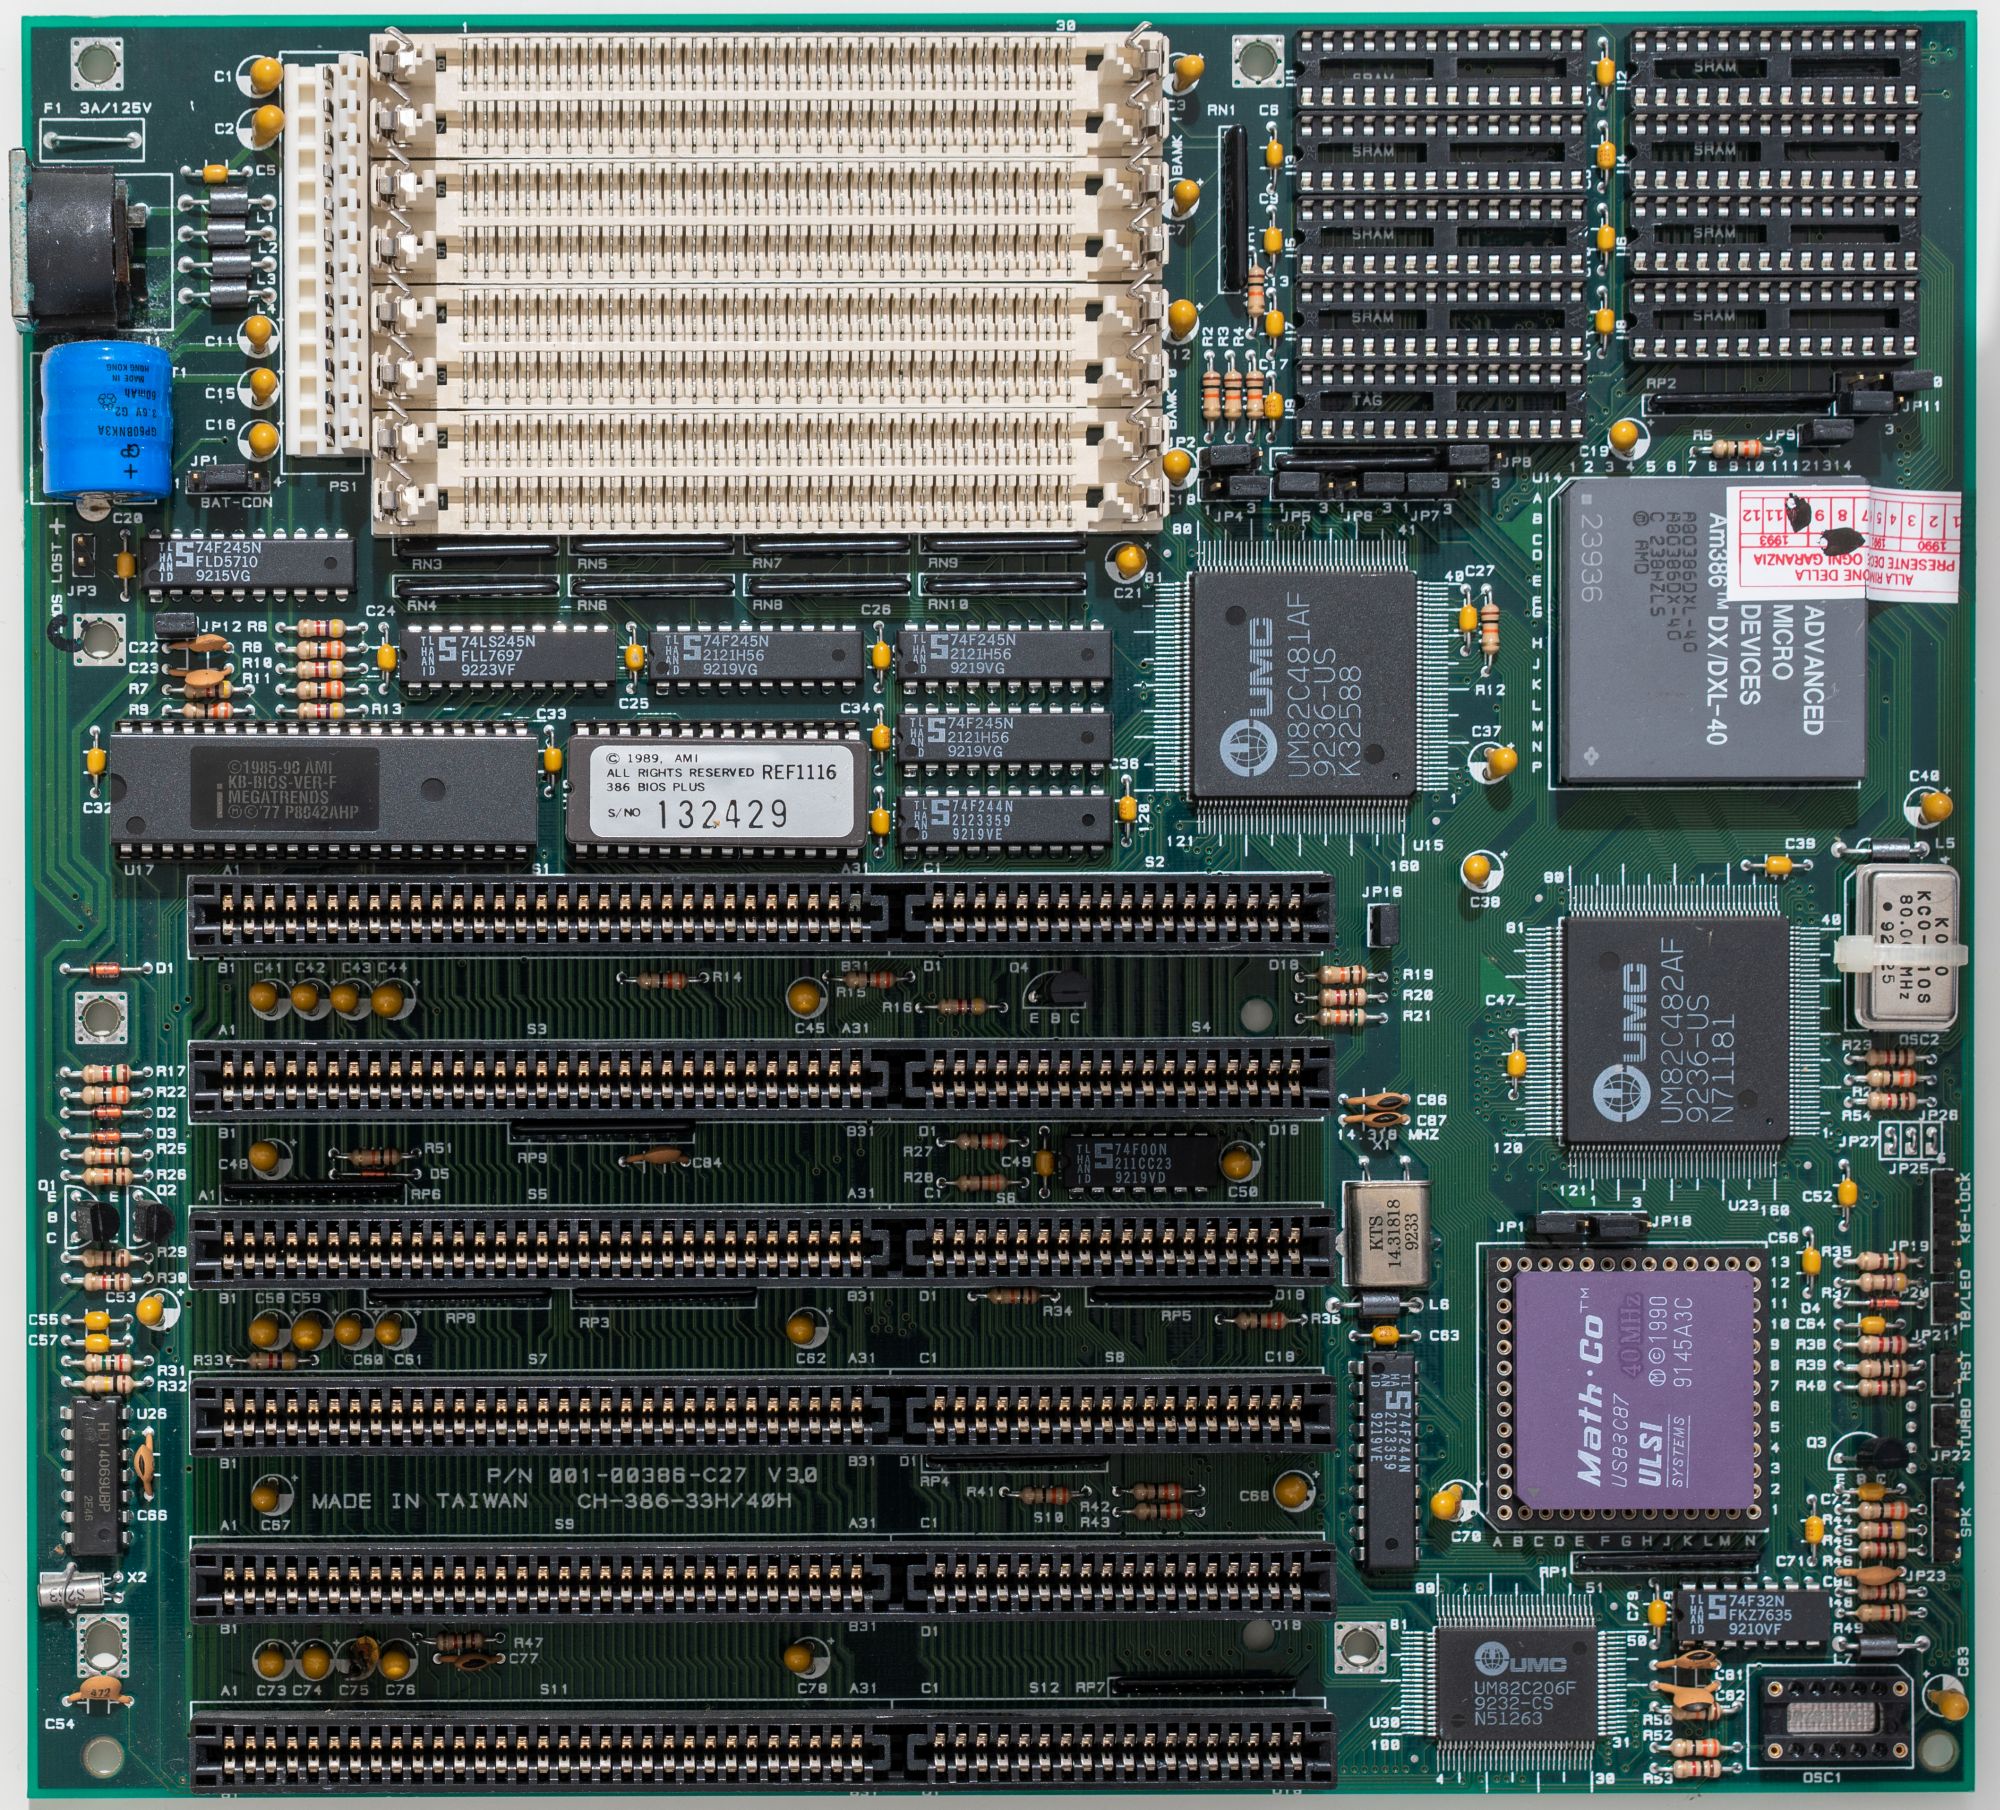
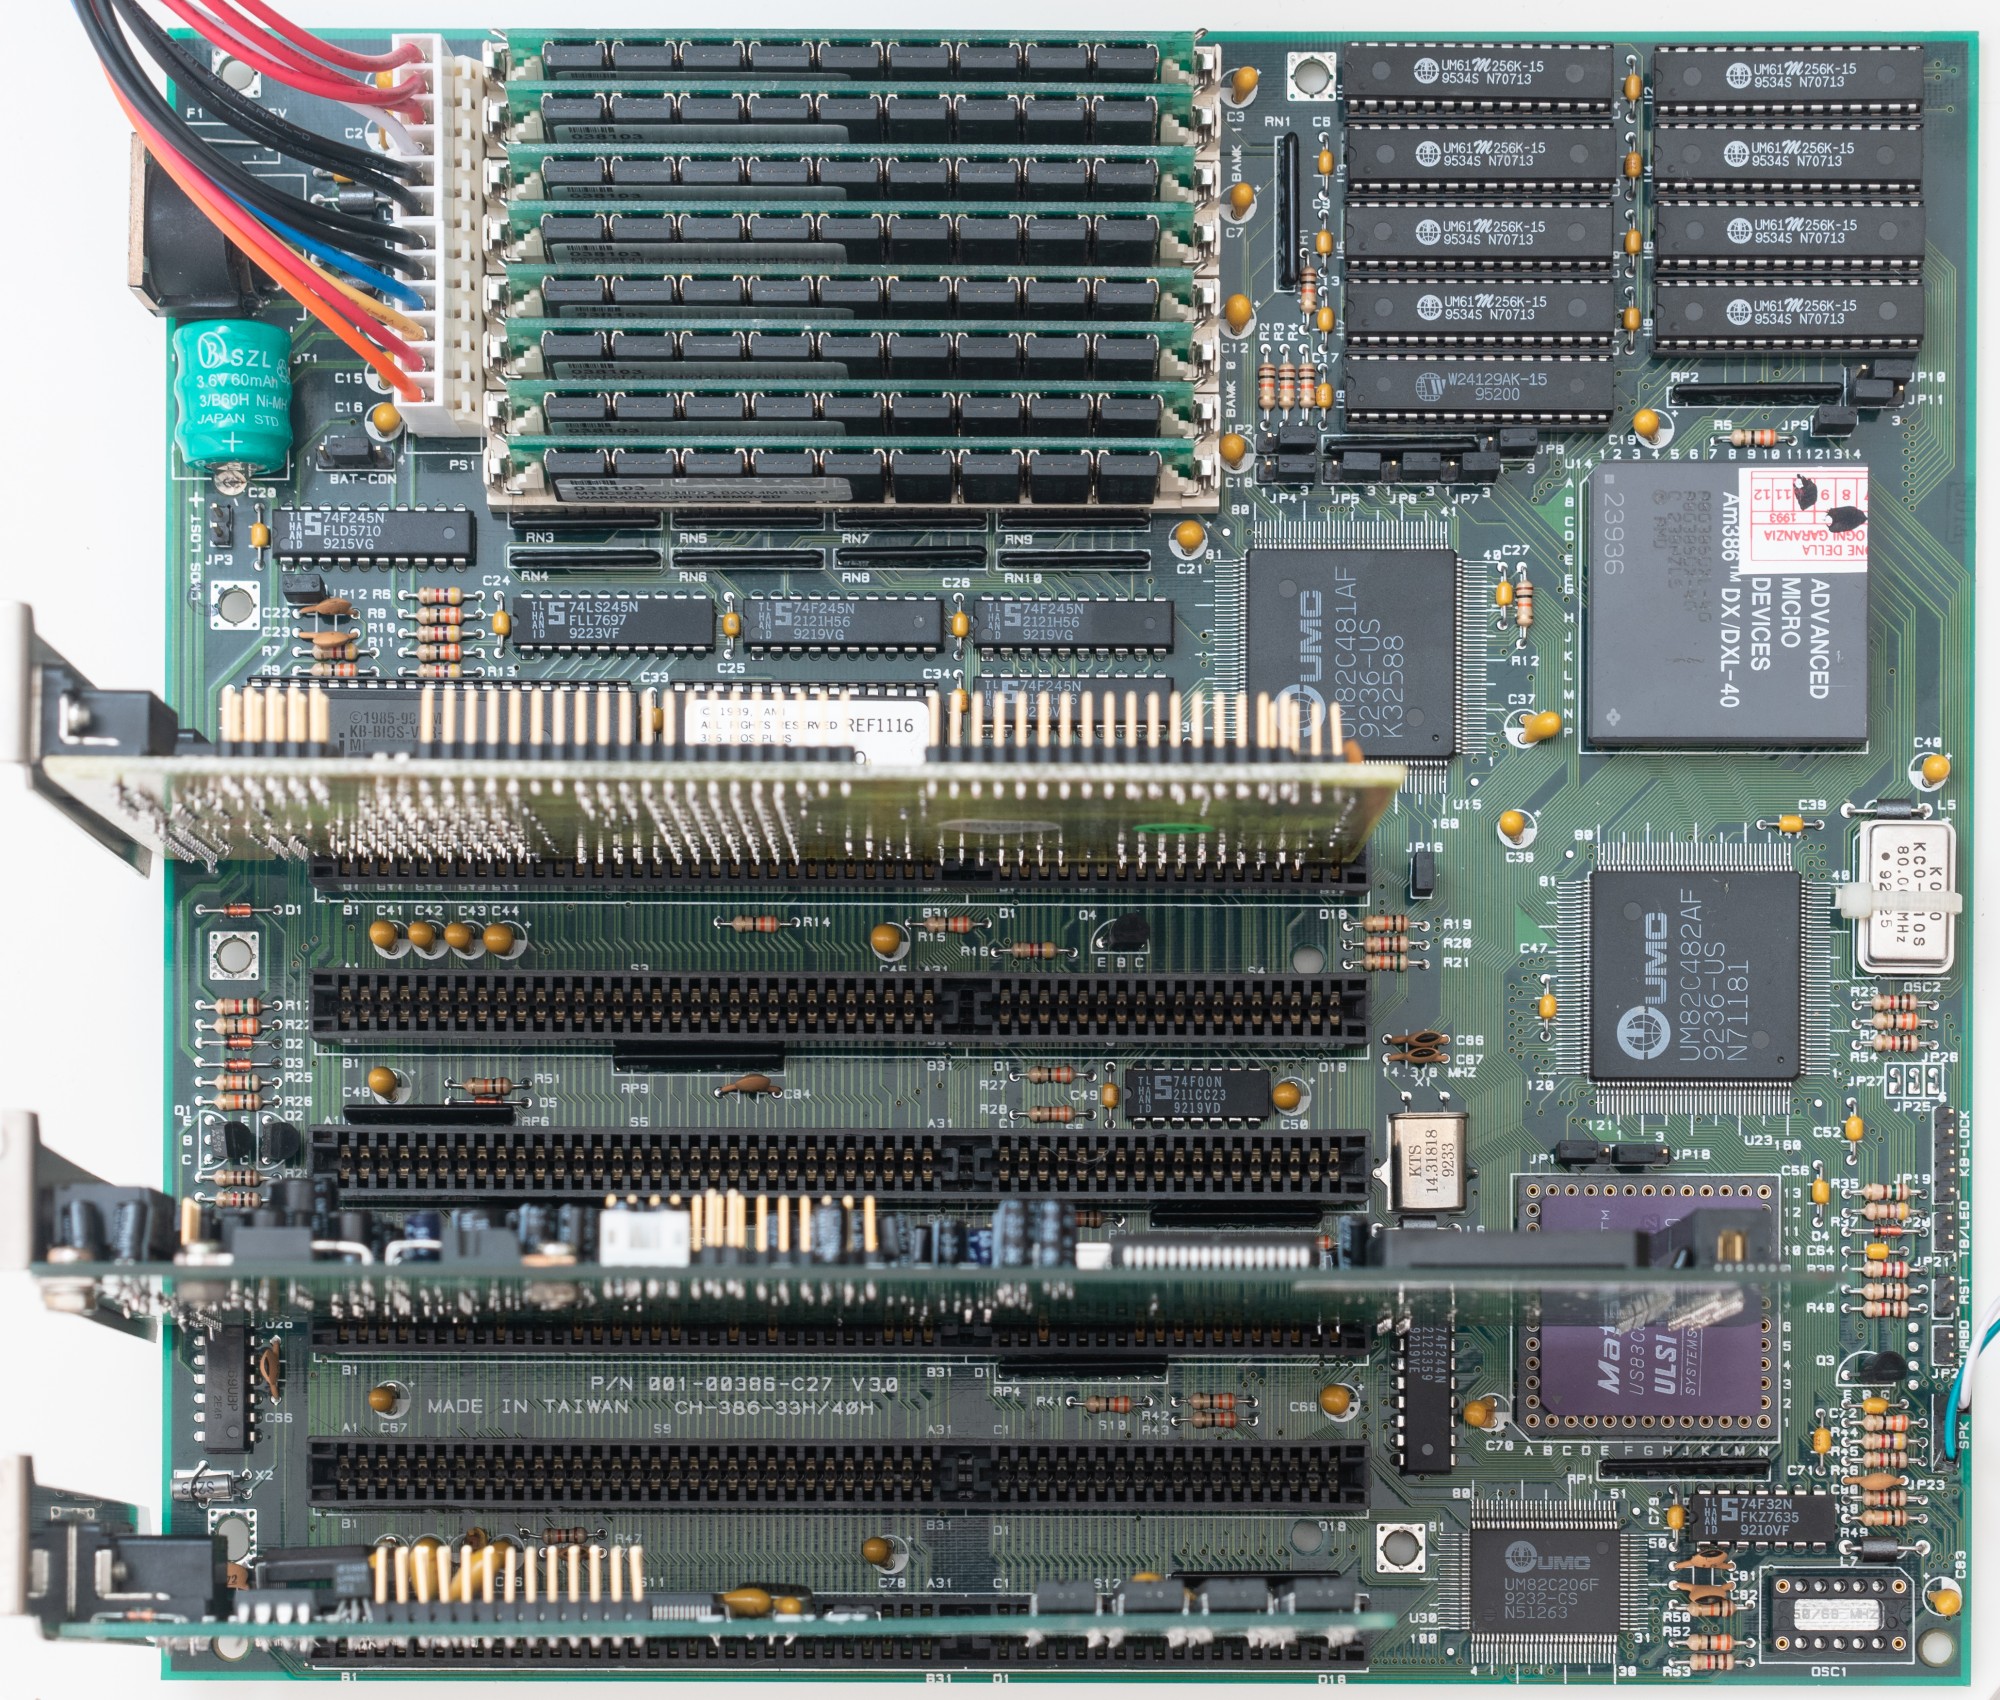
We continue the inspection. The next important moment for retroassembly is the shape of the power connector. The motherboard is made according to the AT standard, which was named after the 1984 IBM PC / AT computer (it was the first PC based on the 80286 processor). The early boards of this form factor had dimensions of 351x305 mm, but downsizing began in 1985, and my 386th board has dimensions of 240x216 mm, smaller than the 1985 Baby AT standard. Since 1995, the ATX standard has been introduced, which is still used today, which has different dimensions and has more space for I / O ports integrated on the motherboard, and there is enough space for cooling the processor. The important thing is that to power the old motherboard you need an appropriate power supply, or an adapter from a modern power supply with an ATX connector.
Something like this:
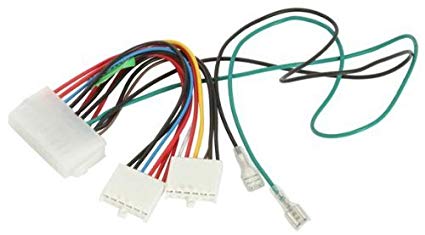
The main, most important mantra of the assembler of the retrocomputer: "black wires should be together." The two halves of the AT power connector are completely interchangeable, have no protection against the fool, and if you do not follow the correct orientation, the construction will immediately end with magical blue smoke. This applies to almost all connectors except the Molex standard for powering hard drives and optical drives. Yes, and he can, having tried, insert the wrong side.
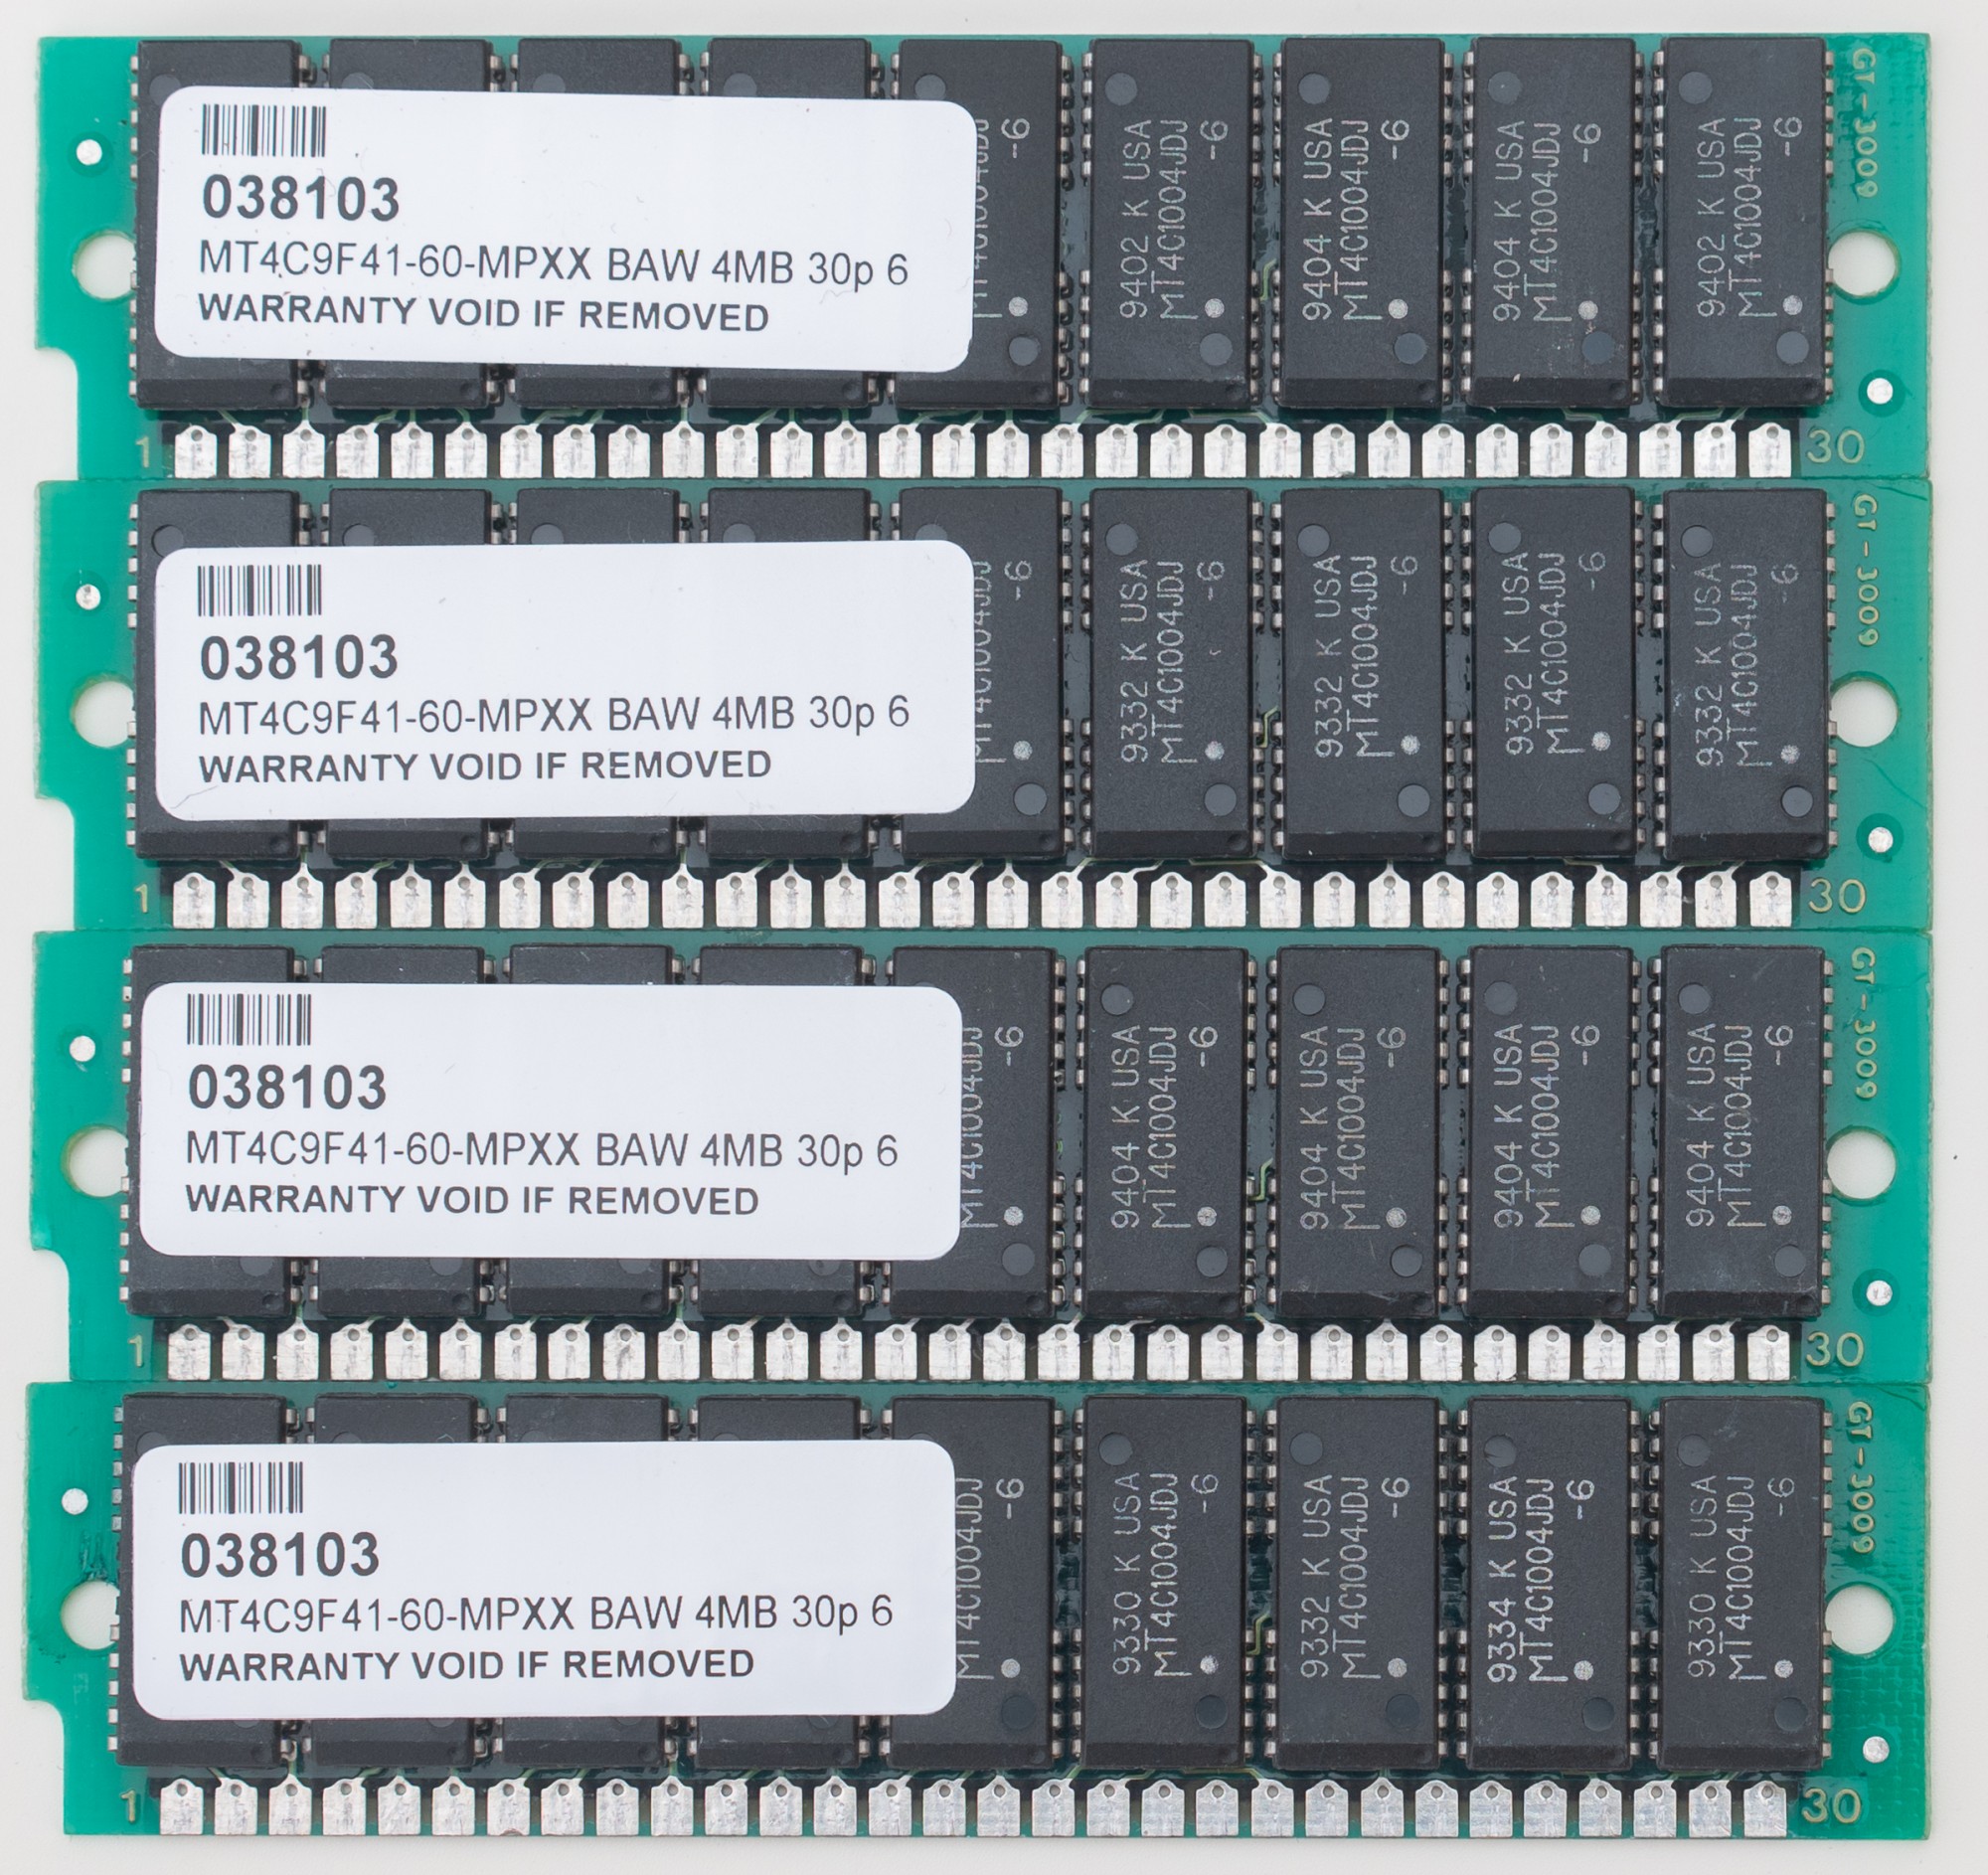
While we are looking at this corner of the motherboard, let's look at the memory slots. They support the SIMM standard, historically this is the first format of memory modules similar to modern ones. Before him there were modules on the legs , microcircuits soldered directly on the motherboard and separate expansion cards. We will need 30-pin modules, not the later 72-pin ones, which I originally mistakenly bought. Each module is eight-bit, and to work in a system with a 32-bit processor, they require at least four (in the 286th computer, two can be used). But since my retrobuild is held under the motto “we will not leave any slots empty,” I ordered 8 modules at once, 4 megabytes each. It turned out smart for the 386th computer and reasonable even for the Pentium MMX 32 megabytes.
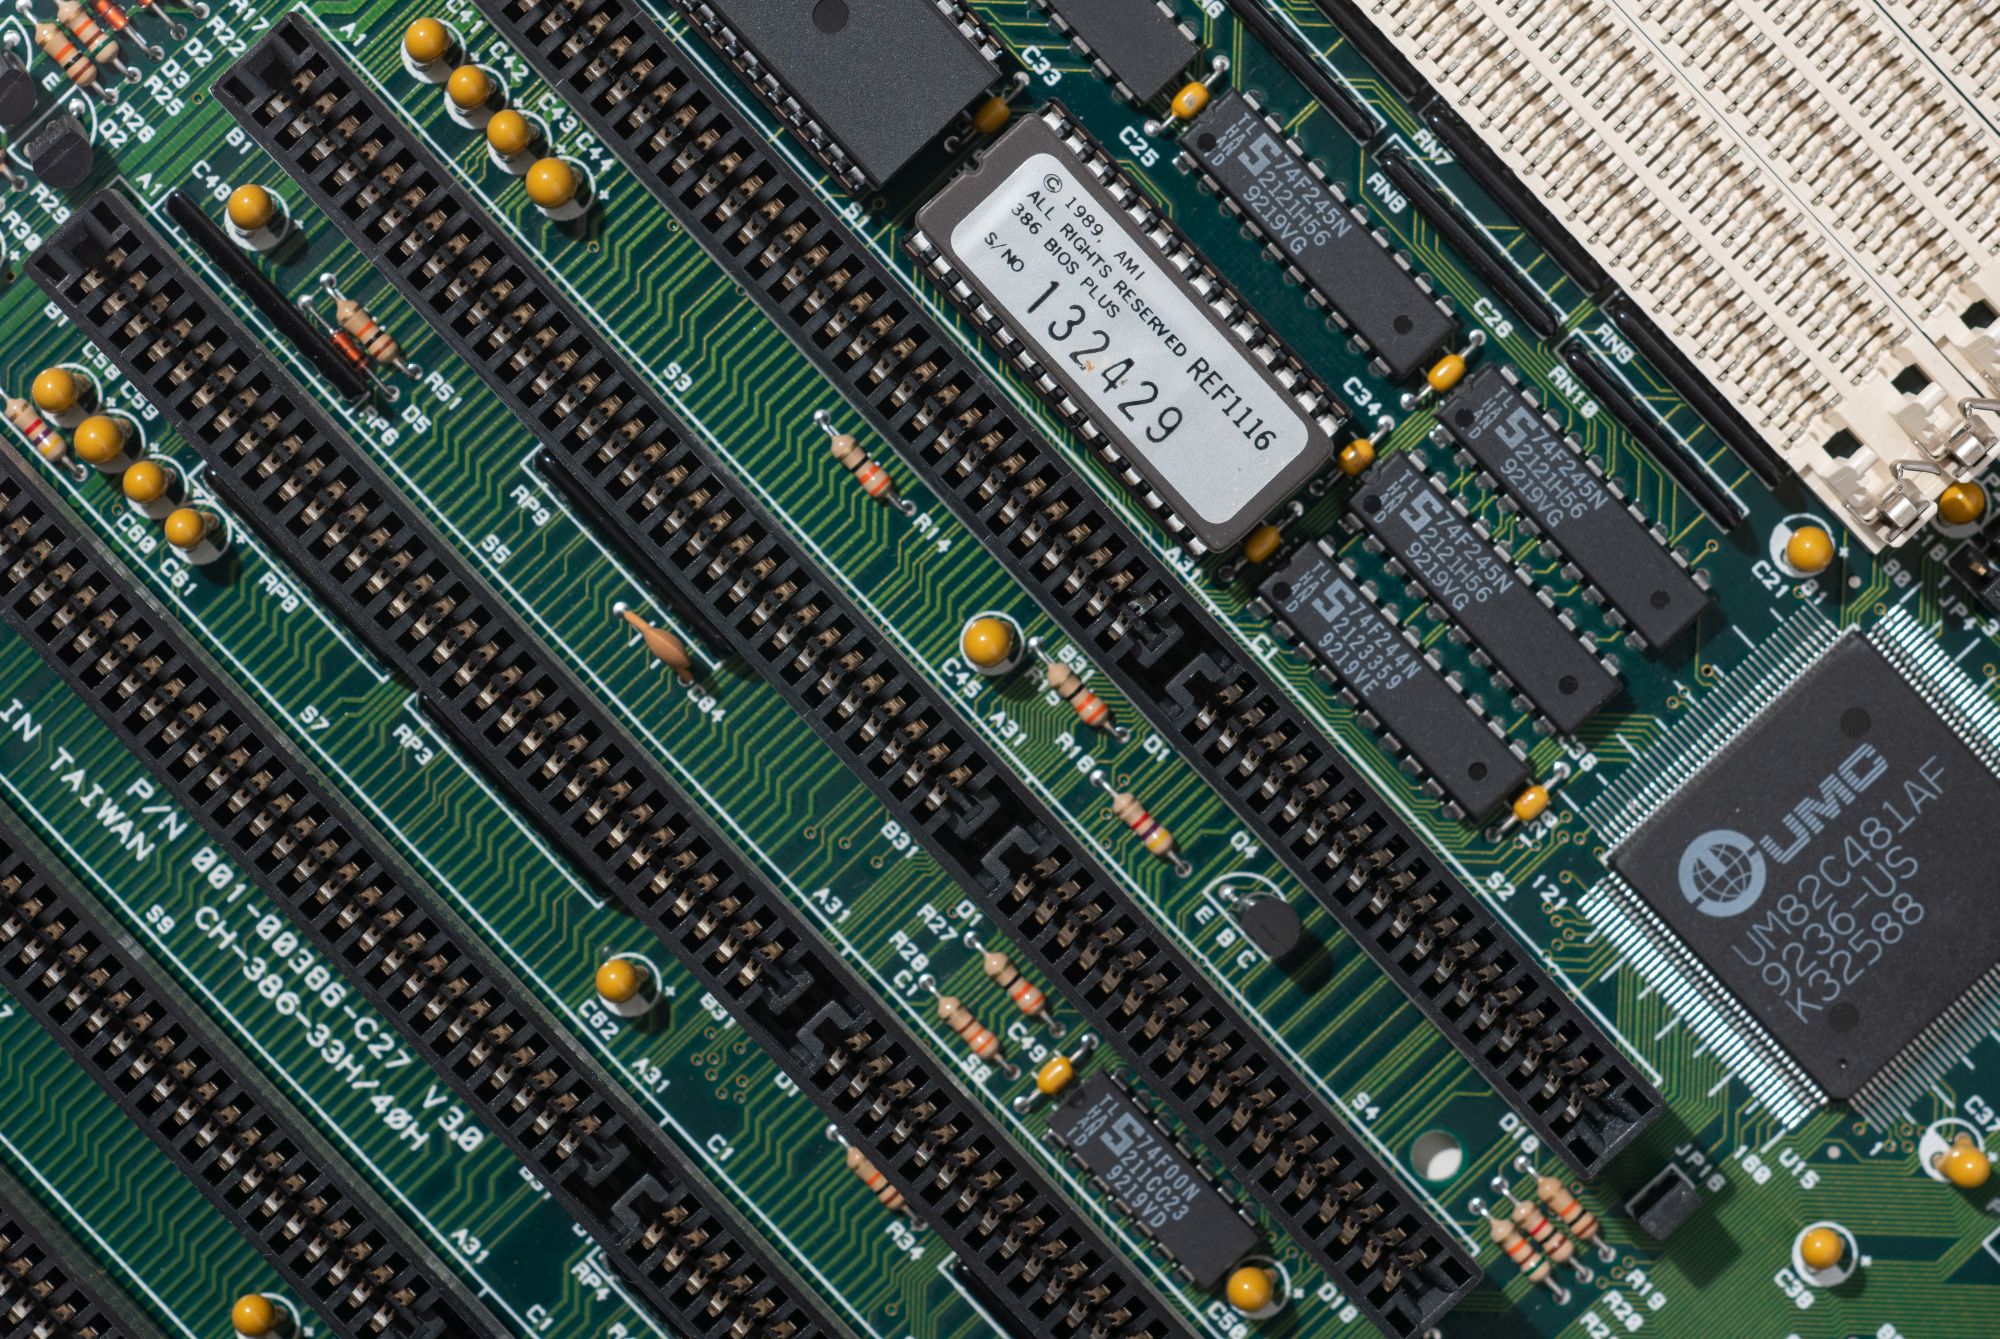
Finish the inspection on expansion slots, 16-bit ISA. The 80386 processor was released in 1985, and at that time manufacturers had serious problems with providing the appropriate peripherals. In earlier systems, the only 32-bit slot was a proprietary expansion port for additional RAM. We can say that the 80386 is a little ahead of its time, so in 1988 Intel released the 80386SX processor with a 16-bit data bus. By 1992, there were at least two standards for 32-bit expansion cards - EISA and MCA. The latter was proprietary and was used, as a rule, only on IBM computers. EISA, developed by a consortium of PC manufacturers and mechanically compatible with 16-bit cards, was rarely used, usually in high-performance PCs, and to find such a motherboard today, to put it mildly, is not easy. Actually, the matter went only with the VESA Local Bus , but motherboards with its support appeared only in 1992, and this standard was tied to the capabilities of 486 processors. This whole zoo was eventually replaced by the PCI standard. Exceptionally 16-bit ISA slots on the 386th system are normal. That was how most computers worked, and so maximum compatibility was ensured, albeit with reduced theoretical performance. The maximum theoretical bus bandwidth is only 16 megabytes per second.
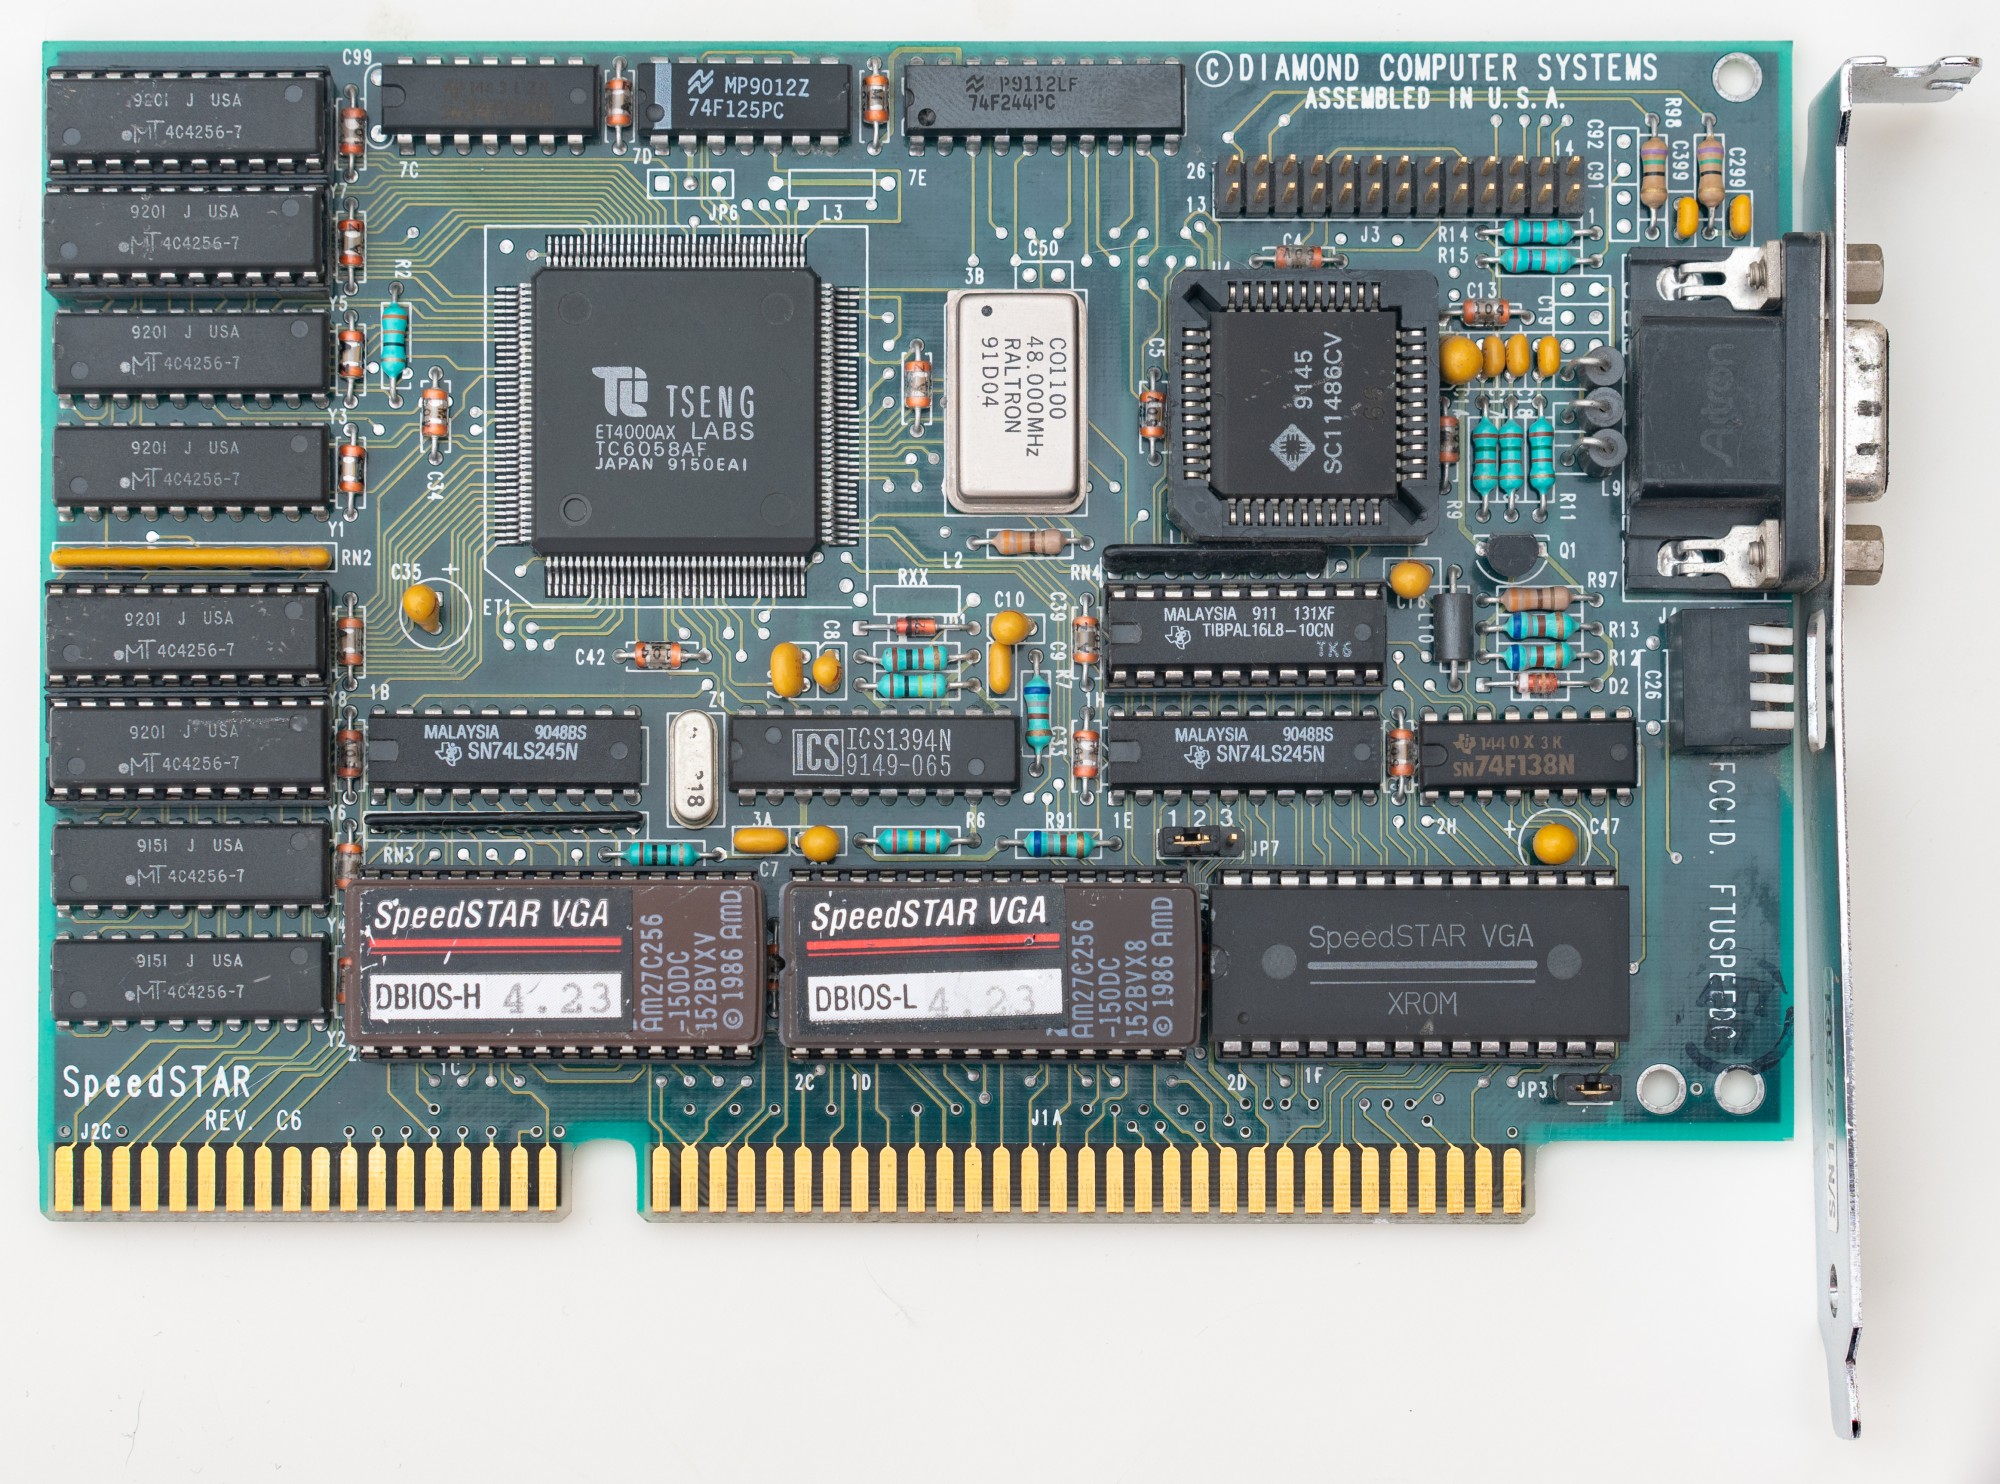
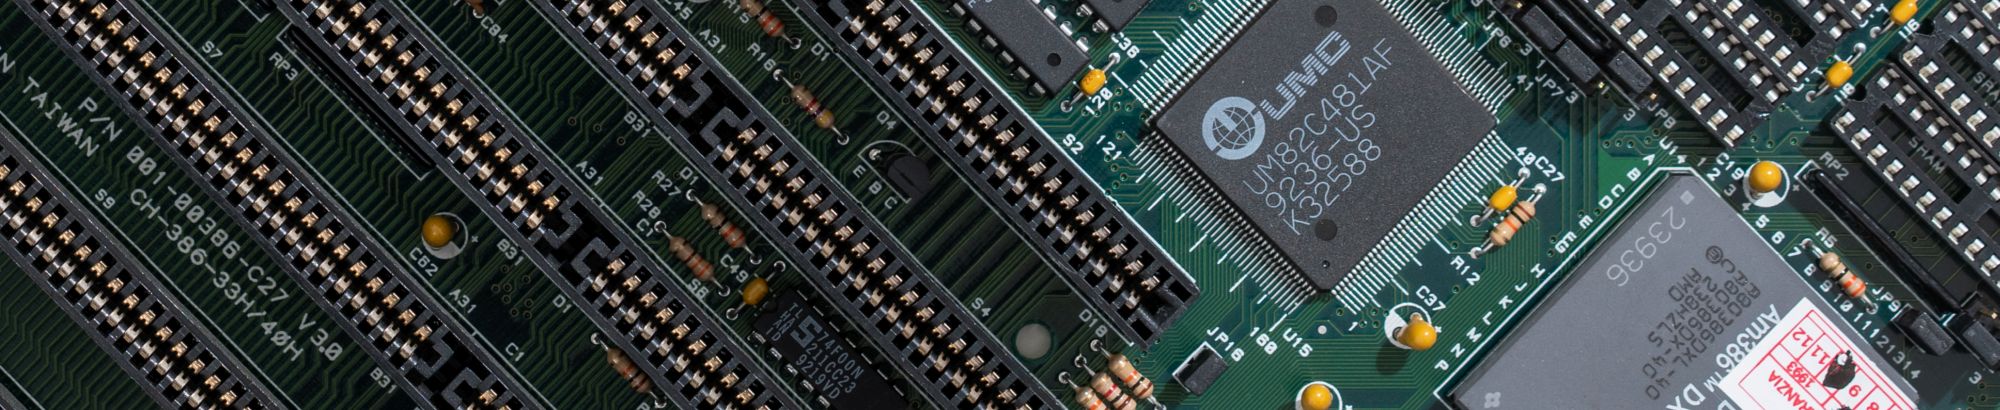
Unlike modern motherboards, only the keyboard controller is integrated on my motherboard for 80386. This is not enough for normal operation: you need an adapter for the display and something to connect at least a drive. Ideally, a hard drive. There were more advanced motherboards with integrated controllers, and even video, but they were more likely proprietary solutions with a non-standard port arrangement. These can also be collected, but preferably complete with the original case. In general, I could, having spent about the same money, buy a good rare computer assembly, with a power supply and so on, but that would not be so interesting. I purchased a Diamond Speedstar graphics card with a Tseng ET4000AX chip and 1 megabyte of internal memory. Video cards based on the Tseng chipset are considered one of the most powerful for the ISA bus. A megabyte of video memory is also a practical maximum, apart from relatively rare models with two megabytes and specialized video accelerators.

Well, the last necessary board is the so-called Multi I / O Card, or just a multicard. It replaces several boards for connecting peripherals at once and contains interfaces for drives, IDE hard drives, two serial ports on a separate bracket, a parallel port and a Game Port for a joystick.
On all expansion cards of those years manually, jumpers or switches, interrupts and other parameters are set. The same thing happens on the motherboard, where the volume of the cache memory, the type of video interface and so on are programmed with jumpers. An ancient board without instructions, and even configured incorrectly or with missing jumpers, is a guaranteed headache and attempts to start the board by poking. Fortunately, the network contains a fairly extensive database of settings. For my Chicony motherboard, you can see them here , and on the same resource there is information on a huge number of motherboards and expansion cards. In the simplest case, the specified parameters are signed directly on the board itself, but this is not always the case.
I assembled this whole construction somewhere in a month, periodically bumping into the absence of any critical element. Either the power adapter for the drive is not enough (but such things can be bought new until now), then the drive, which seemed alive to me, is dead. An important element for debugging a computer is PC Speaker, which I eventually soldered from a pair of wires and a speaker from a non-working laptop. It helps to determine that the motherboard is live even without a video card, by listening to error signals. It would be strange if all this construction started immediately. It did not start: the power supply, borrowed from a later Pentium III-based computer, turned on and immediately went into defense.
The reason for this was one of the tantalum capacitors near the power connector: he closed the -5v line to the ground. Calling the contacts of the power connector as a whole is recommended even before the first power-up - it won’t hurt. Fortunately, -5v power is the rudiment of an even more ancient era, it is not required for the operation of this motherboard, and it is completely absent on modern power supplies. Only rare expansion cards can not fly without -5v supply, so it was enough for me to remove the capacitor, and it will be possible to replace it later.

Has it earned? No. The PSU fan spins, but nothing happens. I take out the memory - the motherboard through the speaker reports about its absence. I take out the video card - swears at the lack of a video adapter. I’m checking the video card in the IBM laptop dock with ISA slots - and it doesn’t work there either. As a result, I had to buy another video card - Diamond Speedstar Pro, also with a megabyte of memory, but already on a Cirrus Logic chip. And now it started!
The memory test takes a long time, simply because there are a lot of it - this is the theoretical maximum for a given motherboard. Testing RAM when loading the HIMEM.SYS driver in MS-DOS takes even more time, and it is better to disable it, for speed. I would like to add a hard drive right away, and corresponding to the era, older, with authentic sound, but here I was not lucky: the first 500 megabyte hard drive could only make scary sounds, and was not even detected. But there is a simple modern solution:
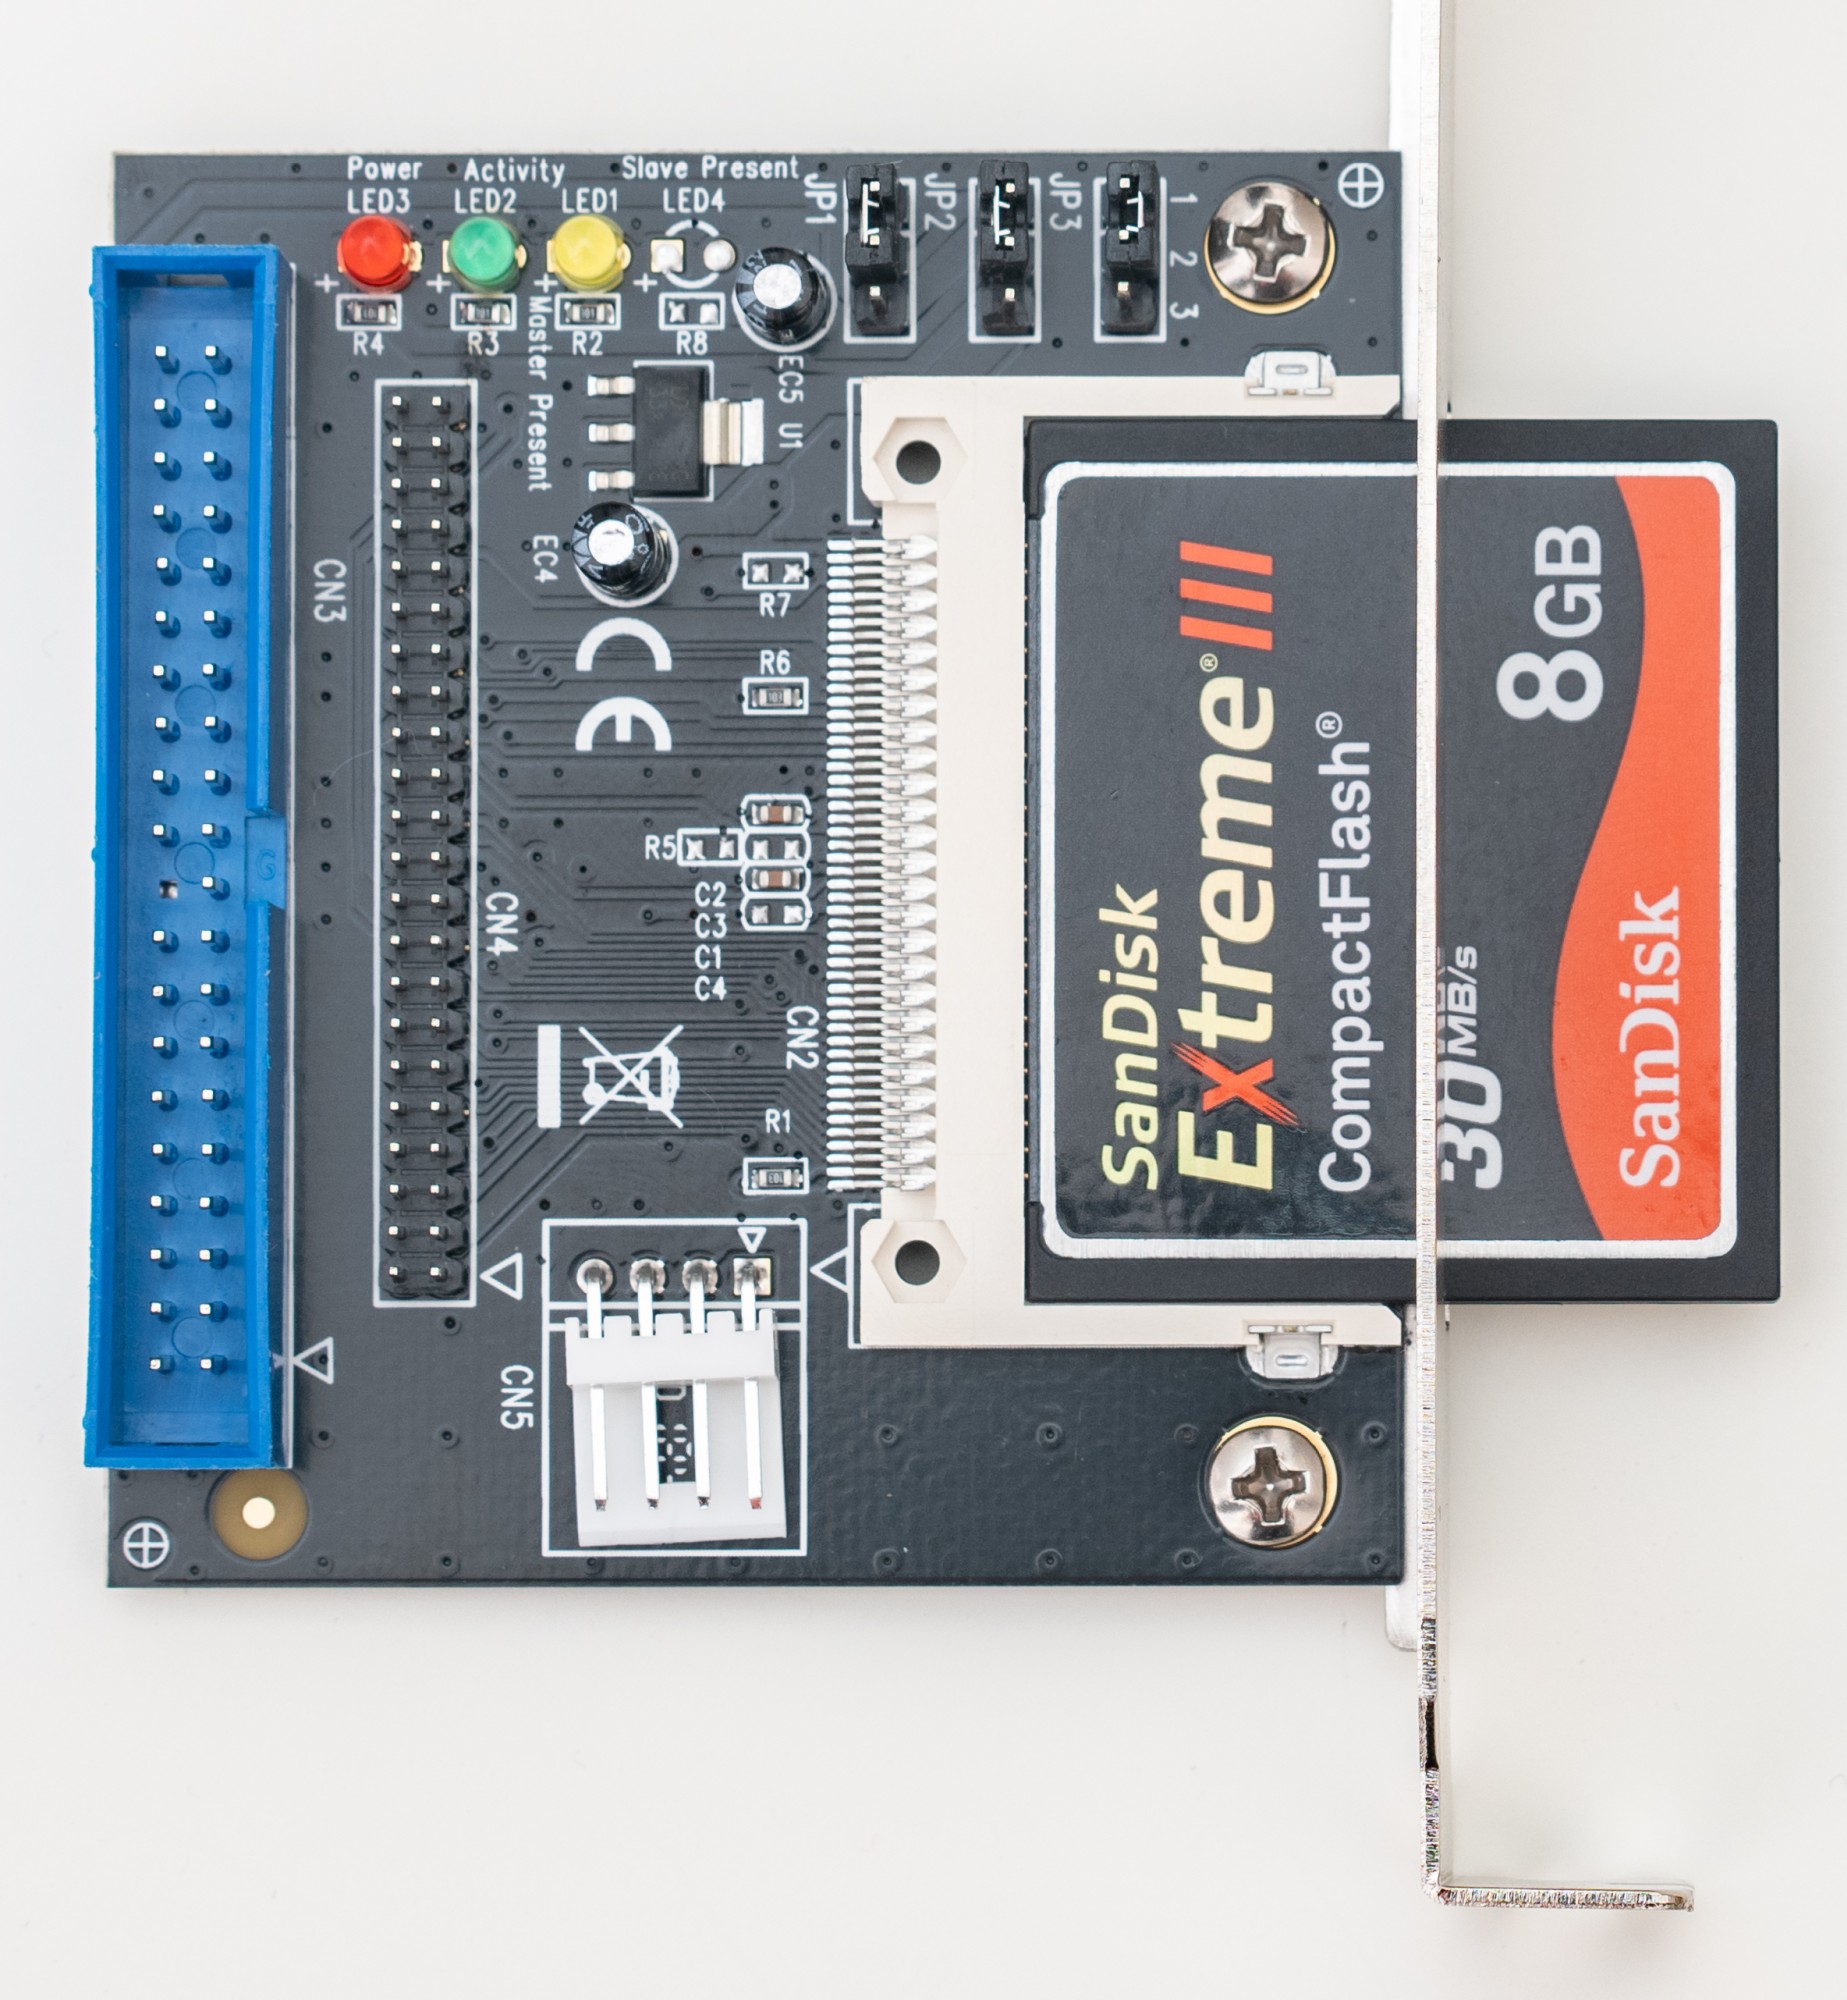
The IDE adapter for Compact Flash cards can be screwed into one of the free expansion slots, and quickly transfer data to a memory card from a modern computer. But then another problem arose: the dense, spartan BIOS.
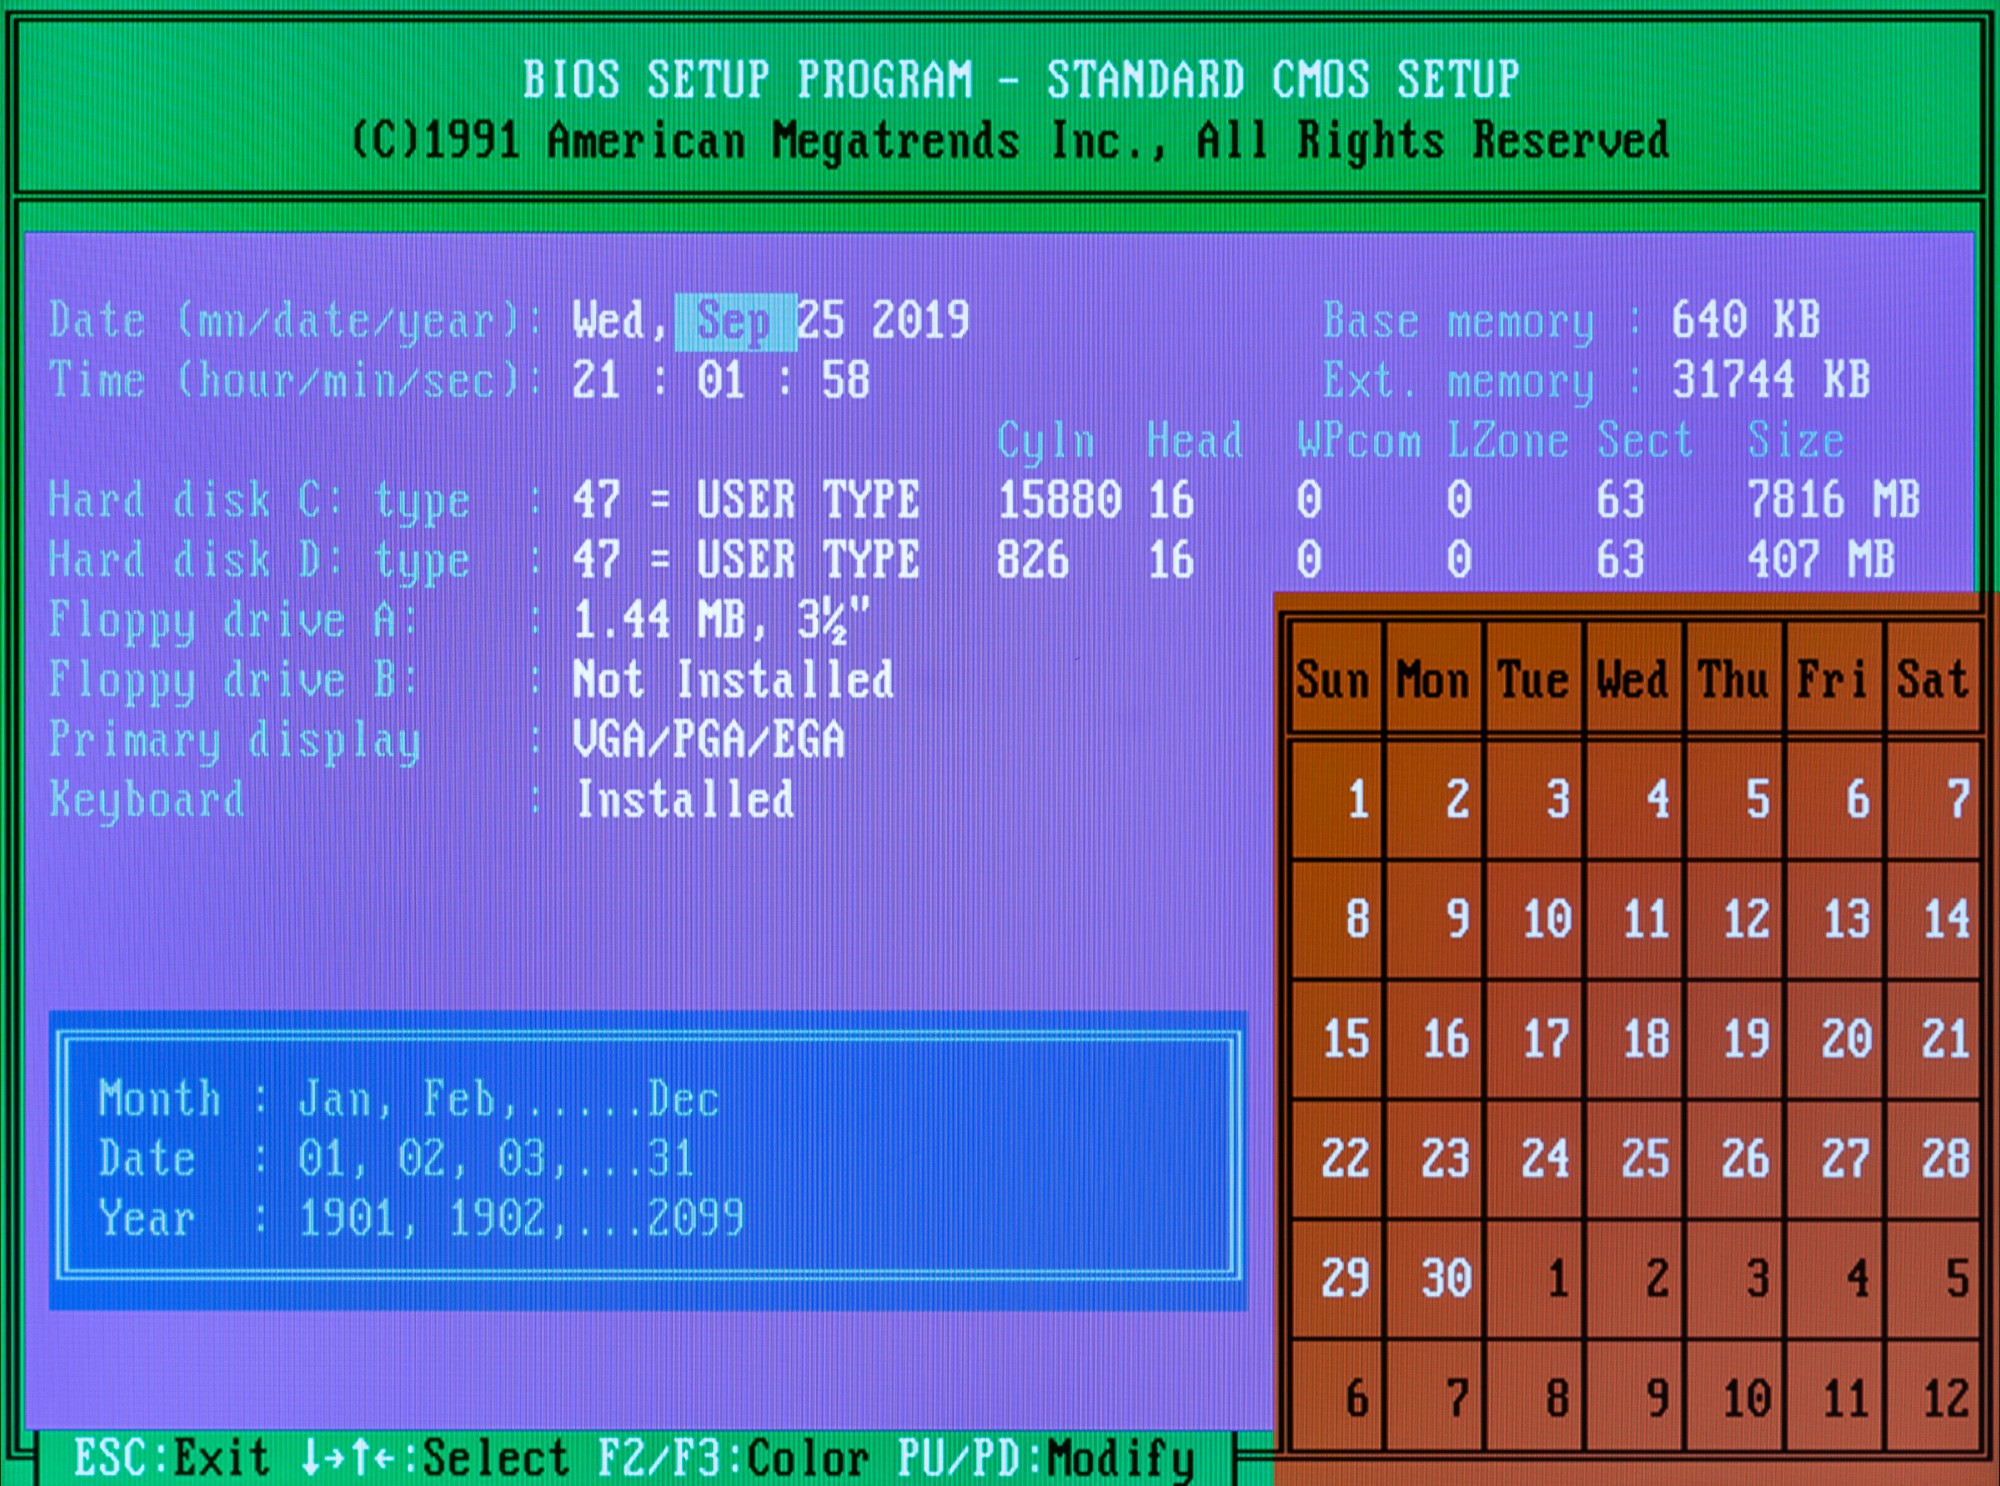
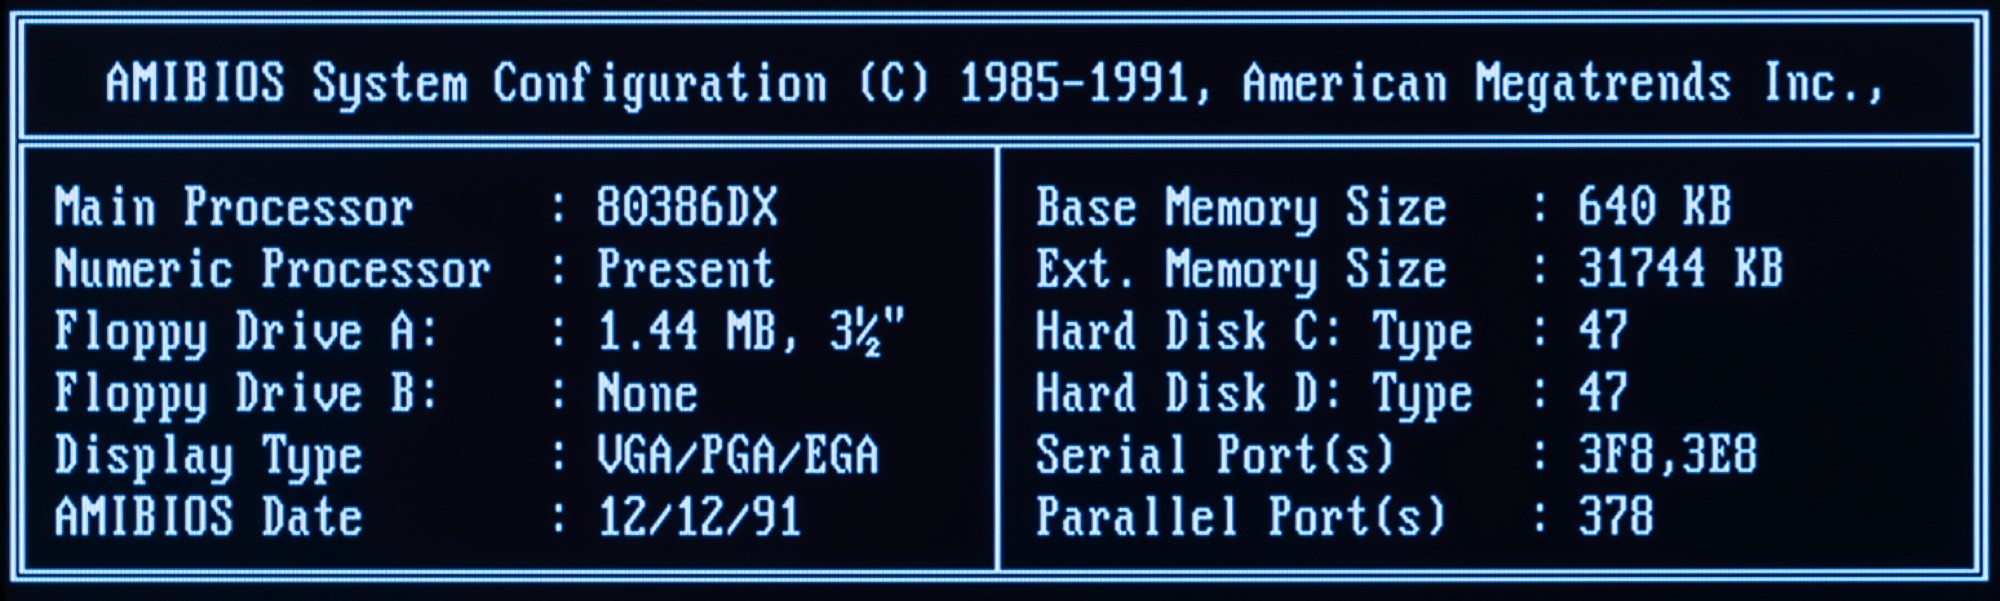
It does not have a function to automatically detect hard disk parameters. For real HDDs, they were determined by the number of cylinders, heads and sectors . There are no heads in the memory card, but for compatibility it passes some parameters to the BIOS if it can read them. Mine does not know how, and as a rule there is a simple solution - insert a memory card with an adapter into a computer with the ability to automatically detect. I don’t have one (more precisely, but with a trimmed notebook BIOS), but there is an IDEINFO utility that can be run directly on an old computer from a floppy disk, and it will show the parameters suitable for a flash card. It remains to enter them in the BIOS. Although the final card size of 8 gigabytes is correctly determined there, the maximum available is 504 megabytes due to the limitations ofhardware iron , overcome already on 486 systems. There are several ways to get around this limitation, but for a start, half a gigabyte will be enough for me. In 1992, I would probably be surprised - but why more?

You can check basic system parameters using the System Speed Test or SpeedSys software. This is a domestic development (you can look at the program’s website in the web archive), which allows you to evaluate the performance of the processor, hard disk, and RAM. As you can see, the result for my processor (4.37 points) is roughly in line with expectations, the performance of the HDD stick (1.7 megabytes per second) is limited solely by the interface, and still incredibly high. And the memory bandwidth (12.97 megabytes per second) is frankly funny, the same Compact Flash card in sequential read mode will be three times faster. By the way, what if you run the test on a newer computer? For example, on a ThinkPad 600 laptop with a Pentium II 233 MHz processor, which I recently slowed down for Windows 3.1.
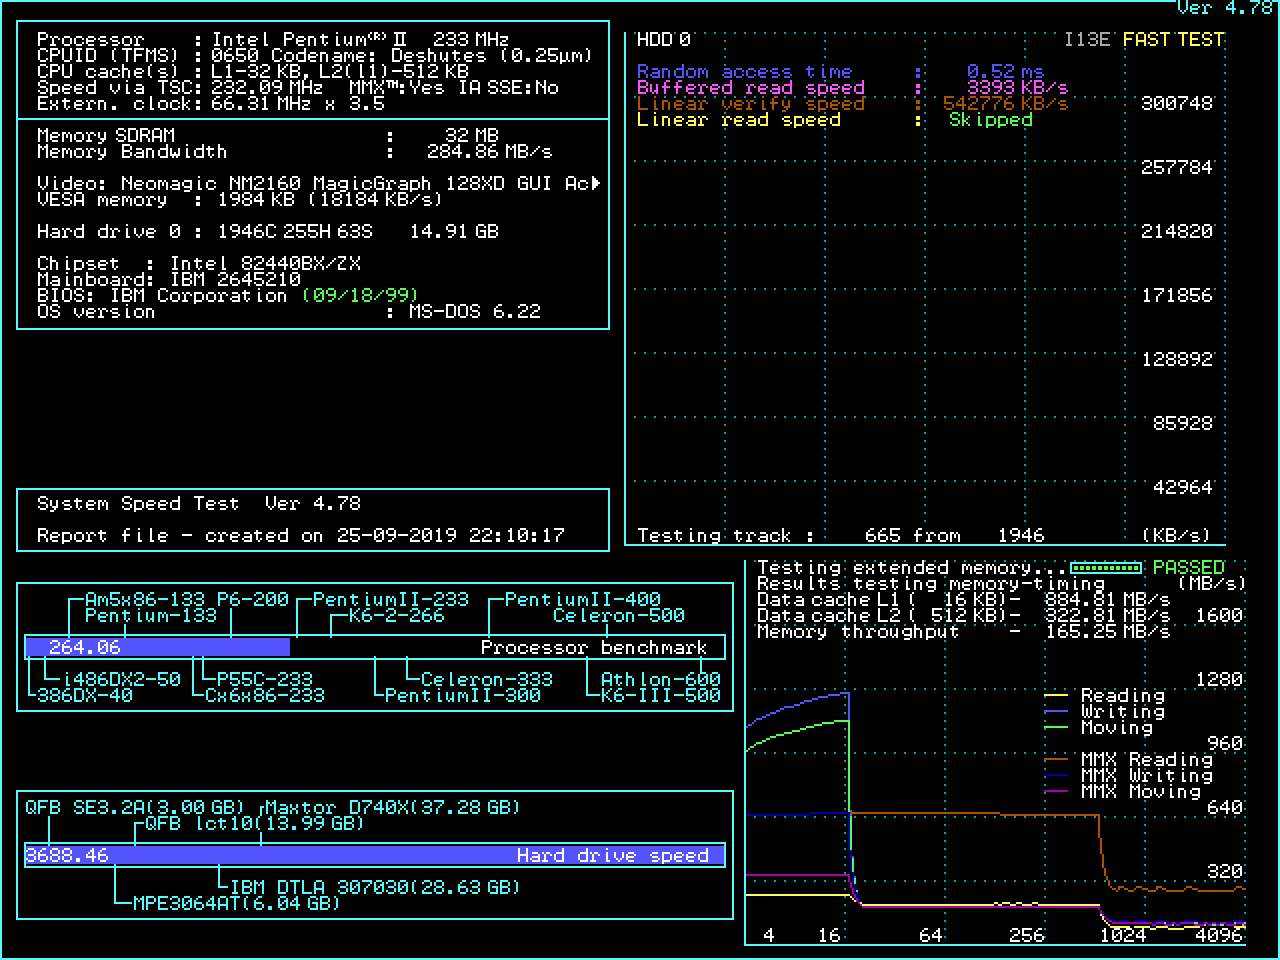
The difference is obvious, although we are comparing, in fact, one ancient computer with another. The laptop, released 6 years later, turned out to be 60 times more powerful (of course, only in this benchmark, but the difference is huge anyway). However, there is a way to improve the performance of the 386th system once every two times, by one small upgrade.
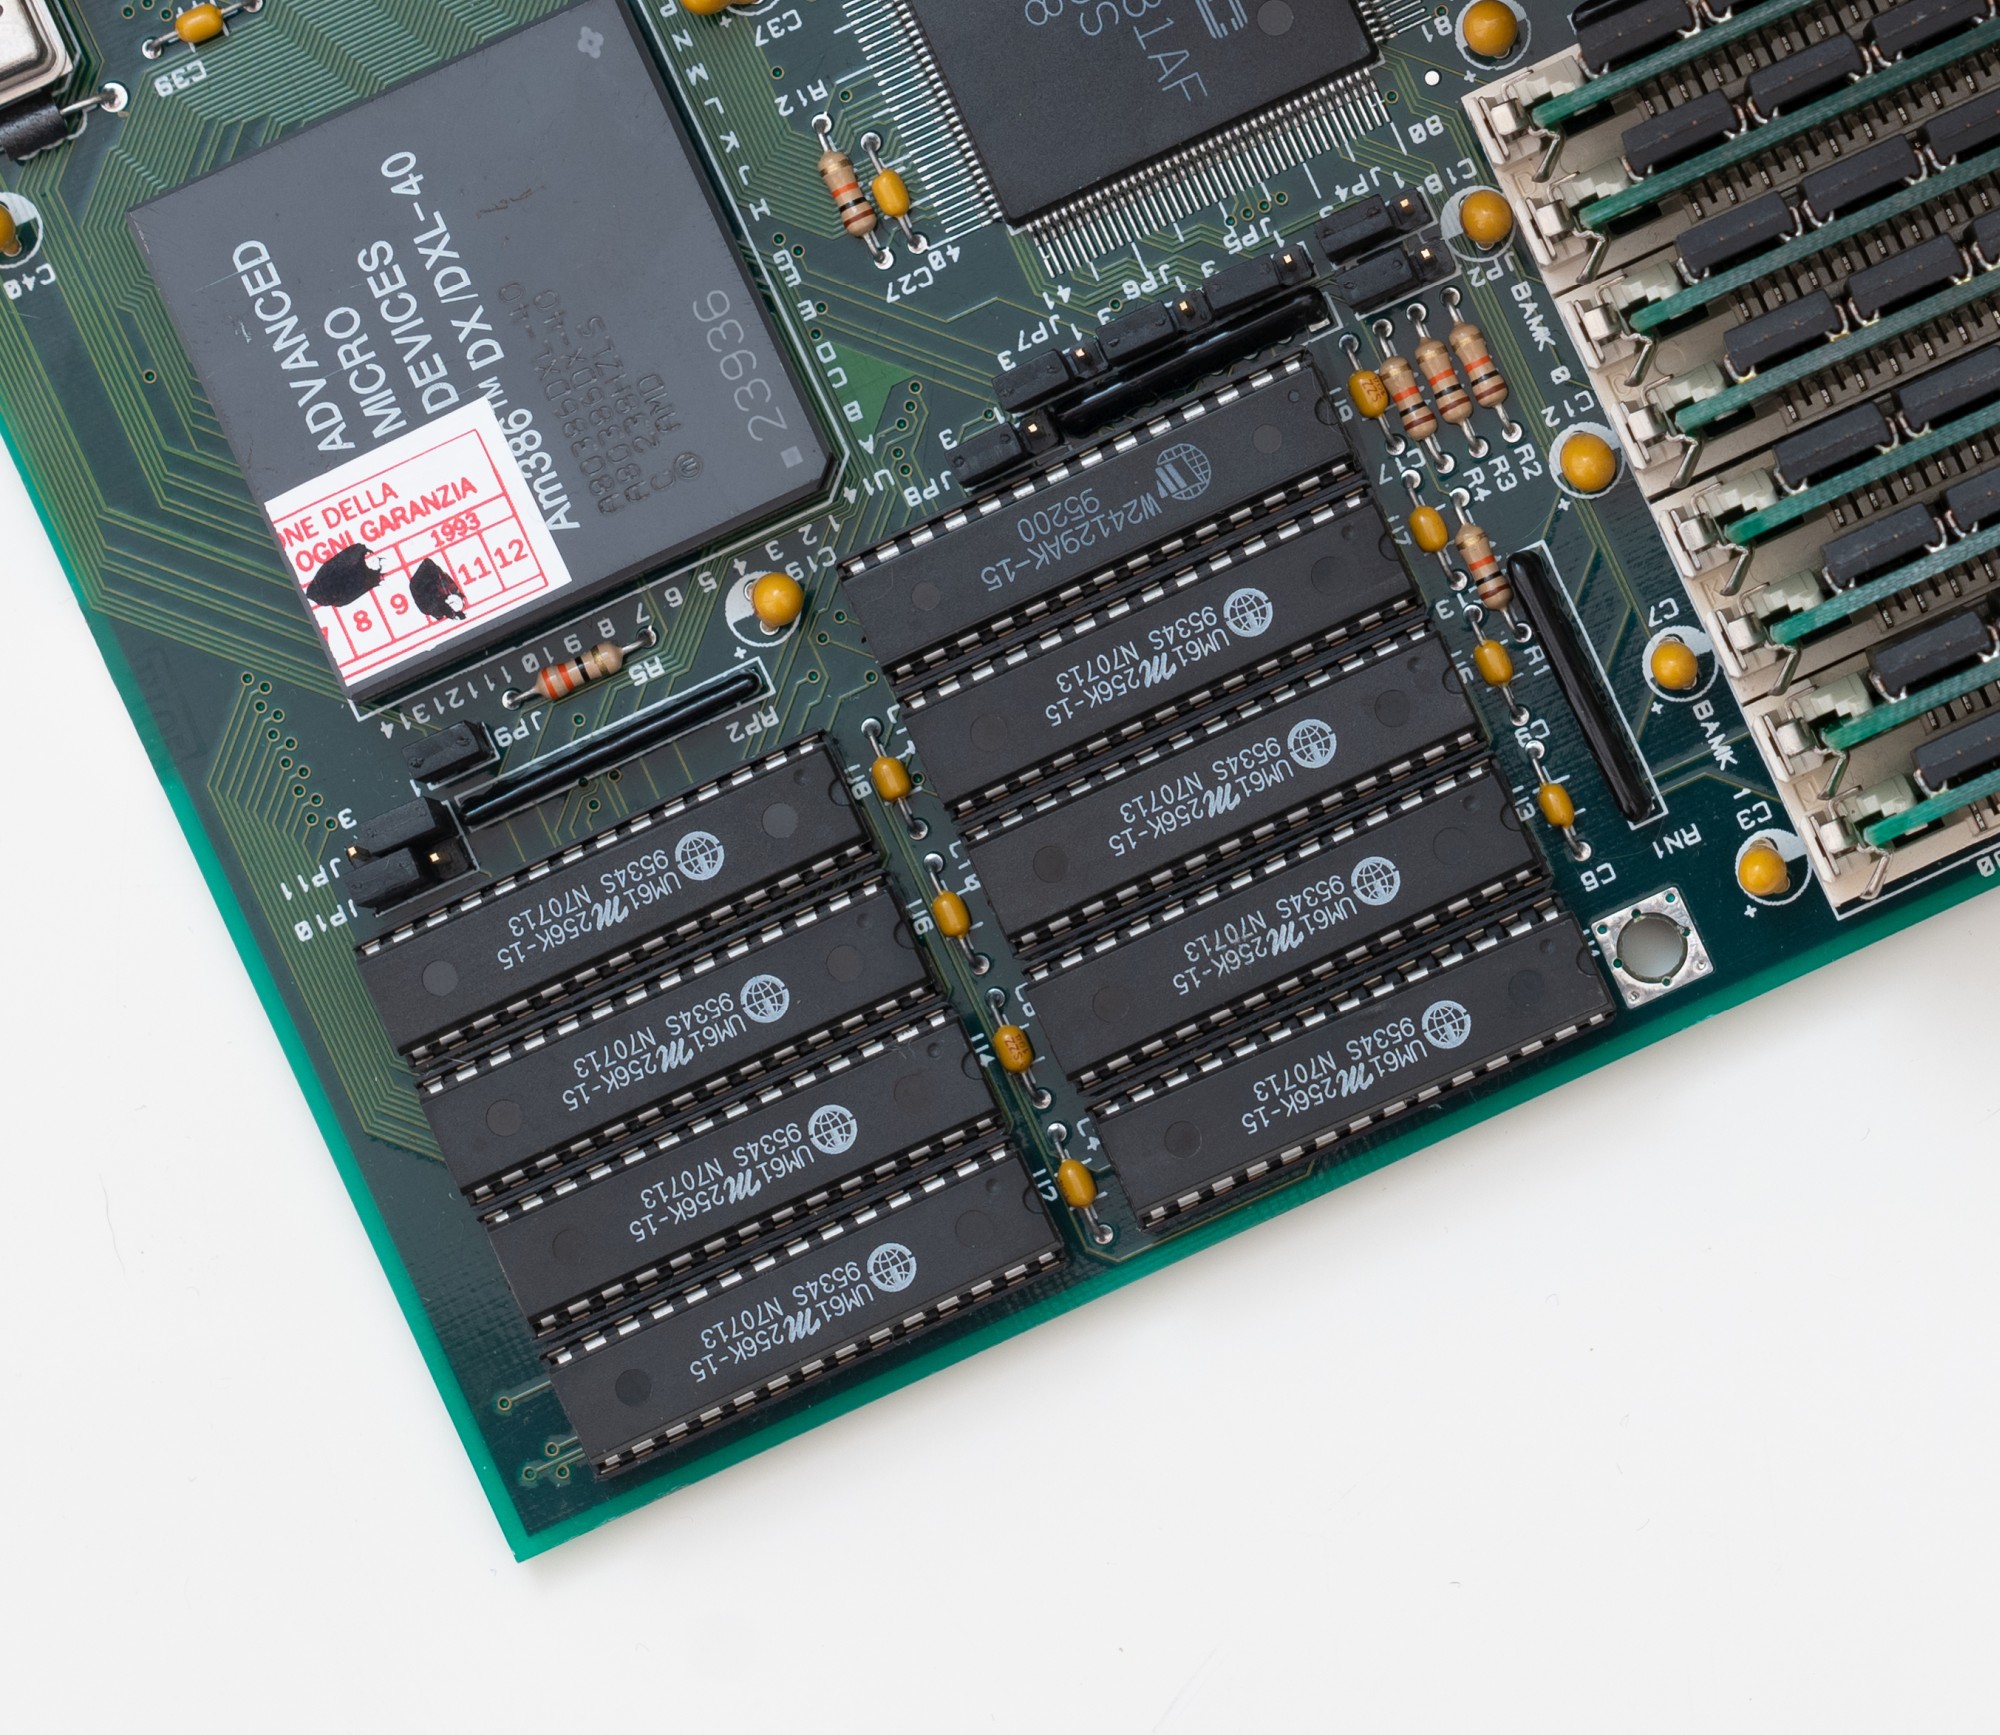
On the motherboard there is a place for cache chips. You can call it a second-level cache, although in the case of the 386th processor this is wrong: there is no first-level cache directly on the chip, it will appear only in 80486. The second-level cache will not be built into Intel processors until 1996 in the Pentium Pro model. Fast static RAM speeds up the loading and execution of data and instructions. In the era of 386-486, it was a welcome upgrade, so much so that some manufacturers without shame and conscience put on board wooden models of the corresponding chips. My motherboard supports a maximum of 256 kilobytes of cache, and we will supply as much.
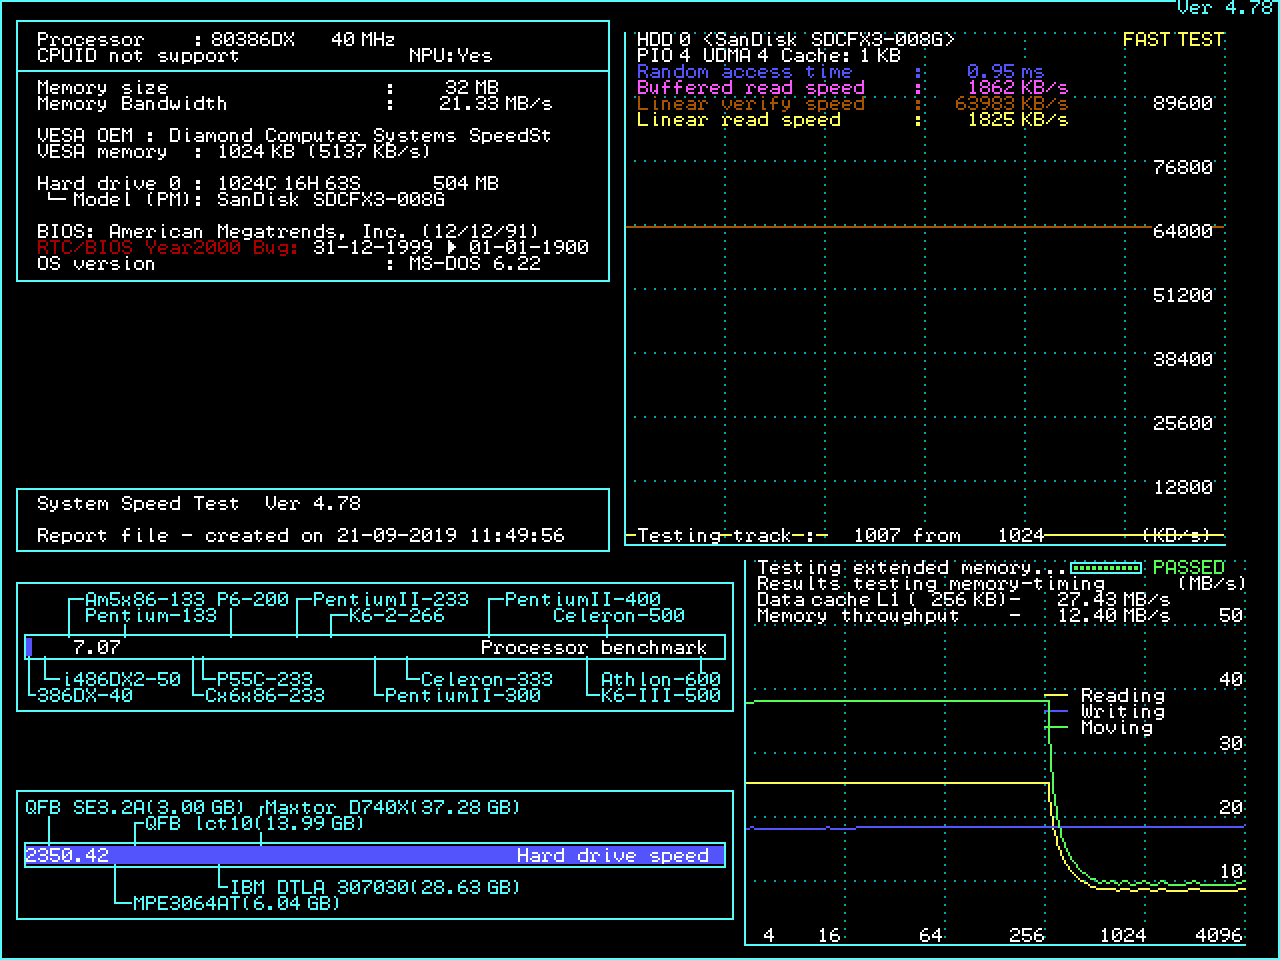
7.07 points in SYSCHECK, performance increase by 60% without processor upgrade, although in other benchmarks the speed increased three times. We will dwell on this for the time being: the 386th is working and is ready for further construction. Oh yes, I promised to show the video of the first launch. It is not that impressive: it was shot after thoughtful testing and working with a soldering iron, without much hope of success, with shaking hands on a mobile phone. I posted it in a telegram . And here I will lay out the spoiler of one of the future posts about this computer.
In the next article I will show what the 386th processor is capable of and in more detail compare the capabilities of this computer with modern systems.
The beginning of the nineties in IT is a time of great diversity, continuous progress and regular work on bugs. Modern computers are much more limited by various industry standards, and then development in the style of “whoever is what” was the norm. Three decades later, this is confronted with the problem of limited choice and high prices. Today I will talk about the main hardware of the old computer on the 386th processor (without which it won’t work), the everyday life of the collector of antiquities, I will show the first launch and drive the vintage benchmark.
Links to all articles about the assembly of this computer:
0. 1992 in the computer press
1. Consider the motherboard of the 386th computer <- you are here
2. Benchmark of the 386th processor and the dashing nineties
I keep a diary of a collector of old pieces of iron in a Telegram .
With the assembly of the 386th computer, I was of course a little late, about fifteen years. Already in the late nineties, old iron "before the Pentium" could be purchased inexpensively. In the early 2000s, I would most likely have assembled the base system for free. To date, computers 30 years ago have acquired a sufficient degree of vintage, prices have crawled up. No, you can still find the computer hardware of that era for ridiculous money, but it requires perseverance, time and free space to assemble one worker from a dozen mossy desktops. I went the "expensive way", picking up something interesting on the announcement sites and on eBay, in accordance with my ideas about the beautiful, uncompromising 386th computer. Representations, however, were vague at first, so at some point I relied on a non-working (therefore inexpensive) motherboard, because the most powerful 386th AMD AM386 DX40 processor was already bundled with it.
Inspection of any motherboard for the 386s and 486s (excluding the latest) systems must begin with a battery. And even before the purchase. Here is such a non-standard barrel - a 3.6-volt nickel-cadmium battery - sooner or later reduces the chances of any motherboard to survive, sometimes to zero. Let's imagine the history of this motherboard: it honestly worked in the home or work computer of the year until 1998, then it was put on the shelf, where it spent another twenty years. About five years after the resignation, the battery began to leak, but no one knew about it until the very moment of sale to the new owner. If I ever build a time machine, I’ll definitely go to the nineties and recommend that all owners of computers still alive at that time remove the battery before long-term storage. Otherwise, it will flow, in a hundred percent of cases.
We can say that I was lucky, and the board was stored either vertically or upside down, in general - the keyboard connector suffered the most. Damage to the motherboard itself was limited to a patch just below the battery and next. All this was fairly easy to clean (experienced retailers recommend
We continue the inspection. The next important moment for retroassembly is the shape of the power connector. The motherboard is made according to the AT standard, which was named after the 1984 IBM PC / AT computer (it was the first PC based on the 80286 processor). The early boards of this form factor had dimensions of 351x305 mm, but downsizing began in 1985, and my 386th board has dimensions of 240x216 mm, smaller than the 1985 Baby AT standard. Since 1995, the ATX standard has been introduced, which is still used today, which has different dimensions and has more space for I / O ports integrated on the motherboard, and there is enough space for cooling the processor. The important thing is that to power the old motherboard you need an appropriate power supply, or an adapter from a modern power supply with an ATX connector.
Something like this:
The main, most important mantra of the assembler of the retrocomputer: "black wires should be together." The two halves of the AT power connector are completely interchangeable, have no protection against the fool, and if you do not follow the correct orientation, the construction will immediately end with magical blue smoke. This applies to almost all connectors except the Molex standard for powering hard drives and optical drives. Yes, and he can, having tried, insert the wrong side.
While we are looking at this corner of the motherboard, let's look at the memory slots. They support the SIMM standard, historically this is the first format of memory modules similar to modern ones. Before him there were modules on the legs , microcircuits soldered directly on the motherboard and separate expansion cards. We will need 30-pin modules, not the later 72-pin ones, which I originally mistakenly bought. Each module is eight-bit, and to work in a system with a 32-bit processor, they require at least four (in the 286th computer, two can be used). But since my retrobuild is held under the motto “we will not leave any slots empty,” I ordered 8 modules at once, 4 megabytes each. It turned out smart for the 386th computer and reasonable even for the Pentium MMX 32 megabytes.
Finish the inspection on expansion slots, 16-bit ISA. The 80386 processor was released in 1985, and at that time manufacturers had serious problems with providing the appropriate peripherals. In earlier systems, the only 32-bit slot was a proprietary expansion port for additional RAM. We can say that the 80386 is a little ahead of its time, so in 1988 Intel released the 80386SX processor with a 16-bit data bus. By 1992, there were at least two standards for 32-bit expansion cards - EISA and MCA. The latter was proprietary and was used, as a rule, only on IBM computers. EISA, developed by a consortium of PC manufacturers and mechanically compatible with 16-bit cards, was rarely used, usually in high-performance PCs, and to find such a motherboard today, to put it mildly, is not easy. Actually, the matter went only with the VESA Local Bus , but motherboards with its support appeared only in 1992, and this standard was tied to the capabilities of 486 processors. This whole zoo was eventually replaced by the PCI standard. Exceptionally 16-bit ISA slots on the 386th system are normal. That was how most computers worked, and so maximum compatibility was ensured, albeit with reduced theoretical performance. The maximum theoretical bus bandwidth is only 16 megabytes per second.
Unlike modern motherboards, only the keyboard controller is integrated on my motherboard for 80386. This is not enough for normal operation: you need an adapter for the display and something to connect at least a drive. Ideally, a hard drive. There were more advanced motherboards with integrated controllers, and even video, but they were more likely proprietary solutions with a non-standard port arrangement. These can also be collected, but preferably complete with the original case. In general, I could, having spent about the same money, buy a good rare computer assembly, with a power supply and so on, but that would not be so interesting. I purchased a Diamond Speedstar graphics card with a Tseng ET4000AX chip and 1 megabyte of internal memory. Video cards based on the Tseng chipset are considered one of the most powerful for the ISA bus. A megabyte of video memory is also a practical maximum, apart from relatively rare models with two megabytes and specialized video accelerators.
Well, the last necessary board is the so-called Multi I / O Card, or just a multicard. It replaces several boards for connecting peripherals at once and contains interfaces for drives, IDE hard drives, two serial ports on a separate bracket, a parallel port and a Game Port for a joystick.
On all expansion cards of those years manually, jumpers or switches, interrupts and other parameters are set. The same thing happens on the motherboard, where the volume of the cache memory, the type of video interface and so on are programmed with jumpers. An ancient board without instructions, and even configured incorrectly or with missing jumpers, is a guaranteed headache and attempts to start the board by poking. Fortunately, the network contains a fairly extensive database of settings. For my Chicony motherboard, you can see them here , and on the same resource there is information on a huge number of motherboards and expansion cards. In the simplest case, the specified parameters are signed directly on the board itself, but this is not always the case.
I assembled this whole construction somewhere in a month, periodically bumping into the absence of any critical element. Either the power adapter for the drive is not enough (but such things can be bought new until now), then the drive, which seemed alive to me, is dead. An important element for debugging a computer is PC Speaker, which I eventually soldered from a pair of wires and a speaker from a non-working laptop. It helps to determine that the motherboard is live even without a video card, by listening to error signals. It would be strange if all this construction started immediately. It did not start: the power supply, borrowed from a later Pentium III-based computer, turned on and immediately went into defense.
The reason for this was one of the tantalum capacitors near the power connector: he closed the -5v line to the ground. Calling the contacts of the power connector as a whole is recommended even before the first power-up - it won’t hurt. Fortunately, -5v power is the rudiment of an even more ancient era, it is not required for the operation of this motherboard, and it is completely absent on modern power supplies. Only rare expansion cards can not fly without -5v supply, so it was enough for me to remove the capacitor, and it will be possible to replace it later.
Has it earned? No. The PSU fan spins, but nothing happens. I take out the memory - the motherboard through the speaker reports about its absence. I take out the video card - swears at the lack of a video adapter. I’m checking the video card in the IBM laptop dock with ISA slots - and it doesn’t work there either. As a result, I had to buy another video card - Diamond Speedstar Pro, also with a megabyte of memory, but already on a Cirrus Logic chip. And now it started!
The memory test takes a long time, simply because there are a lot of it - this is the theoretical maximum for a given motherboard. Testing RAM when loading the HIMEM.SYS driver in MS-DOS takes even more time, and it is better to disable it, for speed. I would like to add a hard drive right away, and corresponding to the era, older, with authentic sound, but here I was not lucky: the first 500 megabyte hard drive could only make scary sounds, and was not even detected. But there is a simple modern solution:
The IDE adapter for Compact Flash cards can be screwed into one of the free expansion slots, and quickly transfer data to a memory card from a modern computer. But then another problem arose: the dense, spartan BIOS.
It does not have a function to automatically detect hard disk parameters. For real HDDs, they were determined by the number of cylinders, heads and sectors . There are no heads in the memory card, but for compatibility it passes some parameters to the BIOS if it can read them. Mine does not know how, and as a rule there is a simple solution - insert a memory card with an adapter into a computer with the ability to automatically detect. I don’t have one (more precisely, but with a trimmed notebook BIOS), but there is an IDEINFO utility that can be run directly on an old computer from a floppy disk, and it will show the parameters suitable for a flash card. It remains to enter them in the BIOS. Although the final card size of 8 gigabytes is correctly determined there, the maximum available is 504 megabytes due to the limitations of
You can check basic system parameters using the System Speed Test or SpeedSys software. This is a domestic development (you can look at the program’s website in the web archive), which allows you to evaluate the performance of the processor, hard disk, and RAM. As you can see, the result for my processor (4.37 points) is roughly in line with expectations, the performance of the HDD stick (1.7 megabytes per second) is limited solely by the interface, and still incredibly high. And the memory bandwidth (12.97 megabytes per second) is frankly funny, the same Compact Flash card in sequential read mode will be three times faster. By the way, what if you run the test on a newer computer? For example, on a ThinkPad 600 laptop with a Pentium II 233 MHz processor, which I recently slowed down for Windows 3.1.
The difference is obvious, although we are comparing, in fact, one ancient computer with another. The laptop, released 6 years later, turned out to be 60 times more powerful (of course, only in this benchmark, but the difference is huge anyway). However, there is a way to improve the performance of the 386th system once every two times, by one small upgrade.
On the motherboard there is a place for cache chips. You can call it a second-level cache, although in the case of the 386th processor this is wrong: there is no first-level cache directly on the chip, it will appear only in 80486. The second-level cache will not be built into Intel processors until 1996 in the Pentium Pro model. Fast static RAM speeds up the loading and execution of data and instructions. In the era of 386-486, it was a welcome upgrade, so much so that some manufacturers without shame and conscience put on board wooden models of the corresponding chips. My motherboard supports a maximum of 256 kilobytes of cache, and we will supply as much.
7.07 points in SYSCHECK, performance increase by 60% without processor upgrade, although in other benchmarks the speed increased three times. We will dwell on this for the time being: the 386th is working and is ready for further construction. Oh yes, I promised to show the video of the first launch. It is not that impressive: it was shot after thoughtful testing and working with a soldering iron, without much hope of success, with shaking hands on a mobile phone. I posted it in a telegram . And here I will lay out the spoiler of one of the future posts about this computer.
In the next article I will show what the 386th processor is capable of and in more detail compare the capabilities of this computer with modern systems.
All Articles