Making your Google Call Screening based on Voximplant and Dialogflow
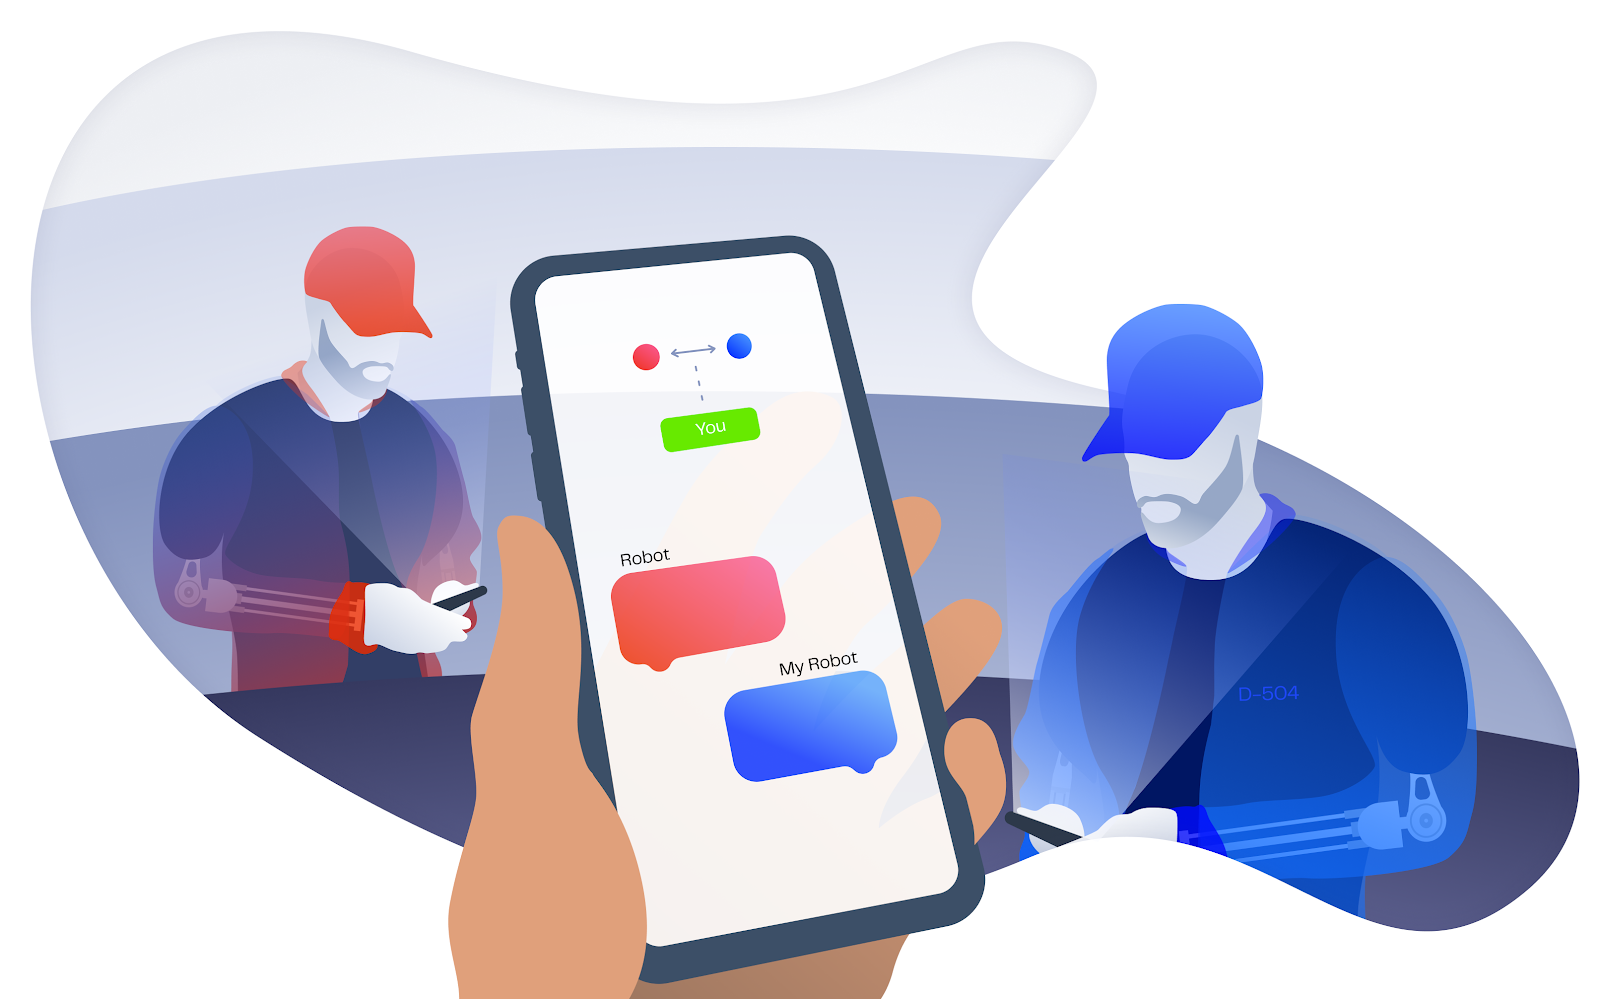
You may have heard or read about the Call Screening feature that Google rolled out for its Pixel phones in the US. The idea is great - when you receive an incoming call, the virtual assistant starts talking, while you see this conversation in the form of a chat and at any time you can start talking instead of an assistant. This is very useful these days, when almost half of the calls are spam , but you do not want to miss important calls from someone not on your contact list. The only catch is that this functionality is only available on the Pixel phone and only in the USA. Well, obstacles exist to overcome them, right? Therefore, we decided to tell how to make such a decision using Voximplant and Dialogflow. I ask for cat.
Architecture
I suggest not to waste time explaining how Voximplant and Dialogflow work, if you wish, you can easily find information on the Internet. So let's get acquainted with the very concept of our Call Screening.
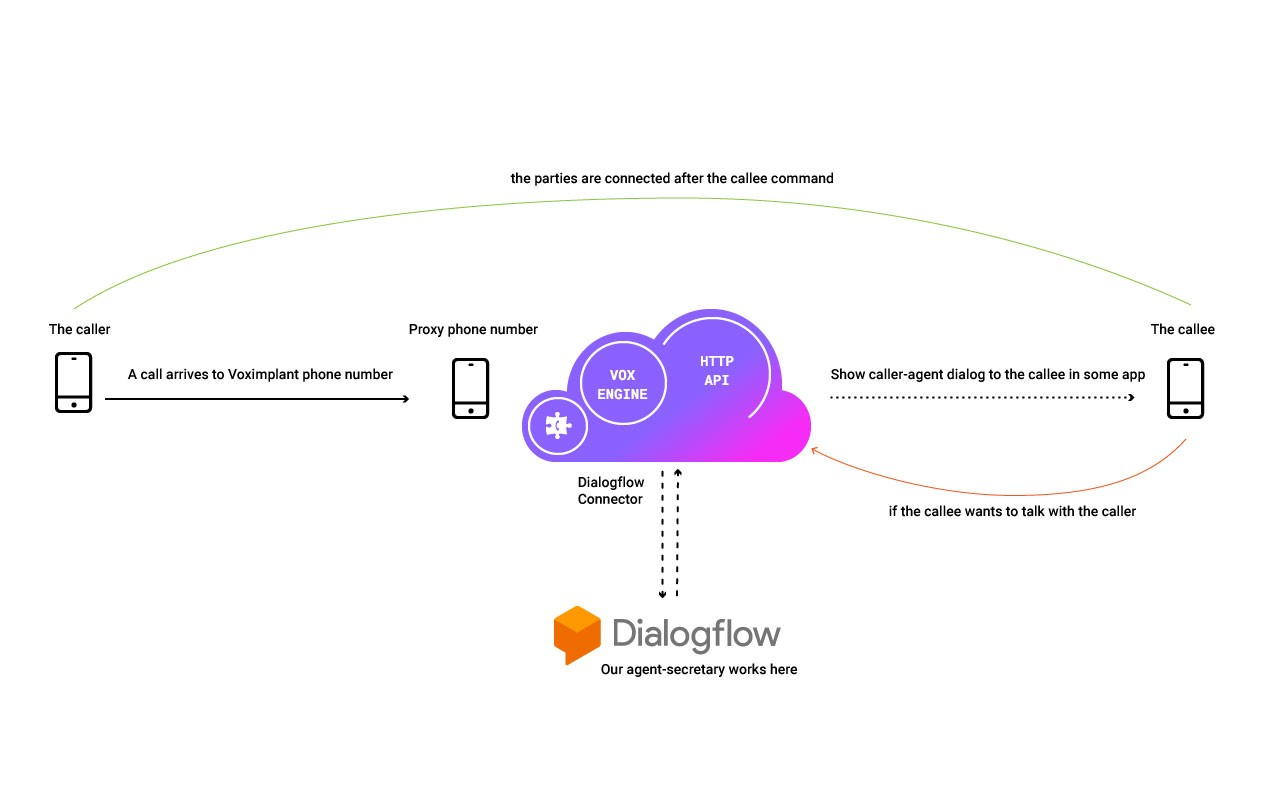
Suppose you already have a phone number that you use daily and that you receive important calls to. In this case, we need a second number, which will be indicated everywhere - in the mail, on a business card, when you fill out online forms, etc. This number will be connected to the natural language processing system (in our case, Dialogflow) and forward calls to your main number only if you want to. In the form of a diagram, it looks like this (the picture is clickable):
Understanding the architecture, we can take up the implementation, but with one caveat: we will not make a mobile application to show a dialogue between Dialogflow and an incoming subscriber, we will create a simple web application with a dialogue renderer to visually show how Call Screening works. In this application there will be an Intervene button, by pressing which Voximplant will connect the incoming subscriber with the dialed subscriber, if the latter decided to talk on his own.
Implementation
Log in to your Voximplant account and create a new application, for example, screening:

Open the "Numbers" section and buy a number that will work as an intermediary:
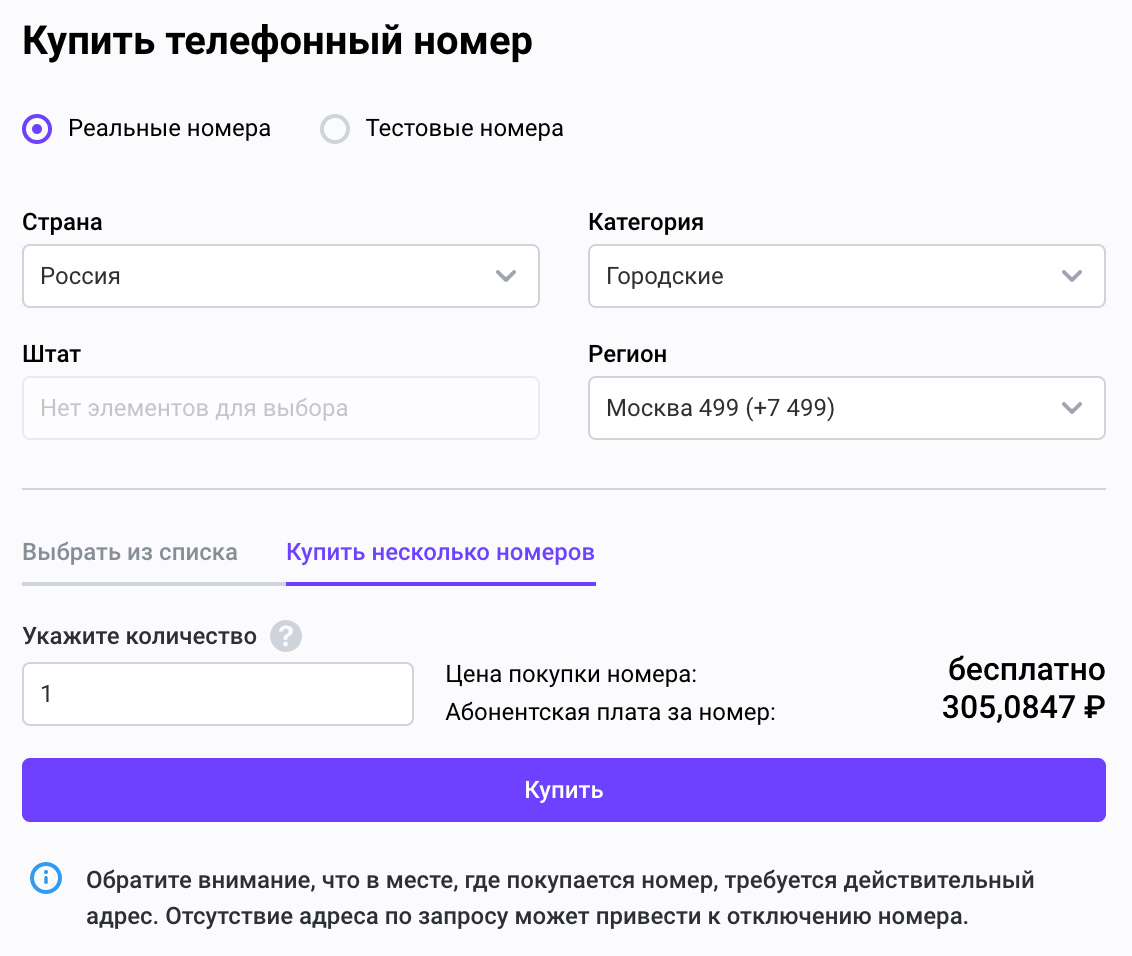
Next, go to the screening application, in the "Numbers" section, the "Available" tab. Here you will see the number you just bought. Attach it to the application using the “Attach” button - in the window that appears, leave all the default values and click “Attach”.
While inside the application, go to the Scripts tab and create a myscreening script - in it we use the code from the article How to use Dialogflow Connector . In this case, the code will be slightly changed, because we need to “see” the dialogue between the caller and the assistant; all code can be taken here .
ATTENTION: you will need to change the value of the server variable to the name of your ngrok server (details about ngrok will be a bit lower). Also, substitute your values on line 31, where your phone number is your main number (for example, your personal mobile number), and voximplant number is the number you recently bought.
outbound_call = VoxEngine.callPSTN(“YOUR PHONE NUMBER”, “VOXIMPLANT NUMBER”)
A callPSTN call will occur at the moment when you decide to break into the conversation and personally chat with the incoming caller.
After you save the script, you need to bind it to the purchased number. To do this, while still inside your application, go to the “Routing” tab to create a new rule - the “New Rule” button in the upper right corner. Specify a name (for example, allcalls), leave the default mask (. * - which means that all incoming calls will be processed by the scripts selected for this rule) and specify the myscreening script.
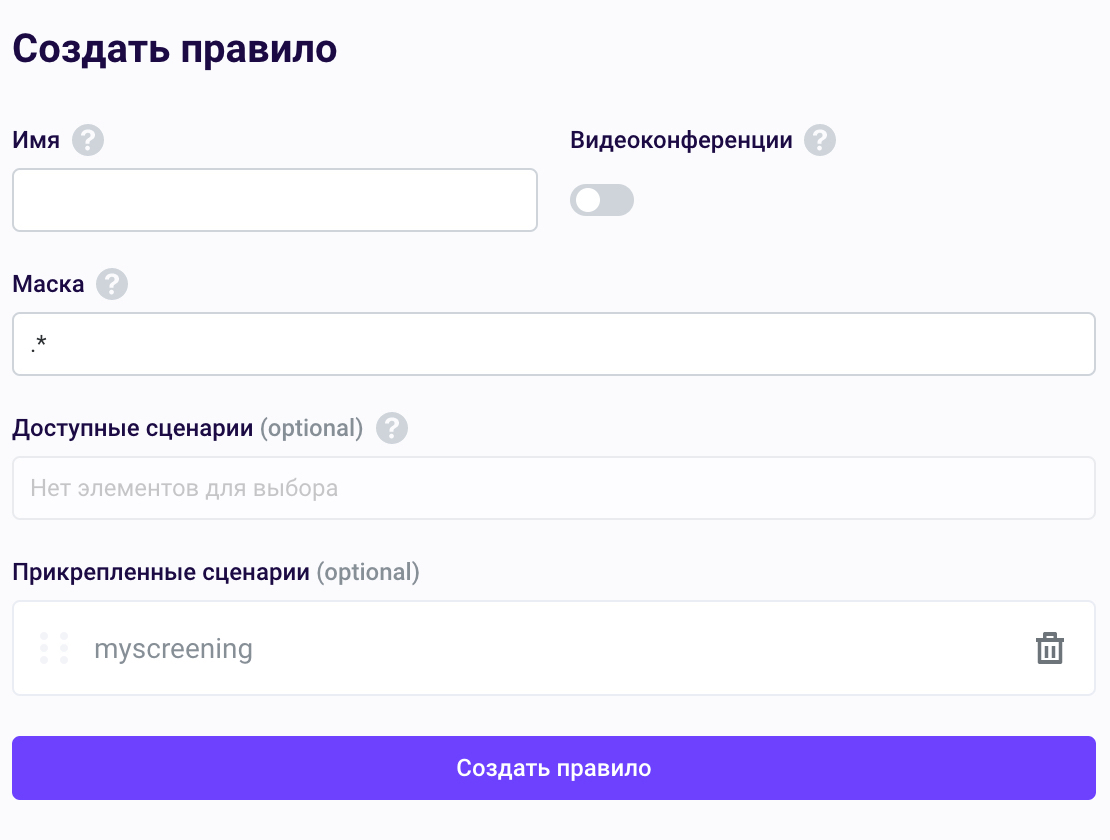
Save the rule.
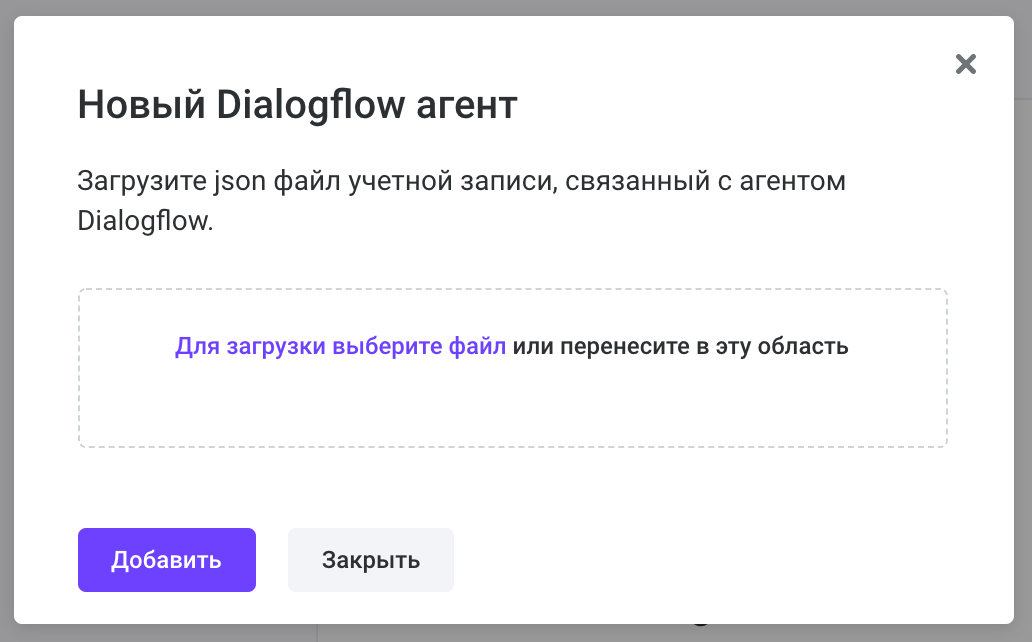
From now on, the phone number is tied to the script. The last thing to do is to attach the bot to the application. To do this, go to the “Dialogflow Connector” tab, click the “Add Dialogflow Agent” button in the upper right corner and upload the JSON file of your Dialogflow agent.
If you need an agent for example / testing, then you can take ours at this link: github.com/aylarov/callscreening/tree/master/dialogflow . Just do not demand much from him, this is just an example that you are free to redo as you like and boldly share the results :)
Simple backend on NodeJS
Let's deploy a simple backend on a node, for example, this:
github.com/aylarov/callscreening/tree/master/nodejs
This is a normal application that requires only two commands to run:
npm install node index.js
The server will start on port 3000 of your machine, so to connect it to the Voximplant cloud, we use the ngrok utility. When you install ngrok , run it with the command:
ngrok http 3000
You will see the domain name that ngrok generated for your local server - copy it and substitute it into the server variable.
Client
The client application looks like a simple chat that you can pick up from here .
Just copy all the files to a directory on your web server and it will work. In the script.js file, replace the server variable with the ngrok domain name, and the callee variable with the number you bought. Save the file and launch the application in a browser. If everything is in order, then you will see a WebSocket connection in the developer panel.
Demo
You can see the application in action on this video:
PS If you click on the Intervene button, then the caller will be directed to my phone number, and if you click on Disconnect, it will be ...? True, the call will be disconnected.
All Articles