Working with hierarchies in lsFusion

In various applications, there is often a need to implement a hierarchical representation of objects. Typically, this is used to classify them by specifying groups. These groups form a tree of dynamic depth, which is then used for navigation, data aggregation, and parameter setting.
In this article, I will show how this logic can be implemented in the open and free lsFusion platform.
As an example, let's take a simple logic in which you need to implement the logic of goods grouped into specific groups that form a hierarchy of dynamic depth. In this case, the goods can be tied to an intermediate node of the tree.
First, according to the standard scheme, declare the Product group entity as a simple flat class with editing forms and a list:
CLASS Group '' ;
|
Now let's make a hierarchy out of groups. To do this, we introduce a property that will contain a link to the parent group:
parent = DATA Group (Group);
|
Next, we make a property that will recursively determine the relationship between two groups:
level '' (Group child, Group parent) =
|
On what principle the RECURSION operator works , I will not describe in this article, but the level property will return 2 to the degree “path length between child and parent in the corresponding directional tree”. MATERIALIZED indicates that the platform should store it in a separate table, where for each pair of connected nodes there will be a separate record with the level value in the corresponding column. With any change in the structure of the tree, this table will be automatically recounted.
For example, for such a tree:

The table will look like this:
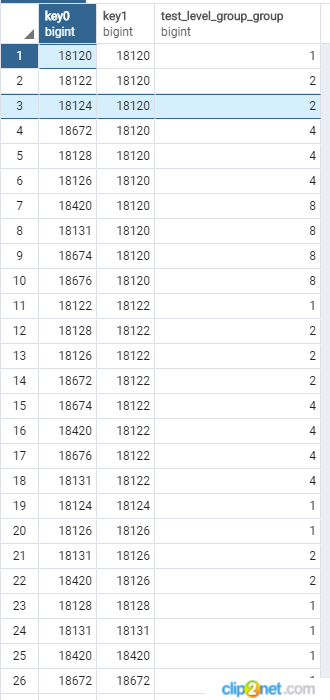
In it, key0 is the descendant code, and key1 is the parent code. The number of entries in this table will be approximately equal to the number of groups times the average depth of the tree. Such a storage scheme will be useful in that if you need to count all the descendants of the group, you don’t have to resort to CTE requests, but you can use the usual JOIN for this table.
Further, based on the constructed property, you can calculate the canonical name of the group:
canonicalName ' ' (Group group) =
|
For example, for the Milk group in the above picture, the canonical name would be All / Groceries / Dairy / Milk . CHARWIDTH is specified in order to tell the platform what width to use for this property (in characters) when building the interface.
Now we will expand the form for viewing and editing groups with newly created properties:
EXTEND FORM group
|
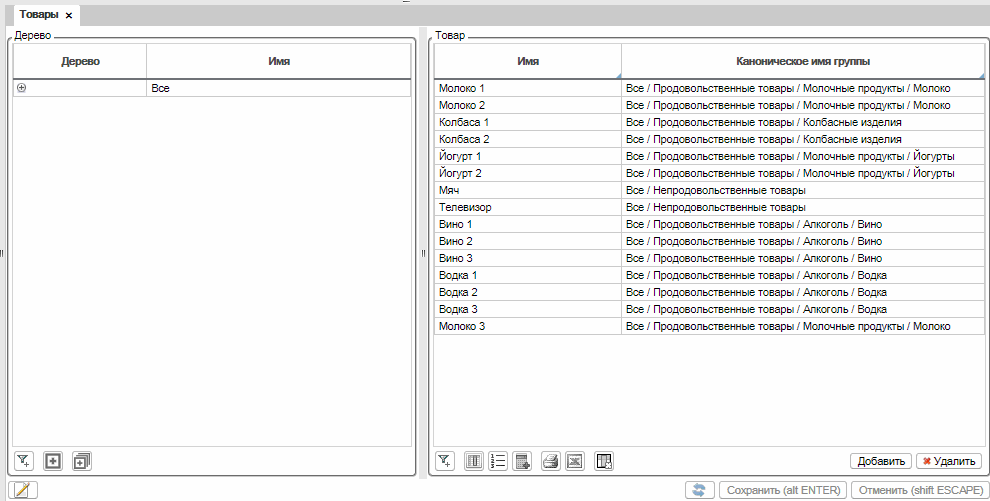
A form with a list of groups in a flat form will look like this:

After the logic of the groups is completed, add the entity Product :
CLASS Product '' ;
|
Create a product link to the product group to which it belongs:
group '' = DATA Group (Product);
|
Finally, we will create a form for entering goods, in which there will be two elements: a tree of groups and a list of goods. For the selected tree group, only products that belong to any descendant of the selected node will be displayed in the list. First, declare a form and add a tree to it with a list of groups:
FORM products ''
|
Using the TREE command, a tree is created from objects of the Group class, the hierarchy of which is determined by the previously created parent property.
Add the form to the navigator:
NAVIGATOR {
|
In this example, input and editing of goods will be carried out not through separate dialogs, but directly in the form itself. To do this, create an action to create a product with reference to the selected group:
newProduct '' (Group g) {
|
Now, on the previously created form, add the list of products with editable columns:
EXTEND FORM products
|
Throw on the form buttons for adding and removing goods:
EXTEND FORM products
|
Since the action newProduct is defined for a group of products, it must be explicitly specified that it should be added to the toolbar with the list of products (p).
It remains to configure the design so that the tree is displayed on the left, and the list of products is displayed on the right, and between them there is a separator, with which you can resize objects:
DESIGN products {
|
The final form will look like this:
After the hierarchy of products and groups is created, often there is a need to set some parameter at any of the levels. Moreover, the lower the hierarchy level is specified, the higher its value. For example, if the Dairy group is set to 30, and the Milk group is set to 20, then the last one should be selected.
Suppose you want to define the premium option in this way. To do this, first create the appropriate property for the group:
markup ', %' = DATA NUMERIC [ 10 , 2 ] (Group);
|
In order to find the desired value, just use the grouping with the choice of the last value:
parentMarkup ' ( ), %' (Group child) =
|
Translated into ordinary language, this expression finds ( GROUP ) the last ( LAST ) markup on the top group ( Group parent ), in decreasing order of distance to it ( ORDER DESC level (child, parent) ), for which this markup given ( WHERE markup (parent) ). Here I want to note how lsFusion corresponds to the natural language.
Add the properties created above to the product form in the group tree:
EXTEND FORM products
|
Suppose that there is a need to set a premium directly for a product, and that it should be higher than the premium for the group. To do this, first create the primary property for the product:
dataMarkup ' , %' = DATA NUMERIC [ 10 , 2 ] (Product);
|
Then we declare a property that will return the premium from the product, if one is specified, or the premium from the group:
markup ', %' (Product p) = OVERRIDE dataMarkup(p), parentMarkup(group(p));
|
After that, add both properties to the form:
EXTEND FORM products
|
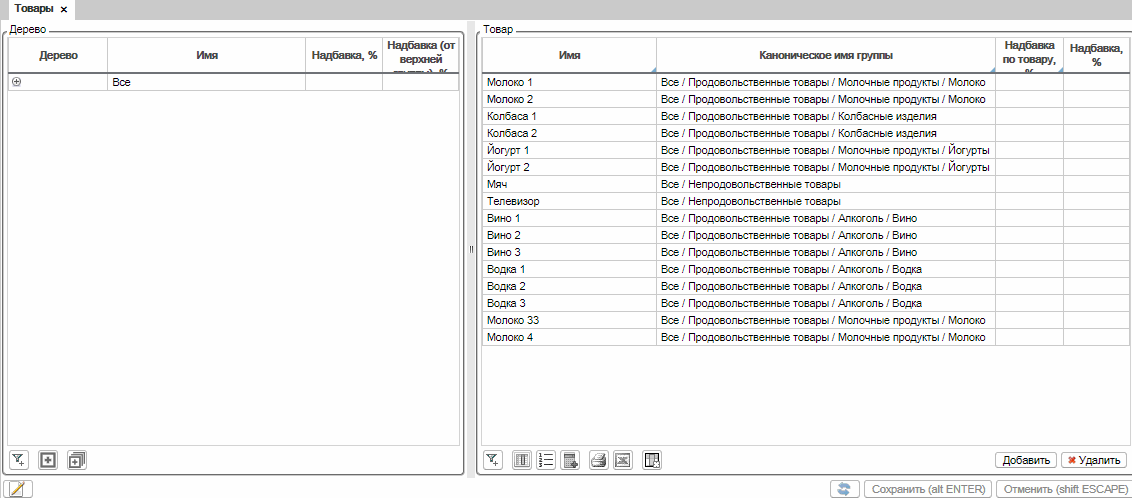
The mechanism for setting premiums for groups and products will look like this:
Conclusion
In the above article, we were able to create the logic of the goods, combine them into groups with a hierarchy of dynamic depth, and also provide the user with the ability to set premiums at any level. All this took about 70 significant lines of code. You can try how it works online, as well as make your changes to the code, in the corresponding section of the site (Platform tab). Here is all the source code that you need to paste into the appropriate field:
Source
CLASS Group '' ;
|
The template described above can be modified and used in various ways by adding additional parameters to the properties. For example, in one of the implementations of the ERP system, premiums for groups and goods are set in this way not globally, but separately for each type of price. Moreover, the implementation in complexity is no different from the example described above.
All Articles