An easy and safe way to automate canary deployments with Helm

Canary deployment is a very effective way to test new code on a subset of users. It significantly reduces the traffic load, which can cause problems during the deployment process, as it occurs only within a certain subgroup. This article is devoted to how to organize a similar deployment using Kubernetes and deployment automation. It is assumed that you know something about Helm and Kubernetes resources .
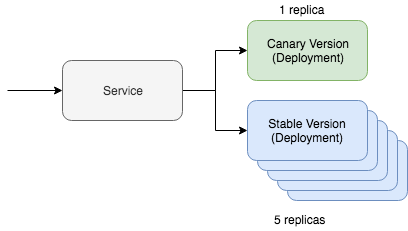
Kubernetes’s simple canary deployment includes two key resources: the service itself and the deployment tool. The canary deployment works through one service, which interacts with two different resources that serve update traffic. One of these resources will work with the "canary" version, and the second with the stable one. In this situation, we can adjust the number of canary versions in order to reduce the amount of traffic required for maintenance. If, for example, you prefer to use Yaml, then it will look in Kubernetes as follows:
kind: Deployment metadata: name: app-canary labels: app: app spec: replicas: 1 ... image: myapp:canary --- kind: Deployment metadata: name: app labels: app: app spec: replicas: 5 ... image: myapp:stable --- kind: Service selector: app: app # Selector will route traffic to both deployments.
It’s even easier to imagine this option on kubectl, and the Kubernetes documentation even has a full tutorial on this scenario. But the main question of this post is how we are going to automate this process using Helm.
Automation of a canary deployment
First of all, we need the Helm chart map, into which the resources discussed above have already been added. It should look something like this:
~/charts/app ├── Chart.yaml ├── README.md ├── templates │ ├── NOTES.txt │ ├── _helpers.tpl │ ├── deployment.yaml │ └── service.yaml └── values.yaml
The core of Helm is multi-release release management. The stable version is our main stable branch of the project code. But with Helm, we can deploy a canary release with our experimental code. The main thing is to keep the traffic exchange between the stable version and the canary release. We will manage all this using a special selector:
selector: app.kubernetes.io/name: myapp
Our both "canary" and stable deployment resources will indicate this label on the modules. If everything is set up correctly, then during the deployment of the canary version of our Helm chart, we will see that the traffic will be directed to freshly deployed modules. A stable version of this command will look like this:
helm upgrade --install myapp \ --namespace default \ --set app.name=myapp \ # Goes into app.kubernetes.io/name --set app.version=v1 \ # Goes into app.kubernetes.io/version --set image.tag=stable \ --set replicaCount=5
Now let's check out our canary release. To deploy the canary version, we need to remember two things. The release name must be different so that we do not roll up the update on the current stable version. The version and tag must also be different so that we can deploy different code and identify differences by resource labels.
helm upgrade --install myapp-canary \ --namespace default \ --set app.name=myapp \ # Goes into app.kubernetes.io/name --set app.version=v2 \ # Goes into app.kubernetes.io/version --set image.tag=canary \ --set replicaCount=1
That, in fact, is all! If you ping the service, you can see that the canary update routes traffic only part of the time.
If you are looking for deployment automation tools that include the described logic, then check out Deliverybot and the Helm automation tools on GitHub . The Helm charts used to implement the method described above are on Github, right here . In general, this was a theoretical overview of how to implement the deployment of canary versions in practice, with specific concepts and examples.
All Articles