Automation For The Smallest. Part 1.1. Virtualization Basics
The previous article looked at the architecture of a virtualized network, underlay-overlay, the package path between VMs and more.
Roman Gorge was inspired by her and decided to write a review issue on virtualization in general.
In this article we will touch upon (or try to touch upon) the questions: how the virtualization of network functions actually occurs, how the backend of the main products for launching and managing VM is implemented, and how virtual switching works (OVS and Linux bridge).
The topic of virtualization is wide and deep, it is impossible to explain all the details of the work of the hypervisor (and it is not necessary). We will limit ourselves to the minimum set of knowledge necessary to understand the operation of any virtualized solution, not necessarily Telco.

The history of modern virtualization technologies dates back to 1999, when the young company VMware released a product called VMware Workstation. This was a virtualization product for desktop / client applications. Server side virtualization came a bit later in the form of the ESX Server product, which later evolved into ESXi (i means integrated) - this is the same product that is used everywhere in IT and Telco as a server application hypervisor.
On the Opensource side, two major projects brought virtualization to Linux:
Today, VMware ESXi and Linux QEMU / KVM are the two main hypervisors that dominate the market. They are also representatives of two different types of hypervisors:
A discussion of what is better and what is worse is beyond the scope of this article.

Iron producers also had to do their part to ensure acceptable performance.
Perhaps the most important and most widely used is Intel VT (Virtualization Technology) - a set of extensions developed by Intel for its x86 processors that are used for the effective operation of the hypervisor (and in some cases are necessary, for example, KVM will not work without VT turned on -x and without it, the hypervisor is forced to engage in purely software emulation, without hardware acceleration).
Two of these extensions are best known - VT-x and VT-d. The first is important for improving CPU performance during virtualization, as it provides hardware support for some of its functions (with VT-x 99.9% Guest OS code is executed directly on the physical processor, making outputs for emulation only in the most necessary cases), the second is for connecting physical devices directly to the virtual machine (for forward virtual functions (VF) SRIOV, for example, VT-d must be enabled ).
The next important concept is the difference between full virtualization and para-virtualization.
Full virtualization is good, it allows you to run any operating system on any processor, however, it is extremely inefficient and absolutely not suitable for highly loaded systems.
Para-virtualization, in short, is when Guest OS understands that it is running in a virtual environment and cooperates with the hypervisor to achieve greater efficiency. That is, the guest-hypervisor interface appears.
The vast majority of operating systems used today have support for para-virtualization - in the Linux kernel, this has appeared since the kernel version 2.6.20.
For a virtual machine to work, not only a virtual processor (vCPU) and virtual memory (RAM) are needed; emulation of PCI devices is also required. That is, in fact, it requires a set of drivers for managing virtual network interfaces, disks, etc.
In the Linux KVM hypervisor, this problem was solved by implementing virtio , a framework for developing and using virtualized I / O devices.
Virtio is an additional level of abstraction, which allows you to emulate various I / O devices in a para-virtualized hypervisor, providing a unified and standardized interface to the side of the virtual machine. This allows you to reuse the virtio driver code for various inherently devices. Virtio consists of:
This modularity allows you to change the technologies used in the hypervisor without affecting the drivers in the virtual machine (this point is very important for network acceleration technologies and Cloud solutions in general, but more on that later).
That is, there is a guest-hypervisor connection when the Guest OS “knows” that it is running in a virtual environment.
What does a virtual machine consist of?
There are three main types of virtual resources:
Theoretically, QEMU is able to emulate any type of processor and its corresponding flags and functionality; in practice, they use either the host-model and turn off the flags pointwise before transferring them to Guest OS, or they take named-model and turn on / off flags pointwise.
By default, QEMU will emulate a processor that Guest OS will recognize as QEMU Virtual CPU. This is not the best type of processor, especially if an application running in a virtual machine uses CPU flags for its work. Learn more about the different CPU models in QEMU .
QEMU / KVM also allows you to control the processor topology, the number of threads, cache size, bind vCPU to the physical core and much more.
Whether this is needed for a virtual machine or not depends on the type of application running on Guest OS. For example, it is a well-known fact that for applications that process packets with high PPS, it is important to do CPU pinning , that is, not to allow the physical processor to be transferred to other virtual machines.
Next in line is RAM. From the point of view of Host OS, a virtual machine launched using QEMU / KVM is no different from any other process running in user-space of the operating system. Accordingly, the process of allocating memory to a virtual machine is performed by the same calls in kernel Host OS, as if you launched, for example, a Chrome browser.
From the point of view of the virtual machine, memory has already been allocated to it at the time of its launch, but in reality it is not so, and kernel Host OS allocates new sections of memory to the QEMU / KVM process as the application in Guest OS requests additional memory (although there may also be an exception if you directly specify QEMU / KVM to allocate all the memory to the virtual machine directly at startup).
The memory is allocated not byte by byte, but by a certain size - page . The page size is configurable and theoretically can be any, but in practice the size is 4kB (default), 2MB and 1GB. The last two sizes are called HugePages and are often used to allocate memory for memory intensive virtual machines. The reason for using HugePages in the process of finding a match between the virtual address of page and the physical memory in Translation Lookaside Buffer ( TLB ), which in turn is limited and stores information only about the last used pages. If there is no information about the desired page in the TLB, a process called miss TLB occurs, and you need to use the Host OS processor to find the physical memory cell corresponding to the desired page.
This process is inefficient and slow, so fewer pages of larger size are used.
QEMU / KVM also allows you to emulate various NUMA topologies for Guest OS, take memory for a virtual machine only from a specific NUMA node Host OS, and so on. The most common practice is to take memory for a virtual machine from a NUMA node local to the processors allocated to the virtual machine. The reason is the desire to avoid unnecessary load on the QPI bus connecting the CPU sockets of the physical server (of course, this is logical if your server has 2 or more sockets).
As you know, RAM is called operational memory because its contents disappear when the power is turned off or the operating system is rebooted. To store information, you need persistent storage device (ROM) or persistent storage .
There are two main types of persistent storage:
The virtual machine needs persistent storage , however, how to do it if the virtual machine “lives” in the host OS memory? In short, any guest OS call to the virtual disk controller is intercepted by QEMU / KVM and transformed into a record on the host OS physical disk. This method is inefficient, and therefore, here, as well as for network devices, the virtio driver is used instead of fully emulating an IDE or iSCSI device. Read more about this here . Thus, the virtual machine accesses its virtual disk through a virtio driver, and then QEMU / KVM makes the transferred information written to the physical disk. It is important to understand that in Host OS, a disk backend can be implemented as a CEPH, NFS, or iSCSI shelf.
The easiest way to emulate persistent storage is to use the file in some directory of Host OS as the disk space of a virtual machine. QEMU / KVM supports many different formats of this kind of file - raw, vdi, vmdk and others. However, the most widely used format is qcow2 (QEMU copy-on-write version 2). In general, qcow2 is a structured file in a certain way without any operating system. A large number of virtual machines are distributed in the form of qcow2-images (images) and are a copy of the system disk of a virtual machine, packed in qcow2-format. This has several advantages - qcow2 encoding takes up much less space than a raw copy of a byte to byte disk, QEMU / KVM can resize a qcow2 file, which means it is possible to change the size of a virtual machine’s system disk, and AES qcow2 encryption is also supported (this makes sense, since the image of a virtual machine may contain intellectual property).
Further, when the virtual machine starts, QEMU / KVM uses the qcow2 file as a system disk (I omit the process of loading the virtual machine here, although this is also an interesting task), and the virtual machine has the ability to read / write data to the qcow2 file via virtio -driver. Thus, the process of taking images of virtual machines works, since at any time the qcow2 file contains a full copy of the system disk of the virtual machine, and the image can be used for backup, transfer to another host, and more.
In general, this qcow2 file will be defined in the Guest OS as a / dev / vda device , and Guest OS will partition the disk space into partitions and install the file system. Similarly, the following qcow2 files, connected by QEMU / KVM as / dev / vdX devices, can be used as block storage in a virtual machine to store information (this is how the Openstack Cinder component works).
Last on our list of virtual resources are network cards and I / O devices. A virtual machine, like a physical host, needs a PCI / PCIe bus to connect I / O devices. QEMU / KVM is able to emulate different types of chipsets - q35 or i440fx (the first supports PCIe, the second supports legacy PCI), as well as various PCI topologies, for example, create separate PCI buses (PCI expander bus) for NUMA nodes Guest OS.
After creating the PCI / PCIe bus, you must connect an I / O device to it. In general, it can be anything from a network card to a physical GPU. And, of course, a network card, both fully virtualized (fully e1000 virtualized interface, for example), and para-virtualized (virtio, for example) or a physical NIC. The last option is used for data-plane virtual machines where you need to get line-rate packet transfer rates - routers, firewalls, etc.
There are two main approaches here - PCI passthrough and SR-IOV . The main difference between them is that for PCI-PT, the driver is used only inside Guest OS, and for SRIOV, the Host OS driver (for creating VF - Virtual Functions ) and the Guest OS driver are used to control SR-IOV VF. Juniper wrote excellent details about PCI-PT and SRIOV.

Thus, we examined the main types of virtual resources and the next step is to understand how the virtual machine communicates with the outside world through a network.
If there is a virtual machine, and it has a virtual interface, then, obviously, the problem arises of transferring a packet from one VM to another. In Linux-based hypervisors (KVM, for example), this problem can be solved using the Linux bridge, however, the Open vSwitch (OVS) project has gained widespread acceptance.
There are several core functionalities that have enabled OVS to spread widely and become the de-facto basic packet switching method used in many cloud computing platforms (such as Openstack) and virtualized solutions.
OVS architecture at first glance looks pretty scary, but it is only at first glance.
To work with OVS, you need to understand the following:
How does the network device of a virtual machine end up in OVS?
To solve this problem, we need to somehow interconnect the virtual interface located in the user-space of the operating system with the datapath OVS located in kernel.
In the Linux operating system, packets are transferred between the kernel and user-space processes through two special interfaces. Both interfaces are used to write / read a packet to / from a special file for transferring packets from a user-space process to kernel and vice versa - file descriptor (FD) (this is one of the reasons for poor virtual switching performance if datapath OVS is in kernel - each packet need to write / read through FD)
That is why when the virtual machine is running in Host OS, you can see the created TAP interfaces with the ip link or ifconfig command - this is the “response” part of virtio, which is “visible” in kernel Host OS. It is also worth noting that the TAP interface has the same MAC address as the virtio interface in the virtual machine.
The TAP interface can be added to OVS using the ovs-vsctl commands - then any package switched by OVS to the TAP interface will be transferred to the virtual machine via file descriptor.
Now, if we need to be able to transfer packets between two or more virtual machines that are running on the same hypervisor, we only need to create an OVS bridge and add TAP interfaces to it using the ovs-vsctl commands. Which teams are needed for this are easily googled.
There may be several OVS bridges on the hypervisor, for example, this is how Openstack Neutron works, or virtual machines can be in different namespace to implement multi-tenancy.
And if the virtual machines are in different OVS bridges?
To solve this problem, there is another tool - veth pair . Veth pair can be represented as a pair of network interfaces connected by a cable - all that "flies" into one interface, "flies" from another. Veth pair is used to connect several OVS bridges or Linux bridges to each other. Another important point is that the parts of the veth pair can be in different namespace Linux OS, that is, the veth pair can also be used to communicate the namespace with each other at the network level.
In the previous chapters we examined the theoretical foundations of virtualization, in this chapter we will talk about the tools that are available to the user directly for starting and changing virtual machines on the KVM hypervisor.
Let us dwell on three main components that cover 90 percent of all kinds of operations with virtual machines:
libvirt is a large-scale open-source project that develops a set of tools and drivers for managing hypervisors. It supports not only QEMU / KVM, but also ESXi, LXC and much more.
The main reason for its popularity is a structured and intuitive interface for interacting through a set of XML files, plus the possibility of automation through an API. It should be noted that libvirt does not describe all the possible functions of the hypervisor, it only provides a convenient interface for using the hypervisor functions that are useful , from the point of view of project participants.
And yes, libvirt is the de facto standard in the virtualization world today. Just take a look at the list of applications that use libvirt.

The good news about libvirt is that all the necessary packages are already preinstalled in all the most frequently used Host OS - Ubuntu, CentOS and RHEL, so most likely you won’t have to compile the necessary packages and compile libvirt. In the worst case, you will have to use the appropriate batch installer (apt, yum and the like).
Upon initial installation and startup, libvirt creates Linux bridge virbr0 and its minimal configuration by default.
This Linux bridge will not be connected to any physical interface, however, it can be used to communicate virtual machines within a single hypervisor. Libvirt can certainly be used with OVS, however, for this, the user must create OVS bridges using the appropriate OVS commands.
Any virtual resource needed to create a virtual machine (compute, network, storage) is represented as an object in libvirt. A set of different XML files is responsible for the process of describing and creating these objects.
It does not make much sense to describe the process of creating virtual networks and virtual storages in detail, since this application is well described in the libvirt documentation:
The virtual machine itself with all connected PCI devices is called domain in libvirt terminology. This is also an object inside libvirt , which is described by a separate XML file.
This XML file is, strictly speaking, a virtual machine with all virtual resources - RAM, processor, network devices, disks, and more. Often this XML file is called libvirt XML or dump XML.
It is unlikely that there will be a person who understands all the parameters of libvirt XML, however, this is not required when there is documentation.
In general, libvirt XML for Ubuntu Desktop Guest OS will be quite simple - 40-50 lines. Since all performance optimization is also described in libvirt XML (NUMA topology, CPU topologies, CPU pinning, etc.), libvirt XML can be very complex for network functions and contain several hundred lines. Any manufacturer of network devices that ships their software as virtual machines has recommended examples of libvirt XML.
The virsh utility is a “native” command line for managing libvirt. Its main purpose is to manage libvirt objects described as XML files. Typical examples are start, stop, define, destroy, and so on. That is, the life cycle of objects - life-cycle management.
A description of all virsh commands and flags is also available in the libvirt documentation.
Another utility that is used to interact with libvirt. One of the main advantages is that you don’t have to deal with the XML format, but get by with the flags available in virsh-install. The second important point is the sea of examples and information on the Web.
Thus, no matter what utility you use, it will ultimately be libvirt that controls the hypervisor, so it is important to understand the architecture and principles of its operation.
In this article, we examined the minimum set of theoretical knowledge that is necessary for working with virtual machines. I intentionally did not give practical examples and conclusions of the teams, since such examples can be found as many as you like on the Web, and I did not set myself the task of writing a “step-by-step guide”. If you are interested in a specific topic or technology, leave your comments and write questions.
Roman Gorge was inspired by her and decided to write a review issue on virtualization in general.
In this article we will touch upon (or try to touch upon) the questions: how the virtualization of network functions actually occurs, how the backend of the main products for launching and managing VM is implemented, and how virtual switching works (OVS and Linux bridge).
The topic of virtualization is wide and deep, it is impossible to explain all the details of the work of the hypervisor (and it is not necessary). We will limit ourselves to the minimum set of knowledge necessary to understand the operation of any virtualized solution, not necessarily Telco.
Content
- Introduction and a brief history of virtualization
- Types of virtual resources - compute, storage, network
- Virtual switching
- Virtualization tools - libvirt, virsh and more
- Conclusion
Introduction and a brief history of virtualization
The history of modern virtualization technologies dates back to 1999, when the young company VMware released a product called VMware Workstation. This was a virtualization product for desktop / client applications. Server side virtualization came a bit later in the form of the ESX Server product, which later evolved into ESXi (i means integrated) - this is the same product that is used everywhere in IT and Telco as a server application hypervisor.
On the Opensource side, two major projects brought virtualization to Linux:
- KVM (Kernel-based Virtual Machine) is a Linux kernel module that allows kernel to work as a hypervisor (creates the necessary infrastructure for launching and managing VMs). It was added in kernel version 2.6.20 in 2007.
- QEMU (Quick Emulator) - directly emulates hardware for a virtual machine (CPU, Disk, RAM, anything including a USB port) and is used in conjunction with KVM to achieve almost "native" performance.
In fact, at the moment, all the functionality of KVM is available in QEMU, but this is not important, since most Linux virtualization users do not directly use KVM / QEMU, but access them through at least one level of abstraction, but more on that later.
Today, VMware ESXi and Linux QEMU / KVM are the two main hypervisors that dominate the market. They are also representatives of two different types of hypervisors:
- Type 1 - the hypervisor runs directly on the hardware (bare-metal). This is VMware ESXi, Linux KVM, Hyper-V
- Type 2 - the hypervisor is launched inside the Host OS (operating system). This is VMware Workstation or Oracle VirtualBox.
A discussion of what is better and what is worse is beyond the scope of this article.
Iron producers also had to do their part to ensure acceptable performance.
Perhaps the most important and most widely used is Intel VT (Virtualization Technology) - a set of extensions developed by Intel for its x86 processors that are used for the effective operation of the hypervisor (and in some cases are necessary, for example, KVM will not work without VT turned on -x and without it, the hypervisor is forced to engage in purely software emulation, without hardware acceleration).
Two of these extensions are best known - VT-x and VT-d. The first is important for improving CPU performance during virtualization, as it provides hardware support for some of its functions (with VT-x 99.9% Guest OS code is executed directly on the physical processor, making outputs for emulation only in the most necessary cases), the second is for connecting physical devices directly to the virtual machine (for forward virtual functions (VF) SRIOV, for example, VT-d must be enabled ).
The next important concept is the difference between full virtualization and para-virtualization.
Full virtualization is good, it allows you to run any operating system on any processor, however, it is extremely inefficient and absolutely not suitable for highly loaded systems.
Para-virtualization, in short, is when Guest OS understands that it is running in a virtual environment and cooperates with the hypervisor to achieve greater efficiency. That is, the guest-hypervisor interface appears.
The vast majority of operating systems used today have support for para-virtualization - in the Linux kernel, this has appeared since the kernel version 2.6.20.
For a virtual machine to work, not only a virtual processor (vCPU) and virtual memory (RAM) are needed; emulation of PCI devices is also required. That is, in fact, it requires a set of drivers for managing virtual network interfaces, disks, etc.
In the Linux KVM hypervisor, this problem was solved by implementing virtio , a framework for developing and using virtualized I / O devices.
Virtio is an additional level of abstraction, which allows you to emulate various I / O devices in a para-virtualized hypervisor, providing a unified and standardized interface to the side of the virtual machine. This allows you to reuse the virtio driver code for various inherently devices. Virtio consists of:
- Front-end driver - what is in the virtual machine
- Back-end driver - what is in the hypervisor
- Transport driver - what connects the backend and frontend
This modularity allows you to change the technologies used in the hypervisor without affecting the drivers in the virtual machine (this point is very important for network acceleration technologies and Cloud solutions in general, but more on that later).
That is, there is a guest-hypervisor connection when the Guest OS “knows” that it is running in a virtual environment.
If you ever wrote a question in RFP or answered a question in RFP “Is virtio supported in your product?” It was about support for the front-end virtio driver.
Types of virtual resources - compute, storage, network
What does a virtual machine consist of?
There are three main types of virtual resources:
- compute - processor and RAM
- storage - virtual machine system disk and block storage
- network - network cards and input / output devices
Compute
CPU
Theoretically, QEMU is able to emulate any type of processor and its corresponding flags and functionality; in practice, they use either the host-model and turn off the flags pointwise before transferring them to Guest OS, or they take named-model and turn on / off flags pointwise.
By default, QEMU will emulate a processor that Guest OS will recognize as QEMU Virtual CPU. This is not the best type of processor, especially if an application running in a virtual machine uses CPU flags for its work. Learn more about the different CPU models in QEMU .
QEMU / KVM also allows you to control the processor topology, the number of threads, cache size, bind vCPU to the physical core and much more.
Whether this is needed for a virtual machine or not depends on the type of application running on Guest OS. For example, it is a well-known fact that for applications that process packets with high PPS, it is important to do CPU pinning , that is, not to allow the physical processor to be transferred to other virtual machines.
Memory
Next in line is RAM. From the point of view of Host OS, a virtual machine launched using QEMU / KVM is no different from any other process running in user-space of the operating system. Accordingly, the process of allocating memory to a virtual machine is performed by the same calls in kernel Host OS, as if you launched, for example, a Chrome browser.
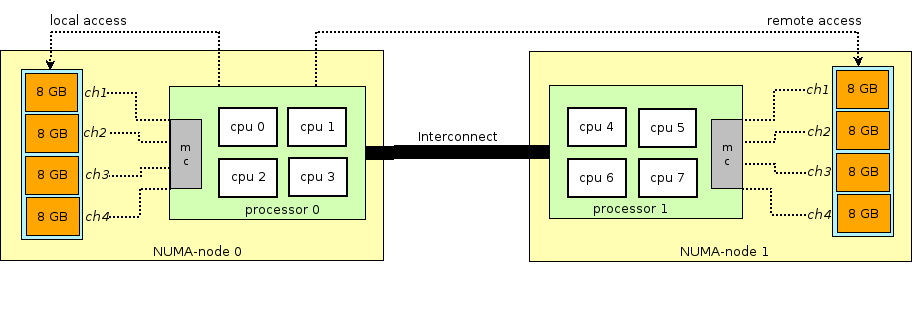
Before continuing the story of RAM in virtual machines, you need to digress and explain the term NUMA - Non-Uniform Memory Access.
The architecture of modern physical servers implies the presence of two or more processors (CPU) and associated random access memory (RAM). Such a bunch of processor + memory is called a node or node. Communication between various NUMA nodes is carried out through a special bus - QPI (QuickPath Interconnect)
Local NUMA node is allocated - when the process running in the operating system uses the processor and RAM located in the same NUMA node, and the remote NUMA node - when the process running in the operating system uses the processor and RAM located in different NUMA nodes, that is, for the interaction of the processor and memory, data transfer via the QPI bus is required.
From the point of view of the virtual machine, memory has already been allocated to it at the time of its launch, but in reality it is not so, and kernel Host OS allocates new sections of memory to the QEMU / KVM process as the application in Guest OS requests additional memory (although there may also be an exception if you directly specify QEMU / KVM to allocate all the memory to the virtual machine directly at startup).
The memory is allocated not byte by byte, but by a certain size - page . The page size is configurable and theoretically can be any, but in practice the size is 4kB (default), 2MB and 1GB. The last two sizes are called HugePages and are often used to allocate memory for memory intensive virtual machines. The reason for using HugePages in the process of finding a match between the virtual address of page and the physical memory in Translation Lookaside Buffer ( TLB ), which in turn is limited and stores information only about the last used pages. If there is no information about the desired page in the TLB, a process called miss TLB occurs, and you need to use the Host OS processor to find the physical memory cell corresponding to the desired page.
This process is inefficient and slow, so fewer pages of larger size are used.
QEMU / KVM also allows you to emulate various NUMA topologies for Guest OS, take memory for a virtual machine only from a specific NUMA node Host OS, and so on. The most common practice is to take memory for a virtual machine from a NUMA node local to the processors allocated to the virtual machine. The reason is the desire to avoid unnecessary load on the QPI bus connecting the CPU sockets of the physical server (of course, this is logical if your server has 2 or more sockets).
Storage
As you know, RAM is called operational memory because its contents disappear when the power is turned off or the operating system is rebooted. To store information, you need persistent storage device (ROM) or persistent storage .
There are two main types of persistent storage:
- Block storage (block storage) - a block of disk space, which can be used to install the file system and create partitions. If it’s rude, then you can take it as a regular disk.
- Object storage - information can be saved only as an object (file), accessible via HTTP / HTTPS. Typical examples of object storage are AWS S3 or Dropbox.
The virtual machine needs persistent storage , however, how to do it if the virtual machine “lives” in the host OS memory? In short, any guest OS call to the virtual disk controller is intercepted by QEMU / KVM and transformed into a record on the host OS physical disk. This method is inefficient, and therefore, here, as well as for network devices, the virtio driver is used instead of fully emulating an IDE or iSCSI device. Read more about this here . Thus, the virtual machine accesses its virtual disk through a virtio driver, and then QEMU / KVM makes the transferred information written to the physical disk. It is important to understand that in Host OS, a disk backend can be implemented as a CEPH, NFS, or iSCSI shelf.
The easiest way to emulate persistent storage is to use the file in some directory of Host OS as the disk space of a virtual machine. QEMU / KVM supports many different formats of this kind of file - raw, vdi, vmdk and others. However, the most widely used format is qcow2 (QEMU copy-on-write version 2). In general, qcow2 is a structured file in a certain way without any operating system. A large number of virtual machines are distributed in the form of qcow2-images (images) and are a copy of the system disk of a virtual machine, packed in qcow2-format. This has several advantages - qcow2 encoding takes up much less space than a raw copy of a byte to byte disk, QEMU / KVM can resize a qcow2 file, which means it is possible to change the size of a virtual machine’s system disk, and AES qcow2 encryption is also supported (this makes sense, since the image of a virtual machine may contain intellectual property).
Further, when the virtual machine starts, QEMU / KVM uses the qcow2 file as a system disk (I omit the process of loading the virtual machine here, although this is also an interesting task), and the virtual machine has the ability to read / write data to the qcow2 file via virtio -driver. Thus, the process of taking images of virtual machines works, since at any time the qcow2 file contains a full copy of the system disk of the virtual machine, and the image can be used for backup, transfer to another host, and more.
In general, this qcow2 file will be defined in the Guest OS as a / dev / vda device , and Guest OS will partition the disk space into partitions and install the file system. Similarly, the following qcow2 files, connected by QEMU / KVM as / dev / vdX devices, can be used as block storage in a virtual machine to store information (this is how the Openstack Cinder component works).
Network
Last on our list of virtual resources are network cards and I / O devices. A virtual machine, like a physical host, needs a PCI / PCIe bus to connect I / O devices. QEMU / KVM is able to emulate different types of chipsets - q35 or i440fx (the first supports PCIe, the second supports legacy PCI), as well as various PCI topologies, for example, create separate PCI buses (PCI expander bus) for NUMA nodes Guest OS.
After creating the PCI / PCIe bus, you must connect an I / O device to it. In general, it can be anything from a network card to a physical GPU. And, of course, a network card, both fully virtualized (fully e1000 virtualized interface, for example), and para-virtualized (virtio, for example) or a physical NIC. The last option is used for data-plane virtual machines where you need to get line-rate packet transfer rates - routers, firewalls, etc.
There are two main approaches here - PCI passthrough and SR-IOV . The main difference between them is that for PCI-PT, the driver is used only inside Guest OS, and for SRIOV, the Host OS driver (for creating VF - Virtual Functions ) and the Guest OS driver are used to control SR-IOV VF. Juniper wrote excellent details about PCI-PT and SRIOV.
For clarification, it is worth noting that PCI passthrough and SR-IOV are complementary technologies. SR-IOV is a slicing of a physical function into virtual functions. This is done at the host OS level. At the same time, Host OS sees virtual functions as another PCI / PCIe device. What he does next with them is not important.
And PCI-PT is a mechanism for forwarding any Host OS PCI device in Guest OS, including the virtual function created by the SR-IOV device
Thus, we examined the main types of virtual resources and the next step is to understand how the virtual machine communicates with the outside world through a network.
Virtual switching
If there is a virtual machine, and it has a virtual interface, then, obviously, the problem arises of transferring a packet from one VM to another. In Linux-based hypervisors (KVM, for example), this problem can be solved using the Linux bridge, however, the Open vSwitch (OVS) project has gained widespread acceptance.
There are several core functionalities that have enabled OVS to spread widely and become the de-facto basic packet switching method used in many cloud computing platforms (such as Openstack) and virtualized solutions.
- Network state transfer - when migrating a VM between hypervisors, the task arises of transferring ACLs, QoSs, L2 / L3 forwarding tables, and more. And OVS can do it.
- Implementation of the packet transfer mechanism (datapath) in both kernel and user-space
- CUPS (Control / User-plane separation) architecture - allows you to transfer the functionality of packet processing to a specialized chipset (Broadcom and Marvell chipset, for example, can do this), controlling it through the OVS control-plane.
- Support for remote traffic control methods - OpenFlow protocol (hi, SDN).
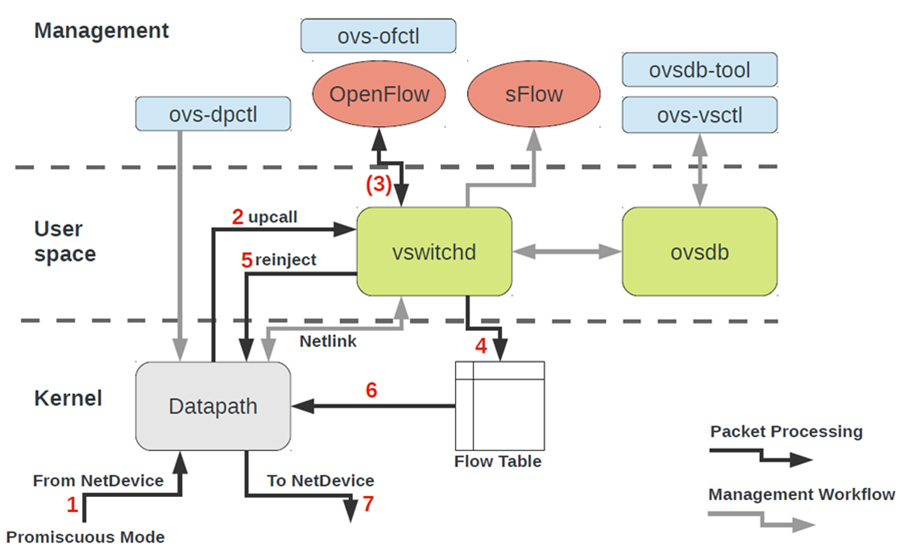
OVS architecture at first glance looks pretty scary, but it is only at first glance.
To work with OVS, you need to understand the following:
- Datapath - packages are processed here. The analogy is the switch-fabric of an iron switch. Datapath includes receiving packets, processing headers, matching matches in the flow table, which is already programmed in Datapath. If OVS runs in kernel, then it is implemented as a kernel module. If OVS runs in user-space, then this is a process in user-space Linux.
- vswitchd and ovsdb are daemons in user-space, which directly implements the functionality of the switch, stores the configuration, sets flow to the datapath and programs it.
- OVS setup and troubleshoot toolkit - ovs-vsctl, ovs-dpctl, ovs-ofctl, ovs-appctl . All that is needed to register port configuration in ovsdb, register which flow should be switched to, collect statistics and so on. Good people wrote an article about this.
How does the network device of a virtual machine end up in OVS?
To solve this problem, we need to somehow interconnect the virtual interface located in the user-space of the operating system with the datapath OVS located in kernel.
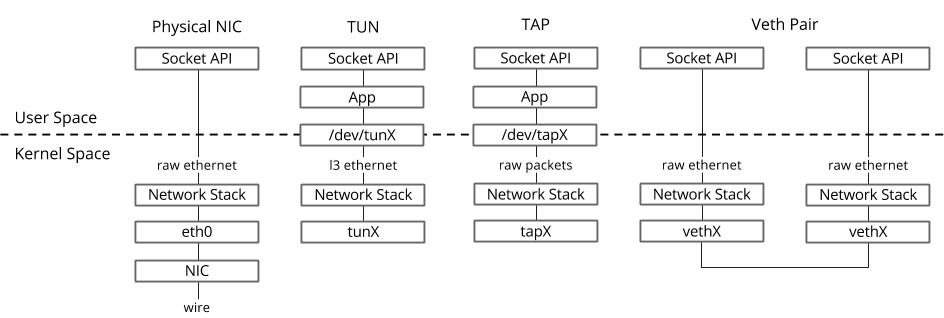
In the Linux operating system, packets are transferred between the kernel and user-space processes through two special interfaces. Both interfaces are used to write / read a packet to / from a special file for transferring packets from a user-space process to kernel and vice versa - file descriptor (FD) (this is one of the reasons for poor virtual switching performance if datapath OVS is in kernel - each packet need to write / read through FD)
- TUN (tunnel) - a device working in L3 mode and allowing to write / read only IP packets to / from FD.
- TAP (network tap) - the same as the tun interface + can perform operations with Ethernet frames, i.e. work in L2 mode.
That is why when the virtual machine is running in Host OS, you can see the created TAP interfaces with the ip link or ifconfig command - this is the “response” part of virtio, which is “visible” in kernel Host OS. It is also worth noting that the TAP interface has the same MAC address as the virtio interface in the virtual machine.
The TAP interface can be added to OVS using the ovs-vsctl commands - then any package switched by OVS to the TAP interface will be transferred to the virtual machine via file descriptor.
The actual procedure for creating a virtual machine may be different, i.e. First, you can create an OVS bridge, then tell the virtual machine to create an interface connected to this OVS, or vice versa.
Now, if we need to be able to transfer packets between two or more virtual machines that are running on the same hypervisor, we only need to create an OVS bridge and add TAP interfaces to it using the ovs-vsctl commands. Which teams are needed for this are easily googled.
There may be several OVS bridges on the hypervisor, for example, this is how Openstack Neutron works, or virtual machines can be in different namespace to implement multi-tenancy.
And if the virtual machines are in different OVS bridges?
To solve this problem, there is another tool - veth pair . Veth pair can be represented as a pair of network interfaces connected by a cable - all that "flies" into one interface, "flies" from another. Veth pair is used to connect several OVS bridges or Linux bridges to each other. Another important point is that the parts of the veth pair can be in different namespace Linux OS, that is, the veth pair can also be used to communicate the namespace with each other at the network level.
Virtualization tools - libvirt, virsh and more
In the previous chapters we examined the theoretical foundations of virtualization, in this chapter we will talk about the tools that are available to the user directly for starting and changing virtual machines on the KVM hypervisor.
Let us dwell on three main components that cover 90 percent of all kinds of operations with virtual machines:
- libvirt
- virsh CLI
- virt-install
Of course, there are many other utilities and CLI commands that allow you to control the hypervisor, for example, you can directly use the qemu_system_x86_64 commands or the virt manager GUI, but this is more of an exception. In addition, the existing Cloud platforms, Openstack, for example, use just libvirt.
libvirt
libvirt is a large-scale open-source project that develops a set of tools and drivers for managing hypervisors. It supports not only QEMU / KVM, but also ESXi, LXC and much more.
The main reason for its popularity is a structured and intuitive interface for interacting through a set of XML files, plus the possibility of automation through an API. It should be noted that libvirt does not describe all the possible functions of the hypervisor, it only provides a convenient interface for using the hypervisor functions that are useful , from the point of view of project participants.
And yes, libvirt is the de facto standard in the virtualization world today. Just take a look at the list of applications that use libvirt.
The good news about libvirt is that all the necessary packages are already preinstalled in all the most frequently used Host OS - Ubuntu, CentOS and RHEL, so most likely you won’t have to compile the necessary packages and compile libvirt. In the worst case, you will have to use the appropriate batch installer (apt, yum and the like).
Upon initial installation and startup, libvirt creates Linux bridge virbr0 and its minimal configuration by default.
That is why when installing Ubuntu Server, for example, you will see in the output of the ifconfig Linux bridge virbr0 command - this is the result of running the libvirtd daemon
This Linux bridge will not be connected to any physical interface, however, it can be used to communicate virtual machines within a single hypervisor. Libvirt can certainly be used with OVS, however, for this, the user must create OVS bridges using the appropriate OVS commands.
Any virtual resource needed to create a virtual machine (compute, network, storage) is represented as an object in libvirt. A set of different XML files is responsible for the process of describing and creating these objects.
It does not make much sense to describe the process of creating virtual networks and virtual storages in detail, since this application is well described in the libvirt documentation:
The virtual machine itself with all connected PCI devices is called domain in libvirt terminology. This is also an object inside libvirt , which is described by a separate XML file.
This XML file is, strictly speaking, a virtual machine with all virtual resources - RAM, processor, network devices, disks, and more. Often this XML file is called libvirt XML or dump XML.
It is unlikely that there will be a person who understands all the parameters of libvirt XML, however, this is not required when there is documentation.
In general, libvirt XML for Ubuntu Desktop Guest OS will be quite simple - 40-50 lines. Since all performance optimization is also described in libvirt XML (NUMA topology, CPU topologies, CPU pinning, etc.), libvirt XML can be very complex for network functions and contain several hundred lines. Any manufacturer of network devices that ships their software as virtual machines has recommended examples of libvirt XML.
virsh CLI
The virsh utility is a “native” command line for managing libvirt. Its main purpose is to manage libvirt objects described as XML files. Typical examples are start, stop, define, destroy, and so on. That is, the life cycle of objects - life-cycle management.
A description of all virsh commands and flags is also available in the libvirt documentation.
virt-install
Another utility that is used to interact with libvirt. One of the main advantages is that you don’t have to deal with the XML format, but get by with the flags available in virsh-install. The second important point is the sea of examples and information on the Web.
Thus, no matter what utility you use, it will ultimately be libvirt that controls the hypervisor, so it is important to understand the architecture and principles of its operation.
Conclusion
In this article, we examined the minimum set of theoretical knowledge that is necessary for working with virtual machines. I intentionally did not give practical examples and conclusions of the teams, since such examples can be found as many as you like on the Web, and I did not set myself the task of writing a “step-by-step guide”. If you are interested in a specific topic or technology, leave your comments and write questions.
useful links
Thanks
- Alexander Shalimov , my colleague and expert in the development of virtual networks. For comments and edits.
- Yevgeny Yakovlev, my colleague and expert in the field of virtualization, for comments and corrections.
All Articles