Training Cisco 200-125 CCNA v3.0. Day 27. Introduction to ACL. Part 1
Today we will begin the study of ACL access control list, this topic will take 2 video tutorials. We will consider the configuration of the standard ACL, and in the next video tutorial I will talk about the extended list.
In this lesson we will cover 3 topics. The first - what is an ACL, the second - what is the difference between a standard and an expanded access list, and at the end of the lesson as a laboratory work, we will consider setting up a standard ACL and solving possible problems.
So what is an ACL? If you studied the course from the very first video lesson, then remember how we organized the communication between various network devices.
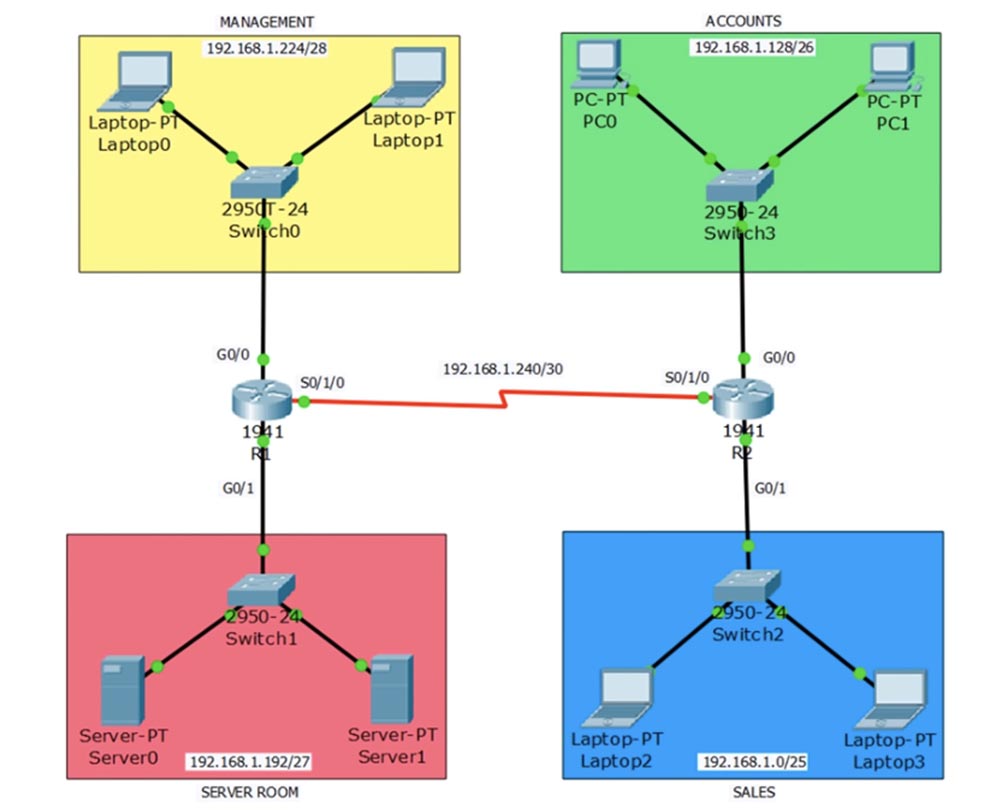
We also studied static routing over different protocols with the goal of acquiring communication skills between devices and networks. Now we have reached the training stage, where we should take care of ensuring traffic control, that is, to prevent the “bad guys” or unauthorized users from penetrating the network. For example, this may concern people from the SALES sales department, which is depicted in this diagram. Here we also show the ACCOUNTS finance department, MANAGEMENT management department and server SERVER ROOM.
So, a hundred employees can work in the sales department, and we don’t want any of them to be able to get to the server via the network. An exception is made for the sales manager who works at Laptop2 computer - he may have access to the server room. A new employee working at Laptop3 should not have this access, that is, if traffic from his computer reaches router R2, he should be dropped.
The role of the ACL is to filter traffic according to the specified filtering parameters. They include the source IP address, destination IP address, protocol, number of ports and other parameters, thanks to which you can identify traffic and perform some actions with it.
So, ACL is a filtering mechanism of the 3rd level of the OSI model. This means that this mechanism is used in routers. The main criterion for filtering is the identification of the data stream. For example, if we want to block the guy with the Laptop3 computer from accessing the server, we must first identify his traffic. This traffic moves in the direction of Laptop-Switch2-R2-R1-Switch1-Server1 through the corresponding interfaces of network devices, while the G0 / 0 interfaces of the routers have nothing to do with it.

To identify traffic, we must identify its path. Having done this, we can decide exactly where to install the filter. You don’t have to worry about the filters themselves, we will discuss them in the next lesson, for now we need to understand the principle to which interface the filter should be applied.
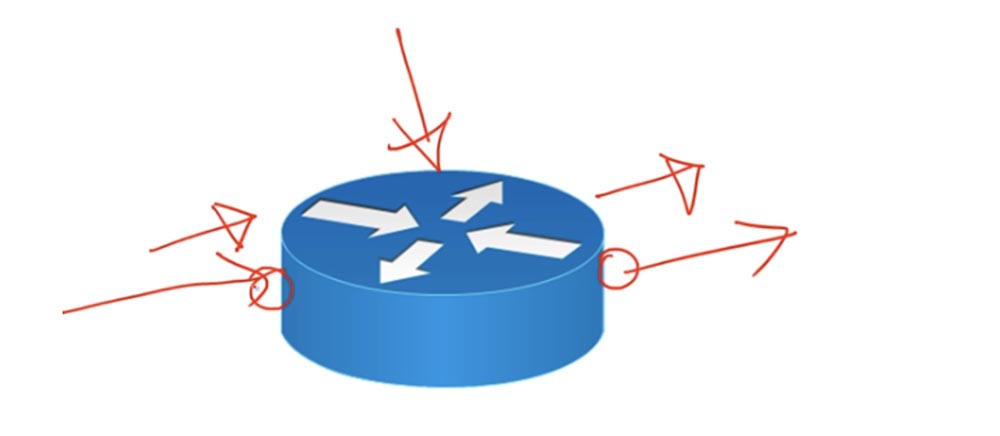
If you look at the router, you can see that each time the traffic moves there is an interface where the data stream enters, and an interface through which this stream flows.
In fact, there are 3 interfaces: the input interface, the output interface, and the router’s own interface. Just remember that filtering can only be applied to the input or output interface.
The principle of ACL operation resembles an admission to an event that can only be visited by those guests whose name is on the list of invited guests. An ACL is a list of qualification parameters that serve to identify traffic. For example, this list indicates that any traffic is allowed from the IP address 192.168.1.10, and traffic from all other addresses is prohibited. As I said, this list can be applied to both the input and output interfaces.
There are 2 types of ACLs: standard and advanced. The standard ACL has an identifier from 1 to 99 or from 1300 to 1999. These are simply the names of lists that have no advantages over each other as the numbering increases. In addition to the number, the ACL can be assigned its own name. Extended ACLs are numbered 100 to 199 or 2000 to 2699 and may also have a name.
In a standard ACL, classification is based on the IP address of the traffic source. Therefore, when using such a list, you cannot limit the traffic directed to any source, you can only block the traffic coming from some device.
The Advanced ACL classifies traffic by source IP address, destination IP address, protocol used, and port number. For example, you can block only FTP traffic, or only HTTP traffic. Today we will look at the standard ACL, and the following video tutorial will devote to the extended lists.
As I said, an ACL is a list of conditions. After you apply this list to the inbound or outbound interface of the router, the router checks the traffic with this list and, if it meets the conditions set forth in the list, decides whether to allow or block this traffic. Often people find it difficult to determine the input and output interfaces of the router, although there is nothing complicated. When we talk about the inbound interface, this means that only incoming traffic will be monitored on this port, and the router will not apply restrictions to outgoing traffic. Similarly, when it comes to the output interface, this means that all the rules will apply only to outgoing traffic, while the incoming traffic on this port will be accepted without restrictions. For example, if the router has 2 ports: f0 / 0 and f0 / 1, then the ACL will be used only for traffic entering the f0 / 0 interface, or only for traffic coming from the f0 / 1 interface. The traffic entering the f0 / 1 interface or coming from the f0 / 0 port will not be affected by the list.

Therefore, do not be confused by the incoming or outgoing direction of the interface, it depends on the direction of movement of specific traffic. So, after the router has checked the traffic for compliance with the ACL conditions, it can take only two solutions: skip traffic or reject it. For example, you can allow traffic directed to address 180.160.1.30 and reject traffic destined for address 192.168.1.10. Each list can contain many conditions, but each of these conditions must allow or deny.
Suppose there is a list:
Deny _______
Allow ________
Allow ________
Deny _________.
First, the router will check the traffic for coincidence with the first condition, if it does not match, with the second condition. If the traffic matches the third condition, the router will stop checking and will not compare it with other conditions of the list. He will perform the “allow” action and proceed to check the next portion of traffic.
In case you didn’t set a rule for any packet and the traffic went through all the lines of the list without falling under any of the conditions, it is destroyed, because each ACL by default ends with the deny any command - that is, drop any packet, not falling under any of the rules. This condition takes effect if there is at least one rule in the list, otherwise it does not apply. But if the first line contains the entry deny 192.168.1.30 and the list will no longer contain any conditions, then the permit any command should be at the end, that is, allow any traffic except that prohibited by the rule. You must take this into account in order to avoid errors when configuring the ACL.
I want you to remember the basic rule for creating an ASL list: place the standard ASL as close as possible to the destination, that is, to the recipient of the traffic, and the extended ASL as close to the source, that is, to the sender of the traffic. These are the recommendations of Cisco, but in practice there are situations when it is more reasonable to place a standard ACL near a traffic source. But if you get a question on the ACL placement rules in the exam, follow the recommendations of Cisco and answer unequivocally: standard - closer to the destination, advanced - closer to the source.
Now let's look at the syntax of a standard ACL. There are two types of command syntax in global router configuration mode: classic syntax and modern syntax.

The classic type of command is access-list <ACL number> <disable / allow> <criteria>. If you specify <ACL number> from 1 to 99, the device will automatically understand that it is standard ACL, and if from 100 to 199, then it is extended. Since we are considering a standard list in today's lesson, we can use any number from 1 to 99. Then we indicate the action that should be applied when the parameters match the criteria specified below - to allow or disable traffic. We will consider the criterion later, since it is also used in modern syntax.
The modern type of command is also used in the global configuration mode Rx (config) and looks like this: ip access-list standard <ACL number / name>. Here you can use either a number from 1 to 99, or the name of an ACL, for example, ACL_Networking. This command immediately puts the system into sub-command mode of the standard Rx mode (config-std-nacl), where it is already necessary to enter <prohibit / allow> <criteria>. The modern type of teams has more advantages than the classic.
In the classic list, if you type access-list 10 deny ______, then type the following command of the same kind for a different criterion and as a result you get 100 such commands, then to change any of the entered commands you will need to delete the entire access- list list 10 with the command no access-list 10. This will delete all 100 commands, because there is no way to edit any single command of this list.
In modern syntax, a command is divided into two lines, the first of which contains a list number. Suppose, if you have an access-list standard 10 deny ________, an access-list standard 20 deny ________, and so on, then you can insert intermediate lists between them with other criteria, for example, access-list standard 15 deny ________.
Alternatively, you can simply delete the access-list standard 20 lines and re-type them with other parameters between the access-list standard 10 and access-list standard 30 lines. Thus, there are various ways to edit the modern ACL syntax.
You need to be very careful about compiling ACLs. As you know, lists are read from top to bottom. If you place a line with the permission of the traffic of a particular host on top, then below you can place a line with the traffic ban of the whole network that this host is a part of, both conditions will be checked - the traffic to a specific host will be passed, and the traffic of all other hosts this network is blocked. Therefore, always place specific records at the top of the list, and general ones at the bottom.
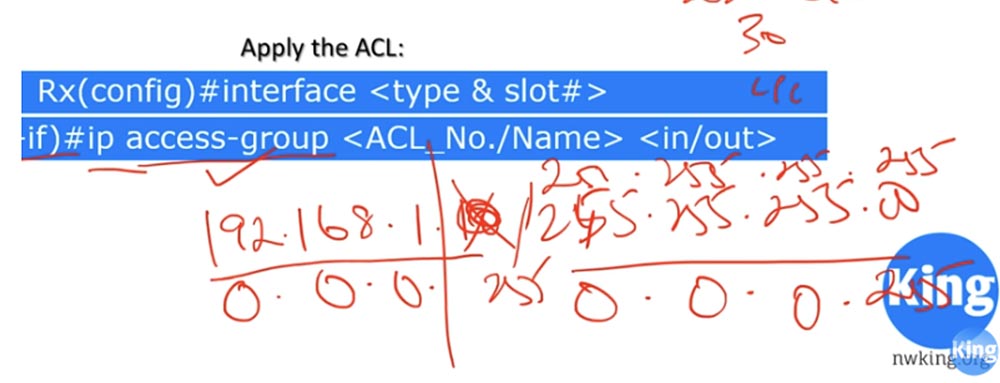
So, after you have created a classic or modern ACL, you must apply it. To do this, go to the settings of a specific interface, for example, f0 / 0 using the interface <type and slot> command, switch to the interface subcommand mode and enter the ip access-group <ACL number / name> <in / out> command. Note the difference: when compiling a list, access-list is used, and when it is used, access-group is used. You must determine which interface the list will be applied to - the interface of the incoming or the interface of the outgoing traffic. If the list has a name, for example, Networking, the same name is repeated in the list application command on this interface.
Now let's take a specific task and try to solve it using the example of our network diagram using Packet Tracer. So, we have 4 networks: sales, accounting, management and server.
Task No. 1: all traffic sent from the sales and finance departments to the management and server departments should be blocked. The lock point is the S0 / 1/0 interface of router R2. First we have to make a list that will contain such entries:

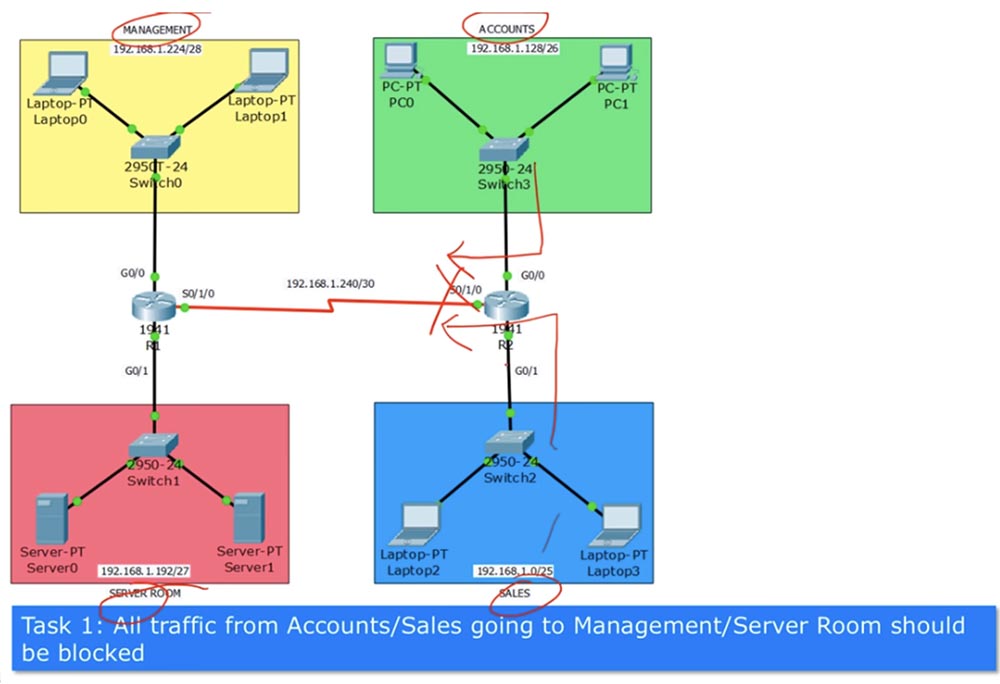
We will call the list “Security Management ACL and Server ACL”, abbreviated ACL Secure_Ma_And_Se. The following is a ban on network traffic from the financial department 192.168.1.128/26, a ban on network traffic from the sales department 192.168.1.0/25 and the resolution of any other traffic. At the end of the list, it is indicated that it is used for the outgoing S0 / 1/0 interface of router R2. If we don’t have a Permit Any entry at the end of the list, then all other traffic will be blocked, because by default, the Deny Any entry is always set at the end of the ACL.
Can I apply this ACL to the G0 / 0 interface? Of course I can, but in this case only traffic from accounting will be blocked, and the traffic of the sales department will not be limited by anything. Similarly, you can apply the ACL to the G0 / 1 interface, but in this case the finance department traffic will not be blocked. Of course, we can create two separate blocking lists for these interfaces, but it is much more efficient to combine them into one list and apply it to the output interface of router R2 or the input interface S0 / 1/0 of router R1.
Although according to Cisco rules, a standard ACL should be placed as close as possible to the destination, I’ll still place it closer to the traffic source, because I want to block all outgoing traffic, and it’s better to do it closer to the source so that this traffic doesn’t occupy the network between two routers.
I forgot to tell you about the criteria, so let's quickly go back. As a criterion, you can specify any - in this case, any traffic from any device and any network will be prohibited or allowed. You can also specify the host with its identifier - in this case, the record will be the IP address of a specific device. Finally, you can specify the whole network, for example, 192.168.1.10/24. In this case, / 24 will indicate the presence of a subnet mask of 255.255.255.0, however, it is not possible to specify the IP address of the subnet mask in the ACL. For this case, the ACL has a concept called Wildcart Mask, or "reverse mask." Therefore, you must provide the IP address and reverse mask. The reverse mask is as follows: you must subtract the direct subnet mask from the general subnet mask, i.e., the number corresponding to the octet value in the direct mask is subtracted from 255.

Thus, as a criterion in the ACL, you should use the parameter 192.168.1.10 0.0.0.255.
How it works? If the reverse mask octet contains 0, then the criterion is considered to match the corresponding octet of the IP address of the subnet. If there is a number in the inverse mask octet, the match is not checked. Thus, for the network 192.168.1.0 and the inverse mask 0.0.0.255, all traffic from addresses whose first three octets are equal to 192.168.1., Regardless of the value of the fourth octet, will be blocked or allowed depending on the specified action.
Using the reverse mask is not difficult, and we will return to the Wildcart Mask in the next video so that I can explain how to work with it.
28:50 min
Thank you for staying with us. Do you like our articles? Want to see more interesting materials? Support us by placing an order or recommending it to your friends, a 30% discount for Habr users on a unique analogue of entry-level servers that was invented by us for you: The whole truth about VPS (KVM) E5-2650 v4 (6 Cores) 10GB DDR4 240GB SSD 1Gbps from $ 20 or how to divide the server? (options are available with RAID1 and RAID10, up to 24 cores and up to 40GB DDR4).
Dell R730xd 2 times cheaper? Only we have 2 x Intel TetraDeca-Core Xeon 2x E5-2697v3 2.6GHz 14C 64GB DDR4 4x960GB SSD 1Gbps 100 TV from $ 199 in the Netherlands! Dell R420 - 2x E5-2430 2.2Ghz 6C 128GB DDR3 2x960GB SSD 1Gbps 100TB - from $ 99! Read about How to Build Infrastructure Bldg. class c using Dell R730xd E5-2650 v4 servers costing 9,000 euros for a penny?
In this lesson we will cover 3 topics. The first - what is an ACL, the second - what is the difference between a standard and an expanded access list, and at the end of the lesson as a laboratory work, we will consider setting up a standard ACL and solving possible problems.
So what is an ACL? If you studied the course from the very first video lesson, then remember how we organized the communication between various network devices.
We also studied static routing over different protocols with the goal of acquiring communication skills between devices and networks. Now we have reached the training stage, where we should take care of ensuring traffic control, that is, to prevent the “bad guys” or unauthorized users from penetrating the network. For example, this may concern people from the SALES sales department, which is depicted in this diagram. Here we also show the ACCOUNTS finance department, MANAGEMENT management department and server SERVER ROOM.
So, a hundred employees can work in the sales department, and we don’t want any of them to be able to get to the server via the network. An exception is made for the sales manager who works at Laptop2 computer - he may have access to the server room. A new employee working at Laptop3 should not have this access, that is, if traffic from his computer reaches router R2, he should be dropped.
The role of the ACL is to filter traffic according to the specified filtering parameters. They include the source IP address, destination IP address, protocol, number of ports and other parameters, thanks to which you can identify traffic and perform some actions with it.
So, ACL is a filtering mechanism of the 3rd level of the OSI model. This means that this mechanism is used in routers. The main criterion for filtering is the identification of the data stream. For example, if we want to block the guy with the Laptop3 computer from accessing the server, we must first identify his traffic. This traffic moves in the direction of Laptop-Switch2-R2-R1-Switch1-Server1 through the corresponding interfaces of network devices, while the G0 / 0 interfaces of the routers have nothing to do with it.
To identify traffic, we must identify its path. Having done this, we can decide exactly where to install the filter. You don’t have to worry about the filters themselves, we will discuss them in the next lesson, for now we need to understand the principle to which interface the filter should be applied.
If you look at the router, you can see that each time the traffic moves there is an interface where the data stream enters, and an interface through which this stream flows.
In fact, there are 3 interfaces: the input interface, the output interface, and the router’s own interface. Just remember that filtering can only be applied to the input or output interface.
The principle of ACL operation resembles an admission to an event that can only be visited by those guests whose name is on the list of invited guests. An ACL is a list of qualification parameters that serve to identify traffic. For example, this list indicates that any traffic is allowed from the IP address 192.168.1.10, and traffic from all other addresses is prohibited. As I said, this list can be applied to both the input and output interfaces.
There are 2 types of ACLs: standard and advanced. The standard ACL has an identifier from 1 to 99 or from 1300 to 1999. These are simply the names of lists that have no advantages over each other as the numbering increases. In addition to the number, the ACL can be assigned its own name. Extended ACLs are numbered 100 to 199 or 2000 to 2699 and may also have a name.
In a standard ACL, classification is based on the IP address of the traffic source. Therefore, when using such a list, you cannot limit the traffic directed to any source, you can only block the traffic coming from some device.
The Advanced ACL classifies traffic by source IP address, destination IP address, protocol used, and port number. For example, you can block only FTP traffic, or only HTTP traffic. Today we will look at the standard ACL, and the following video tutorial will devote to the extended lists.
As I said, an ACL is a list of conditions. After you apply this list to the inbound or outbound interface of the router, the router checks the traffic with this list and, if it meets the conditions set forth in the list, decides whether to allow or block this traffic. Often people find it difficult to determine the input and output interfaces of the router, although there is nothing complicated. When we talk about the inbound interface, this means that only incoming traffic will be monitored on this port, and the router will not apply restrictions to outgoing traffic. Similarly, when it comes to the output interface, this means that all the rules will apply only to outgoing traffic, while the incoming traffic on this port will be accepted without restrictions. For example, if the router has 2 ports: f0 / 0 and f0 / 1, then the ACL will be used only for traffic entering the f0 / 0 interface, or only for traffic coming from the f0 / 1 interface. The traffic entering the f0 / 1 interface or coming from the f0 / 0 port will not be affected by the list.
Therefore, do not be confused by the incoming or outgoing direction of the interface, it depends on the direction of movement of specific traffic. So, after the router has checked the traffic for compliance with the ACL conditions, it can take only two solutions: skip traffic or reject it. For example, you can allow traffic directed to address 180.160.1.30 and reject traffic destined for address 192.168.1.10. Each list can contain many conditions, but each of these conditions must allow or deny.
Suppose there is a list:
Deny _______
Allow ________
Allow ________
Deny _________.
First, the router will check the traffic for coincidence with the first condition, if it does not match, with the second condition. If the traffic matches the third condition, the router will stop checking and will not compare it with other conditions of the list. He will perform the “allow” action and proceed to check the next portion of traffic.
In case you didn’t set a rule for any packet and the traffic went through all the lines of the list without falling under any of the conditions, it is destroyed, because each ACL by default ends with the deny any command - that is, drop any packet, not falling under any of the rules. This condition takes effect if there is at least one rule in the list, otherwise it does not apply. But if the first line contains the entry deny 192.168.1.30 and the list will no longer contain any conditions, then the permit any command should be at the end, that is, allow any traffic except that prohibited by the rule. You must take this into account in order to avoid errors when configuring the ACL.
I want you to remember the basic rule for creating an ASL list: place the standard ASL as close as possible to the destination, that is, to the recipient of the traffic, and the extended ASL as close to the source, that is, to the sender of the traffic. These are the recommendations of Cisco, but in practice there are situations when it is more reasonable to place a standard ACL near a traffic source. But if you get a question on the ACL placement rules in the exam, follow the recommendations of Cisco and answer unequivocally: standard - closer to the destination, advanced - closer to the source.
Now let's look at the syntax of a standard ACL. There are two types of command syntax in global router configuration mode: classic syntax and modern syntax.
The classic type of command is access-list <ACL number> <disable / allow> <criteria>. If you specify <ACL number> from 1 to 99, the device will automatically understand that it is standard ACL, and if from 100 to 199, then it is extended. Since we are considering a standard list in today's lesson, we can use any number from 1 to 99. Then we indicate the action that should be applied when the parameters match the criteria specified below - to allow or disable traffic. We will consider the criterion later, since it is also used in modern syntax.
The modern type of command is also used in the global configuration mode Rx (config) and looks like this: ip access-list standard <ACL number / name>. Here you can use either a number from 1 to 99, or the name of an ACL, for example, ACL_Networking. This command immediately puts the system into sub-command mode of the standard Rx mode (config-std-nacl), where it is already necessary to enter <prohibit / allow> <criteria>. The modern type of teams has more advantages than the classic.
In the classic list, if you type access-list 10 deny ______, then type the following command of the same kind for a different criterion and as a result you get 100 such commands, then to change any of the entered commands you will need to delete the entire access- list list 10 with the command no access-list 10. This will delete all 100 commands, because there is no way to edit any single command of this list.
In modern syntax, a command is divided into two lines, the first of which contains a list number. Suppose, if you have an access-list standard 10 deny ________, an access-list standard 20 deny ________, and so on, then you can insert intermediate lists between them with other criteria, for example, access-list standard 15 deny ________.
Alternatively, you can simply delete the access-list standard 20 lines and re-type them with other parameters between the access-list standard 10 and access-list standard 30 lines. Thus, there are various ways to edit the modern ACL syntax.
You need to be very careful about compiling ACLs. As you know, lists are read from top to bottom. If you place a line with the permission of the traffic of a particular host on top, then below you can place a line with the traffic ban of the whole network that this host is a part of, both conditions will be checked - the traffic to a specific host will be passed, and the traffic of all other hosts this network is blocked. Therefore, always place specific records at the top of the list, and general ones at the bottom.
So, after you have created a classic or modern ACL, you must apply it. To do this, go to the settings of a specific interface, for example, f0 / 0 using the interface <type and slot> command, switch to the interface subcommand mode and enter the ip access-group <ACL number / name> <in / out> command. Note the difference: when compiling a list, access-list is used, and when it is used, access-group is used. You must determine which interface the list will be applied to - the interface of the incoming or the interface of the outgoing traffic. If the list has a name, for example, Networking, the same name is repeated in the list application command on this interface.
Now let's take a specific task and try to solve it using the example of our network diagram using Packet Tracer. So, we have 4 networks: sales, accounting, management and server.
Task No. 1: all traffic sent from the sales and finance departments to the management and server departments should be blocked. The lock point is the S0 / 1/0 interface of router R2. First we have to make a list that will contain such entries:
We will call the list “Security Management ACL and Server ACL”, abbreviated ACL Secure_Ma_And_Se. The following is a ban on network traffic from the financial department 192.168.1.128/26, a ban on network traffic from the sales department 192.168.1.0/25 and the resolution of any other traffic. At the end of the list, it is indicated that it is used for the outgoing S0 / 1/0 interface of router R2. If we don’t have a Permit Any entry at the end of the list, then all other traffic will be blocked, because by default, the Deny Any entry is always set at the end of the ACL.
Can I apply this ACL to the G0 / 0 interface? Of course I can, but in this case only traffic from accounting will be blocked, and the traffic of the sales department will not be limited by anything. Similarly, you can apply the ACL to the G0 / 1 interface, but in this case the finance department traffic will not be blocked. Of course, we can create two separate blocking lists for these interfaces, but it is much more efficient to combine them into one list and apply it to the output interface of router R2 or the input interface S0 / 1/0 of router R1.
Although according to Cisco rules, a standard ACL should be placed as close as possible to the destination, I’ll still place it closer to the traffic source, because I want to block all outgoing traffic, and it’s better to do it closer to the source so that this traffic doesn’t occupy the network between two routers.
I forgot to tell you about the criteria, so let's quickly go back. As a criterion, you can specify any - in this case, any traffic from any device and any network will be prohibited or allowed. You can also specify the host with its identifier - in this case, the record will be the IP address of a specific device. Finally, you can specify the whole network, for example, 192.168.1.10/24. In this case, / 24 will indicate the presence of a subnet mask of 255.255.255.0, however, it is not possible to specify the IP address of the subnet mask in the ACL. For this case, the ACL has a concept called Wildcart Mask, or "reverse mask." Therefore, you must provide the IP address and reverse mask. The reverse mask is as follows: you must subtract the direct subnet mask from the general subnet mask, i.e., the number corresponding to the octet value in the direct mask is subtracted from 255.
Thus, as a criterion in the ACL, you should use the parameter 192.168.1.10 0.0.0.255.
How it works? If the reverse mask octet contains 0, then the criterion is considered to match the corresponding octet of the IP address of the subnet. If there is a number in the inverse mask octet, the match is not checked. Thus, for the network 192.168.1.0 and the inverse mask 0.0.0.255, all traffic from addresses whose first three octets are equal to 192.168.1., Regardless of the value of the fourth octet, will be blocked or allowed depending on the specified action.
Using the reverse mask is not difficult, and we will return to the Wildcart Mask in the next video so that I can explain how to work with it.
28:50 min
Thank you for staying with us. Do you like our articles? Want to see more interesting materials? Support us by placing an order or recommending it to your friends, a 30% discount for Habr users on a unique analogue of entry-level servers that was invented by us for you: The whole truth about VPS (KVM) E5-2650 v4 (6 Cores) 10GB DDR4 240GB SSD 1Gbps from $ 20 or how to divide the server? (options are available with RAID1 and RAID10, up to 24 cores and up to 40GB DDR4).
Dell R730xd 2 times cheaper? Only we have 2 x Intel TetraDeca-Core Xeon 2x E5-2697v3 2.6GHz 14C 64GB DDR4 4x960GB SSD 1Gbps 100 TV from $ 199 in the Netherlands! Dell R420 - 2x E5-2430 2.2Ghz 6C 128GB DDR3 2x960GB SSD 1Gbps 100TB - from $ 99! Read about How to Build Infrastructure Bldg. class c using Dell R730xd E5-2650 v4 servers costing 9,000 euros for a penny?
All Articles